頁數 1 / 3
下一頁
搜尋 下載 結果:
因為想把同一網站下的靜態檔用另一個 domain 處理
但是 css 如果有設定下載字型檔 .ttf or .woff
就會出現 CORS 問題,其他 js, css,圖片就能正常
為了解決CORS的問題,其實只要 Response Header 要設定 Access-Control-Allow-Origin: *
或是設定特定網站 Access-Control-Allow-Origin: https://www.s3.com.tw
後來發現 IIS 網站可以設定 web.config 設定 response header 解決
當然要先裝一下 urlrewrite 2.0 才可以使用
只針對 font 類型的靜態檔
{REQUEST_URI} 也可以改為 {PATH_INFO}
但是 css 如果有設定下載字型檔 .ttf or .woff
就會出現 CORS 問題,其他 js, css,圖片就能正常
為了解決CORS的問題,其實只要 Response Header 要設定 Access-Control-Allow-Origin: *
或是設定特定網站 Access-Control-Allow-Origin: https://www.s3.com.tw
後來發現 IIS 網站可以設定 web.config 設定 response header 解決
當然要先裝一下 urlrewrite 2.0 才可以使用
只針對 font 類型的靜態檔
<configuration>

<system.webServer>

    <rewrite>

     <outboundRules>

        <rule name="Add CORS header for fonts" preCondition="IsFontFile">

         <match serverVariable="RESPONSE_Access-Control-Allow-Origin" pattern=".*" />

         <action type="Rewrite" value="*" />

        </rule>

        <preConditions>

         <preCondition name="IsFontFile">

            <add input="{REQUEST_URI}" pattern="\.woff2$|\.woff$|\.ttf$|\.eot$|\.otf$" />

         </preCondition>

        </preConditions>

     </outboundRules>

    </rewrite>

</system.webServer>

</configuration>
{REQUEST_URI} 也可以改為 {PATH_INFO}
darren, 2026/3/4 下午 05:02:35
IIS 如果要使用 reverse proxy server 服務,其實網路上已經有很多文章可以參考
這篇文章只是記錄一下安裝上要注意的事
過去安裝 IIS 套件 可以透過 Web Platform Installer 搜尋下載
但現在 IIS 的 Web Platform Installer 已經不讓人搜尋下載可安裝的套件
所以要直接去微軟網站找相關套件 可以用 IIS ARR 搜尋
https://www.iis.net/downloads/microsoft/application-request-routing
下載 requestRouter_amd64.msi 安裝這個 (3.0版 2021 年以後就沒有更新了)
安裝前,IIS也要預先安裝 URLRewrite 2 套件
安裝很簡單,msi 安裝後,IIS重啟就可以看到
IIS 的主機設定,可以看到 "Application Reuest Routing Cache" --> 點進後右邊有 Server Proxy Settings
proxy 的設定有一些地方要注意一下,避免未來採到雷
首先 當然先開啟 Enable proxy,下面針對一些要注意的屬性說明一下
1. Time-out : 預設120秒,如果你後端的站台有一些操作可能超過兩分鐘(例如處理報表),這個就調長一點
2. Reverse rewrite host in response header: 這個勾勾預設是開的,他的好意是同站台redirect(302) 到其他網頁,可以覆蓋
host 讓 client端能跑到正常的網址。但如果你是 redirect 到其他站台,建議把它關掉,不然後端網站如果下
redirect (302) 到別的站台,他會主動把 redirect網址 host 改為本站 (被雷過,所以要特別記下來)
3. Include TCP port from client IP: 這是一個 X-Forwarded-For 設定,預設是打開,這樣後端主機抓 client 來源 IP就會類似
"112.121.100.100:443" ,但後端網站在抓 client端IP通常不會管 port number,因此就會造成比對 IP 發生錯誤
所以建議還是把它關閉
4. Enable disk cache: 預設是勾勾打開,如果後端是靜態網站,例如圖片server,這個打開沒有問題,但如果後端網站是動態網站
那還是關掉
darren, 2025/1/10 上午 11:01:38
ubuntu安裝時依照版本不同有些會需要先配置mirror site
mirror site的功用是提供下載套件與系統更新的站台
而要連網確認mirror site會需要配置網路接口,DNS與開放防火牆
17.10以後版本可前往 /etc/netplan 底下的.yaml文件內查看設置
相關參數說明↓
addresses: 對外ip (ex: 192.168.1.10/24)
gateway4: 網路關口, IPv4從本機連結網際網路的端口, 通常設定路由器的IP地址
nameservers: 底下的 addresses為DNS位置, 可設置 8.8.8.8 (google的公共服務器)
設置完後執行 sudo netplan apply變更配置
17.10以前的自己去問GPT, 配置差不多只是位置不一樣
輸入'systemd-resolve --status'查看配置
輸入'ping google.com'測試網路是否正常
以上配置完畢 防火牆有開ubuntu以後可以配置mirror site↓
ubuntu官方承認的Site清單
*注意!! 更新封包皆會從設定的Site取得, 雖是官方認證但是仍有風險, 有高度資安需求建議自行架設mirror site*
mirror site的配置於 /etc/apt/sources.list
'deb http://{domain}' 的皆需修改
可使用 ctrl + \ 來一次修改
完成後執行 'sudp apt-get update' 測試mirror site是否連通
梨子, 2023/12/6 上午 10:39:22
Sourcetree重新安裝(完整清除舊資料)
1. 移除電腦上的Sourcetree軟體
2. 備份以下檔案後,然後刪除:
路徑:C:\Users\<UserName>\AppData\Local 刪除 SourceTree 資料夾
路徑:C:\Users\<UserName>\AppData\Local\Atlassian 刪除 SourceTree 資料夾
路徑:C:\Users\<UserName>\AppData\Roaming\Atlassian 刪除 SourceTree 資料夾
3. 重新下載Sourcetree軟體進行安裝
參考來源:
https://community.atlassian.com/t5/Sourcetree-questions/How-do-I-fully-remove-SourceTree-so-that-I-can-do-a-quot-fresh/qaq-p/1448403
choco, 2023/2/2 上午 08:13:27
文章參考: https://windowsreport.com/windows-server-enable-tls/
工具下載: https://www.nartac.com/Products/IISCrypto/Download
工具下載: https://www.nartac.com/Products/IISCrypto/Download
Bike, 2022/5/5 下午 10:32:11
上一集當中我們完成了Lucene基本操作中的Create與Read,這一集會將CRUD中的Update與Delete的操作方法告訴你,並且本集會著重於講解關於"Norms"與權重(Boost)在Lucene中的運作概念。
首先我們建立一個.Net 6的主控台應用程式

建立好後於右側專案右鍵選擇"管理Nuget套件",並選擇"瀏覽">於搜索列中搜尋"Lucene">安裝3.0.3最新穩定版 與 "System.Configuration.ConfigurationManager"

安裝好後就可以於專案內使用Lucene套件囉!
再來依照上一篇的教學建立一套簡單的Lucene查詢
好囉! 接下來我們要如何更新索引呢?
更新其實就是將存在的索引刪除並重新建立Document,不存在的則直接新增。
首先準備一組資料準備更新
*欲更新的Document必須與創建所引時使用的Document欄位相同*
來測試看看

可以看見 Name = 橘子 的索引已經改為我們新準備的資料囉。
再來是刪除!
與更新非常相似,只需要使用deleteDocument()就可以了。
再來看看輸出結果
可以發現 Score :0.7554128, Id :2, Name :橘子, Description :醫生給娜美最珍貴的寶藏。這筆索引已經被移除囉!

可以發現筆者於更新或刪除時都是輸入單一字來做異動,除了表達可以對索引做複合更動外,
是因為更新與刪除索引同樣會使用到分詞器(analyzer),
*所輸入的索引值非ID等數值時必須要配合分詞器的分詞能力*才能取得所想異動的索引喔!
Boost是什麼呢?
Boost 分為 :
1. Index Time Boost : 在建立索引時就計算好的值。例如上一篇中提到的(NORMS)
2. Query Time Boost : 查詢時賦與搜尋條件不同的值以影響結果。
我們先來測試Index Time Boost的部分
並記得重新CreateIndex才能刷新欄位的權重值喔。

很明顯的搜尋出來的Score分數變動了! 但是有沒有發現明明Name欄位的Boost改成了1.5,蘋果的數值卻仍然只有一半呢?
這是因為我們的Search中所參照的欄位為Description,所以在計算Score的時候其實是完全沒有參與的喔!
另外要記得,使用Index Time Boost的時候,欲給予銓重分配的欄位Field.Index不能使用NO_NORMS,不然這個欄位並不會紀錄權重的資料。
再來我們試試看Query Time Boost
這次我們搜尋兩個欄位"Name"與"Description",並使用 BooleanQuery來將其組合。
BooleanQuery中的 Occur有三種參數 : "MUST","MUST_NOT","SHOULD",功能與字面上的意思一樣為"必須要有","必須沒有"與"有無都包含"。

查詢出來的分數就不一樣囉!
以上就是這一次的分享,Lucene是一款容易入門但是要實際上戰場卻又十分複雜的功能,想要達成真正高效能的全文檢索,在前期的文件規畫配置與資料的權重配比都是一個巨大的挑戰。未來會繼續分享關於Lucene的其他有趣功能,還請繼續期待呦!
另外也可以到GitHub下載我的範例來參考呦!
GitHub: https://github.com/g13579112000/Lucene
參考文件:
1. 黑暗大大的全文檢索筆記 : https://blog.darkthread.net/blog/lucene-net-notes-1/
2. Makble : http://makble.com/lucene-field-boost-example
3. CSDN Jack2013tong 文章 : https://blog.csdn.net/huwei2003/article/details/53408388
首先我們建立一個.Net 6的主控台應用程式
建立好後於右側專案右鍵選擇"管理Nuget套件",並選擇"瀏覽">於搜索列中搜尋"Lucene">安裝3.0.3最新穩定版 與 "System.Configuration.ConfigurationManager"
安裝好後就可以於專案內使用Lucene套件囉!
再來依照上一篇的教學建立一套簡單的Lucene查詢
using Lucene.Net.Analysis.Standard;

using Lucene.Net.Documents;

using Lucene.Net.Index;

using Lucene.Net.QueryParsers;

using Lucene.Net.Search;

using Lucene.Net.Store;


var _dir = new DirectoryInfo("LuceneDocument");

if (!File.Exists(_dir.FullName))

{

    System.IO.Directory.CreateDirectory(_dir.FullName);

}

var analyzer = new StandardAnalyzer(Lucene.Net.Util.Version.LUCENE_CURRENT);

CreateIndex(GetProductsInformation(), _dir, analyzer);


while (true)

{

    Console.Write("請輸入欲查詢字串 :");

    var searchValue = Console.ReadLine();

    Search(searchValue, _dir, analyzer);

}


void CreateIndex(List<Product> information, DirectoryInfo dir, StandardAnalyzer analyzer)

{

    using (var directory = FSDirectory.Open(dir))

    {

        using (var indexWriter = new IndexWriter(directory, analyzer, true, IndexWriter.MaxFieldLength.LIMITED))

        {

            foreach (var index in information)

            {

                var document = new Document();

                document.Add(new Field("Id", index.Id.ToString(), Field.Store.YES, Field.Index.NO));

                document.Add(new Field("Name", index.Name, Field.Store.YES, Field.Index.ANALYZED));

                document.Add(new Field("Description", index.Description, Field.Store.YES, Field.Index.ANALYZED));

                indexWriter.AddDocument(document);

            }

            indexWriter.Optimize();

            indexWriter.Commit();

        }

    }

}

void Search(string searchValue, DirectoryInfo dir, StandardAnalyzer analyzer)

{

    using (var directory = FSDirectory.Open(_dir))

    {

        var parser = new QueryParser(Lucene.Net.Util.Version.LUCENE_CURRENT, "Description", analyzer).Parse(searchValue);

        using (var indexSearcher = new IndexSearcher(directory))

        {

            var queryLimit = 20;

            var hits = indexSearcher.Search(parser, queryLimit);

            if (!hits.ScoreDocs.Any())

            {

                Console.WriteLine("查無相關結果。");

                return;

            }

            Document doc;

            foreach (var hit in hits.ScoreDocs)

            {

                doc = indexSearcher.Doc(hit.Doc);

                Console.WriteLine("Score :" + hit.Score + ", Id :" + doc.Get("Id") + ", Name :" + doc.Get("Name") + ", Description :" + doc.Get("Description"));

            }

        }

    }

}


List<Product> GetProductsInformation()

{

    return new List<Product> {

            new Product{ Id = 1, Name = "蘋果", Description = "一天一蘋果,醫生遠離我。"},

            new Product{ Id = 2, Name = "橘子", Description = "醫生給娜美最珍貴的寶藏。"},

            new Product{ Id = 3, Name = "梨子", Description = "我是梨子,比蘋果好吃多囉!"},

            new Product{ Id = 4, Name = "葡萄", Description = "吃葡萄不吐葡萄皮,不吃葡萄倒吐葡萄皮"},

            new Product{ Id = 5, Name = "榴槤", Description = "水果界的珍寶!好吃一直吃。"}

        };

}

class Product

{

    public long Id { get; set; }

    public string Name { get; set; } = null!;

    public string Description { get; set; } = null!;

}
好囉! 接下來我們要如何更新索引呢?
更新其實就是將存在的索引刪除並重新建立Document,不存在的則直接新增。
首先準備一組資料準備更新
List<Product> GetUpdateProductsInformation()

{

    return new List<Product>

    {

        new Product{ Id = 6, Name = "香蕉", Description = "運動完後吃根香蕉補充養分。"},

        new Product{ Id = 2, Name = "橘子", Description = "橘子跟柳丁你分得出來嗎?"}

    };

}
*欲更新的Document必須與創建所引時使用的Document欄位相同*
void Update(string key, List<Product> information, DirectoryInfo dir, StandardAnalyzer analyzer)

{

    using( var directory = FSDirectory.Open(dir))

    {

        using(var indexWriter = new IndexWriter(directory, analyzer, false, IndexWriter.MaxFieldLength.LIMITED))

        {

            foreach (var index in information)

            {

                var document = new Document();

                document.Add(new Field("Id", index.Id.ToString(), Field.Store.YES, Field.Index.NO));

                document.Add(new Field("Name", index.Name, Field.Store.YES, Field.Index.ANALYZED));

                document.Add(new Field("Description", index.Description, Field.Store.YES, Field.Index.ANALYZED));

                indexWriter.UpdateDocument(new Term("Name", key) ,document);

            }

        }

    }

}
來測試看看
可以看見 Name = 橘子 的索引已經改為我們新準備的資料囉。
再來是刪除!
與更新非常相似,只需要使用deleteDocument()就可以了。
void Delete(string key, DirectoryInfo dir, StandardAnalyzer analyzer)

{

    using (var directory = FSDirectory.Open(dir))

    {

        using (var indexWriter = new IndexWriter(directory, analyzer, false, IndexWriter.MaxFieldLength.LIMITED))

        {

            indexWriter.DeleteDocuments(new Term("Name", key));

            indexWriter.Optimize();

            indexWriter.Commit();

        }

    }

}
再來看看輸出結果
可以發現 Score :0.7554128, Id :2, Name :橘子, Description :醫生給娜美最珍貴的寶藏。這筆索引已經被移除囉!
可以發現筆者於更新或刪除時都是輸入單一字來做異動,除了表達可以對索引做複合更動外,
是因為更新與刪除索引同樣會使用到分詞器(analyzer),
*所輸入的索引值非ID等數值時必須要配合分詞器的分詞能力*才能取得所想異動的索引喔!
Boost是什麼呢?
Boost 分為 :
1. Index Time Boost : 在建立索引時就計算好的值。例如上一篇中提到的(NORMS)
2. Query Time Boost : 查詢時賦與搜尋條件不同的值以影響結果。
我們先來測試Index Time Boost的部分
void CreateIndexWithBoost(List<Product> information, DirectoryInfo dir, StandardAnalyzer analyzer)

{

    using (var directory = FSDirectory.Open(dir))

    {

        using (var indexWriter = new IndexWriter(directory, analyzer, true, IndexWriter.MaxFieldLength.LIMITED))

        {

            foreach (var index in information)

            {

                var document = new Document();

                document.Add(new Field("Id", index.Id.ToString(), Field.Store.YES, Field.Index.NO));

                document.Add(new Field("Name", index.Name, Field.Store.YES, Field.Index.ANALYZED));

                document.Add(new Field("Description", index.Description, Field.Store.YES, Field.Index.ANALYZED));

                document.GetField("Name").Boost = 1.5F;

                document.GetField("Description").Boost = 0.5F;


                indexWriter.AddDocument(document);

            }

            indexWriter.Optimize();

            indexWriter.Commit();

        }

    }

}
並記得重新CreateIndex才能刷新欄位的權重值喔。
很明顯的搜尋出來的Score分數變動了! 但是有沒有發現明明Name欄位的Boost改成了1.5,蘋果的數值卻仍然只有一半呢?
這是因為我們的Search中所參照的欄位為Description,所以在計算Score的時候其實是完全沒有參與的喔!
另外要記得,使用Index Time Boost的時候,欲給予銓重分配的欄位Field.Index不能使用NO_NORMS,不然這個欄位並不會紀錄權重的資料。
再來我們試試看Query Time Boost
void SearchWithBoost(string searchValue, DirectoryInfo dir, StandardAnalyzer analyzer)

{

    using (var directory = FSDirectory.Open(_dir))

    {

        using (var indexSearcher = new IndexSearcher(directory))

        {

            var query = new QueryParser(Lucene.Net.Util.Version.LUCENE_CURRENT, "Name", analyzer).Parse(searchValue);

            var query2 = new QueryParser(Lucene.Net.Util.Version.LUCENE_CURRENT, "Description", analyzer).Parse(searchValue);


            query.Boost = 2.0F;

            query2.Boost = 0.5F;


            BooleanQuery booleanQuery = new BooleanQuery();

            booleanQuery.Add(query, Occur.SHOULD);

            booleanQuery.Add(query2, Occur.SHOULD);


            var hits = indexSearcher.Search(booleanQuery, 20);

            if (!hits.ScoreDocs.Any())

            {

                Console.WriteLine("查無相關結果。");

                return;

            }

            Document doc;

            foreach (var hit in hits.ScoreDocs)

            {

                doc = indexSearcher.Doc(hit.Doc);

                Console.WriteLine("Score :" + hit.Score + ", Id :" + doc.Get("Id") + ", Name :" + doc.Get("Name") + ", Description :" + doc.Get("Description"));

            }

        }

    }

}
這次我們搜尋兩個欄位"Name"與"Description",並使用 BooleanQuery來將其組合。
BooleanQuery中的 Occur有三種參數 : "MUST","MUST_NOT","SHOULD",功能與字面上的意思一樣為"必須要有","必須沒有"與"有無都包含"。
查詢出來的分數就不一樣囉!
以上就是這一次的分享,Lucene是一款容易入門但是要實際上戰場卻又十分複雜的功能,想要達成真正高效能的全文檢索,在前期的文件規畫配置與資料的權重配比都是一個巨大的挑戰。未來會繼續分享關於Lucene的其他有趣功能,還請繼續期待呦!
另外也可以到GitHub下載我的範例來參考呦!
GitHub: https://github.com/g13579112000/Lucene
參考文件:
1. 黑暗大大的全文檢索筆記 : https://blog.darkthread.net/blog/lucene-net-notes-1/
2. Makble : http://makble.com/lucene-field-boost-example
3. CSDN Jack2013tong 文章 : https://blog.csdn.net/huwei2003/article/details/53408388
梨子, 2022/4/20 下午 09:34:03
這裡是我測試 Gmail API 和 Google API 憑証的一些記錄。
如果你的目的是要使用 Gmail Api 取代舊的 Gmail SMTP 來發送通知信,建議你先跳到最下方看一下結論。
如果你是想要看一下 Gmail API 和 Google API 憑証的使用方法,可以看一下這篇文章。
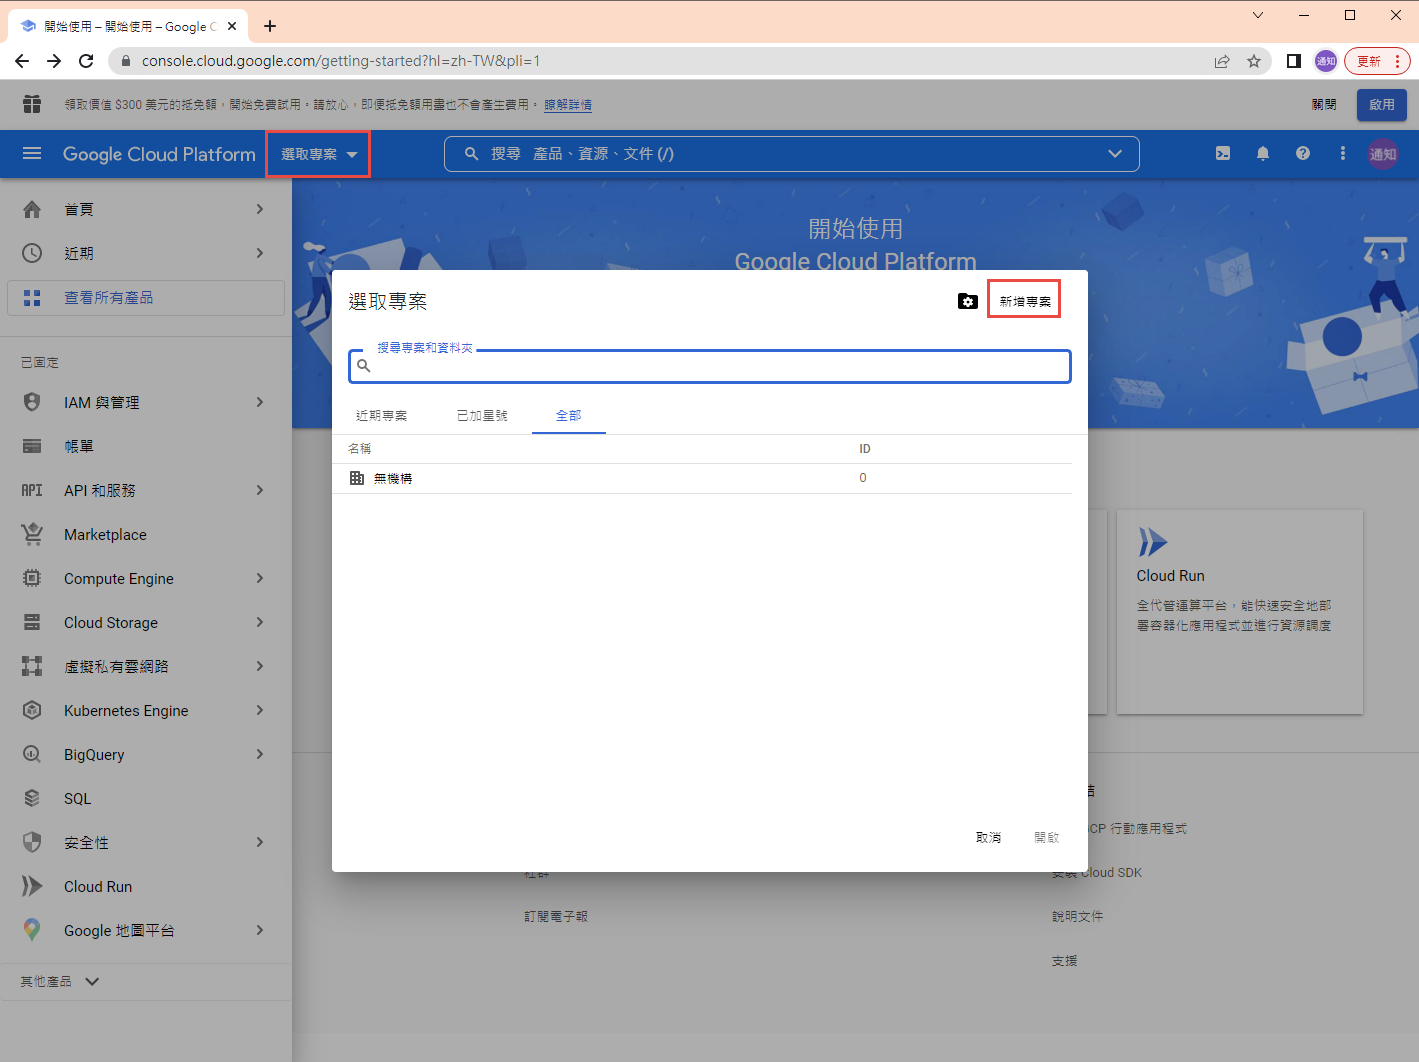
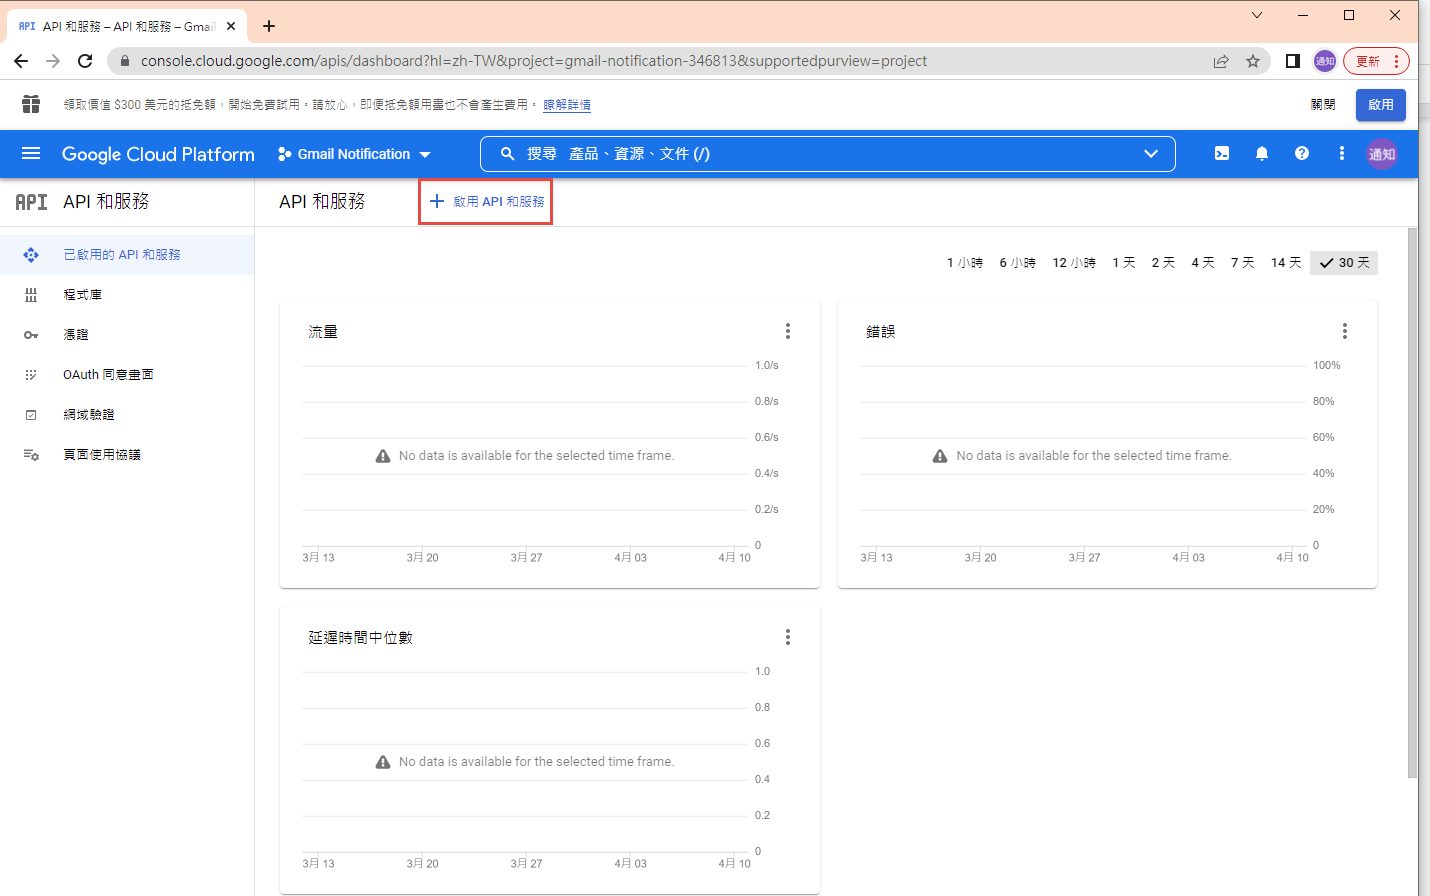
1. 在 google cloud platform 建立新的專案.
https://console.cloud.google.com/
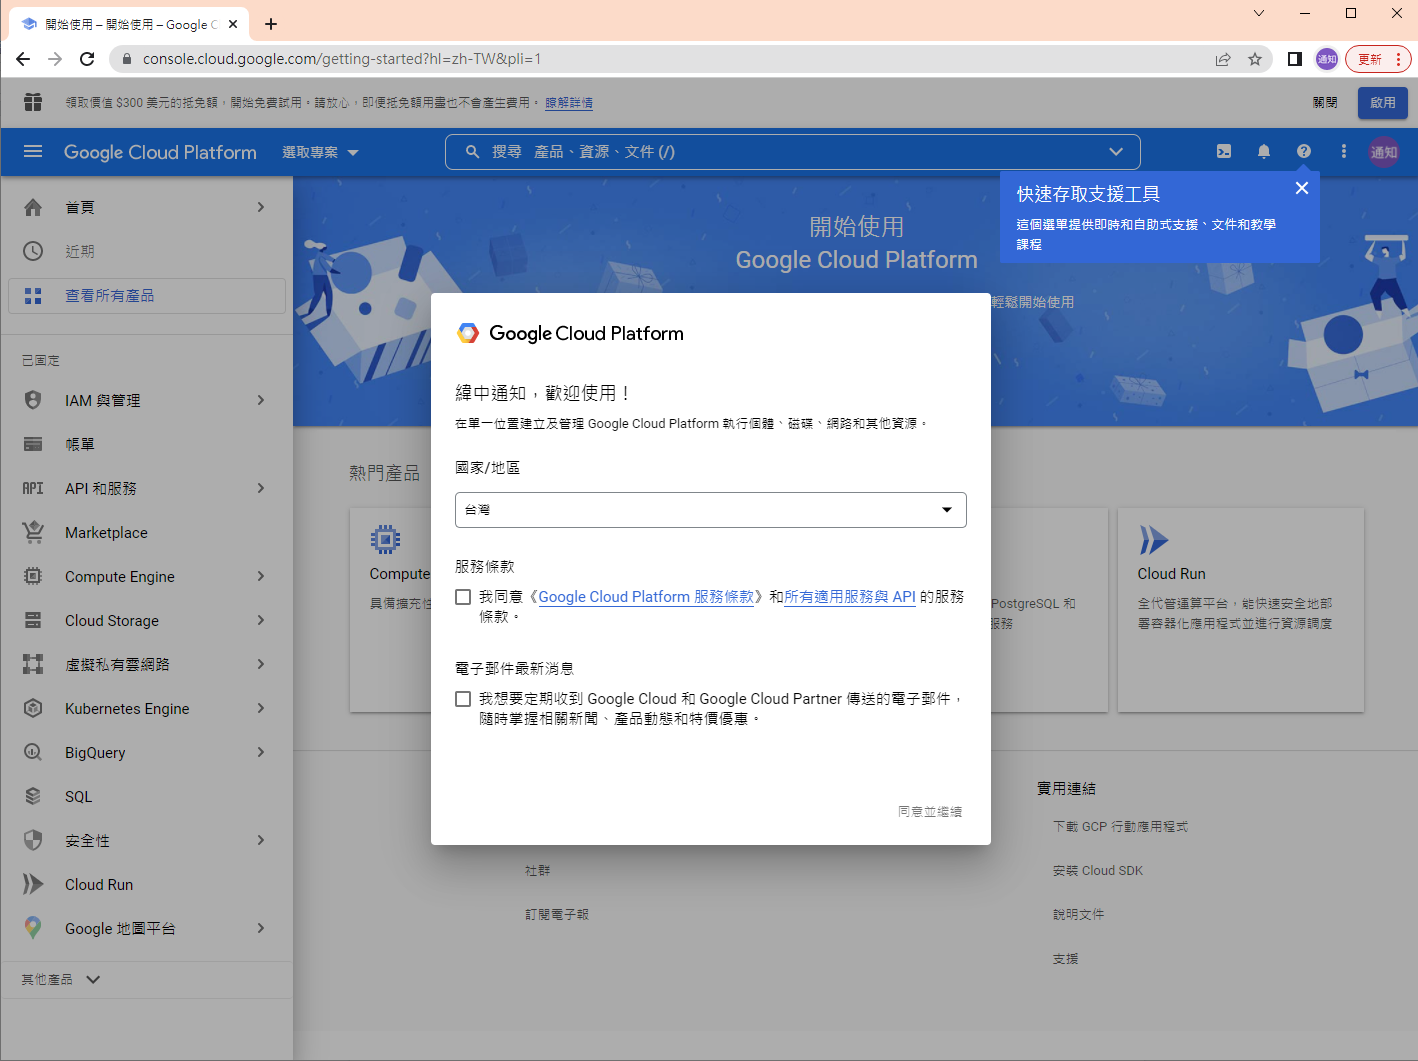

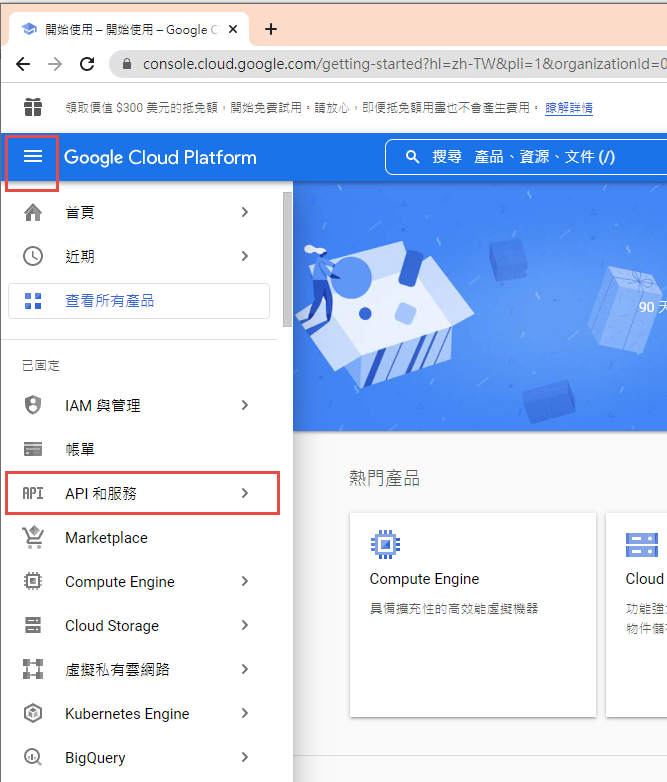
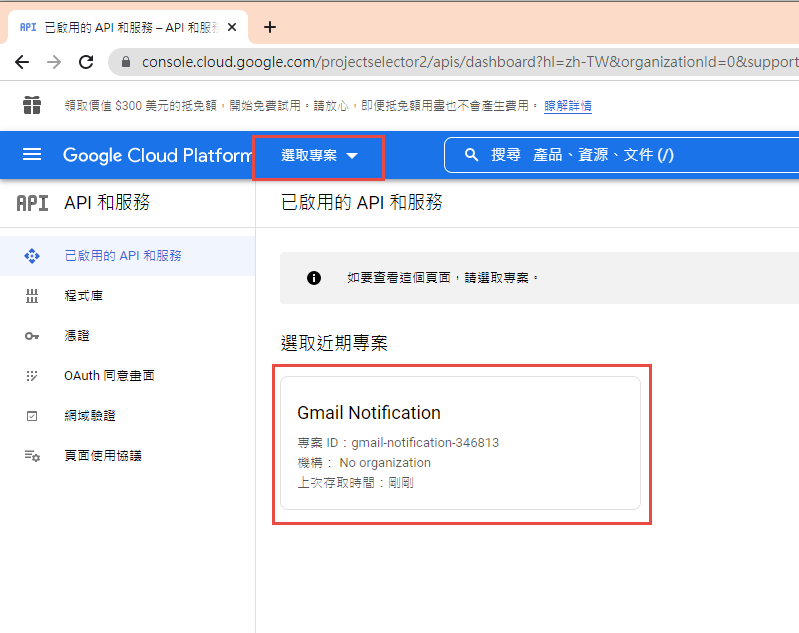
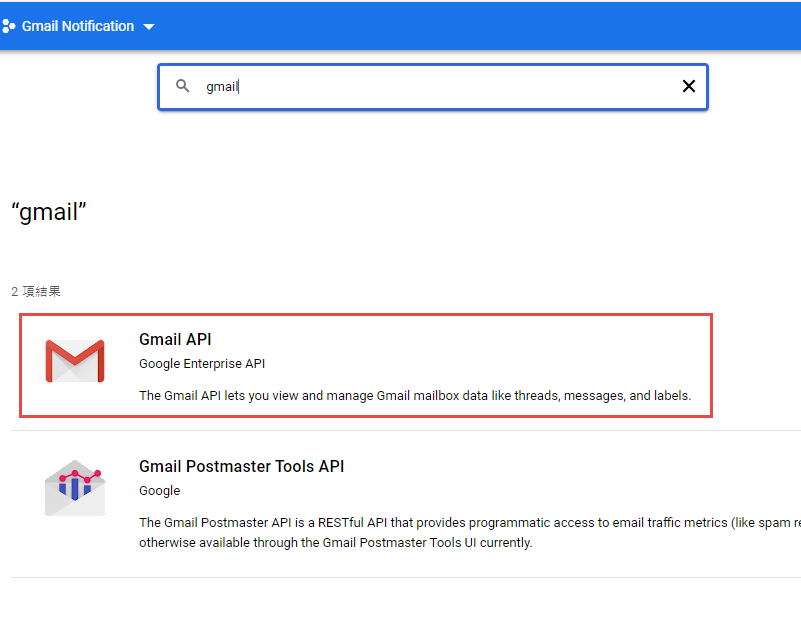
啟用 Gmail API


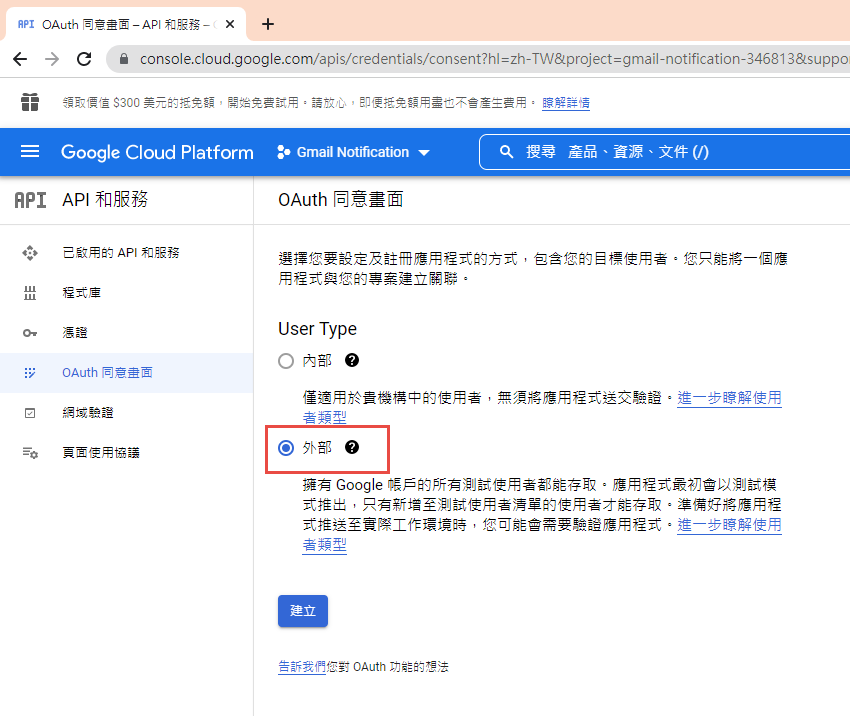
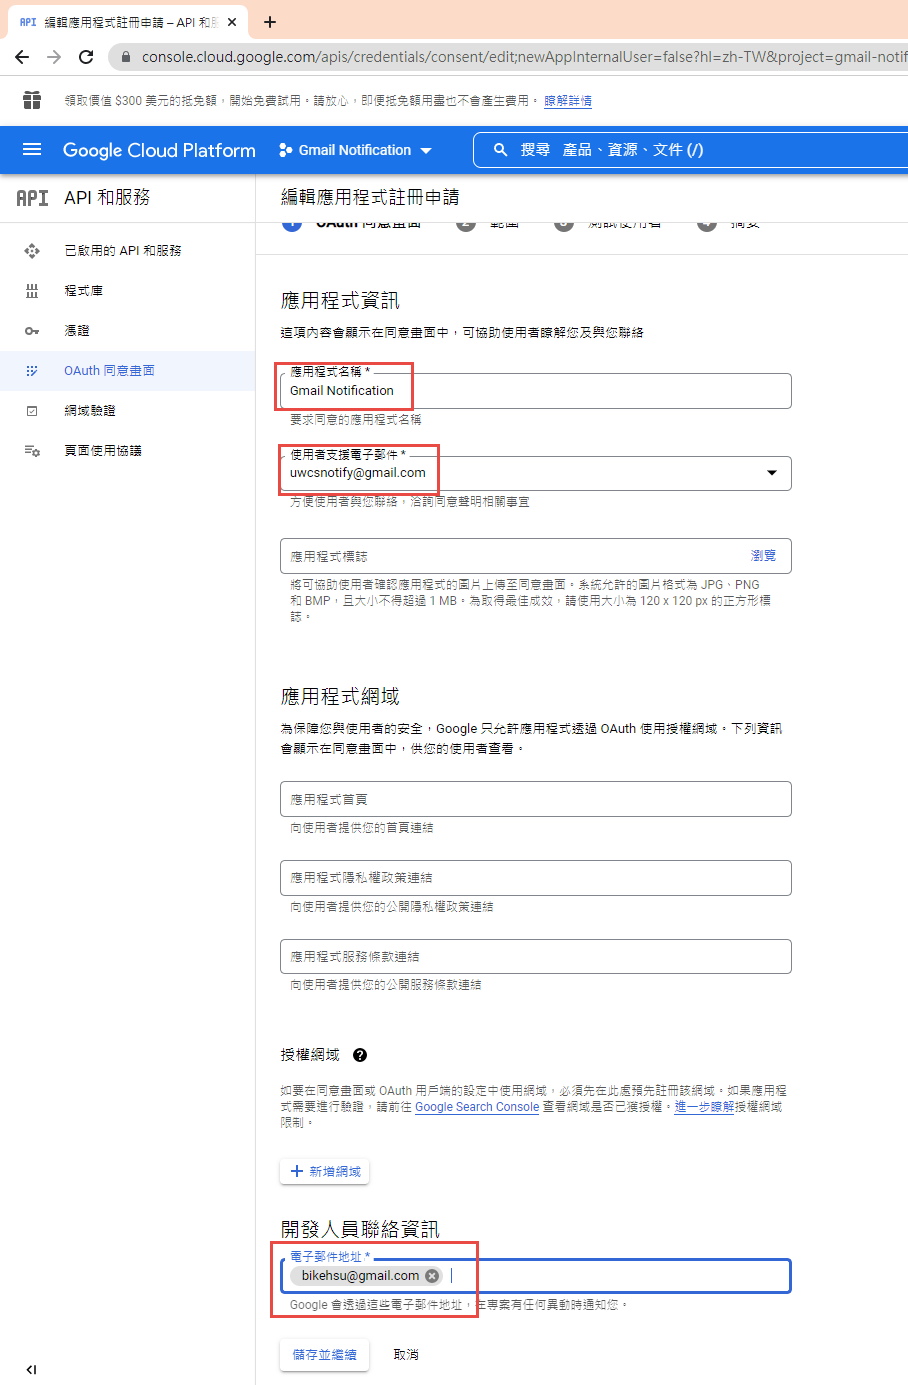
因為我們要透過 OAuth 取得使用者授權,所以要設定使用 OAuth 的同意畫面。
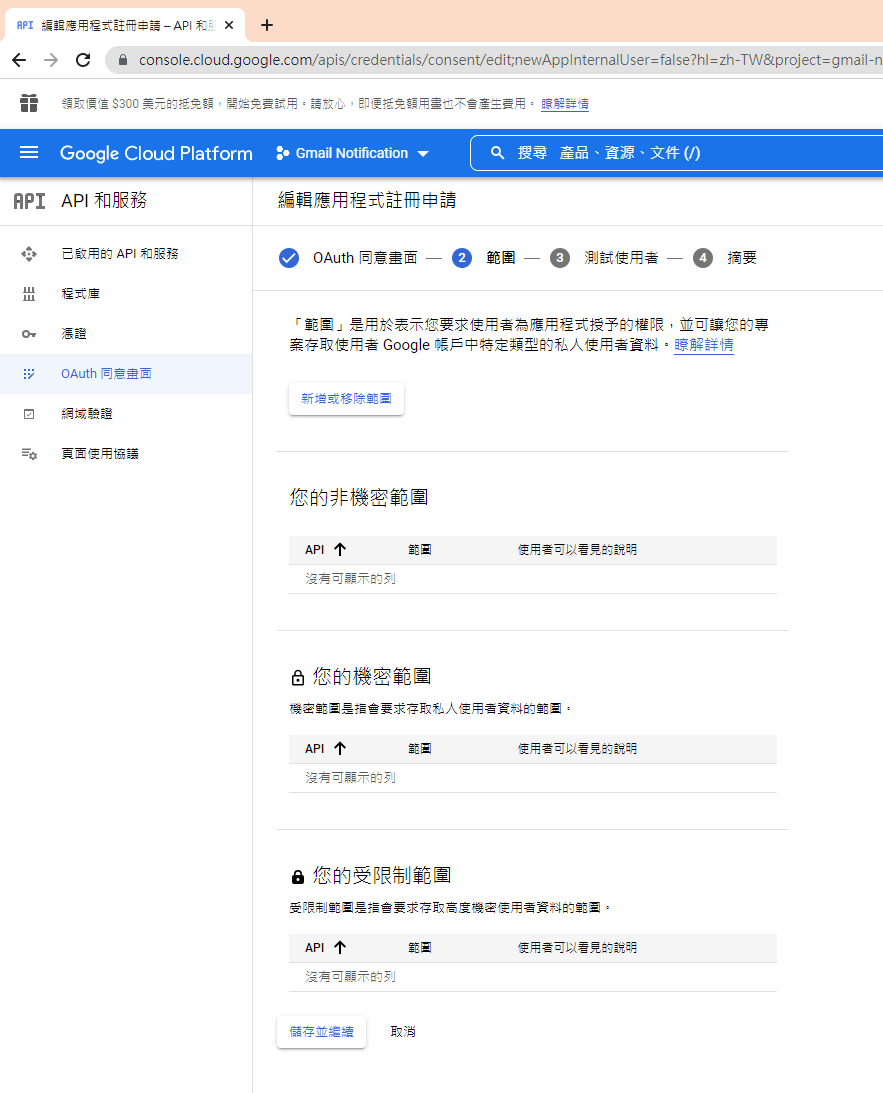
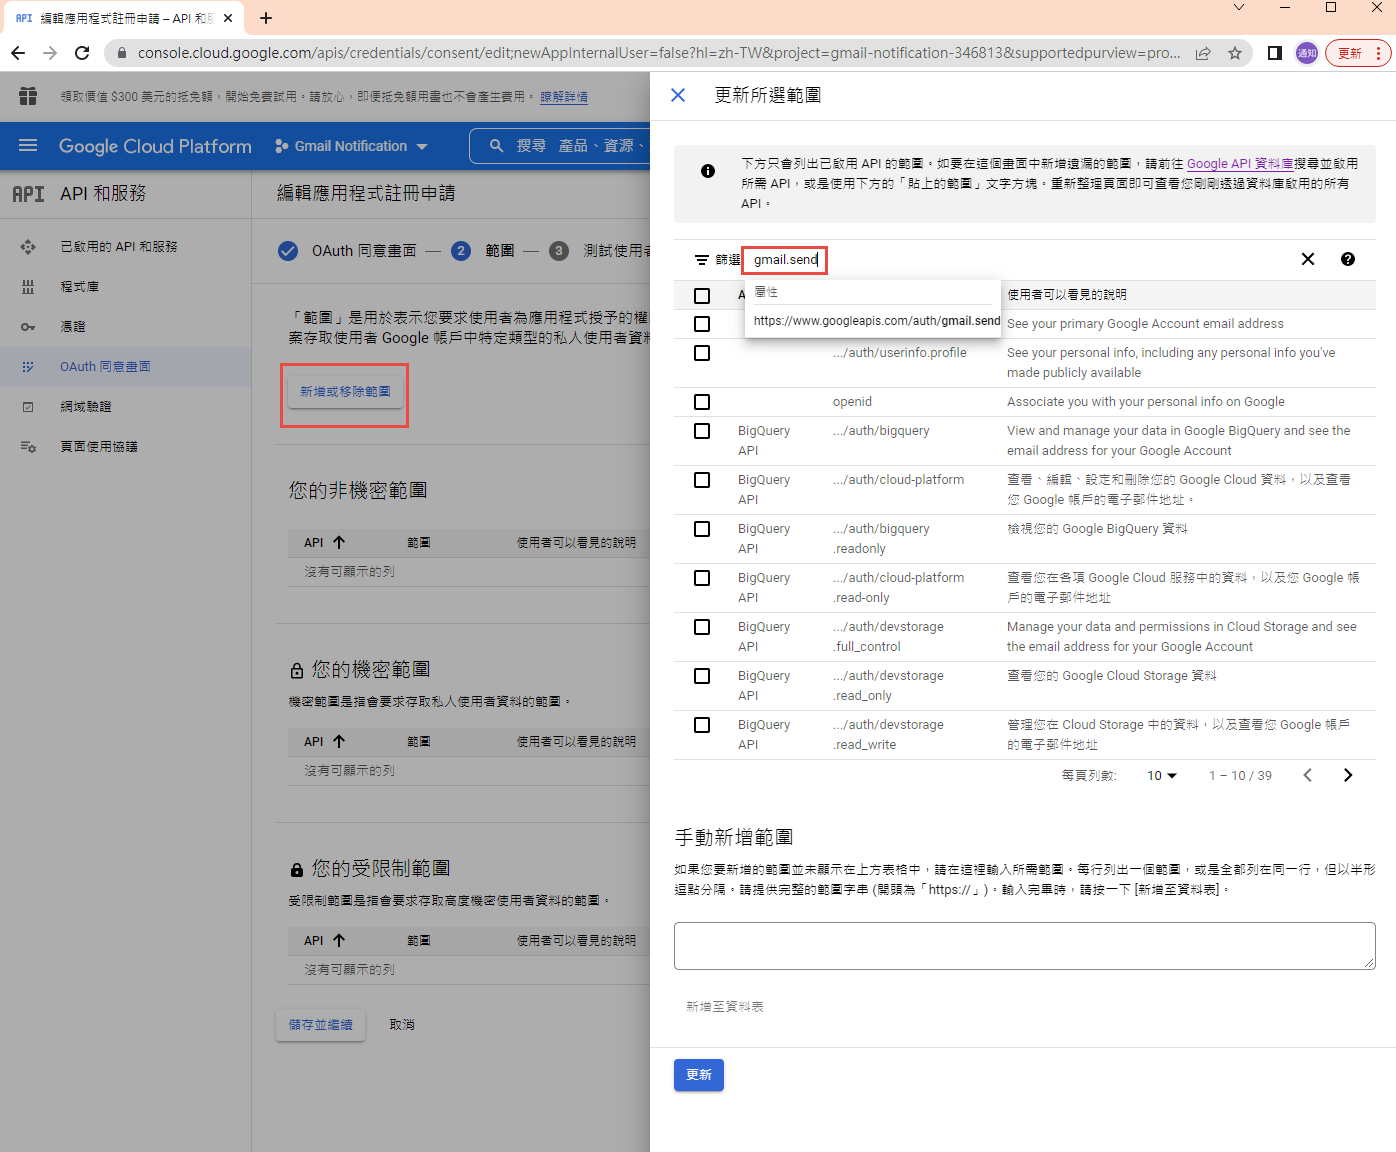
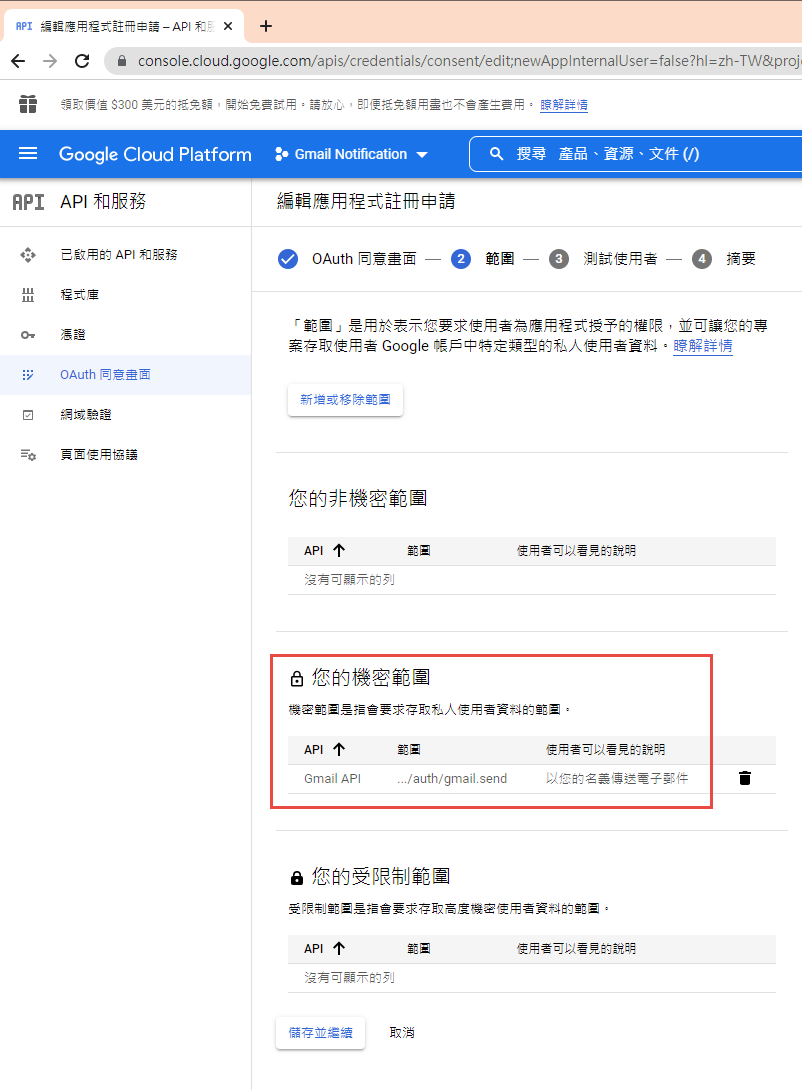
指定授權的範圍
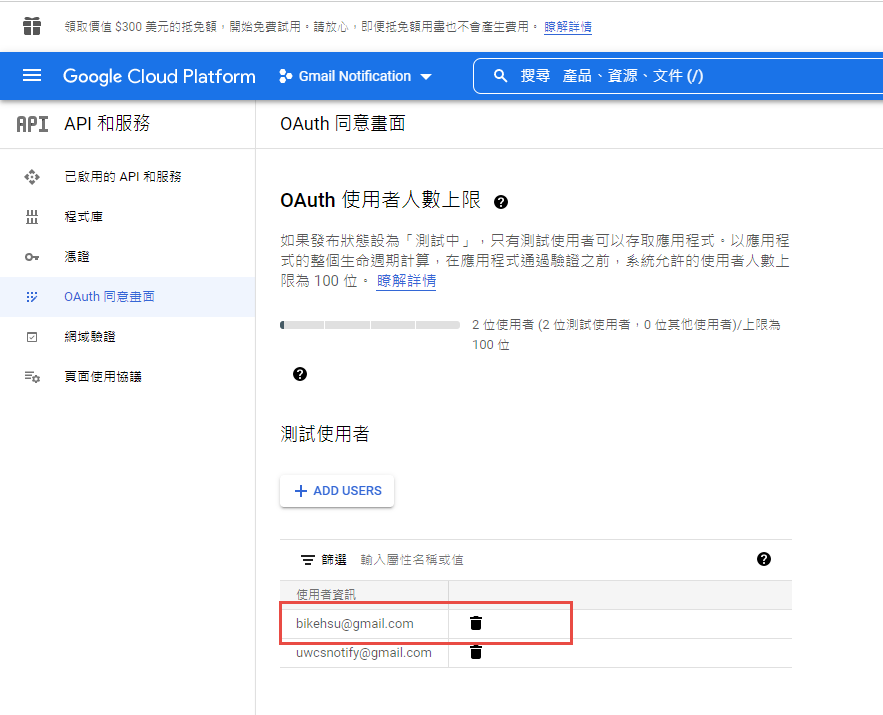
因為剛建立的專案,不會被公開,所以要指定測試使用者
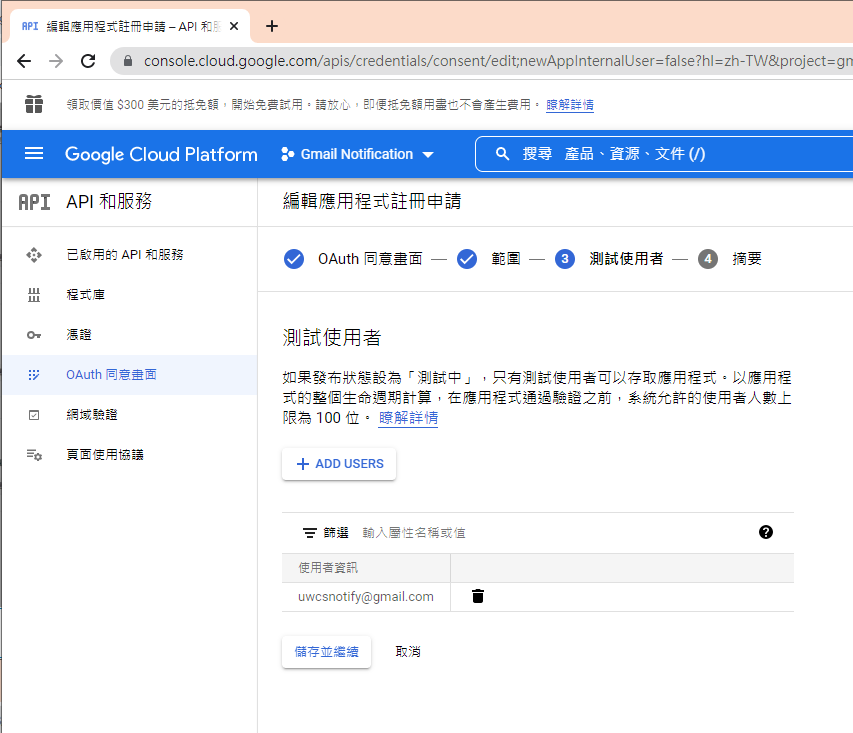
如果要給任意使用者,必需經過發布的流程,但準備工作有點麻煩,所以這次就不發布了。
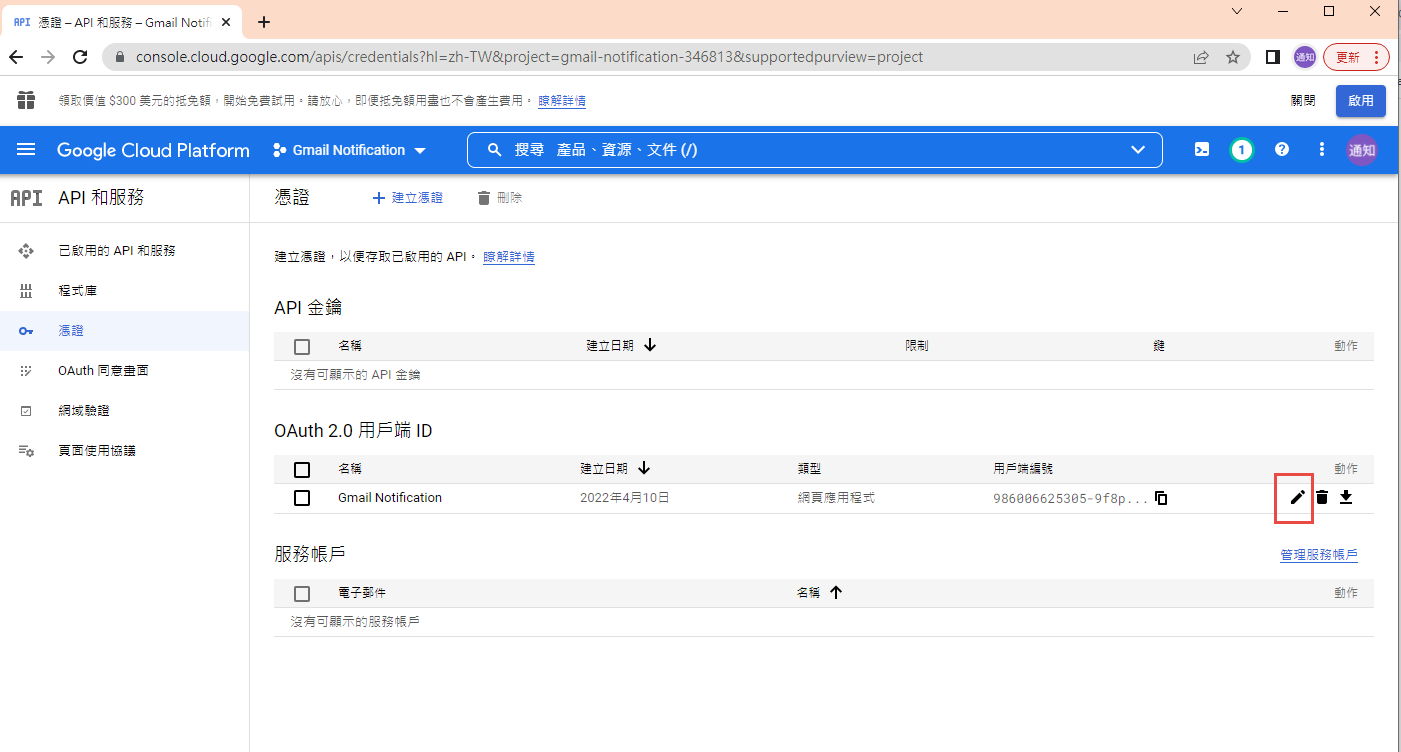
建立 OAuth 2.0 用戶端 ID 憑証

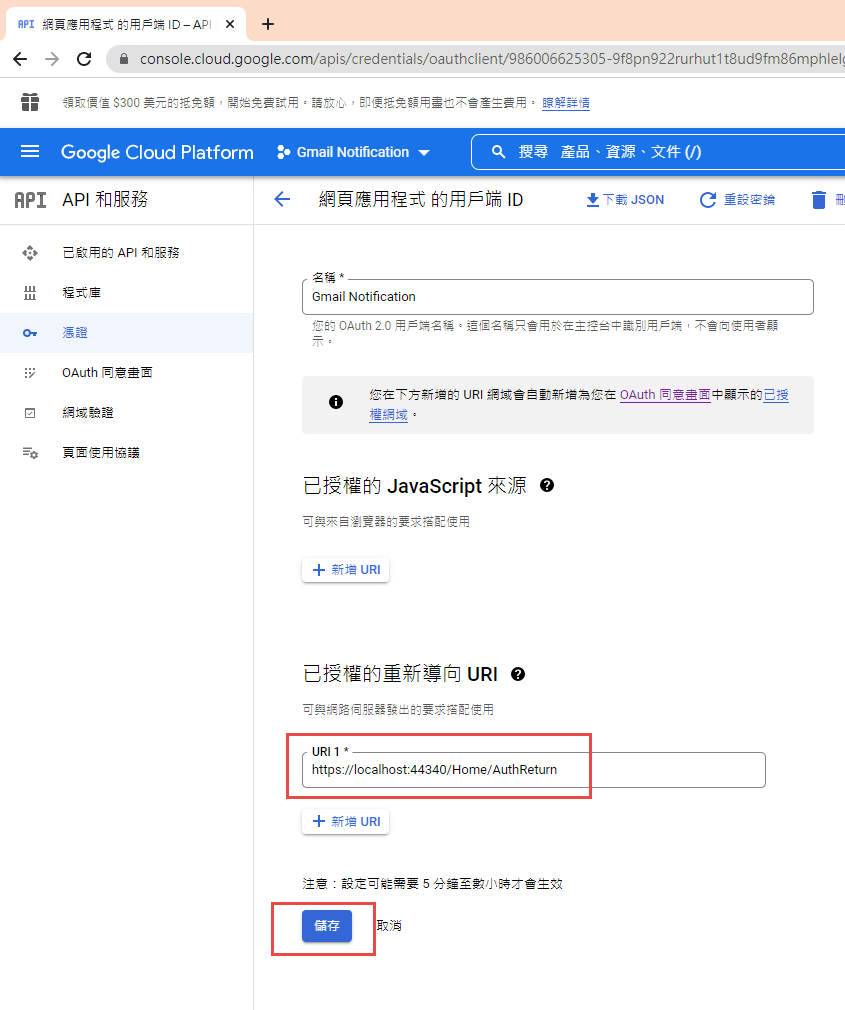
這裡除了名稱外,還有一個設定重導 Uri 的項目。現在不填寫,但稍後要回來補這個資料。
下載 json 之後,命名為 client_secret.json 保留後續使用。
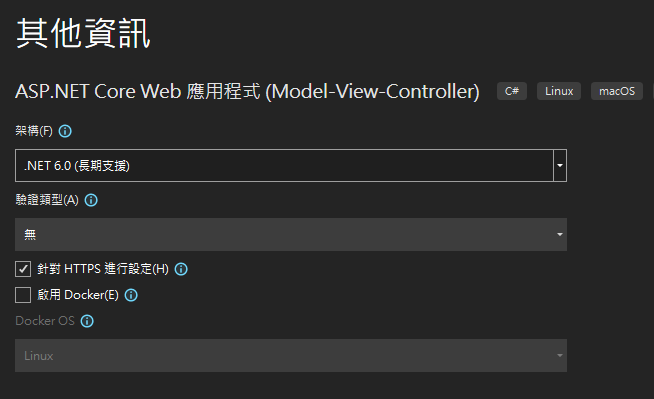
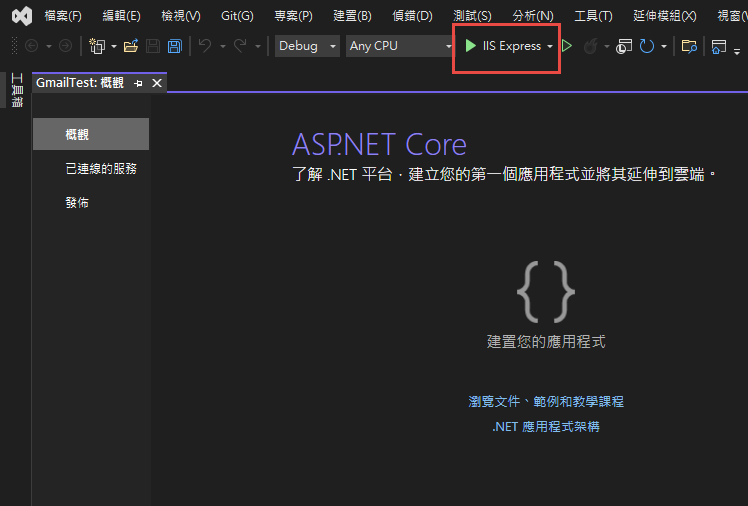
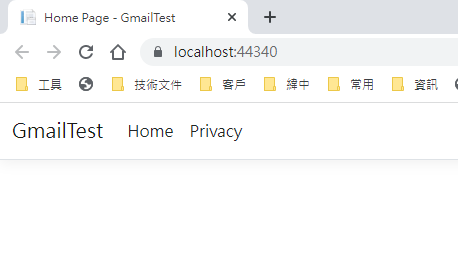
再來就要建立專案了. 用 VS2022 建立一個新專案

記錄網址, 本測試專案是 https://localhost:44340/ ,請依實際網址為準。
回到 OAuth 2.0 用戶端 ID 的設定頁. 在已授權的重新導向 URI 中填入 https://localhost:44340/Home/AuthReturn (填入的網址依實際專案的狀況,可能會有變化)
在 VS2022 中,使用 Nuget 安裝套件: (有漏的再麻煩和我說)
Google.Apis.Gmail.v1
Google.Apis.Auth
MimeKit (發送 gmail 時使用)
建立認証用的網址:
建立一個 Action, 用來取得認証用的網址:
執行結果:
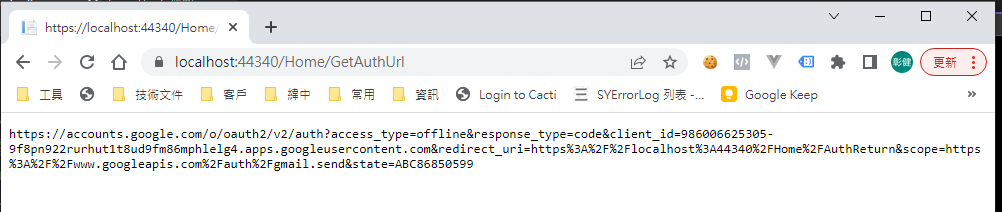
用 chrome 開啟產生的網址:
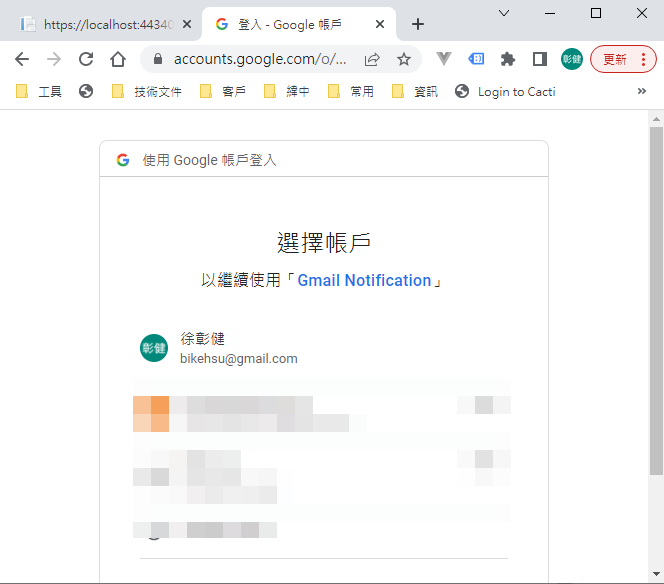
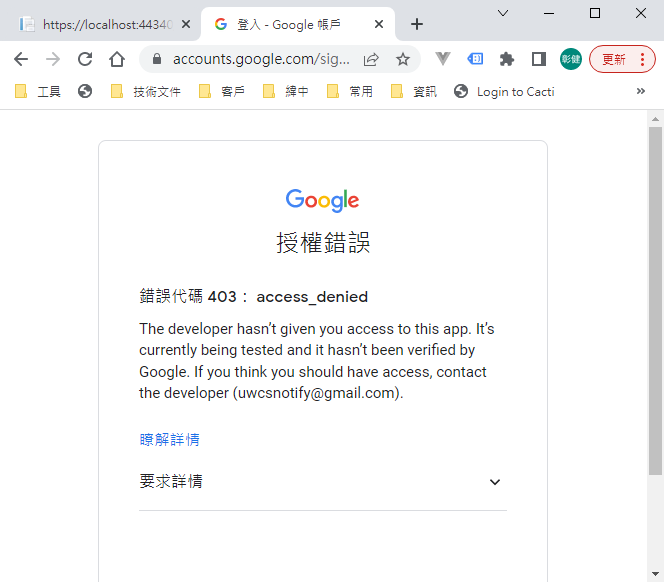
選取任一帳號,如果出現以下錯誤,請回到 "OAuth 同意畫面" 去新增測試使用者
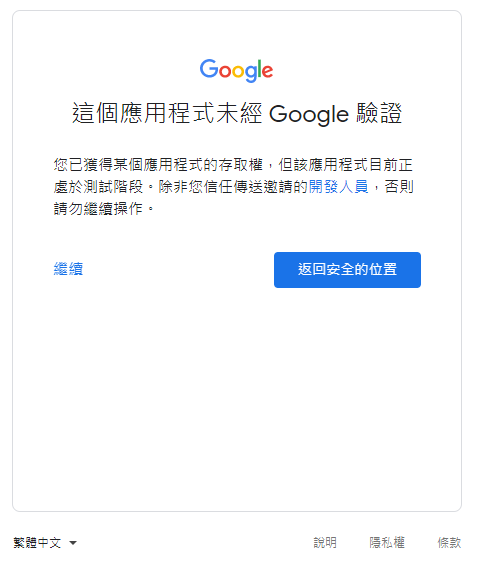
因為應用程式尚未發布,所以會看到警告,勇敢的繼續下去
這裡會要求授權使用你的名義發送信件。(這是在程式中取得授權的項目 Scopes 中所指定的)

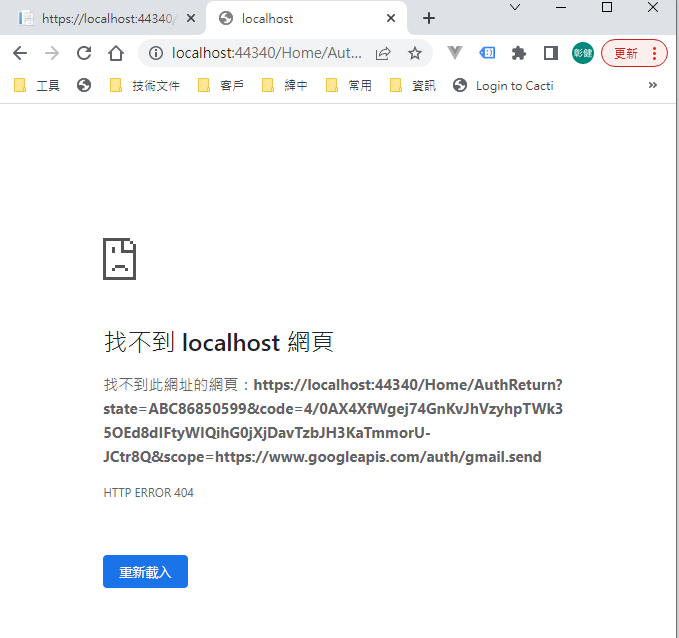
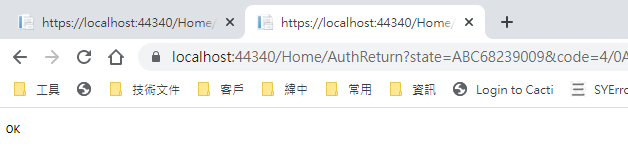
再繼續之後,會被重導至我們在 redirectUri 指定的網址。因為我們尚未完成,所以會看到錯誤,順便也可以看一下,會帶回哪一些參數。有 state, code, scope,共三個。
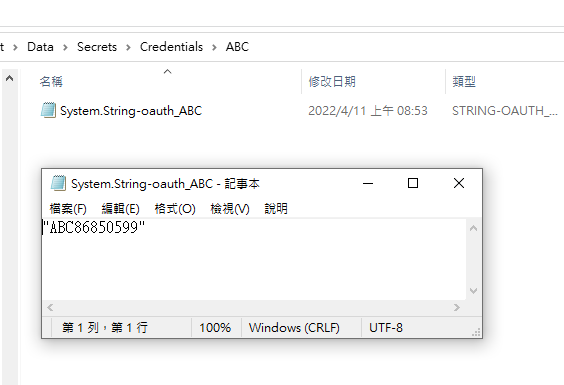
順便看一下,google 的套件會在 Credentials 的目錄下幫使用者建立一個目錄,在完成驗証前,會先放一個 System.String-oauth_XXX 的檔案,裡面的值和回傳的 state 是一樣的,這個應該是用來驗証回傳資料的。
接下來我們要新增 Action "AuthReturn" 如下:
再跑一次上面的流程,最後回到 AuthReturn
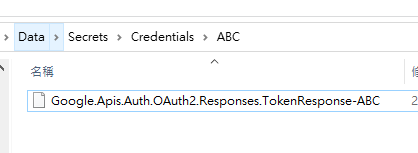
在 D:\project\GmailTest\Data\Secrets\Credentials\ABC 裡面會產生一個檔案: 這個就是我們的 token 了。
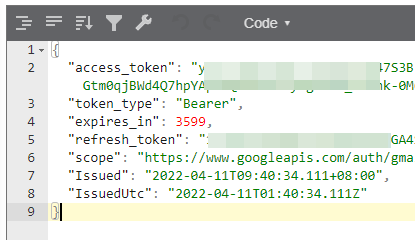
看一下裡面的內容, 有 access_token, refresh_token, scope 等等, 用途應該很好猜了.. 不知道各項目的目途也沒有關係。只要有這個 token 就可以了。
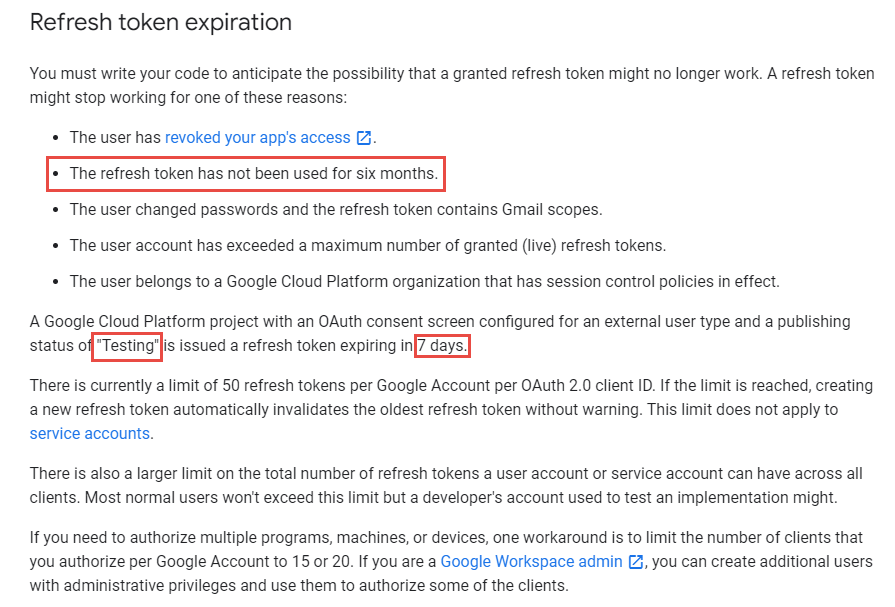
refresh_token 的效期請參考以下文件:
https://developers.google.com/identity/protocols/oauth2 。也可以參考下圖, 若是要用 gmail api 來發送通知信(例如連絡我們),紅色的地方是比較令人困擾的,例如 6 個月以上,沒有人留言,原來留下的 refresh_token 就失效了。使用者必需重新建立一個 refresh_token 。
最後來使用 gmail api 發送通知信, 直接看程式碼如下: 在這個過程中遇到最大的問題除了憑証問題之外,另一個問題是編碼。直到最後找到可以用 MimeKit 把 System.Net.Mail.MailMessage 編碼成 Gmail API 的格式才解決。程式碼如下:
收到的信件:
結論:
使用 Gmail API 最大的原因是要增加安全性,和舊的 smtp 不同的地方是,使用 gmail api 之後,客戶不需要提供 gmail 的帳號和密碼就可以讓系統使用 gmail 發送信件,不過由於 refresh_token 的效期問題,可能會造成無法發送通知信而沒有任何人發現的情況,整個實用性會變的很低。
另一個還沒有測試的部份是應用程的啟用。這個審核不知道會不很麻煩,不過可以而知的時,整個流程會花更多的時間。
取代的做法: 可能要改用 Amazon 的 SES 來寄信,而且為了避免每個小網站都要跑 SES 的建立流程,準備來寫一個 API 給各網站使用,可以發送簡單的通知信。
以上的程式碼可以在這裡下載: https://github.com/bikehsu/GmailTest
如果你的目的是要使用 Gmail Api 取代舊的 Gmail SMTP 來發送通知信,建議你先跳到最下方看一下結論。
如果你是想要看一下 Gmail API 和 Google API 憑証的使用方法,可以看一下這篇文章。
1. 在 google cloud platform 建立新的專案.
https://console.cloud.google.com/
啟用 Gmail API
因為我們要透過 OAuth 取得使用者授權,所以要設定使用 OAuth 的同意畫面。
指定授權的範圍
因為剛建立的專案,不會被公開,所以要指定測試使用者
如果要給任意使用者,必需經過發布的流程,但準備工作有點麻煩,所以這次就不發布了。
建立 OAuth 2.0 用戶端 ID 憑証
這裡除了名稱外,還有一個設定重導 Uri 的項目。現在不填寫,但稍後要回來補這個資料。
下載 json 之後,命名為 client_secret.json 保留後續使用。
再來就要建立專案了. 用 VS2022 建立一個新專案
記錄網址, 本測試專案是 https://localhost:44340/ ,請依實際網址為準。
回到 OAuth 2.0 用戶端 ID 的設定頁. 在已授權的重新導向 URI 中填入 https://localhost:44340/Home/AuthReturn (填入的網址依實際專案的狀況,可能會有變化)
在 VS2022 中,使用 Nuget 安裝套件: (有漏的再麻煩和我說)
Google.Apis.Gmail.v1
Google.Apis.Auth
MimeKit (發送 gmail 時使用)
建立認証用的網址:
建立一個 Action, 用來取得認証用的網址:
        /// <summary>

        /// 取得授權的項目

        /// </summary>

        static string[] Scopes = { GmailService.Scope.GmailSend };


        // 和登入 google 的帳號無關

        // 任意值,若未來有使用者認証,可使用使用者編號或登入帳號。

        string Username = "ABC";


        /// <summary>

        /// 存放 client_secret 和 credential 的地方

        /// </summary>

        string SecretPath = @"D:\project\GmailTest\Data\Secrets";


        /// <summary>

        /// 認証完成後回傳的網址, 必需和 OAuth 2.0 Client Id 中填寫的 "已授權的重新導向 URI" 相同。

        /// </summary>

        string RedirectUri = $"https://localhost:44340/Home/AuthReturn";


        /// <summary>

        /// 取得認証用的網址

        /// </summary>

        /// <returns></returns>

        public async Task<string> GetAuthUrl()

        {

            using (var stream = new FileStream(Path.Combine(SecretPath, "client_secret.json"), FileMode.Open, FileAccess.Read))

            {

                FileDataStore dataStore = null;

                var credentialRoot = Path.Combine(SecretPath, "Credentials");

                if (!Directory.Exists(credentialRoot))

                {

                    Directory.CreateDirectory(credentialRoot);

                }


                //存放 credential 的地方,每個 username 會建立一個目錄。

                string filePath = Path.Combine(credentialRoot, Username);

                dataStore = new FileDataStore(filePath);


                IAuthorizationCodeFlow flow = new GoogleAuthorizationCodeFlow(new GoogleAuthorizationCodeFlow.Initializer

                {

                    ClientSecrets = GoogleClientSecrets.Load(stream).Secrets,

                    Scopes = Scopes,

                    DataStore = dataStore

                });


                var authResult = await new AuthorizationCodeWebApp(flow, RedirectUri, Username)

                .AuthorizeAsync(Username, CancellationToken.None);


                return authResult.RedirectUri;

            }

        }
執行結果:
用 chrome 開啟產生的網址:
選取任一帳號,如果出現以下錯誤,請回到 "OAuth 同意畫面" 去新增測試使用者
因為應用程式尚未發布,所以會看到警告,勇敢的繼續下去
這裡會要求授權使用你的名義發送信件。(這是在程式中取得授權的項目 Scopes 中所指定的)
再繼續之後,會被重導至我們在 redirectUri 指定的網址。因為我們尚未完成,所以會看到錯誤,順便也可以看一下,會帶回哪一些參數。有 state, code, scope,共三個。
順便看一下,google 的套件會在 Credentials 的目錄下幫使用者建立一個目錄,在完成驗証前,會先放一個 System.String-oauth_XXX 的檔案,裡面的值和回傳的 state 是一樣的,這個應該是用來驗証回傳資料的。
接下來我們要新增 Action "AuthReturn" 如下:
        public async Task<string> AuthReturn(AuthorizationCodeResponseUrl authorizationCode)

        {

            string[] scopes = new[] { GmailService.Scope.GmailSend };


            using (var stream = new FileStream(Path.Combine(SecretPath, "client_secret.json"), FileMode.Open, FileAccess.Read))

            {

                //確認 credential 的目錄已建立.

                var credentialRoot = Path.Combine(SecretPath, "Credentials");

                if (!Directory.Exists(credentialRoot))

                {

                    Directory.CreateDirectory(credentialRoot);

                }


                //暫存憑証用目錄

                string tempPath = Path.Combine(credentialRoot, authorizationCode.State);


                IAuthorizationCodeFlow flow = new GoogleAuthorizationCodeFlow(

                new GoogleAuthorizationCodeFlow.Initializer

                {

                    ClientSecrets = GoogleClientSecrets.Load(stream).Secrets,

                    Scopes = scopes,

                    DataStore = new FileDataStore(tempPath)

                });


                //這個動作應該是要把 code 換成 token

                await flow.ExchangeCodeForTokenAsync(Username, authorizationCode.Code, RedirectUri, CancellationToken.None).ConfigureAwait(false);


                if (!string.IsNullOrWhiteSpace(authorizationCode.State))

                {

                    string newPath = Path.Combine(credentialRoot, Username);

                    if (tempPath.ToLower() != newPath.ToLower())

                    {

                        if (Directory.Exists(newPath))

                            Directory.Delete(newPath, true);


                        Directory.Move(tempPath, newPath);

                    }

                }


                return "OK";

            }

        }
再跑一次上面的流程,最後回到 AuthReturn
在 D:\project\GmailTest\Data\Secrets\Credentials\ABC 裡面會產生一個檔案: 這個就是我們的 token 了。
看一下裡面的內容, 有 access_token, refresh_token, scope 等等, 用途應該很好猜了.. 不知道各項目的目途也沒有關係。只要有這個 token 就可以了。
refresh_token 的效期請參考以下文件:
https://developers.google.com/identity/protocols/oauth2 。也可以參考下圖, 若是要用 gmail api 來發送通知信(例如連絡我們),紅色的地方是比較令人困擾的,例如 6 個月以上,沒有人留言,原來留下的 refresh_token 就失效了。使用者必需重新建立一個 refresh_token 。
最後來使用 gmail api 發送通知信, 直接看程式碼如下: 在這個過程中遇到最大的問題除了憑証問題之外,另一個問題是編碼。直到最後找到可以用 MimeKit 把 System.Net.Mail.MailMessage 編碼成 Gmail API 的格式才解決。程式碼如下:
public async Task<bool> SendTestMail()
{
var service = await GetGmailService();
GmailMessage message = new GmailMessage();
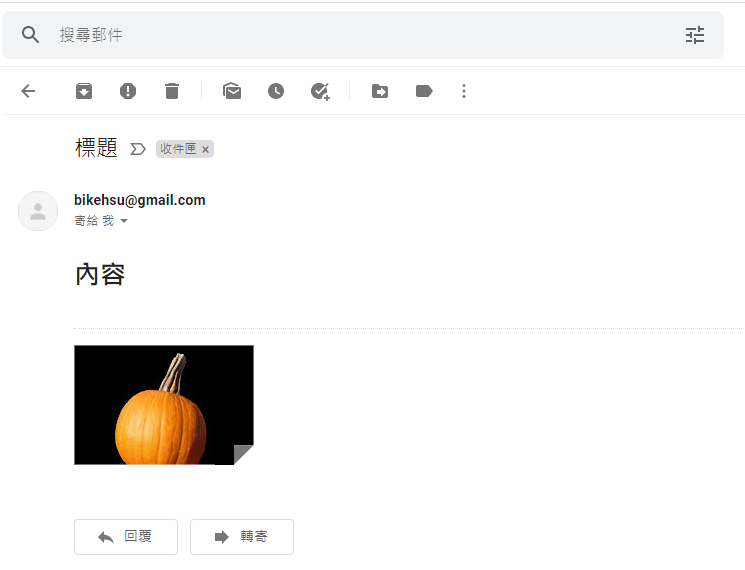
message.Subject = "標題";
message.Body = $"<h1>內容</h1>";
message.FromAddress = "bikehsu@gmail.com";
message.IsHtml = true;
message.ToRecipients = "bikehsu@gmail.com";
message.Attachments = new List<Attachment>();
string filePath = @"C:\Users\bike\Pictures\Vegetable_pumpkin.jpg"; //要附加的檔案
Attachment attachment1 = new Attachment(filePath);
message.Attachments.Add(attachment1);
SendEmail(message, service);
Console.WriteLine("OK");
return true;
}
async Task<GmailService> GetGmailService()
{
UserCredential credential = null;
var credentialRoot = Path.Combine(SecretPath, "Credentials");
if (!Directory.Exists(credentialRoot))
{
Directory.CreateDirectory(credentialRoot);
}
string filePath = Path.Combine(credentialRoot, Username);
using (var stream = new FileStream(Path.Combine(SecretPath, "client_secret.json"), FileMode.Open, FileAccess.Read))
{
credential = await GoogleWebAuthorizationBroker.AuthorizeAsync(
GoogleClientSecrets.Load(stream).Secrets,
Scopes,
Username,
CancellationToken.None,
new FileDataStore(filePath));
}
var service = new GmailService(new BaseClientService.Initializer()
{
HttpClientInitializer = credential,
ApplicationName = "Send Mail",
});
return service;
}
public class GmailMessage
{
public string FromAddress { get; set; }
public string ToRecipients { get; set; }
public string Subject { get; set; }
public string Body { get; set; }
public bool IsHtml { get; set; }
public List<System.Net.Mail.Attachment> Attachments { get; set; }
}
public static void SendEmail(GmailMessage email, GmailService service)
{
var mailMessage = new System.Net.Mail.MailMessage();
mailMessage.From = new System.Net.Mail.MailAddress(email.FromAddress);
mailMessage.To.Add(email.ToRecipients);
mailMessage.ReplyToList.Add(email.FromAddress);
mailMessage.Subject = email.Subject;
mailMessage.Body = email.Body;
mailMessage.IsBodyHtml = email.IsHtml;
if (email.Attachments != null)
{
foreach (System.Net.Mail.Attachment attachment in email.Attachments)
{
mailMessage.Attachments.Add(attachment);
}
}
var mimeMessage = MimeKit.MimeMessage.CreateFromMailMessage(mailMessage);
var gmailMessage = new Google.Apis.Gmail.v1.Data.Message
{
Raw = Encode(mimeMessage)
};
Google.Apis.Gmail.v1.UsersResource.MessagesResource.SendRequest request = service.Users.Messages.Send(gmailMessage, "me");
request.Execute();
}
public static string Encode(MimeMessage mimeMessage)
{
using (MemoryStream ms = new MemoryStream())
{
mimeMessage.WriteTo(ms);
return Convert.ToBase64String(ms.GetBuffer())
.TrimEnd('=')
.Replace('+', '-')
.Replace('/', '_');
}
}
收到的信件:
結論:
使用 Gmail API 最大的原因是要增加安全性,和舊的 smtp 不同的地方是,使用 gmail api 之後,客戶不需要提供 gmail 的帳號和密碼就可以讓系統使用 gmail 發送信件,不過由於 refresh_token 的效期問題,可能會造成無法發送通知信而沒有任何人發現的情況,整個實用性會變的很低。
另一個還沒有測試的部份是應用程的啟用。這個審核不知道會不很麻煩,不過可以而知的時,整個流程會花更多的時間。
取代的做法: 可能要改用 Amazon 的 SES 來寄信,而且為了避免每個小網站都要跑 SES 的建立流程,準備來寫一個 API 給各網站使用,可以發送簡單的通知信。
以上的程式碼可以在這裡下載: https://github.com/bikehsu/GmailTest
Bike, 2022/4/10 下午 09:31:15
環境說明:
AD Server: dc1 (192.168.101.109)
PC: pc110 (192.168.101.110)
PC: pc111 (192.168.101.111)
第一步,把 PC 加入 AD, 這個算是基本操作,網路上說明很多, 就不再截圖了。不過在這裡還是遇到了第一個問題,解決過程請參考另一份文件: https://blog.uwinfo.com.tw/Article.aspx?Id=486
第二步,在 Visual Studio 的測試環境中測試:
一開始是使用 .Net 6.0 來實作,沒想到找到的文件都是 .Net Core 3.1 的,所以先用 .Net Core 3.1 實做了一次,後來改用 .Net 6.0 實作才成功。使用 .Net 6.0 實作的過程如下:
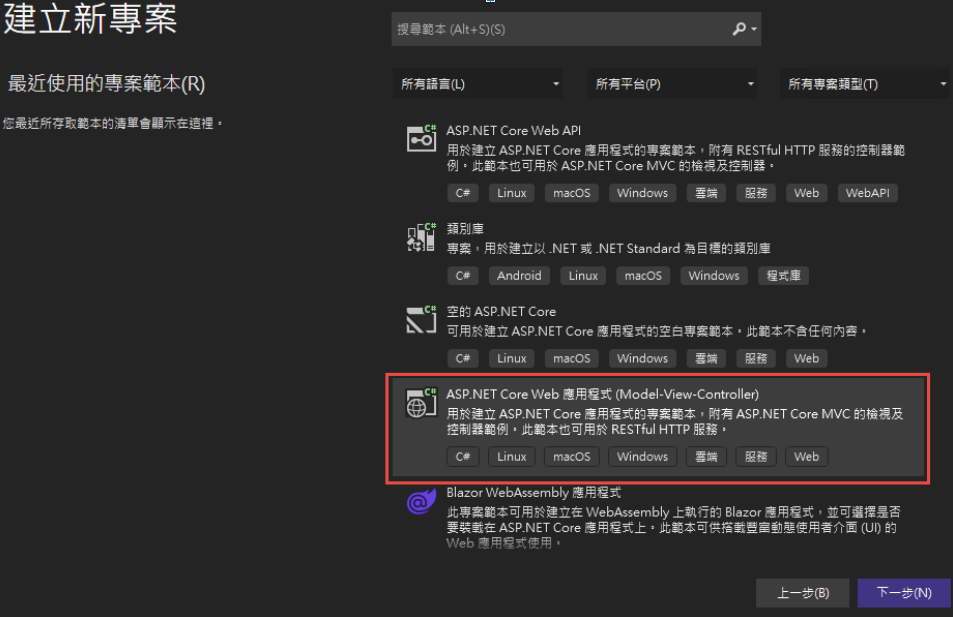
1. 建立一個 MVC 的標準專案:
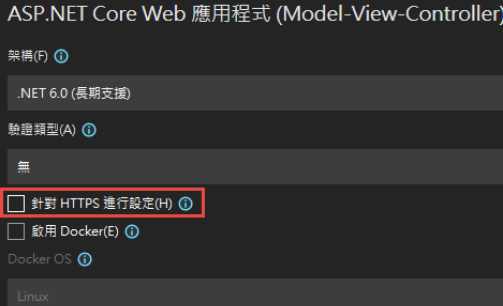
為了避免憑証問題,所以拿掉了 HTTPS 的設定
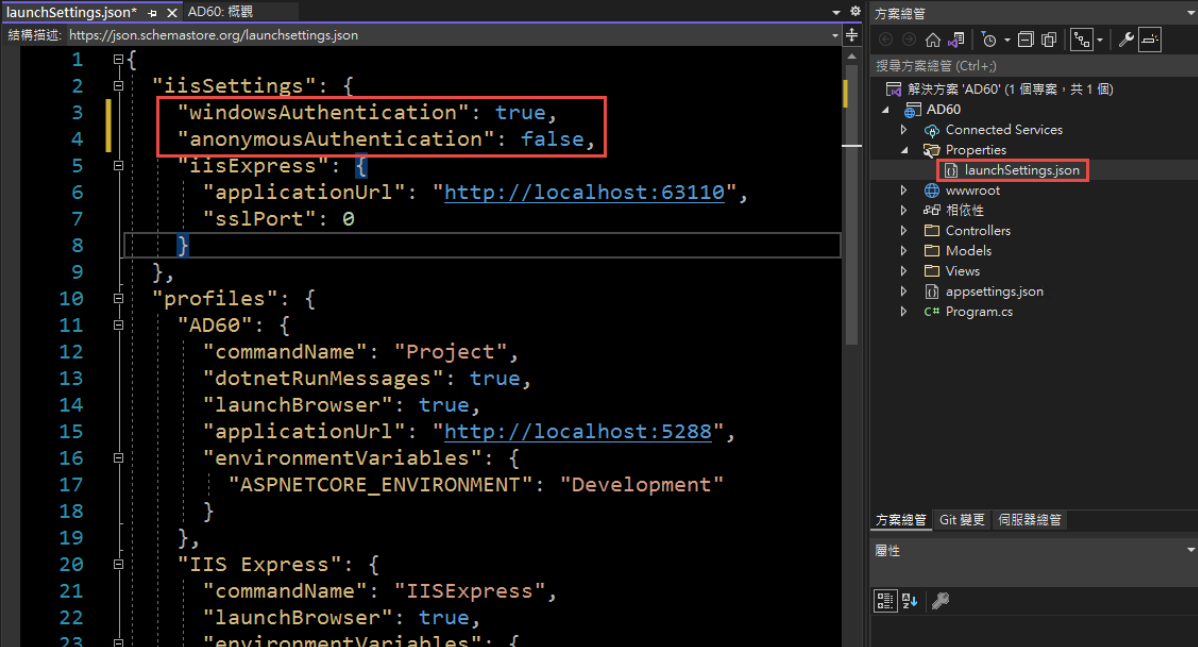
2. 改寫 launchSettings.json:
iisSettings 中的 windowsAuthentication 改為 True, anonymousAuthentication 改為 false。如下圖:
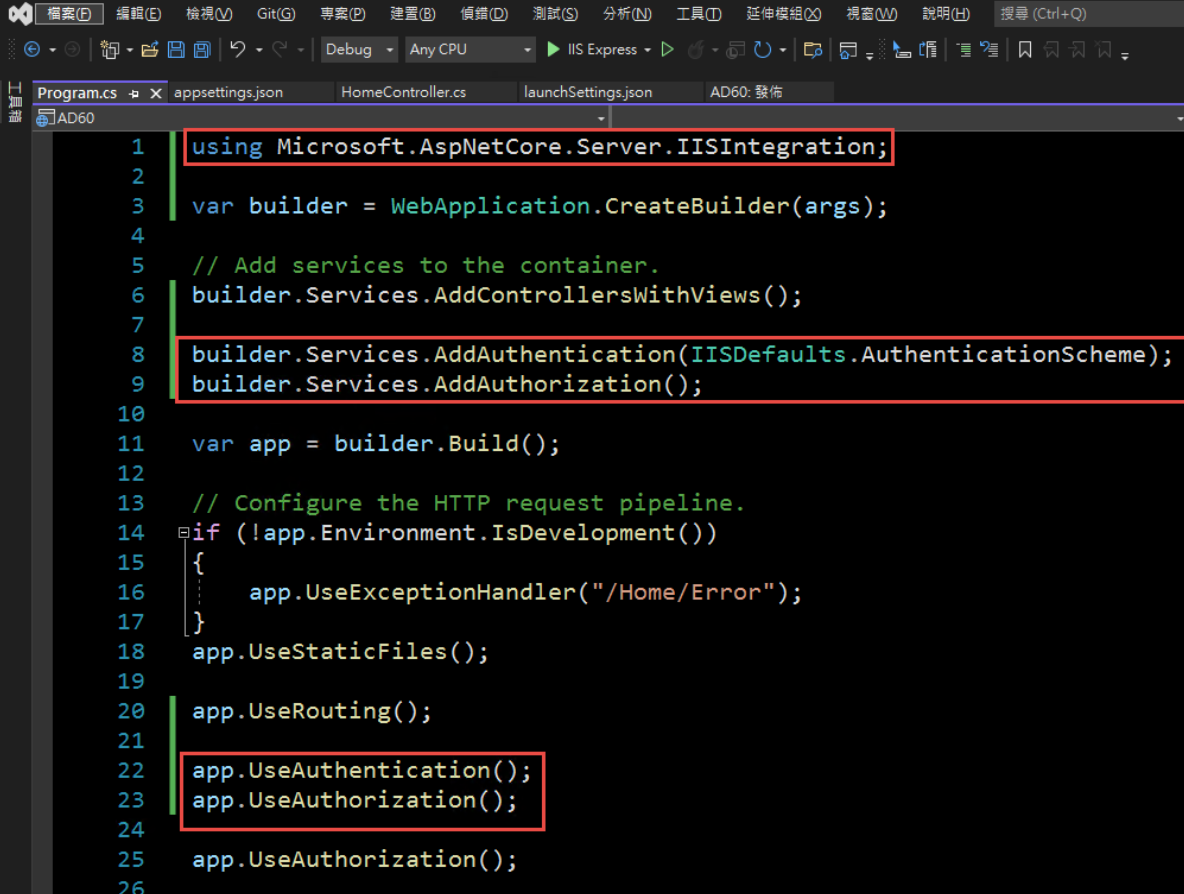
3. 修改 Program.cs, 加入以下四行指令:
builder.Services.AddAuthentication(IISDefaults.AuthenticationScheme);
builder.Services.AddAuthorization();
app.UseAuthentication();
app.UseAuthorization();
(注意: UseAuthentication 要加在 UseAuthentication 之後, VS 2022 應該會提示要新增 using Microsoft.AspNetCore.Server.IISIntegration;)
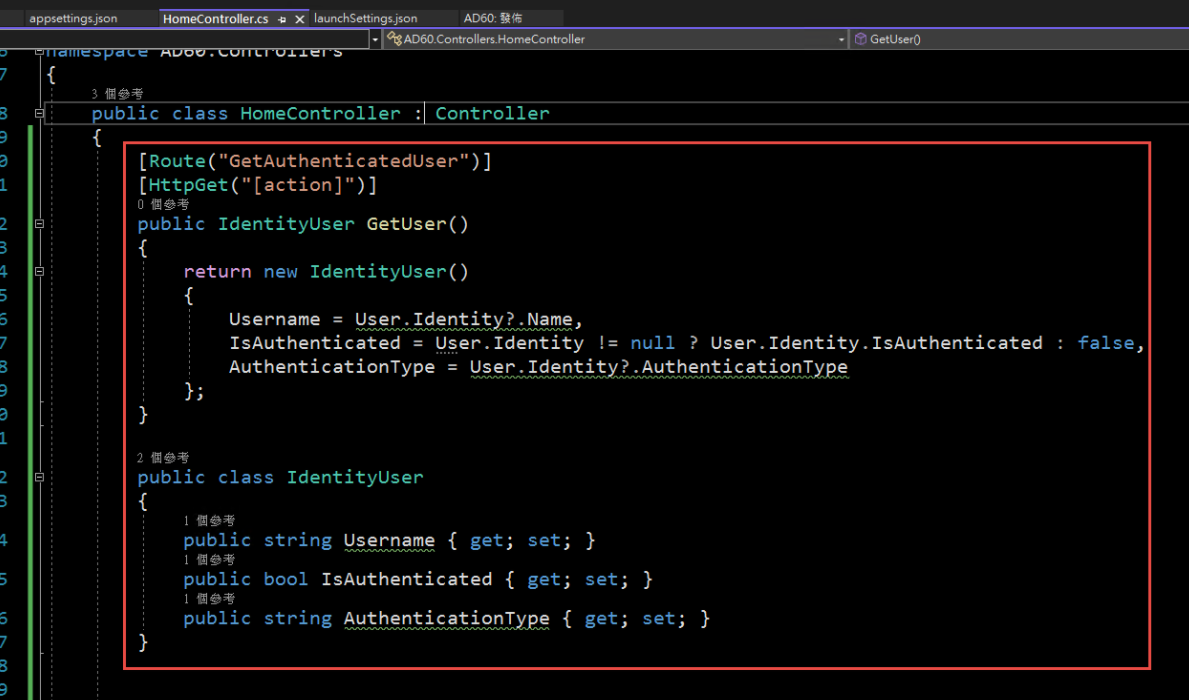
4. 在 HomeController 增加一個 Action, 以讀取驗証資料:
[Route("GetAuthenticatedUser")]
[HttpGet("[action]")]
public IdentityUser GetUser()
{
return new IdentityUser()
{
Username = User.Identity?.Name,
IsAuthenticated = User.Identity != null ? User.Identity.IsAuthenticated : false,
AuthenticationType = User.Identity?.AuthenticationType
};
}
public class IdentityUser
{
public string Username { get; set; }
public bool IsAuthenticated { get; set; }
public string AuthenticationType { get; set; }
}
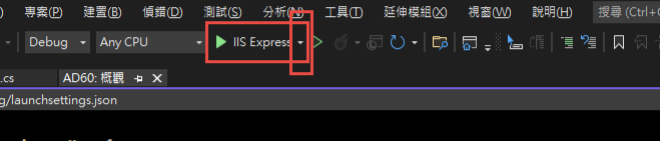
5. 啟動時記得要改用 IIS Express (感覺早上花了兩三個小時在為了這個問題打轉):
6. 執行結果:

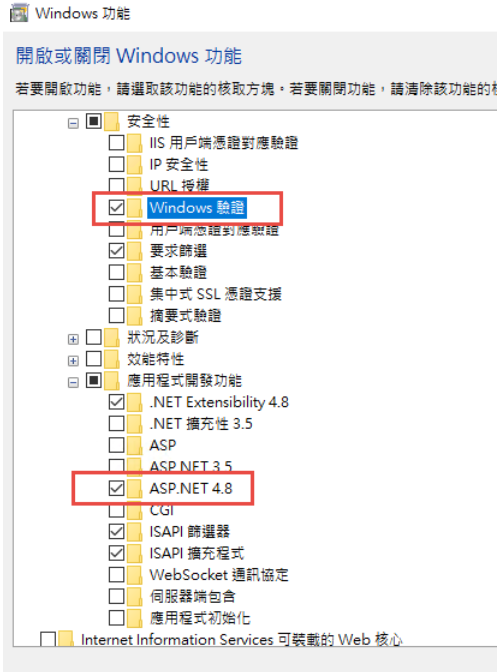
第三步,在 IIS 中安裝網站:
1. 在安裝 IIS 時,記得要勾選 windows 驗證
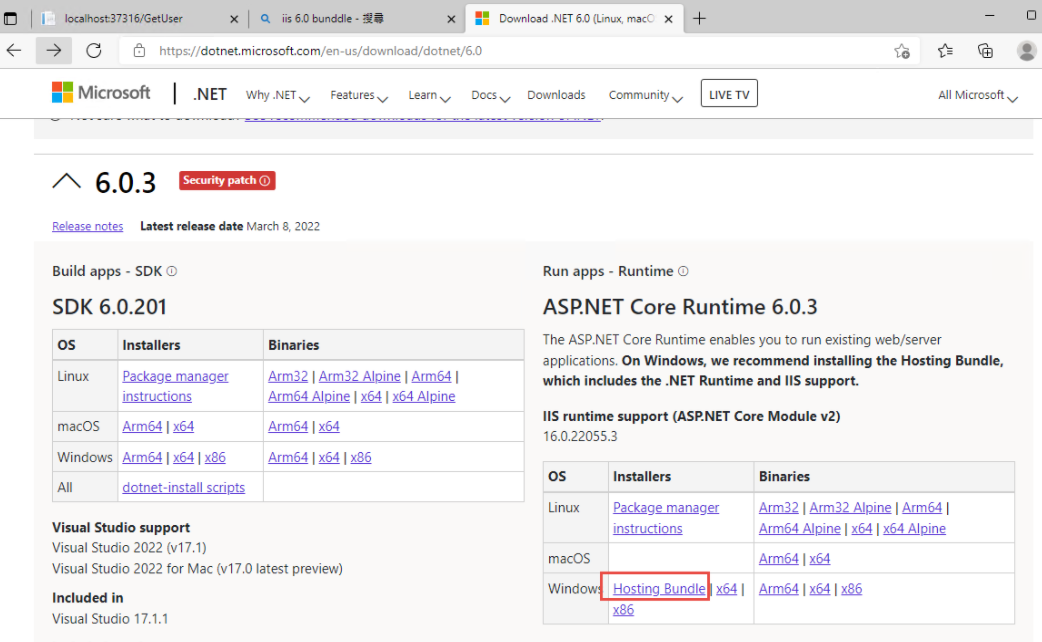
2. 安裝 .Net 6.0 的 Hosting Bundle
https://dotnet.microsoft.com/en-us/download/dotnet/6.0
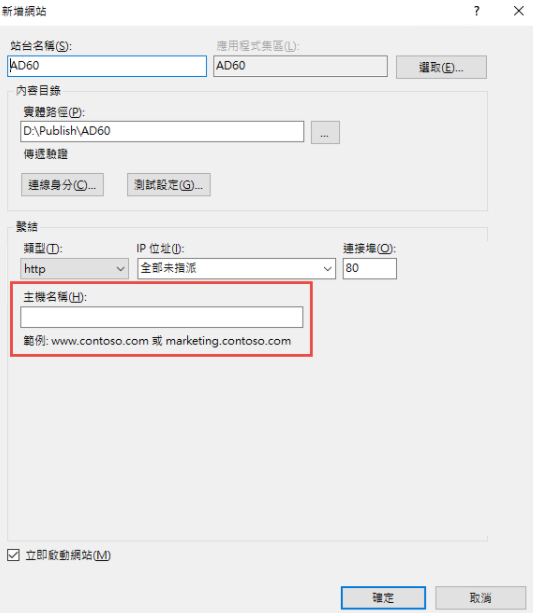
3. 新增網站:
主機名稱留空白 (AD 驗証在網域內好像不會使用指定的主機名稱,這個有待後續再做確認)
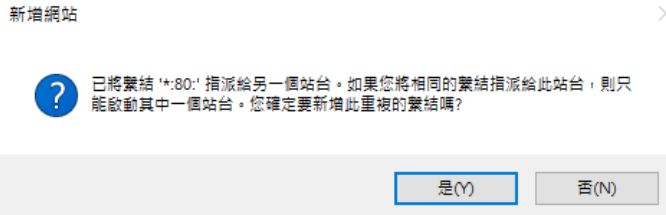
如果沒有刪除預設網站,會遇到警告,直接確認即可.
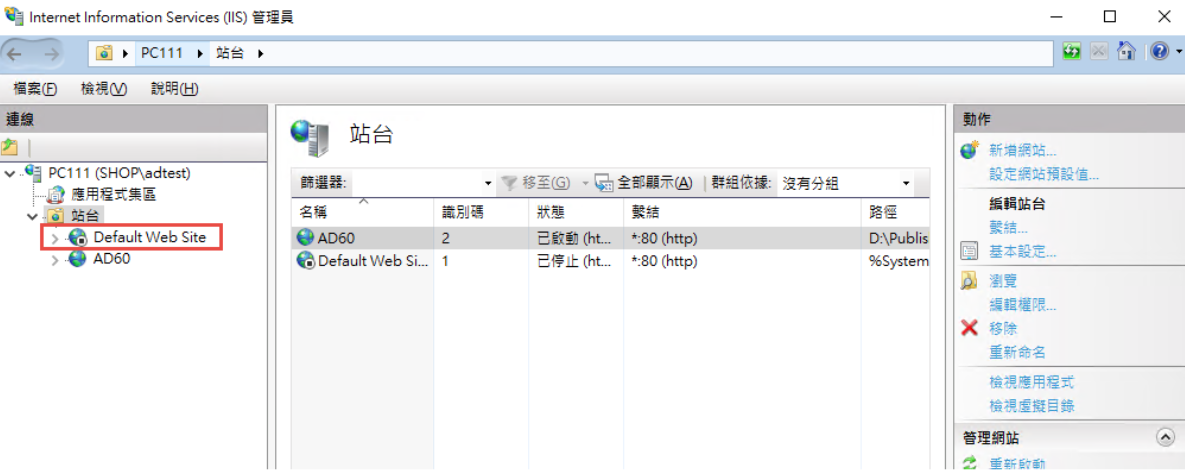
要把 Default Web Site 關閉,再啟動測試站
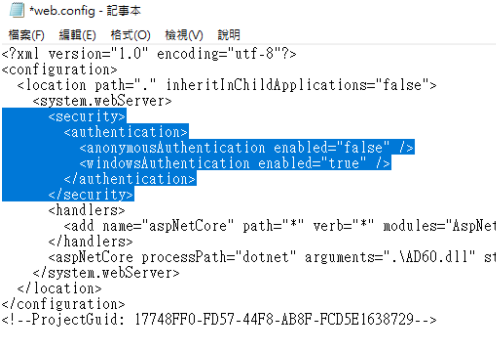
要啟動 windows 驗証: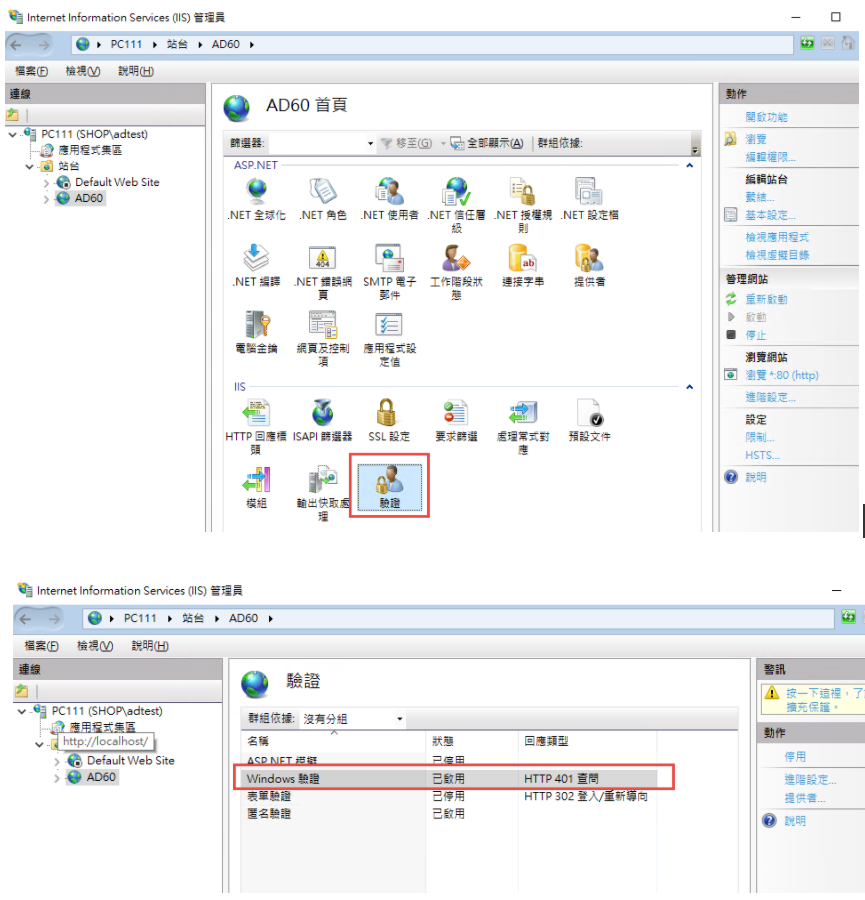
在 web.config 中增加
修改 applicationHost.config:
檔案位置: %windir%\system32\inetsrv\config\applicationHost.config
這兩地方的 Deny 改為 Allow
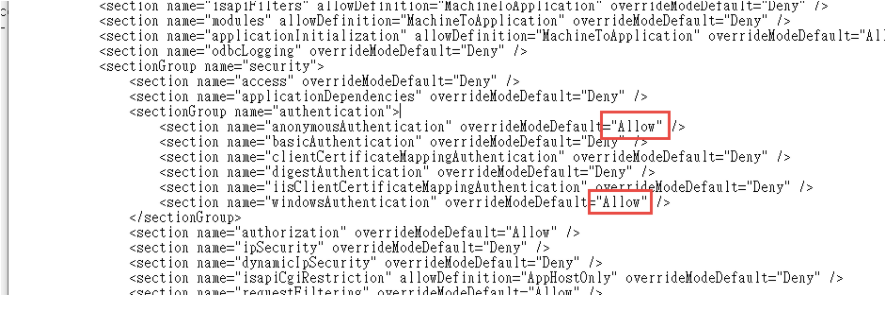
參考文件: https://docs.microsoft.com/zh-tw/iis/get-started/planning-for-security/how-to-use-locking-in-iis-configuration
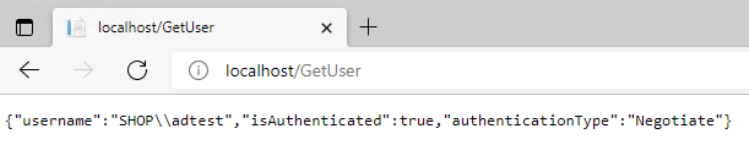
3. 可以取得登入資訊如下:
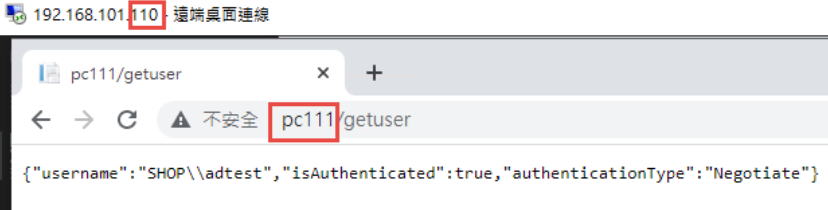
4. 從 Domain 中另一台主機來存取,不用登入,自動取得目前登入者的資訊。
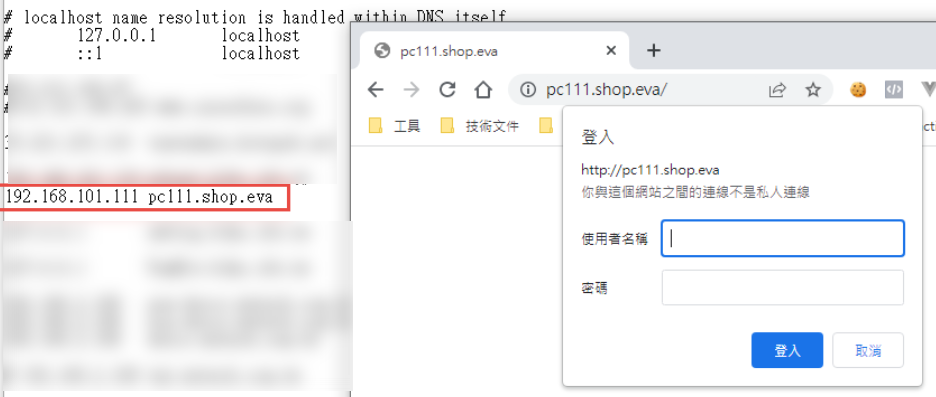
5. 從非網域主機連線: 會要求認証
目前遇到問題: 在網域中的電腦只能用主機名稱登入,非網域的電腦,才能夠使用網址登入。
測試專案下載: https://github.com/bikehsu/AD60
AD Server: dc1 (192.168.101.109)
PC: pc110 (192.168.101.110)
PC: pc111 (192.168.101.111)
第一步,把 PC 加入 AD, 這個算是基本操作,網路上說明很多, 就不再截圖了。不過在這裡還是遇到了第一個問題,解決過程請參考另一份文件: https://blog.uwinfo.com.tw/Article.aspx?Id=486
第二步,在 Visual Studio 的測試環境中測試:
一開始是使用 .Net 6.0 來實作,沒想到找到的文件都是 .Net Core 3.1 的,所以先用 .Net Core 3.1 實做了一次,後來改用 .Net 6.0 實作才成功。使用 .Net 6.0 實作的過程如下:
1. 建立一個 MVC 的標準專案:
為了避免憑証問題,所以拿掉了 HTTPS 的設定
2. 改寫 launchSettings.json:
iisSettings 中的 windowsAuthentication 改為 True, anonymousAuthentication 改為 false。如下圖:
3. 修改 Program.cs, 加入以下四行指令:
builder.Services.AddAuthentication(IISDefaults.AuthenticationScheme);
builder.Services.AddAuthorization();
app.UseAuthentication();
app.UseAuthorization();
(注意: UseAuthentication 要加在 UseAuthentication 之後, VS 2022 應該會提示要新增 using Microsoft.AspNetCore.Server.IISIntegration;)
4. 在 HomeController 增加一個 Action, 以讀取驗証資料:
[Route("GetAuthenticatedUser")]
[HttpGet("[action]")]
public IdentityUser GetUser()
{
return new IdentityUser()
{
Username = User.Identity?.Name,
IsAuthenticated = User.Identity != null ? User.Identity.IsAuthenticated : false,
AuthenticationType = User.Identity?.AuthenticationType
};
}
public class IdentityUser
{
public string Username { get; set; }
public bool IsAuthenticated { get; set; }
public string AuthenticationType { get; set; }
}
5. 啟動時記得要改用 IIS Express (感覺早上花了兩三個小時在為了這個問題打轉):
6. 執行結果:
第三步,在 IIS 中安裝網站:
1. 在安裝 IIS 時,記得要勾選 windows 驗證
2. 安裝 .Net 6.0 的 Hosting Bundle
https://dotnet.microsoft.com/en-us/download/dotnet/6.0
3. 新增網站:
主機名稱留空白 (AD 驗証在網域內好像不會使用指定的主機名稱,這個有待後續再做確認)
如果沒有刪除預設網站,會遇到警告,直接確認即可.
要把 Default Web Site 關閉,再啟動測試站
要啟動 windows 驗証:
在 web.config 中增加
      <security>

        <authentication>

          <anonymousAuthentication enabled="false" />

          <windowsAuthentication enabled="true" />

        </authentication>

      </security>
修改 applicationHost.config:
檔案位置: %windir%\system32\inetsrv\config\applicationHost.config
這兩地方的 Deny 改為 Allow
<section name="anonymousAuthentication" overrideModeDefault="Deny" />

<section name="windowsAuthentication" overrideModeDefault="Deny" />
參考文件: https://docs.microsoft.com/zh-tw/iis/get-started/planning-for-security/how-to-use-locking-in-iis-configuration
3. 可以取得登入資訊如下:
4. 從 Domain 中另一台主機來存取,不用登入,自動取得目前登入者的資訊。
5. 從非網域主機連線: 會要求認証
目前遇到問題: 在網域中的電腦只能用主機名稱登入,非網域的電腦,才能夠使用網址登入。
測試專案下載: https://github.com/bikehsu/AD60
Bike, 2022/3/19 下午 09:10:08
跑.net core 程式的時候遇到
錯誤 MSB3644 找不到 .NETFramework,Version=v5.0 的參考組件。若要解決此問題,請安裝此架構版本的開發人員套件 (SDK/目標套件) 或重定應用程式。您可以在 https://aka.ms/msbuild/developerpacks 下載 .NET Framework 開發人員套件 KOKOxMMBApi C:\Program Files (x86)\Microsoft Visual Studio\2019\Community\MSBuild\Current\Bin\Microsoft.Common.CurrentVersion.targets 1175
遇到此問題時先去
https://dotnet.microsoft.com/download/dotnet/5.0
下載64版本
但另一個原因有可能是vs2019版本過低,建議升到 16.6 版以上
https://visualstudio.microsoft.com/zh-hant/downloads/
接著~很可能遇到無法更新
請參考這篇
https://www.dotblogs.com.tw/Eyelash/2021/01/09/151544
刪除C:\Program Files (x86)\Microsoft Visual Studio\Installer\
Installer刪掉這個資料夾
回到VS 說明 > 檢查版本
就能更新了
Doug, 2021/10/5 上午 11:53:20

下載Runtime版本打開後出現, 【這部電腦已經安裝 .NET Framework 4.6.2 (含) 以上版本的更新】

後來下載Developer Pack版本安裝完畢後就可以了
https://dotnet.microsoft.com/download/dotnet-framework/net462

choco, 2021/8/23 下午 02:28:48