頁數 1 / 3
下一頁
搜尋 console 結果:
<!DOCTYPE html>

<html lang="en">

<head>

    <meta charset="UTF-8">

    <meta name="viewport" content="width=device-width, initial-scale=1.0">

    <title>BLE Printer Test</title>

    <script src="https://cdn.jsdelivr.net/npm/iconv-lite-umd@0.6.10/lib/iconv-lite-umd.js"></script>

</head>

<body>

    <h1>BLE Printer Test 123</h1>

    <button id="printTestButton">Test Print</button>

    <button id="printAgain">Print Again</button>

    <pre id="log"></pre>

    <script>

        // Function to log messages on the page

        function logMessage(message) {

            const logElement = document.getElementById('log');

            logElement.textContent += message + '\n';

        }

        var device;

        var server;

        var service;

        var characteristic;

        var name = 'T58_6752'; // 藍芽設備的名稱

        var uuid = 0x1800; //service UUID (用 BLE Scanner 找到的)

        var characteristicUuid = 0x2A00; // characteristic UUID (用 BLE Scanner 找到的)

        // Function to connect to BLE printer and send test data


        async function connectAndTestPrint() {


            try {

                logMessage("Requesting Bluetooth device...");


                // Request the BLE device

                device = await navigator.bluetooth.requestDevice({

                    //acceptAllDevices: true,

                    filters: [

                        { name: name }

                    ],

                    optionalServices: [uuid] // Replace with the correct service UUID

                });


                logMessage(`Device selected: ${device.name}`);

                logMessage(`Device uuid: ${device.id}`);


                await printAgain();


            } catch (error) {

                logMessage(`Error: ${error.message}`);

            }

        }


        // 转码方法

        function stringToGbk(str) {

            const ranges = [

                [0xA1, 0xA9, 0xA1, 0xFE],

                [0xB0, 0xF7, 0xA1, 0xFE],

                [0x81, 0xA0, 0x40, 0xFE],

                [0xAA, 0xFE, 0x40, 0xA0],

                [0xA8, 0xA9, 0x40, 0xA0],

                [0xAA, 0xAF, 0xA1, 0xFE],

                [0xF8, 0xFE, 0xA1, 0xFE],

                [0xA1, 0xA7, 0x40, 0xA0],

            ]

            const codes = new Uint16Array(23940)

            let i = 0


            for (const [b1Begin, b1End, b2Begin, b2End] of ranges) {

                for (let b2 = b2Begin; b2 <= b2End; b2++) {

                    if (b2 !== 0x7F) {

                        for (let b1 = b1Begin; b1 <= b1End; b1++) {

                            codes[i++] = b2 << 8 | b1

                        }

                    }

                }

            }

            const cstr = new TextDecoder('gbk').decode(codes)


            // 编码表

            const table = new Uint16Array(65536)

            for (let i = 0; i < cstr.length; i++) {

                table[cstr.charCodeAt(i)] = codes[i]

            }

            const buf = new Uint8Array(str.length * 2)

            let n = 0


            for (let i = 0; i < str.length; i++) {

                const code = str.charCodeAt(i)

                if (code < 0x80) {

                    buf[n++] = code

                } else {

                    const gbk = table[code]

                    buf[n++] = gbk & 0xFF

                    buf[n++] = gbk >> 8

                }

            }

            u8buf = buf.subarray(0, n)

            // console.log(u8buf);

            return u8buf

        }


        async function printAgain() {

            // Connect to the GATT server

            server = await device.gatt.connect();

            logMessage("Connected to GATT server.");


            // Get the printer service

            service = await server.getPrimaryService(uuid); // Replace with your printer's service UUID

            logMessage("Printer service retrieved.");


            // Get the characteristic for writing data

            characteristic = await service.getCharacteristic(characteristicUuid); // Replace with the correct characteristic UUID

            logMessage("Printer characteristic retrieved.");


            // Prepare test print data

            const encoder = new TextEncoder();

            const testData = encoder.encode("TEST PRINT: Hello from Web Bluetooth!\n");

            const finalData = encoder.encode("--\n--\n \n \n");


            const setFontSize = new Uint8Array([0x1D, 0x21, 0x11]); // GS ! n

            const setFontSize2 = new Uint8Array([0x1D, 0x21, 0x22]); // GS ! n

            const setFontSize3 = new Uint8Array([0x1D, 0x21, 0x33]); // GS ! n


            // Write test data to the printer

            logMessage("Sending test data to printer...");


            await characteristic.writeValue(new Uint8Array([0x1D, 0x21, 0x00]));

            await characteristic.writeValue(encoder.encode("1x1!\n"));

            await characteristic.writeValue(setFontSize);

            await characteristic.writeValue(encoder.encode("2x2!\n"));

            await characteristic.writeValue(setFontSize2);

            await characteristic.writeValue(encoder.encode("3x3!\n"));

            await characteristic.writeValue(setFontSize3);

            await characteristic.writeValue(encoder.encode("4x4!\n"));


            const initPrinter = new Uint8Array([0x1B, 0x40]); // ESC @

            await characteristic.writeValue(initPrinter);


            // 3. 設置字符集為 GBK

            const setGBK = new Uint8Array([0x1B, 0x74, 0x11]); // ESC t 0x11 (GBK)

            await characteristic.writeValue(setGBK);


            const text = "繁體中文測試\n \n";

            const encodedText = stringToGbk(text);

            await characteristic.writeValue(encodedText);

            logMessage("Test data sent successfully!");


            // QrCode 列印

            const qrData = "https://example.com"; // Your QR code data

            const qrDataLength = qrData.length + 3;

            const pL = qrDataLength & 0xFF; // Low byte

            const pH = (qrDataLength >> 8) & 0xFF; // High byte


            const commands = [

                0x1B, 0x40, // Initialize printer

                0x1D, 0x28, 0x6B, pL, pH, 0x31, 0x50, 0x30, ...new TextEncoder().encode(qrData), // Store data

                0x1D, 0x28, 0x6B, 0x03, 0x00, 0x31, 0x51, 0x30 // Print QR code

            ];


            const buffer = new Uint8Array(commands);

            await characteristic.writeValue(buffer);

            logMessage("QrCode sent successfully!");


            await characteristic.writeValue(finalData);

            logMessage("finalData sent successfully!");


            // Disconnect the GATT server

            server.disconnect();

            logMessage("Disconnected from printer.");

        }


        // Bind the function to the button

        document.getElementById('printTestButton').addEventListener('click', connectAndTestPrint);

        document.getElementById('printAgain').addEventListener('click', printAgain);

    </script>

</body>

</html>
Bike, 2025/1/2 下午 02:20:15
改寫成可輸入多參數,效能也比較好的版本。
以下為測試碼,請自行依照專案需求做修改。
以下為測試碼,請自行依照專案需求做修改。
var root = "C://wdqd/qwewq";

var addPath = @"//\\/fwef/qwf";

var addPath2 = @"5fwfef/qwf";

var addPath3 = @"//fwef/qwf";

var addPath4 = @"\\\fwef/qwf";

var addPath5 = @"\\\\\/fwef/qwf";


var result = root.AddPath(addPath, addPath2, addPath3, addPath4, addPath5);


Console.WriteLine(result);


public static class Helper

{

    public static string AddPath(this string value, params string[] addPaths)

    {

        if (string.IsNullOrEmpty(value))

        {

            throw new Exception("起始目錄不可以為空字串");

        }


        if (value.Contains("..") || addPaths.Any(x => x.Contains("..")))

        {

            throw new Exception($"value: {value}, addPaths: {addPaths.Where(x => x.Contains("..")).ToOneString()} 檔名與路徑不可包含 ..");

        }


        var paths = addPaths.Select(x => x.Substring(x.FindLastContinuousCharPosition('/', '\\') + 1).SafeFilename()).ToList();


        if (paths.Any(x => System.IO.Path.IsPathRooted(x)))

        {

            throw new Exception("不可併入完整路徑 ..");

        }


        paths.Insert(0, value.SafeFilename());


        return System.IO.Path.Combine(paths.ToArray());

    }


    public static string ToOneString<T>(this IEnumerable<T> list, string separator = ",")

    {

        var strList = list.Select(x => x.ToString());

        return string.Join(separator, strList);

    }


    public static int FindLastContinuousCharPosition(this string input, params char[] targets)

    {

        int lastPosition = -1;


        for (int i = 0; i < input.Length; i++)

        {

            if (targets.Contains(input[i]))

            {

                lastPosition = i;

            }

            else

            {

                break;

            }

        }


        return lastPosition;

    }


    public static string SafeFilename(this string value)

    {

        return GetValidFilename(value);

    }


    public static string GetValidFilename(string value)

    {

        string ValidFilenameCharacters = @"0123456789abcdefghijklmnopqrstuvwxyzABCDEFGHIJKLMNOPQRSTUVWXYZ\-_$.@:/# ";

        if (value.Contains(".."))

        {

            throw new Exception("路徑中不可包含 .. ");

        }


        string newUrl = "";

        for (int i = 0; i < value.Length; i++)

        {

            var c = value.Substring(i, 1);

            int k = ValidFilenameCharacters.IndexOf(c);

            if (k < 0)

            {

                throw new Exception($"檔名 '{value}' 中有非法的字元 '" + c + "'。");

            }

            newUrl += ValidFilenameCharacters.Substring(k, 1);

        }


        return newUrl;

    }

}
梨子, 2023/8/28 上午 09:43:49
Console主控台的輸出,只要是非英文,都會是亂碼呈現

情況:

解決方法:
輸入:[Console]::OutputEncoding = [System.Text.Encoding]::UTF8


參考:
一次解決CONSOLE主控台輸出中文亂碼的編碼問題
【茶包射手日記】PowerShell 串接 EXE 輸出中文變亂碼
情況:
解決方法:
輸入:[Console]::OutputEncoding = [System.Text.Encoding]::UTF8
參考:
一次解決CONSOLE主控台輸出中文亂碼的編碼問題
【茶包射手日記】PowerShell 串接 EXE 輸出中文變亂碼
Reiko, 2023/2/13 下午 04:25:51
關於Scaffold的參數,官網雖然有文件但不是很好找,因此在此紀錄一下。
(於PM Console輸入'dotnet ef dbcontext scaffold -h'也可以查看)
-d | --data-annotations : 使用屬性定義模型
-c | --context <NAME> : 產生的DbContext名稱
--context-dir <PATH> : 產生的DbContext位置
-f | --force : 覆寫現有檔案
-o | --output-dir <PATH> : 產生的Entity Model位置
--schema <SCHEMA_NAME1>, <SCHEMA_NAME2>... : 指定Schemas產生Entity
-t | --table <TABLE_NAME1>, <TABLE_NAME2>... : 指定Table產生Entity
--use-database-names : 強制使用DB中Table與Column Name
--json : 輸出Json格式資料表於PM Console
-n | --namespace <NAMESPACE> : 指定命名空間,預設會依照專案與資料夾命名
--context-namespace <NAMESPACE> : 指定DbContext命名空間,預設會依照專案與資料夾命名
--no-onconfiguring : 不產生DbContext中的OnConfiguring
--no-pluralize : 關閉自動複數判別
-p | --project <PROJECT> : 指定專案
-s | --startup-project <PROJECT> : 指定指令執行時起始專案
--framework <FRAMEWORK> : 指定框架版本
--configuration <CONFIGURATION> : 指定配置
--no-build : 跳過專案建置
梨子, 2022/12/15 下午 12:12:11
最近發生 email 有人輸入中文可以過的狀況。測試後才發現 \w 在 C# 可以輸入中文驗證過
把 \w 換成 A-Za-z0-9_ 就可以驗證過
可是搬到 js 處理,就可以過
我想這是 C# 把 \w 當作 [word] 處理的關係,非符號都當作是文字
其他程式語言沒有測試過。不知是不是 c# 獨有的狀況
        string strPattern = @"^[\w\.-]{1,}@[a-zA-Z0-9][\w\.-]*\.[a-zA-Z][a-zA-Z\.]*[a-zA-Z]$";

        System.Text.RegularExpressions.Regex regEx = new System.Text.RegularExpressions.Regex(strPattern);

        string email = "darrenTEST@gmail.com";

        Response.Write(email + " - > " + regEx.IsMatch(email) + "<br/>");

        email = "darren_東@gmail.com";

        Response.Write(email + " - > " + regEx.IsMatch(email) + "<br/>");


// darrenTEST@gmail.com - > True

// darren_東@gmail.com - > True
把 \w 換成 A-Za-z0-9_ 就可以驗證過
string strPattern = @"^[a-zA-Z0-9_\.-]{1,}@[a-zA-Z0-9][\w\.-]*\.[a-zA-Z][a-zA-Z\.]*[a-zA-Z]$";

        System.Text.RegularExpressions.Regex regEx = new System.Text.RegularExpressions.Regex(strPattern);

        string email = "darrenTEST@gmail.com";

        Response.Write(email + " - > " + regEx.IsMatch(email) + "<br/>");

        email = "darren_東@gmail.com";

        Response.Write(email + " - > " + regEx.IsMatch(email) + "<br/>");


// darrenTEST@gmail.com - > True

// darren_東@gmail.com - > False
可是搬到 js 處理,就可以過
        const regex = /^[\w\.-]{1,}@[a-zA-Z0-9][\w\.-]*\.[a-zA-Z][a-zA-Z\.]*[a-zA-Z]$/;

        console.log(regex.test('darrenTEST@gmail.com')); // true

        console.log(regex.test('darren_東@gmail.com')); // false
我想這是 C# 把 \w 當作 [word] 處理的關係,非符號都當作是文字
其他程式語言沒有測試過。不知是不是 c# 獨有的狀況
darren, 2022/4/27 上午 09:29:25
上一集當中我們完成了Lucene基本操作中的Create與Read,這一集會將CRUD中的Update與Delete的操作方法告訴你,並且本集會著重於講解關於"Norms"與權重(Boost)在Lucene中的運作概念。
首先我們建立一個.Net 6的主控台應用程式

建立好後於右側專案右鍵選擇"管理Nuget套件",並選擇"瀏覽">於搜索列中搜尋"Lucene">安裝3.0.3最新穩定版 與 "System.Configuration.ConfigurationManager"

安裝好後就可以於專案內使用Lucene套件囉!
再來依照上一篇的教學建立一套簡單的Lucene查詢
好囉! 接下來我們要如何更新索引呢?
更新其實就是將存在的索引刪除並重新建立Document,不存在的則直接新增。
首先準備一組資料準備更新
*欲更新的Document必須與創建所引時使用的Document欄位相同*
來測試看看

可以看見 Name = 橘子 的索引已經改為我們新準備的資料囉。
再來是刪除!
與更新非常相似,只需要使用deleteDocument()就可以了。
再來看看輸出結果
可以發現 Score :0.7554128, Id :2, Name :橘子, Description :醫生給娜美最珍貴的寶藏。這筆索引已經被移除囉!

可以發現筆者於更新或刪除時都是輸入單一字來做異動,除了表達可以對索引做複合更動外,
是因為更新與刪除索引同樣會使用到分詞器(analyzer),
*所輸入的索引值非ID等數值時必須要配合分詞器的分詞能力*才能取得所想異動的索引喔!
Boost是什麼呢?
Boost 分為 :
1. Index Time Boost : 在建立索引時就計算好的值。例如上一篇中提到的(NORMS)
2. Query Time Boost : 查詢時賦與搜尋條件不同的值以影響結果。
我們先來測試Index Time Boost的部分
並記得重新CreateIndex才能刷新欄位的權重值喔。

很明顯的搜尋出來的Score分數變動了! 但是有沒有發現明明Name欄位的Boost改成了1.5,蘋果的數值卻仍然只有一半呢?
這是因為我們的Search中所參照的欄位為Description,所以在計算Score的時候其實是完全沒有參與的喔!
另外要記得,使用Index Time Boost的時候,欲給予銓重分配的欄位Field.Index不能使用NO_NORMS,不然這個欄位並不會紀錄權重的資料。
再來我們試試看Query Time Boost
這次我們搜尋兩個欄位"Name"與"Description",並使用 BooleanQuery來將其組合。
BooleanQuery中的 Occur有三種參數 : "MUST","MUST_NOT","SHOULD",功能與字面上的意思一樣為"必須要有","必須沒有"與"有無都包含"。

查詢出來的分數就不一樣囉!
以上就是這一次的分享,Lucene是一款容易入門但是要實際上戰場卻又十分複雜的功能,想要達成真正高效能的全文檢索,在前期的文件規畫配置與資料的權重配比都是一個巨大的挑戰。未來會繼續分享關於Lucene的其他有趣功能,還請繼續期待呦!
另外也可以到GitHub下載我的範例來參考呦!
GitHub: https://github.com/g13579112000/Lucene
參考文件:
1. 黑暗大大的全文檢索筆記 : https://blog.darkthread.net/blog/lucene-net-notes-1/
2. Makble : http://makble.com/lucene-field-boost-example
3. CSDN Jack2013tong 文章 : https://blog.csdn.net/huwei2003/article/details/53408388
首先我們建立一個.Net 6的主控台應用程式
建立好後於右側專案右鍵選擇"管理Nuget套件",並選擇"瀏覽">於搜索列中搜尋"Lucene">安裝3.0.3最新穩定版 與 "System.Configuration.ConfigurationManager"
安裝好後就可以於專案內使用Lucene套件囉!
再來依照上一篇的教學建立一套簡單的Lucene查詢
using Lucene.Net.Analysis.Standard;

using Lucene.Net.Documents;

using Lucene.Net.Index;

using Lucene.Net.QueryParsers;

using Lucene.Net.Search;

using Lucene.Net.Store;


var _dir = new DirectoryInfo("LuceneDocument");

if (!File.Exists(_dir.FullName))

{

    System.IO.Directory.CreateDirectory(_dir.FullName);

}

var analyzer = new StandardAnalyzer(Lucene.Net.Util.Version.LUCENE_CURRENT);

CreateIndex(GetProductsInformation(), _dir, analyzer);


while (true)

{

    Console.Write("請輸入欲查詢字串 :");

    var searchValue = Console.ReadLine();

    Search(searchValue, _dir, analyzer);

}


void CreateIndex(List<Product> information, DirectoryInfo dir, StandardAnalyzer analyzer)

{

    using (var directory = FSDirectory.Open(dir))

    {

        using (var indexWriter = new IndexWriter(directory, analyzer, true, IndexWriter.MaxFieldLength.LIMITED))

        {

            foreach (var index in information)

            {

                var document = new Document();

                document.Add(new Field("Id", index.Id.ToString(), Field.Store.YES, Field.Index.NO));

                document.Add(new Field("Name", index.Name, Field.Store.YES, Field.Index.ANALYZED));

                document.Add(new Field("Description", index.Description, Field.Store.YES, Field.Index.ANALYZED));

                indexWriter.AddDocument(document);

            }

            indexWriter.Optimize();

            indexWriter.Commit();

        }

    }

}

void Search(string searchValue, DirectoryInfo dir, StandardAnalyzer analyzer)

{

    using (var directory = FSDirectory.Open(_dir))

    {

        var parser = new QueryParser(Lucene.Net.Util.Version.LUCENE_CURRENT, "Description", analyzer).Parse(searchValue);

        using (var indexSearcher = new IndexSearcher(directory))

        {

            var queryLimit = 20;

            var hits = indexSearcher.Search(parser, queryLimit);

            if (!hits.ScoreDocs.Any())

            {

                Console.WriteLine("查無相關結果。");

                return;

            }

            Document doc;

            foreach (var hit in hits.ScoreDocs)

            {

                doc = indexSearcher.Doc(hit.Doc);

                Console.WriteLine("Score :" + hit.Score + ", Id :" + doc.Get("Id") + ", Name :" + doc.Get("Name") + ", Description :" + doc.Get("Description"));

            }

        }

    }

}


List<Product> GetProductsInformation()

{

    return new List<Product> {

            new Product{ Id = 1, Name = "蘋果", Description = "一天一蘋果,醫生遠離我。"},

            new Product{ Id = 2, Name = "橘子", Description = "醫生給娜美最珍貴的寶藏。"},

            new Product{ Id = 3, Name = "梨子", Description = "我是梨子,比蘋果好吃多囉!"},

            new Product{ Id = 4, Name = "葡萄", Description = "吃葡萄不吐葡萄皮,不吃葡萄倒吐葡萄皮"},

            new Product{ Id = 5, Name = "榴槤", Description = "水果界的珍寶!好吃一直吃。"}

        };

}

class Product

{

    public long Id { get; set; }

    public string Name { get; set; } = null!;

    public string Description { get; set; } = null!;

}
好囉! 接下來我們要如何更新索引呢?
更新其實就是將存在的索引刪除並重新建立Document,不存在的則直接新增。
首先準備一組資料準備更新
List<Product> GetUpdateProductsInformation()

{

    return new List<Product>

    {

        new Product{ Id = 6, Name = "香蕉", Description = "運動完後吃根香蕉補充養分。"},

        new Product{ Id = 2, Name = "橘子", Description = "橘子跟柳丁你分得出來嗎?"}

    };

}
*欲更新的Document必須與創建所引時使用的Document欄位相同*
void Update(string key, List<Product> information, DirectoryInfo dir, StandardAnalyzer analyzer)

{

    using( var directory = FSDirectory.Open(dir))

    {

        using(var indexWriter = new IndexWriter(directory, analyzer, false, IndexWriter.MaxFieldLength.LIMITED))

        {

            foreach (var index in information)

            {

                var document = new Document();

                document.Add(new Field("Id", index.Id.ToString(), Field.Store.YES, Field.Index.NO));

                document.Add(new Field("Name", index.Name, Field.Store.YES, Field.Index.ANALYZED));

                document.Add(new Field("Description", index.Description, Field.Store.YES, Field.Index.ANALYZED));

                indexWriter.UpdateDocument(new Term("Name", key) ,document);

            }

        }

    }

}
來測試看看
可以看見 Name = 橘子 的索引已經改為我們新準備的資料囉。
再來是刪除!
與更新非常相似,只需要使用deleteDocument()就可以了。
void Delete(string key, DirectoryInfo dir, StandardAnalyzer analyzer)

{

    using (var directory = FSDirectory.Open(dir))

    {

        using (var indexWriter = new IndexWriter(directory, analyzer, false, IndexWriter.MaxFieldLength.LIMITED))

        {

            indexWriter.DeleteDocuments(new Term("Name", key));

            indexWriter.Optimize();

            indexWriter.Commit();

        }

    }

}
再來看看輸出結果
可以發現 Score :0.7554128, Id :2, Name :橘子, Description :醫生給娜美最珍貴的寶藏。這筆索引已經被移除囉!
可以發現筆者於更新或刪除時都是輸入單一字來做異動,除了表達可以對索引做複合更動外,
是因為更新與刪除索引同樣會使用到分詞器(analyzer),
*所輸入的索引值非ID等數值時必須要配合分詞器的分詞能力*才能取得所想異動的索引喔!
Boost是什麼呢?
Boost 分為 :
1. Index Time Boost : 在建立索引時就計算好的值。例如上一篇中提到的(NORMS)
2. Query Time Boost : 查詢時賦與搜尋條件不同的值以影響結果。
我們先來測試Index Time Boost的部分
void CreateIndexWithBoost(List<Product> information, DirectoryInfo dir, StandardAnalyzer analyzer)

{

    using (var directory = FSDirectory.Open(dir))

    {

        using (var indexWriter = new IndexWriter(directory, analyzer, true, IndexWriter.MaxFieldLength.LIMITED))

        {

            foreach (var index in information)

            {

                var document = new Document();

                document.Add(new Field("Id", index.Id.ToString(), Field.Store.YES, Field.Index.NO));

                document.Add(new Field("Name", index.Name, Field.Store.YES, Field.Index.ANALYZED));

                document.Add(new Field("Description", index.Description, Field.Store.YES, Field.Index.ANALYZED));

                document.GetField("Name").Boost = 1.5F;

                document.GetField("Description").Boost = 0.5F;


                indexWriter.AddDocument(document);

            }

            indexWriter.Optimize();

            indexWriter.Commit();

        }

    }

}
並記得重新CreateIndex才能刷新欄位的權重值喔。
很明顯的搜尋出來的Score分數變動了! 但是有沒有發現明明Name欄位的Boost改成了1.5,蘋果的數值卻仍然只有一半呢?
這是因為我們的Search中所參照的欄位為Description,所以在計算Score的時候其實是完全沒有參與的喔!
另外要記得,使用Index Time Boost的時候,欲給予銓重分配的欄位Field.Index不能使用NO_NORMS,不然這個欄位並不會紀錄權重的資料。
再來我們試試看Query Time Boost
void SearchWithBoost(string searchValue, DirectoryInfo dir, StandardAnalyzer analyzer)

{

    using (var directory = FSDirectory.Open(_dir))

    {

        using (var indexSearcher = new IndexSearcher(directory))

        {

            var query = new QueryParser(Lucene.Net.Util.Version.LUCENE_CURRENT, "Name", analyzer).Parse(searchValue);

            var query2 = new QueryParser(Lucene.Net.Util.Version.LUCENE_CURRENT, "Description", analyzer).Parse(searchValue);


            query.Boost = 2.0F;

            query2.Boost = 0.5F;


            BooleanQuery booleanQuery = new BooleanQuery();

            booleanQuery.Add(query, Occur.SHOULD);

            booleanQuery.Add(query2, Occur.SHOULD);


            var hits = indexSearcher.Search(booleanQuery, 20);

            if (!hits.ScoreDocs.Any())

            {

                Console.WriteLine("查無相關結果。");

                return;

            }

            Document doc;

            foreach (var hit in hits.ScoreDocs)

            {

                doc = indexSearcher.Doc(hit.Doc);

                Console.WriteLine("Score :" + hit.Score + ", Id :" + doc.Get("Id") + ", Name :" + doc.Get("Name") + ", Description :" + doc.Get("Description"));

            }

        }

    }

}
這次我們搜尋兩個欄位"Name"與"Description",並使用 BooleanQuery來將其組合。
BooleanQuery中的 Occur有三種參數 : "MUST","MUST_NOT","SHOULD",功能與字面上的意思一樣為"必須要有","必須沒有"與"有無都包含"。
查詢出來的分數就不一樣囉!
以上就是這一次的分享,Lucene是一款容易入門但是要實際上戰場卻又十分複雜的功能,想要達成真正高效能的全文檢索,在前期的文件規畫配置與資料的權重配比都是一個巨大的挑戰。未來會繼續分享關於Lucene的其他有趣功能,還請繼續期待呦!
另外也可以到GitHub下載我的範例來參考呦!
GitHub: https://github.com/g13579112000/Lucene
參考文件:
1. 黑暗大大的全文檢索筆記 : https://blog.darkthread.net/blog/lucene-net-notes-1/
2. Makble : http://makble.com/lucene-field-boost-example
3. CSDN Jack2013tong 文章 : https://blog.csdn.net/huwei2003/article/details/53408388
梨子, 2022/4/20 下午 09:34:03
這裡是我測試 Gmail API 和 Google API 憑証的一些記錄。
如果你的目的是要使用 Gmail Api 取代舊的 Gmail SMTP 來發送通知信,建議你先跳到最下方看一下結論。
如果你是想要看一下 Gmail API 和 Google API 憑証的使用方法,可以看一下這篇文章。
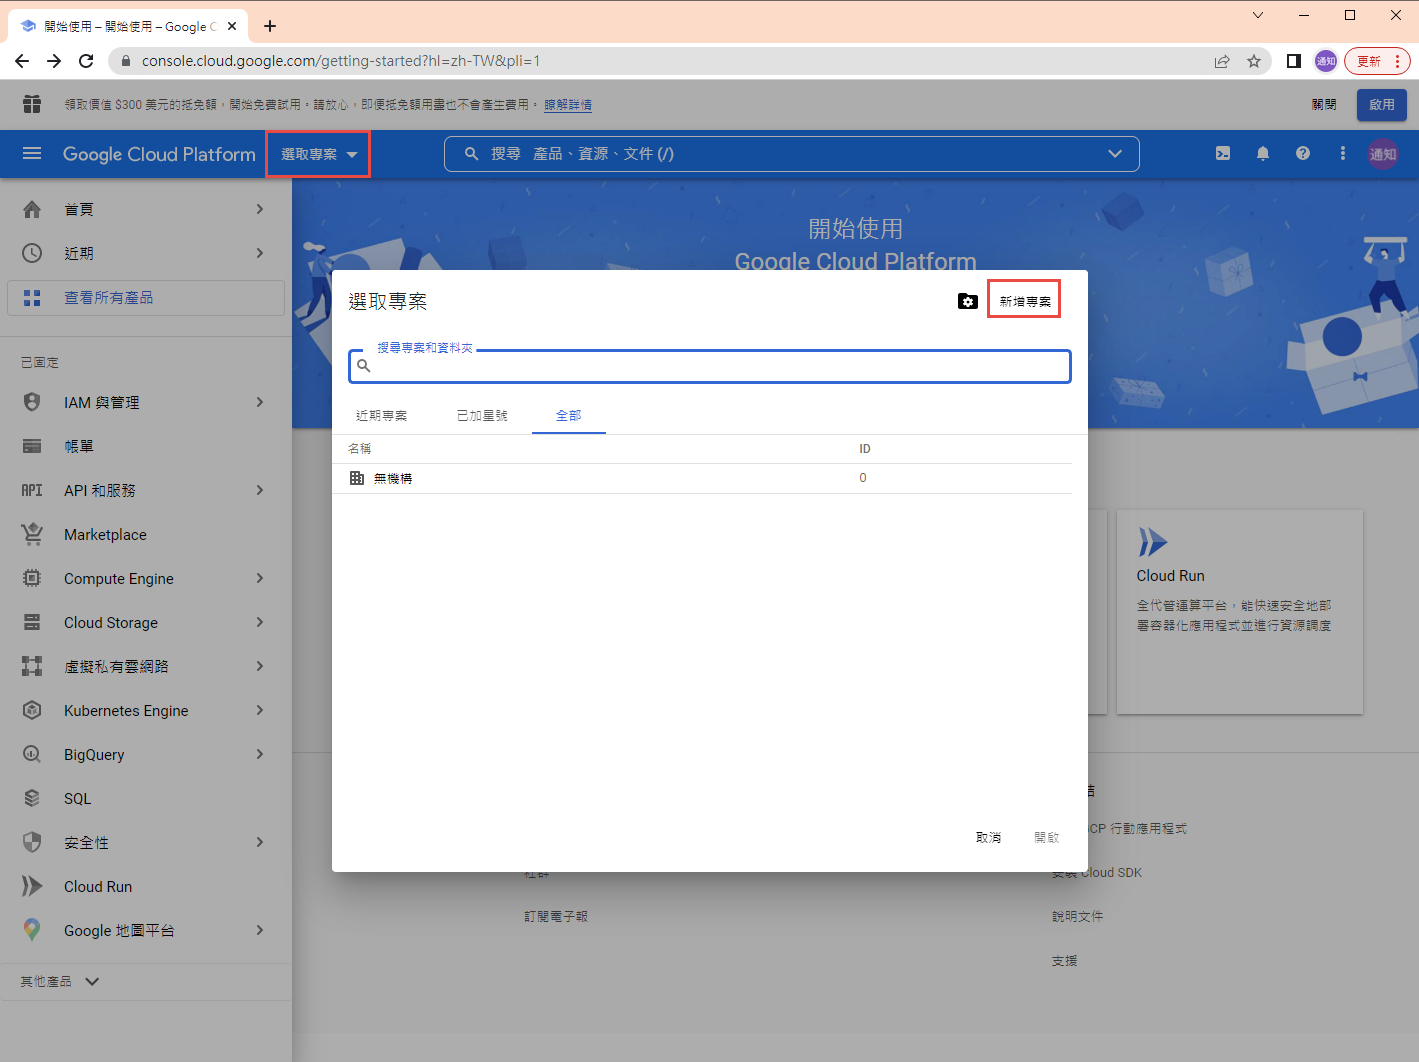
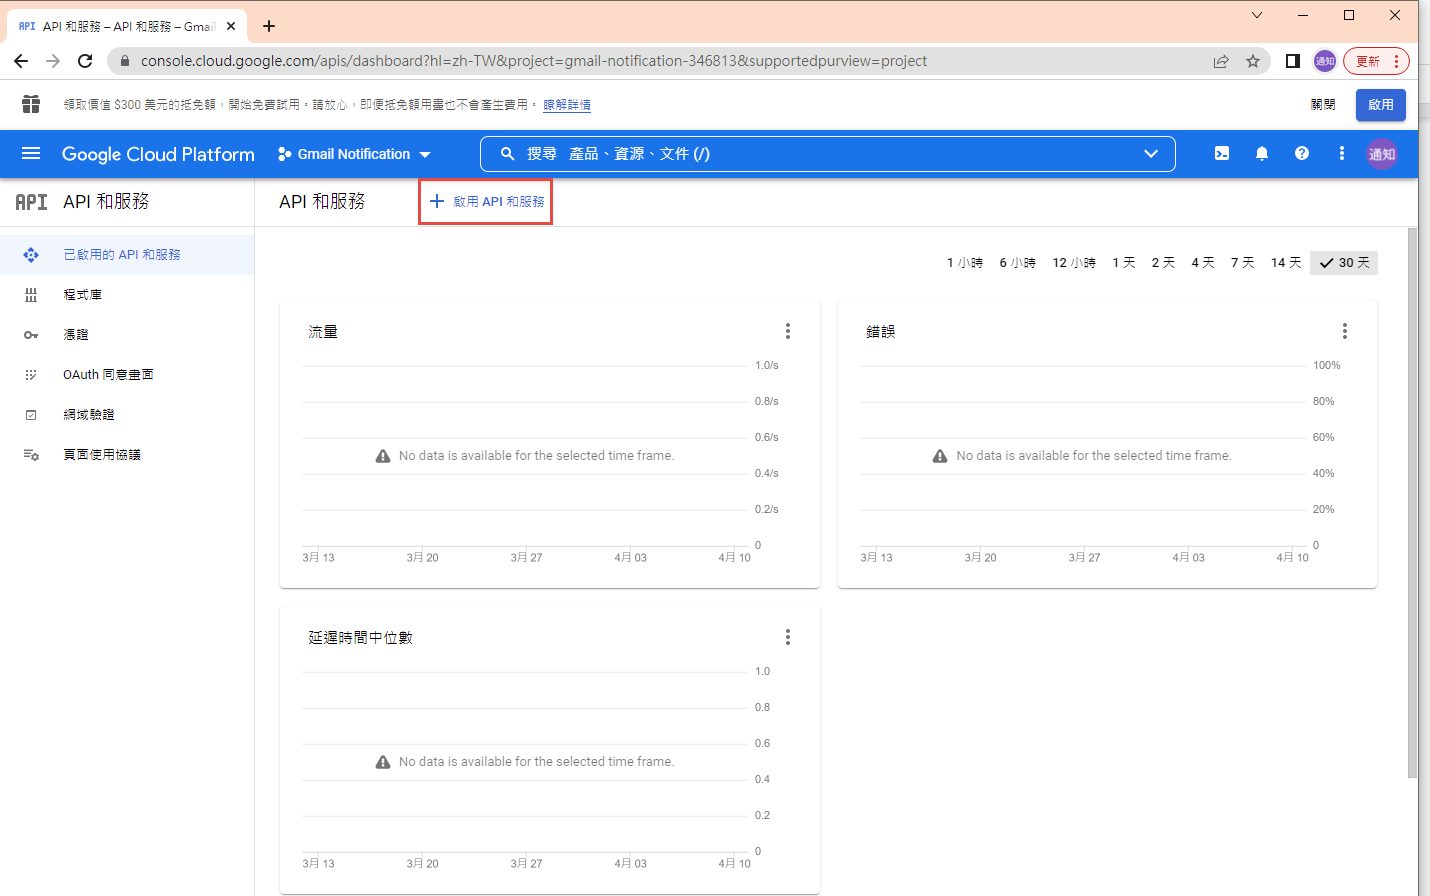
1. 在 google cloud platform 建立新的專案.
https://console.cloud.google.com/
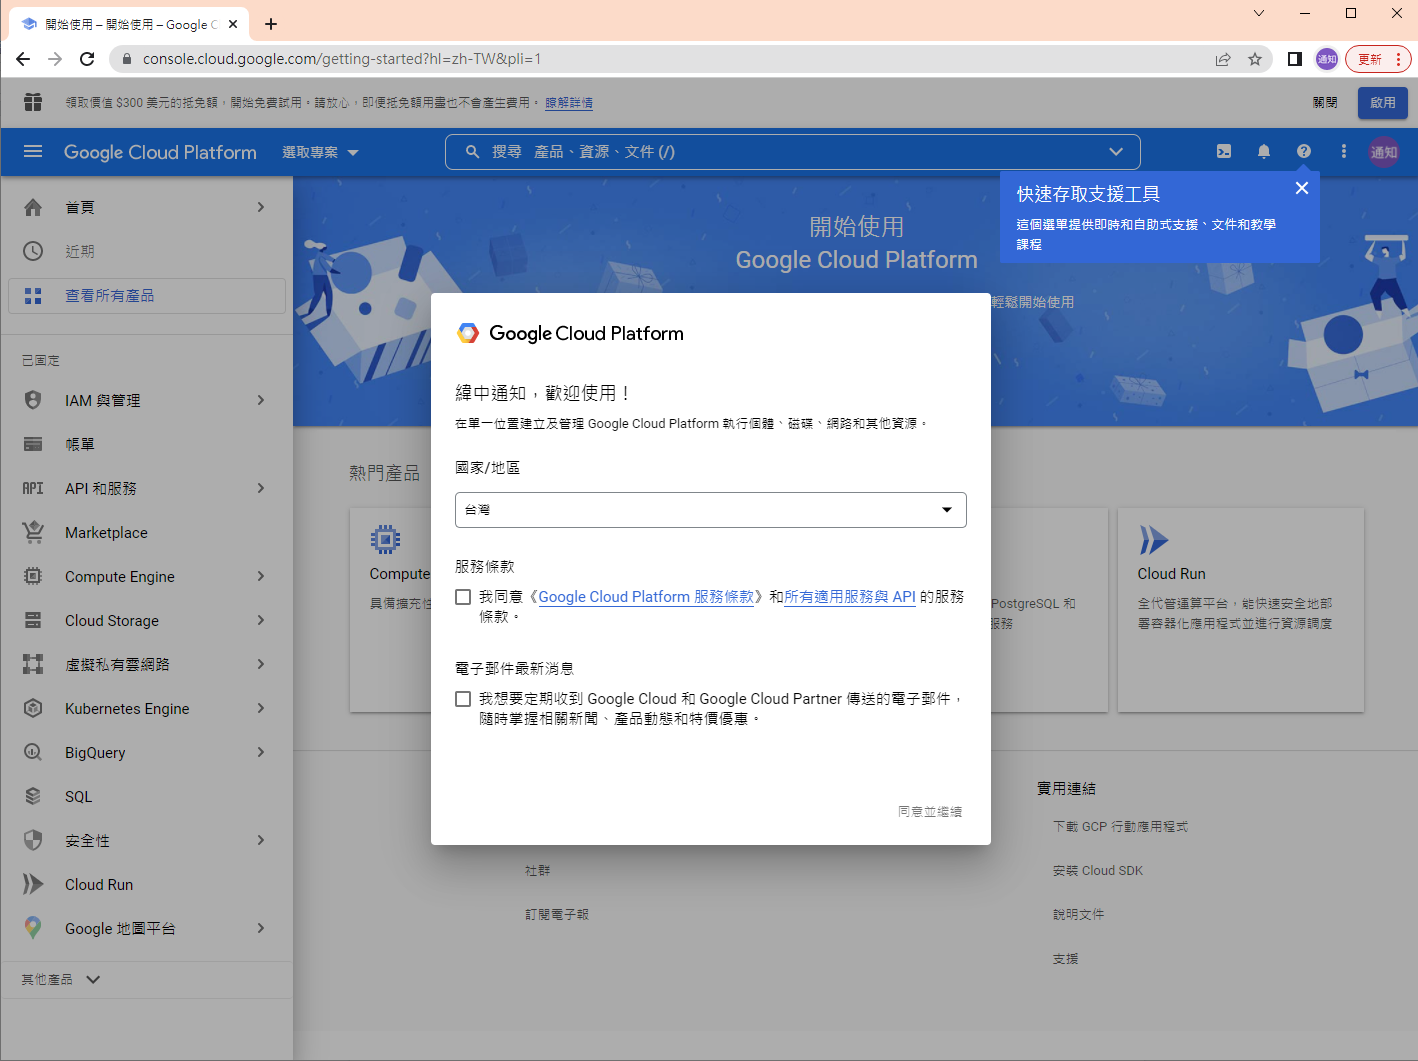

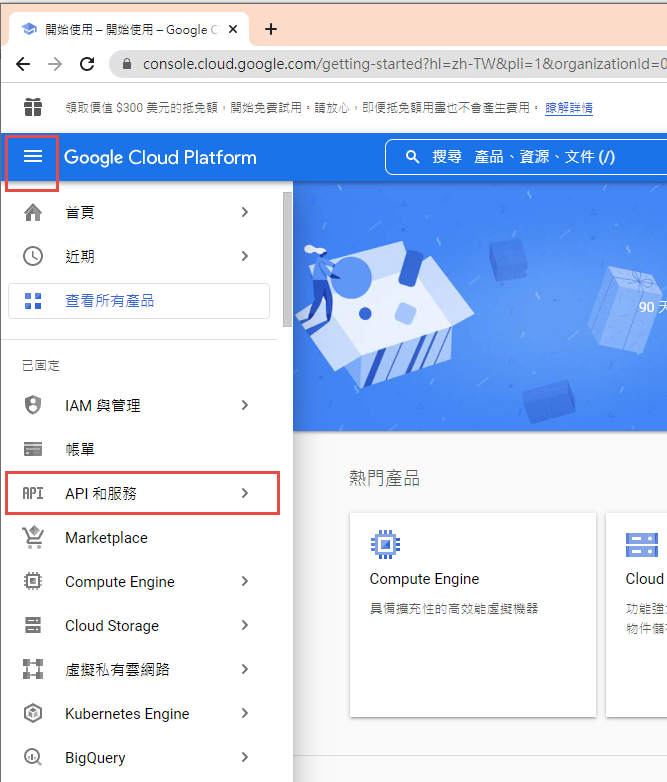
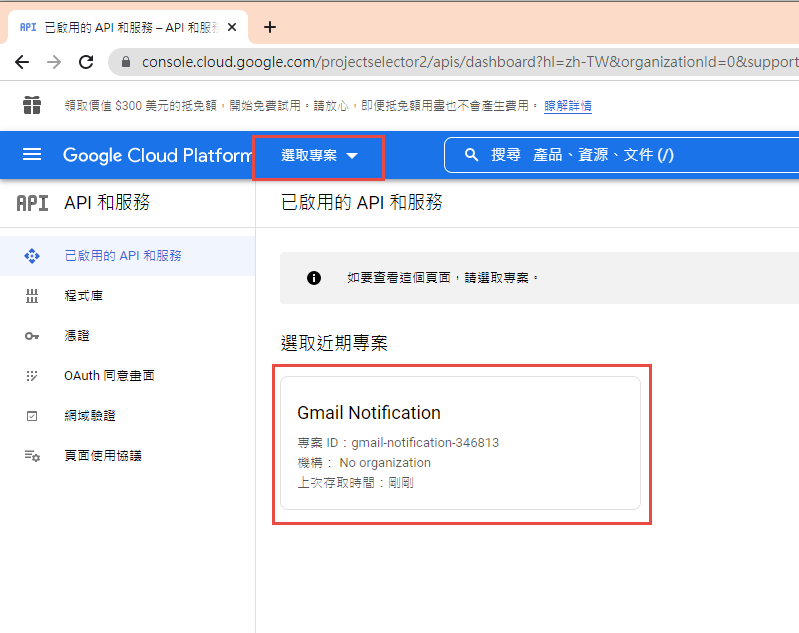
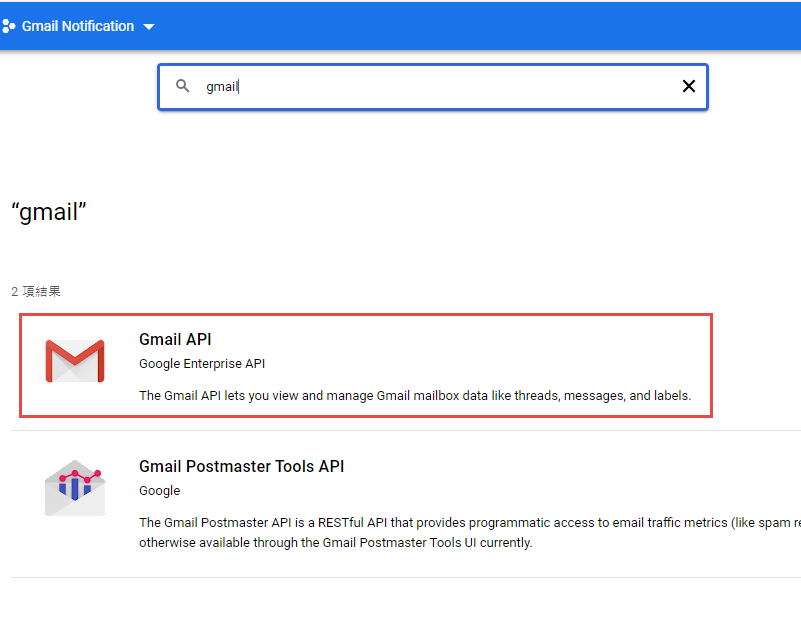
啟用 Gmail API


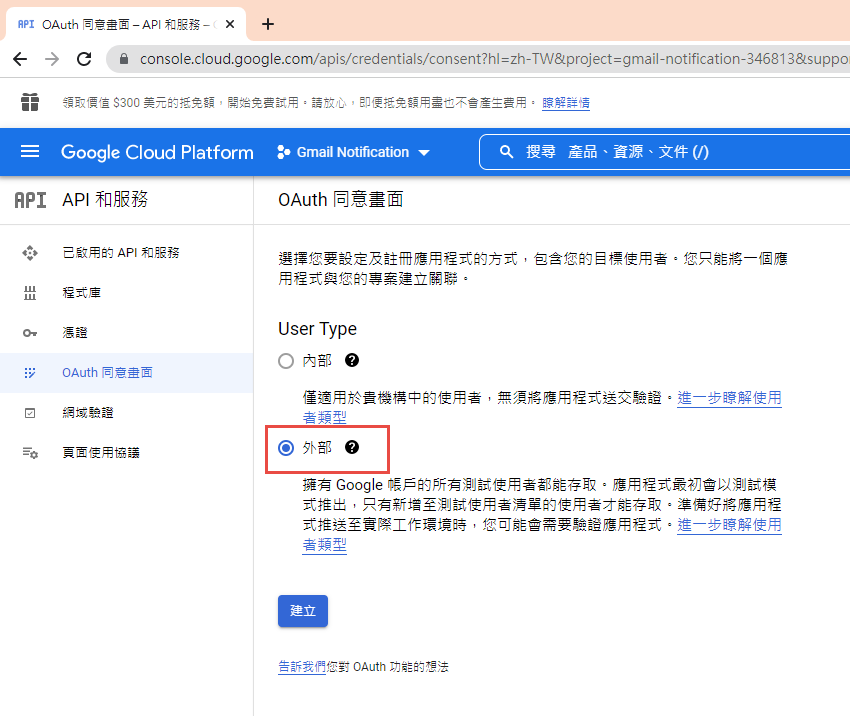
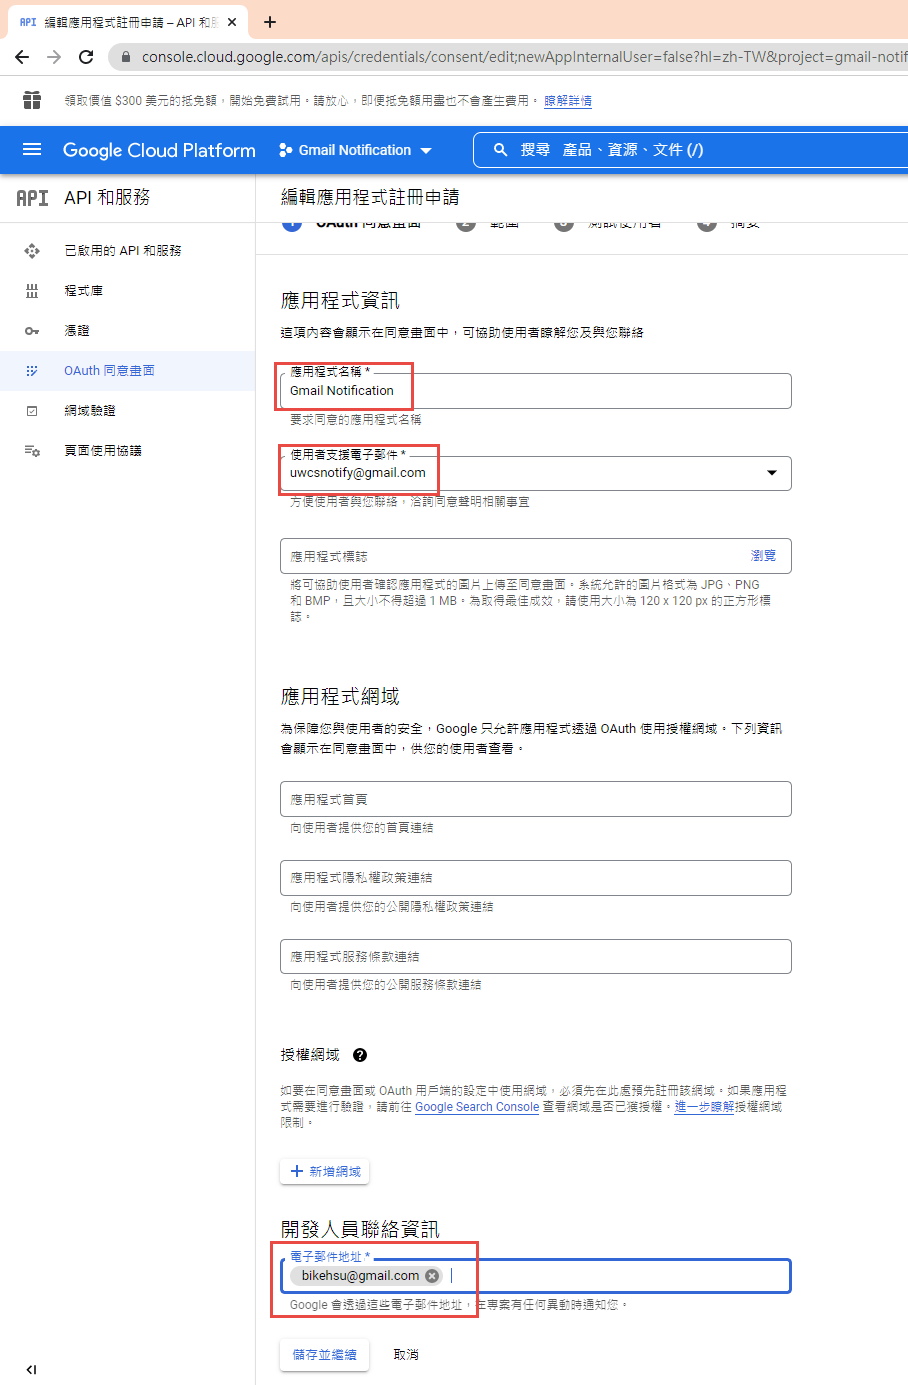
因為我們要透過 OAuth 取得使用者授權,所以要設定使用 OAuth 的同意畫面。
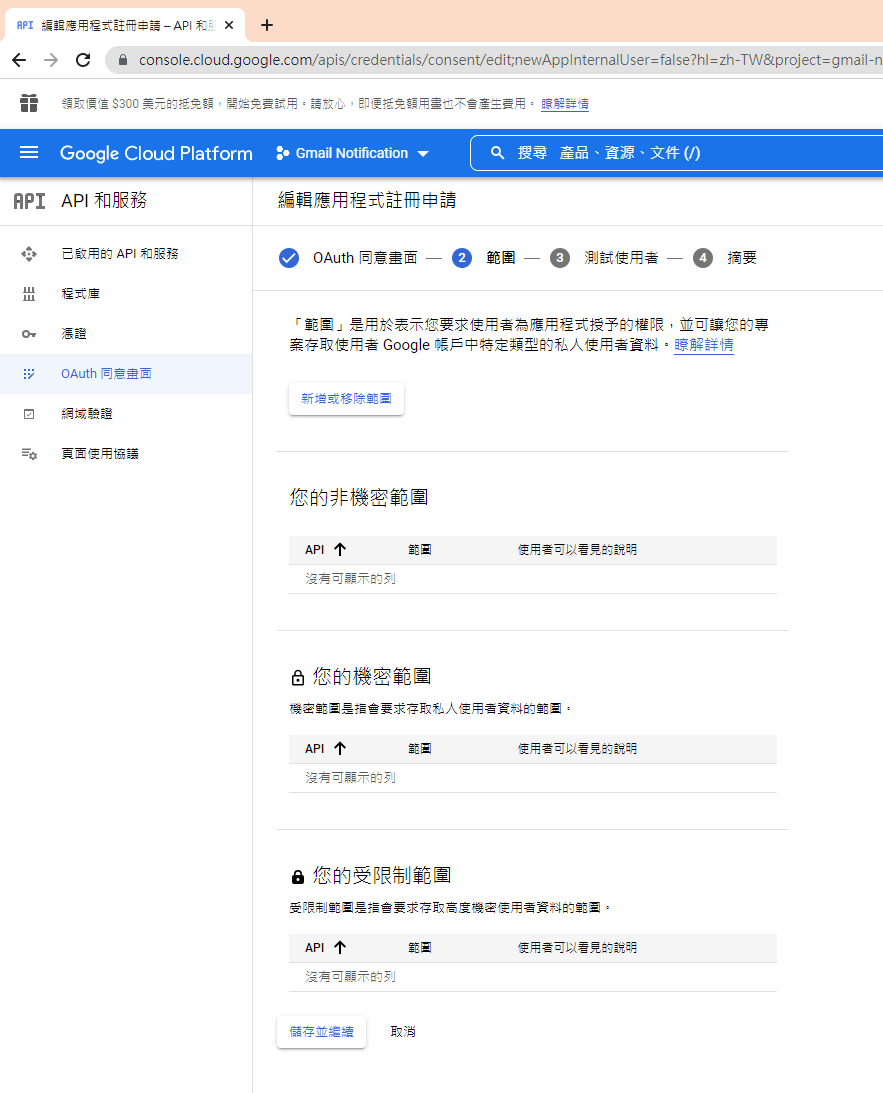
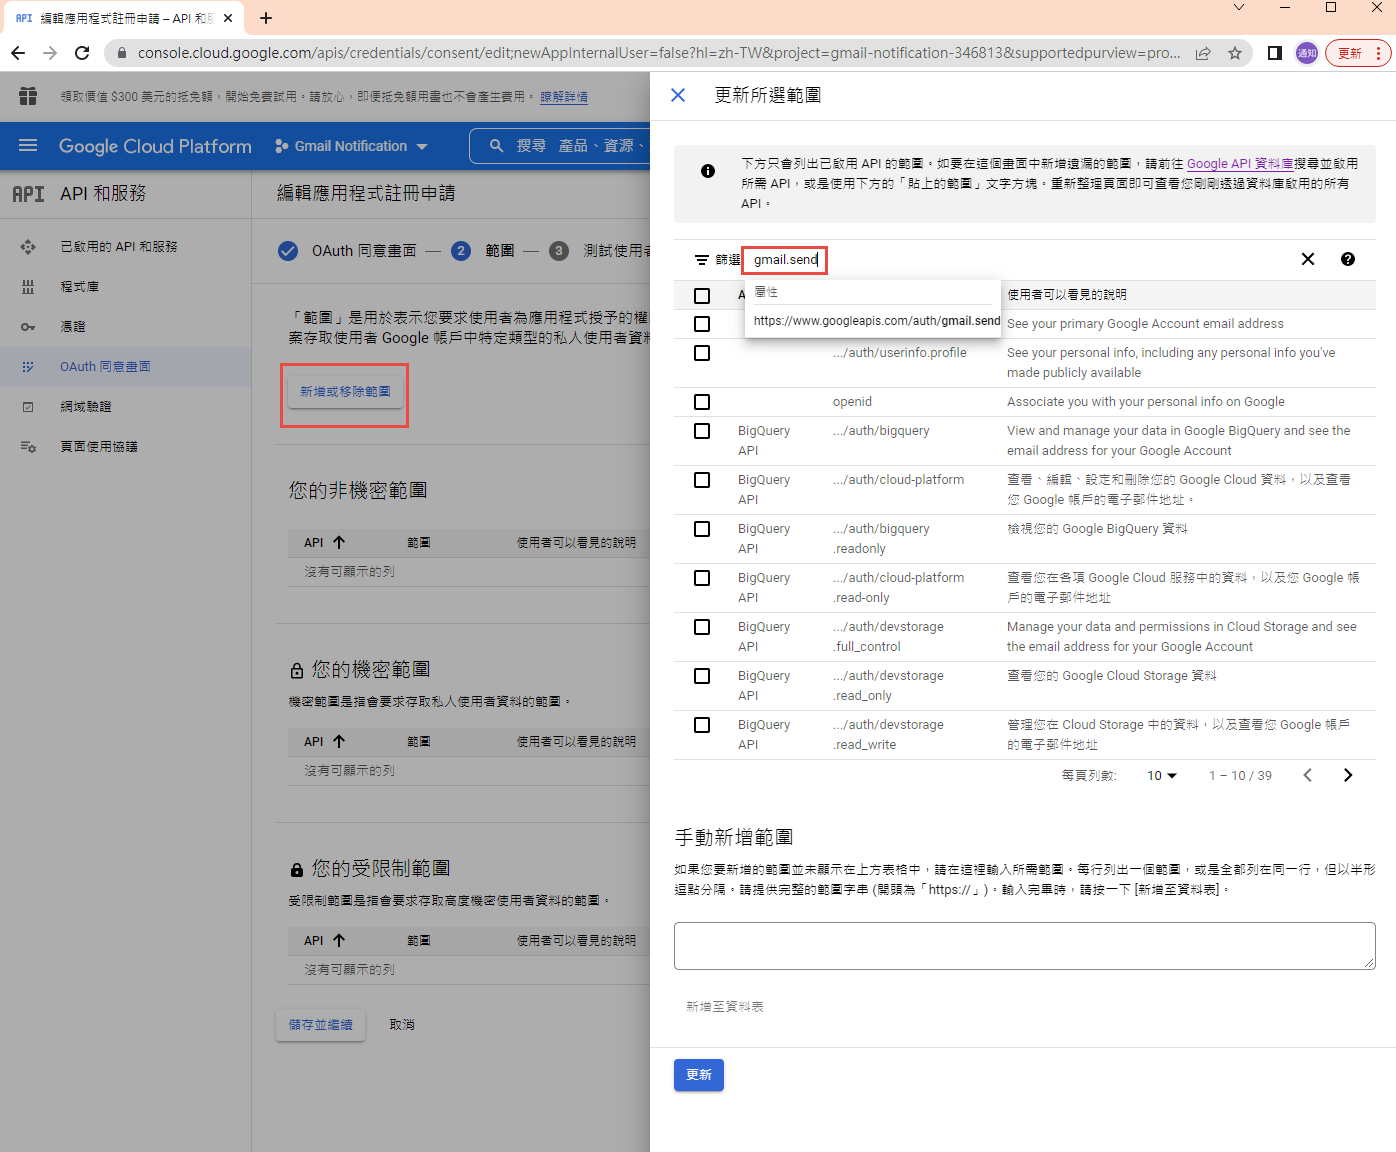
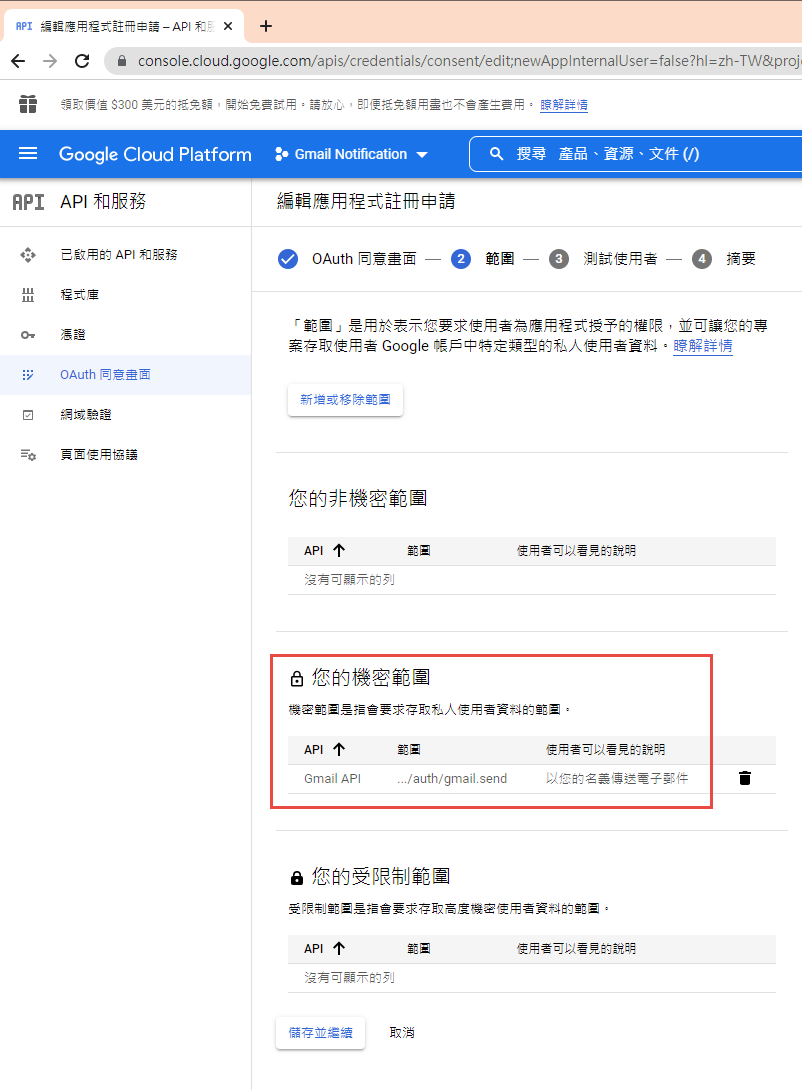
指定授權的範圍
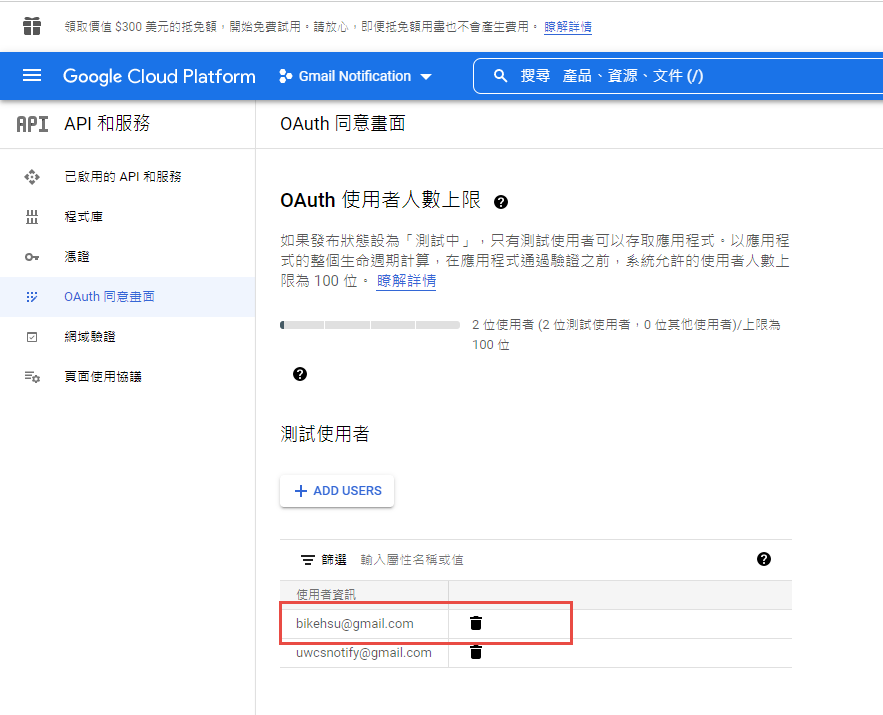
因為剛建立的專案,不會被公開,所以要指定測試使用者
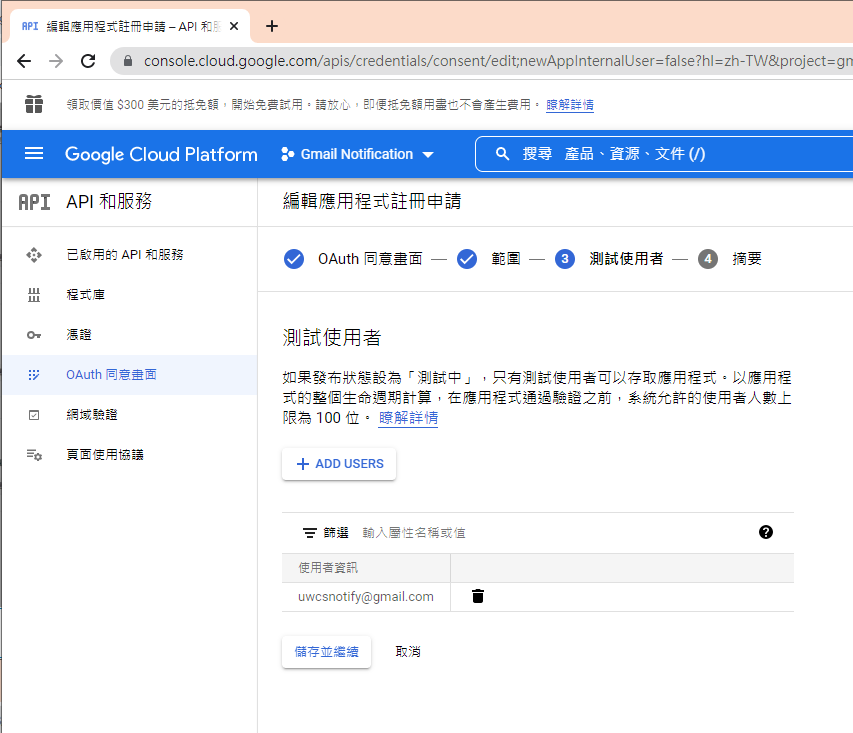
如果要給任意使用者,必需經過發布的流程,但準備工作有點麻煩,所以這次就不發布了。
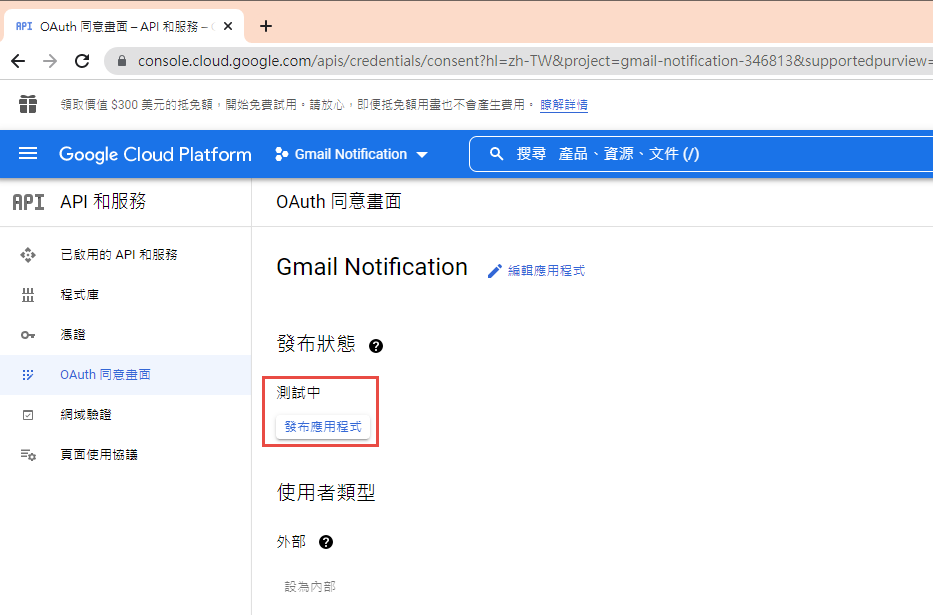
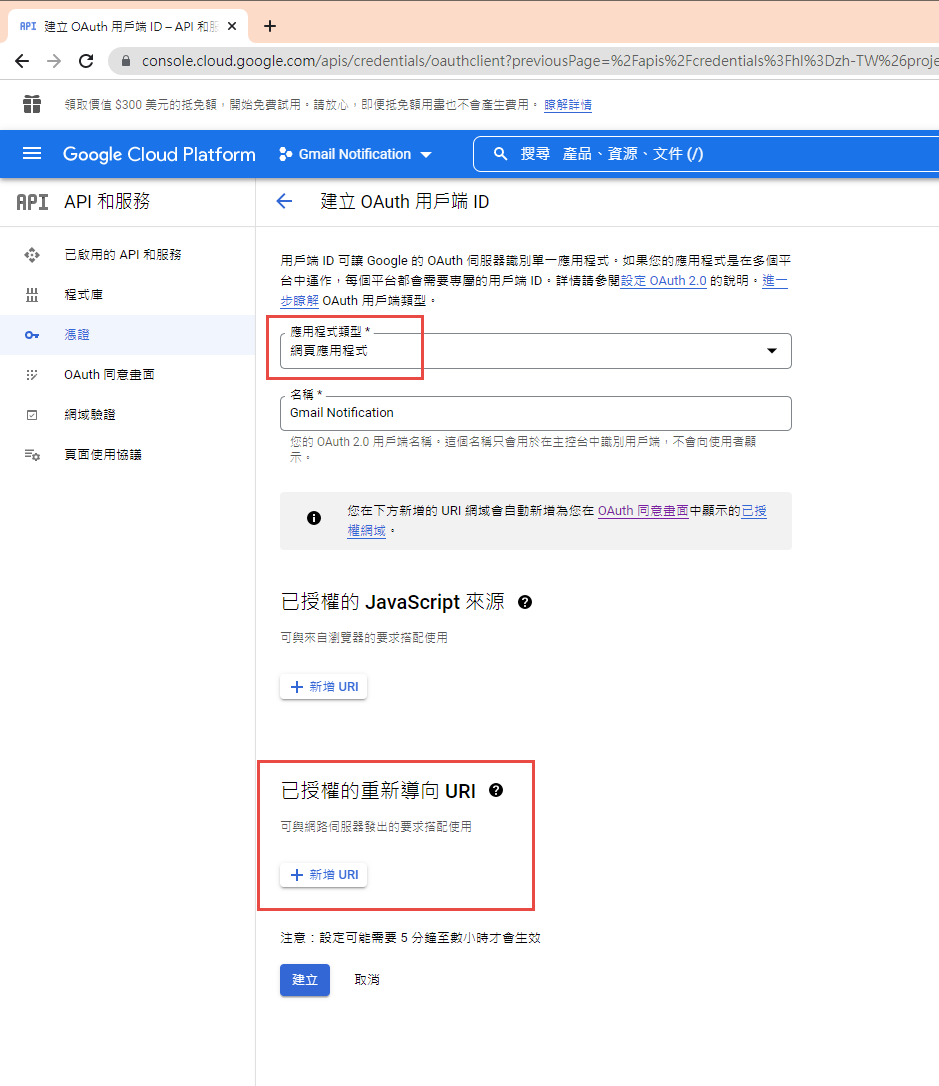
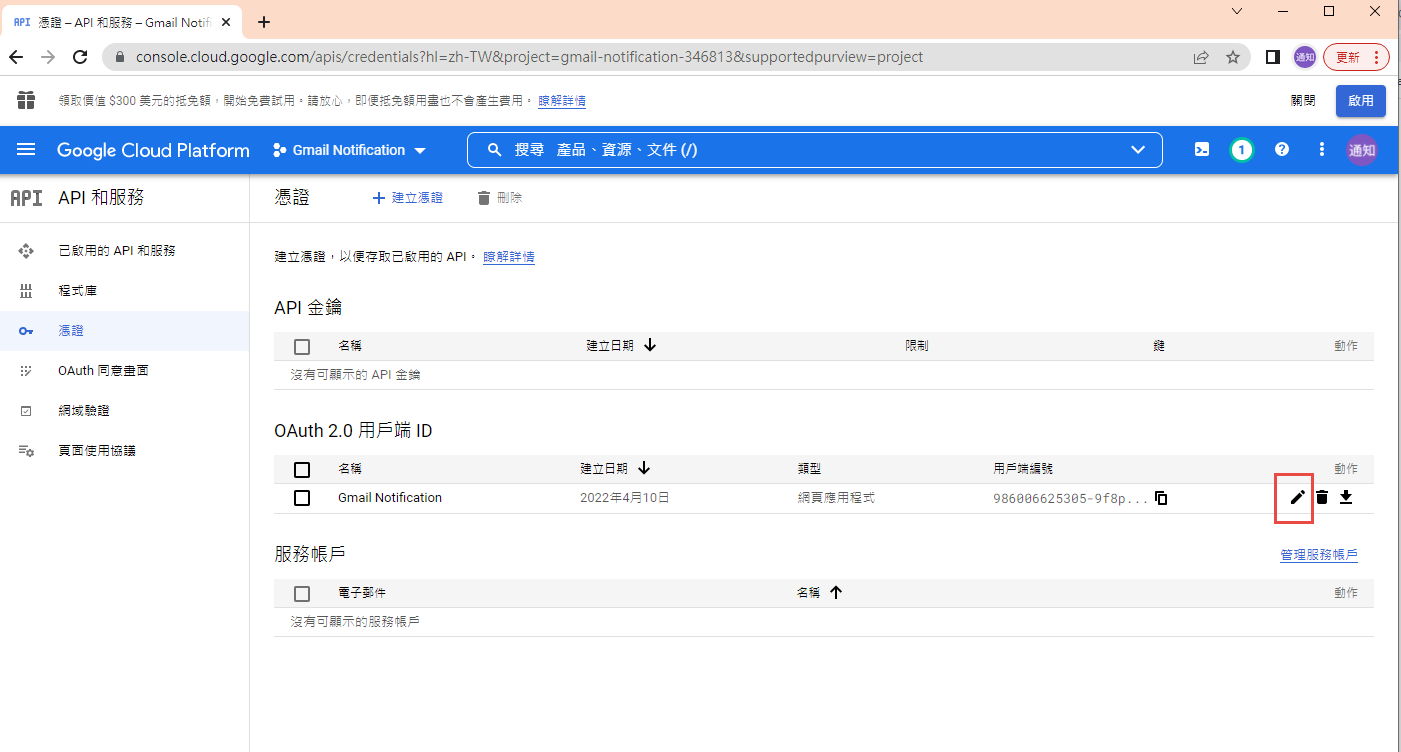
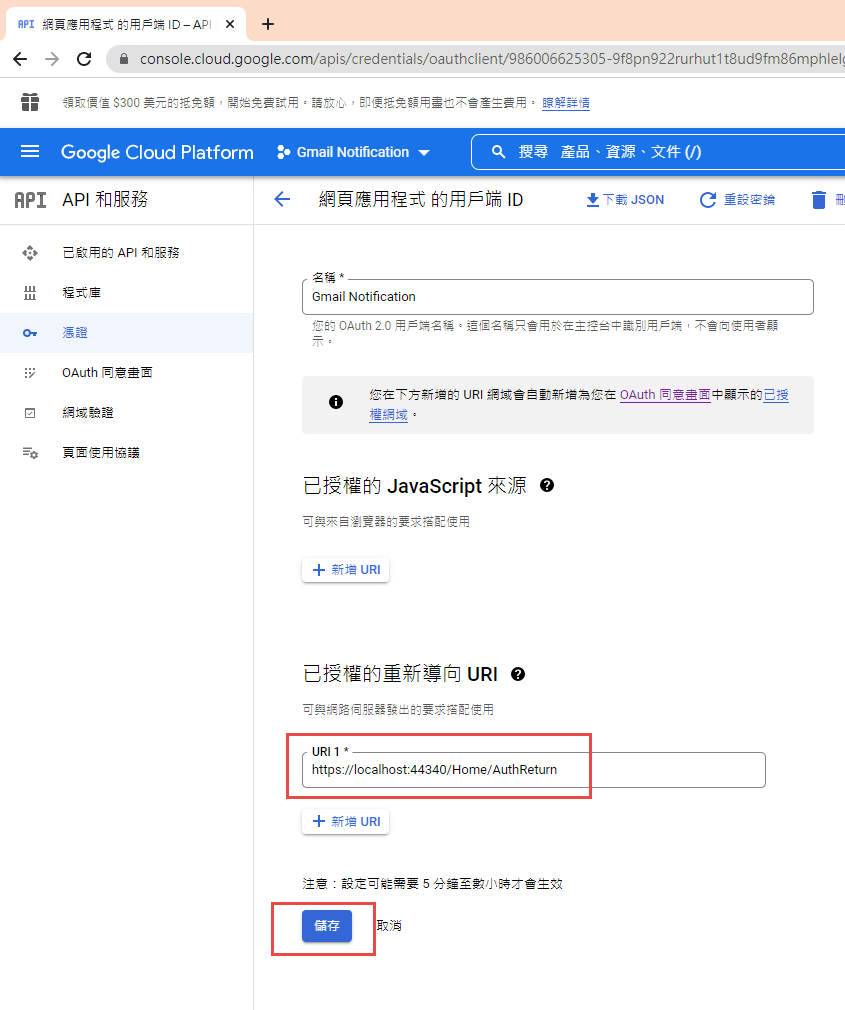
建立 OAuth 2.0 用戶端 ID 憑証

這裡除了名稱外,還有一個設定重導 Uri 的項目。現在不填寫,但稍後要回來補這個資料。
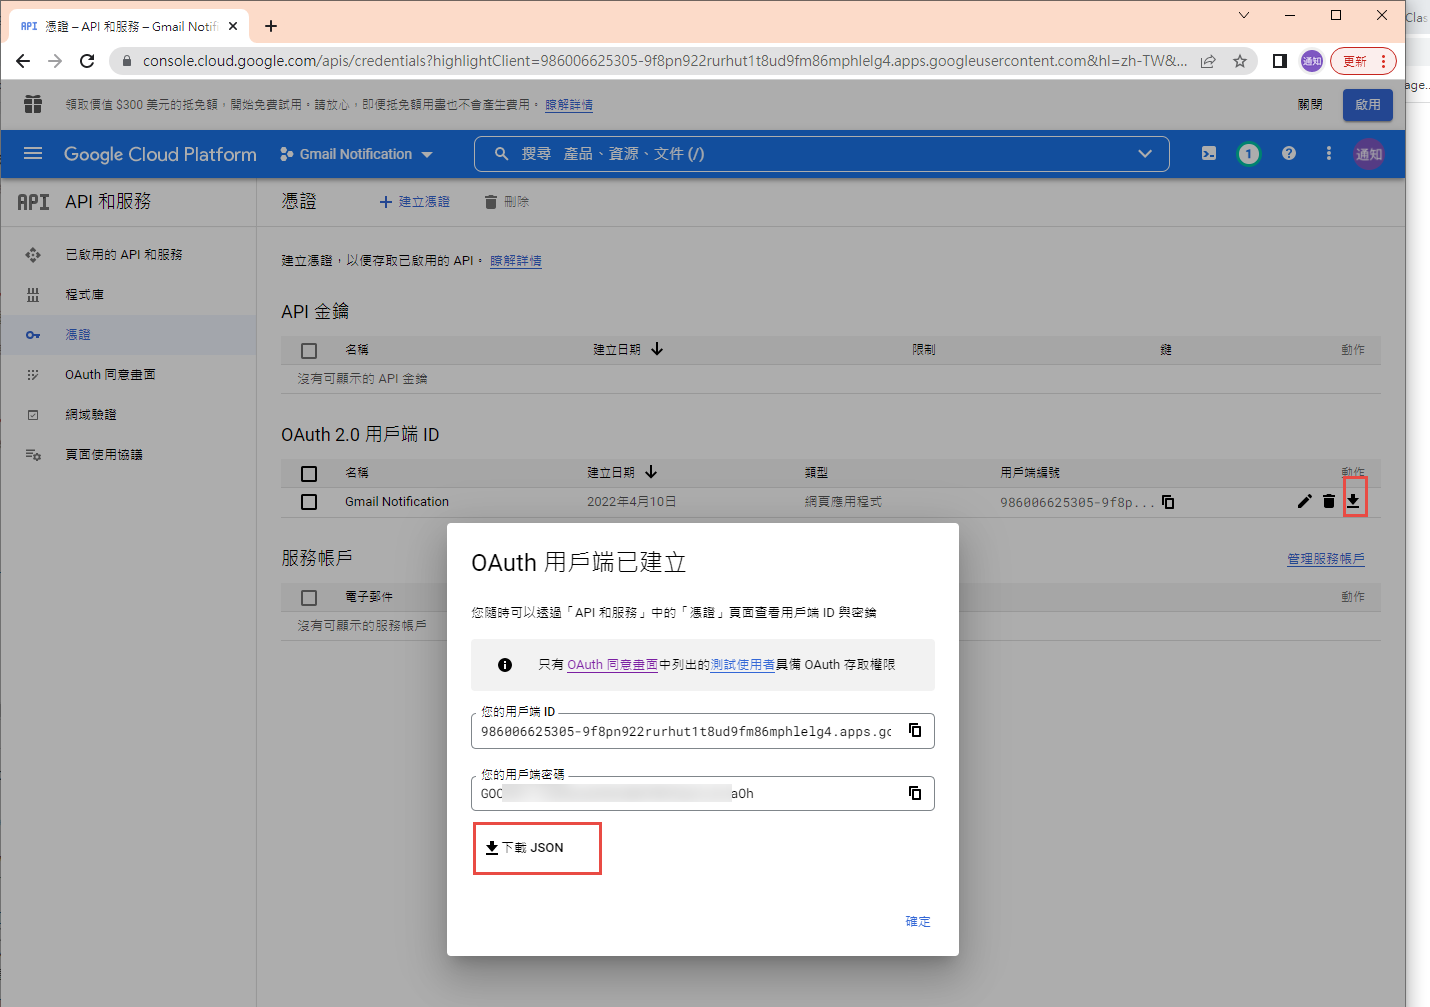
下載 json 之後,命名為 client_secret.json 保留後續使用。
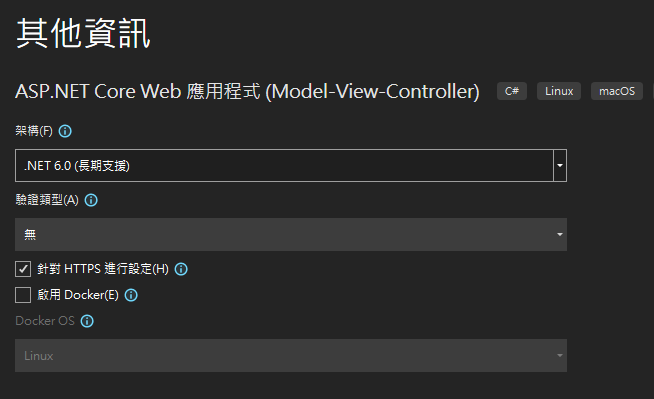
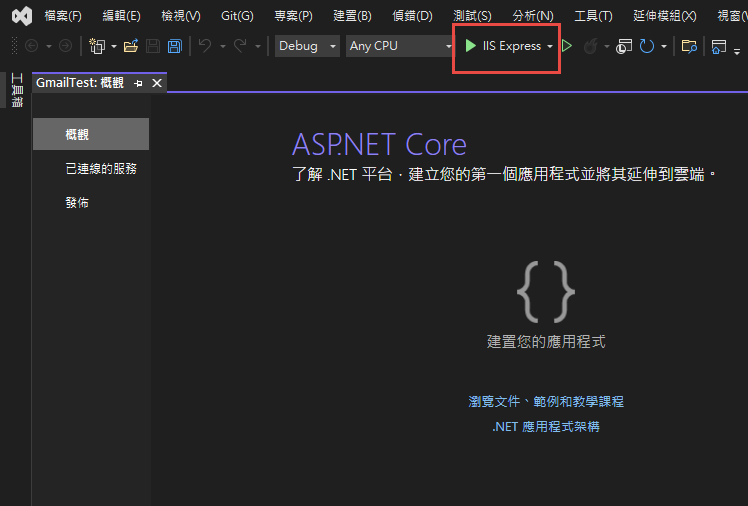
再來就要建立專案了. 用 VS2022 建立一個新專案

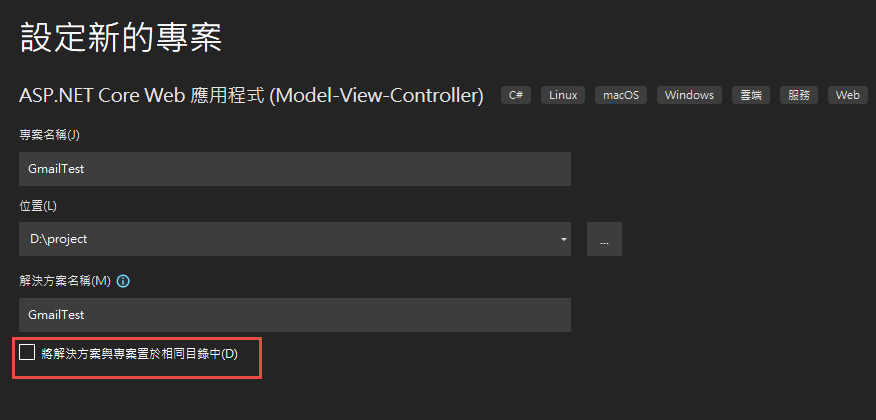
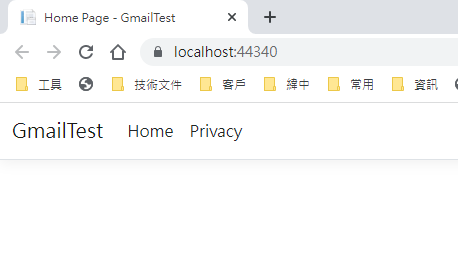
記錄網址, 本測試專案是 https://localhost:44340/ ,請依實際網址為準。
回到 OAuth 2.0 用戶端 ID 的設定頁. 在已授權的重新導向 URI 中填入 https://localhost:44340/Home/AuthReturn (填入的網址依實際專案的狀況,可能會有變化)
在 VS2022 中,使用 Nuget 安裝套件: (有漏的再麻煩和我說)
Google.Apis.Gmail.v1
Google.Apis.Auth
MimeKit (發送 gmail 時使用)
建立認証用的網址:
建立一個 Action, 用來取得認証用的網址:
執行結果:
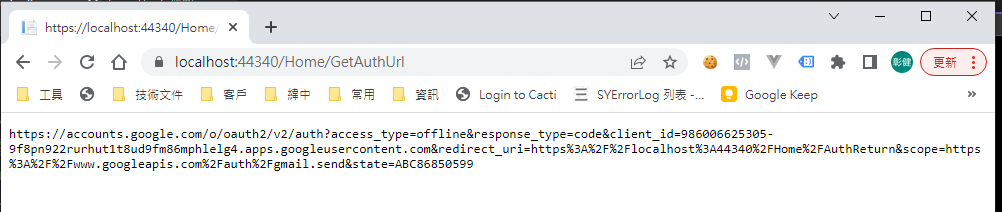
用 chrome 開啟產生的網址:
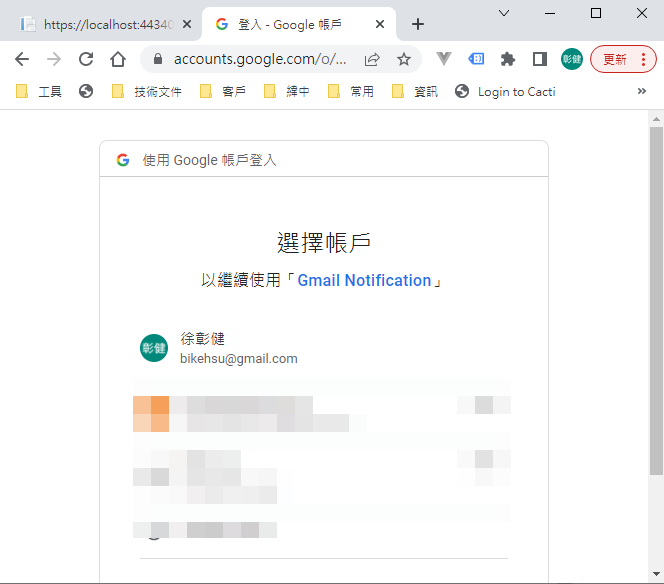
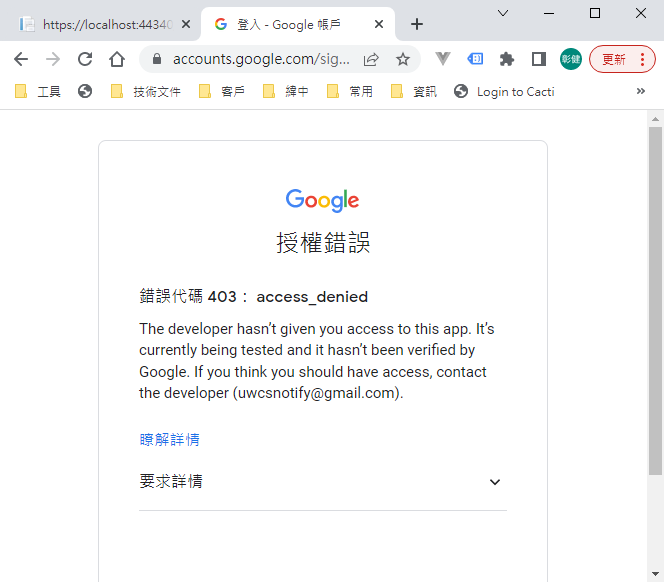
選取任一帳號,如果出現以下錯誤,請回到 "OAuth 同意畫面" 去新增測試使用者
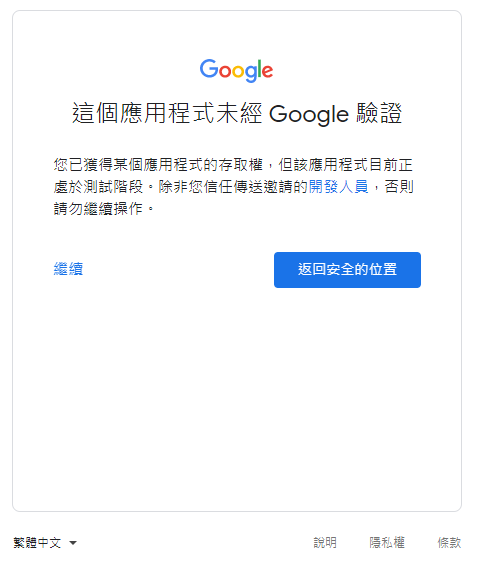
因為應用程式尚未發布,所以會看到警告,勇敢的繼續下去
這裡會要求授權使用你的名義發送信件。(這是在程式中取得授權的項目 Scopes 中所指定的)

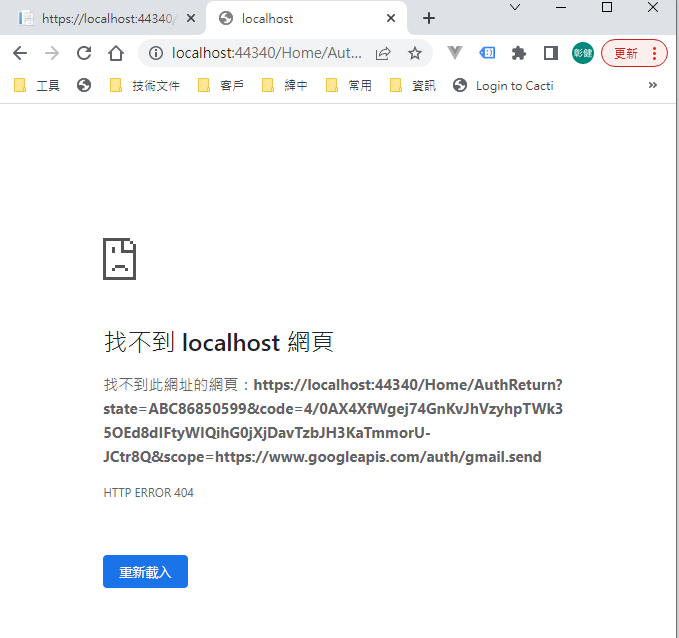
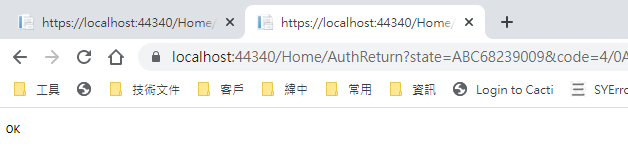
再繼續之後,會被重導至我們在 redirectUri 指定的網址。因為我們尚未完成,所以會看到錯誤,順便也可以看一下,會帶回哪一些參數。有 state, code, scope,共三個。
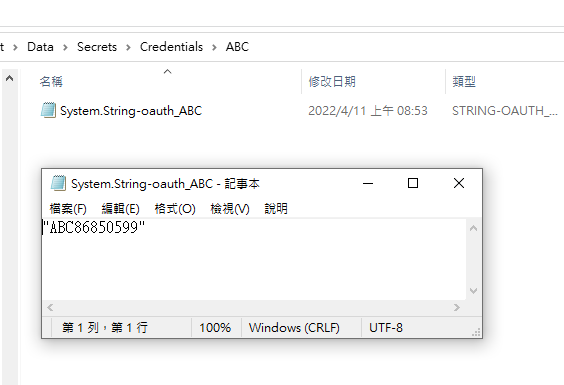
順便看一下,google 的套件會在 Credentials 的目錄下幫使用者建立一個目錄,在完成驗証前,會先放一個 System.String-oauth_XXX 的檔案,裡面的值和回傳的 state 是一樣的,這個應該是用來驗証回傳資料的。
接下來我們要新增 Action "AuthReturn" 如下:
再跑一次上面的流程,最後回到 AuthReturn
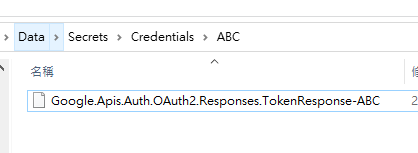
在 D:\project\GmailTest\Data\Secrets\Credentials\ABC 裡面會產生一個檔案: 這個就是我們的 token 了。
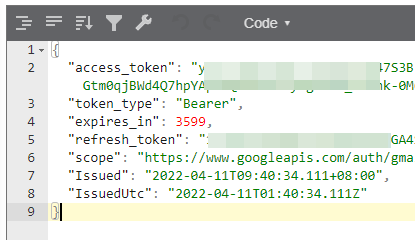
看一下裡面的內容, 有 access_token, refresh_token, scope 等等, 用途應該很好猜了.. 不知道各項目的目途也沒有關係。只要有這個 token 就可以了。
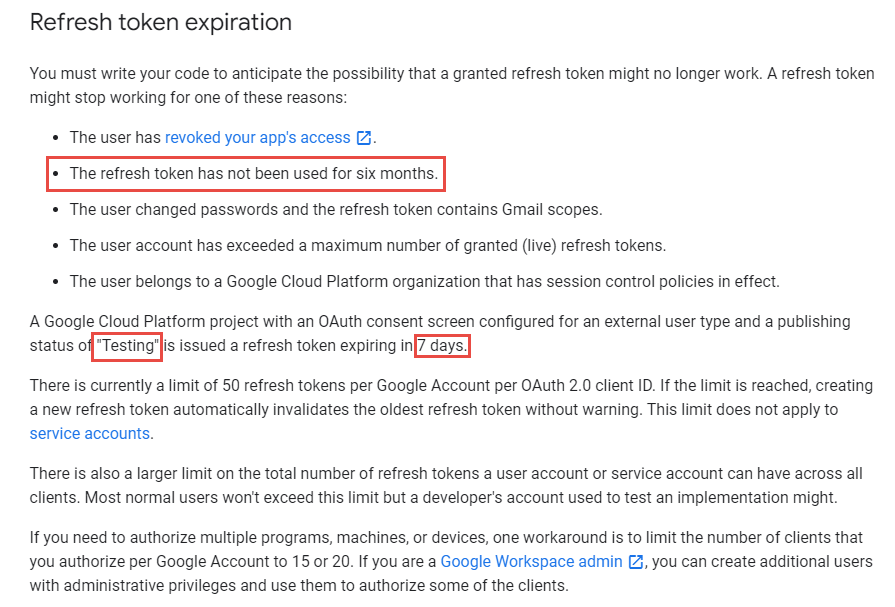
refresh_token 的效期請參考以下文件:
https://developers.google.com/identity/protocols/oauth2 。也可以參考下圖, 若是要用 gmail api 來發送通知信(例如連絡我們),紅色的地方是比較令人困擾的,例如 6 個月以上,沒有人留言,原來留下的 refresh_token 就失效了。使用者必需重新建立一個 refresh_token 。
最後來使用 gmail api 發送通知信, 直接看程式碼如下: 在這個過程中遇到最大的問題除了憑証問題之外,另一個問題是編碼。直到最後找到可以用 MimeKit 把 System.Net.Mail.MailMessage 編碼成 Gmail API 的格式才解決。程式碼如下:
收到的信件:
結論:
使用 Gmail API 最大的原因是要增加安全性,和舊的 smtp 不同的地方是,使用 gmail api 之後,客戶不需要提供 gmail 的帳號和密碼就可以讓系統使用 gmail 發送信件,不過由於 refresh_token 的效期問題,可能會造成無法發送通知信而沒有任何人發現的情況,整個實用性會變的很低。
另一個還沒有測試的部份是應用程的啟用。這個審核不知道會不很麻煩,不過可以而知的時,整個流程會花更多的時間。
取代的做法: 可能要改用 Amazon 的 SES 來寄信,而且為了避免每個小網站都要跑 SES 的建立流程,準備來寫一個 API 給各網站使用,可以發送簡單的通知信。
以上的程式碼可以在這裡下載: https://github.com/bikehsu/GmailTest
如果你的目的是要使用 Gmail Api 取代舊的 Gmail SMTP 來發送通知信,建議你先跳到最下方看一下結論。
如果你是想要看一下 Gmail API 和 Google API 憑証的使用方法,可以看一下這篇文章。
1. 在 google cloud platform 建立新的專案.
https://console.cloud.google.com/
啟用 Gmail API
因為我們要透過 OAuth 取得使用者授權,所以要設定使用 OAuth 的同意畫面。
指定授權的範圍
因為剛建立的專案,不會被公開,所以要指定測試使用者
如果要給任意使用者,必需經過發布的流程,但準備工作有點麻煩,所以這次就不發布了。
建立 OAuth 2.0 用戶端 ID 憑証
這裡除了名稱外,還有一個設定重導 Uri 的項目。現在不填寫,但稍後要回來補這個資料。
下載 json 之後,命名為 client_secret.json 保留後續使用。
再來就要建立專案了. 用 VS2022 建立一個新專案
記錄網址, 本測試專案是 https://localhost:44340/ ,請依實際網址為準。
回到 OAuth 2.0 用戶端 ID 的設定頁. 在已授權的重新導向 URI 中填入 https://localhost:44340/Home/AuthReturn (填入的網址依實際專案的狀況,可能會有變化)
在 VS2022 中,使用 Nuget 安裝套件: (有漏的再麻煩和我說)
Google.Apis.Gmail.v1
Google.Apis.Auth
MimeKit (發送 gmail 時使用)
建立認証用的網址:
建立一個 Action, 用來取得認証用的網址:
        /// <summary>

        /// 取得授權的項目

        /// </summary>

        static string[] Scopes = { GmailService.Scope.GmailSend };


        // 和登入 google 的帳號無關

        // 任意值,若未來有使用者認証,可使用使用者編號或登入帳號。

        string Username = "ABC";


        /// <summary>

        /// 存放 client_secret 和 credential 的地方

        /// </summary>

        string SecretPath = @"D:\project\GmailTest\Data\Secrets";


        /// <summary>

        /// 認証完成後回傳的網址, 必需和 OAuth 2.0 Client Id 中填寫的 "已授權的重新導向 URI" 相同。

        /// </summary>

        string RedirectUri = $"https://localhost:44340/Home/AuthReturn";


        /// <summary>

        /// 取得認証用的網址

        /// </summary>

        /// <returns></returns>

        public async Task<string> GetAuthUrl()

        {

            using (var stream = new FileStream(Path.Combine(SecretPath, "client_secret.json"), FileMode.Open, FileAccess.Read))

            {

                FileDataStore dataStore = null;

                var credentialRoot = Path.Combine(SecretPath, "Credentials");

                if (!Directory.Exists(credentialRoot))

                {

                    Directory.CreateDirectory(credentialRoot);

                }


                //存放 credential 的地方,每個 username 會建立一個目錄。

                string filePath = Path.Combine(credentialRoot, Username);

                dataStore = new FileDataStore(filePath);


                IAuthorizationCodeFlow flow = new GoogleAuthorizationCodeFlow(new GoogleAuthorizationCodeFlow.Initializer

                {

                    ClientSecrets = GoogleClientSecrets.Load(stream).Secrets,

                    Scopes = Scopes,

                    DataStore = dataStore

                });


                var authResult = await new AuthorizationCodeWebApp(flow, RedirectUri, Username)

                .AuthorizeAsync(Username, CancellationToken.None);


                return authResult.RedirectUri;

            }

        }
執行結果:
用 chrome 開啟產生的網址:
選取任一帳號,如果出現以下錯誤,請回到 "OAuth 同意畫面" 去新增測試使用者
因為應用程式尚未發布,所以會看到警告,勇敢的繼續下去
這裡會要求授權使用你的名義發送信件。(這是在程式中取得授權的項目 Scopes 中所指定的)
再繼續之後,會被重導至我們在 redirectUri 指定的網址。因為我們尚未完成,所以會看到錯誤,順便也可以看一下,會帶回哪一些參數。有 state, code, scope,共三個。
順便看一下,google 的套件會在 Credentials 的目錄下幫使用者建立一個目錄,在完成驗証前,會先放一個 System.String-oauth_XXX 的檔案,裡面的值和回傳的 state 是一樣的,這個應該是用來驗証回傳資料的。
接下來我們要新增 Action "AuthReturn" 如下:
        public async Task<string> AuthReturn(AuthorizationCodeResponseUrl authorizationCode)

        {

            string[] scopes = new[] { GmailService.Scope.GmailSend };


            using (var stream = new FileStream(Path.Combine(SecretPath, "client_secret.json"), FileMode.Open, FileAccess.Read))

            {

                //確認 credential 的目錄已建立.

                var credentialRoot = Path.Combine(SecretPath, "Credentials");

                if (!Directory.Exists(credentialRoot))

                {

                    Directory.CreateDirectory(credentialRoot);

                }


                //暫存憑証用目錄

                string tempPath = Path.Combine(credentialRoot, authorizationCode.State);


                IAuthorizationCodeFlow flow = new GoogleAuthorizationCodeFlow(

                new GoogleAuthorizationCodeFlow.Initializer

                {

                    ClientSecrets = GoogleClientSecrets.Load(stream).Secrets,

                    Scopes = scopes,

                    DataStore = new FileDataStore(tempPath)

                });


                //這個動作應該是要把 code 換成 token

                await flow.ExchangeCodeForTokenAsync(Username, authorizationCode.Code, RedirectUri, CancellationToken.None).ConfigureAwait(false);


                if (!string.IsNullOrWhiteSpace(authorizationCode.State))

                {

                    string newPath = Path.Combine(credentialRoot, Username);

                    if (tempPath.ToLower() != newPath.ToLower())

                    {

                        if (Directory.Exists(newPath))

                            Directory.Delete(newPath, true);


                        Directory.Move(tempPath, newPath);

                    }

                }


                return "OK";

            }

        }
再跑一次上面的流程,最後回到 AuthReturn
在 D:\project\GmailTest\Data\Secrets\Credentials\ABC 裡面會產生一個檔案: 這個就是我們的 token 了。
看一下裡面的內容, 有 access_token, refresh_token, scope 等等, 用途應該很好猜了.. 不知道各項目的目途也沒有關係。只要有這個 token 就可以了。
refresh_token 的效期請參考以下文件:
https://developers.google.com/identity/protocols/oauth2 。也可以參考下圖, 若是要用 gmail api 來發送通知信(例如連絡我們),紅色的地方是比較令人困擾的,例如 6 個月以上,沒有人留言,原來留下的 refresh_token 就失效了。使用者必需重新建立一個 refresh_token 。
最後來使用 gmail api 發送通知信, 直接看程式碼如下: 在這個過程中遇到最大的問題除了憑証問題之外,另一個問題是編碼。直到最後找到可以用 MimeKit 把 System.Net.Mail.MailMessage 編碼成 Gmail API 的格式才解決。程式碼如下:
public async Task<bool> SendTestMail()
{
var service = await GetGmailService();
GmailMessage message = new GmailMessage();
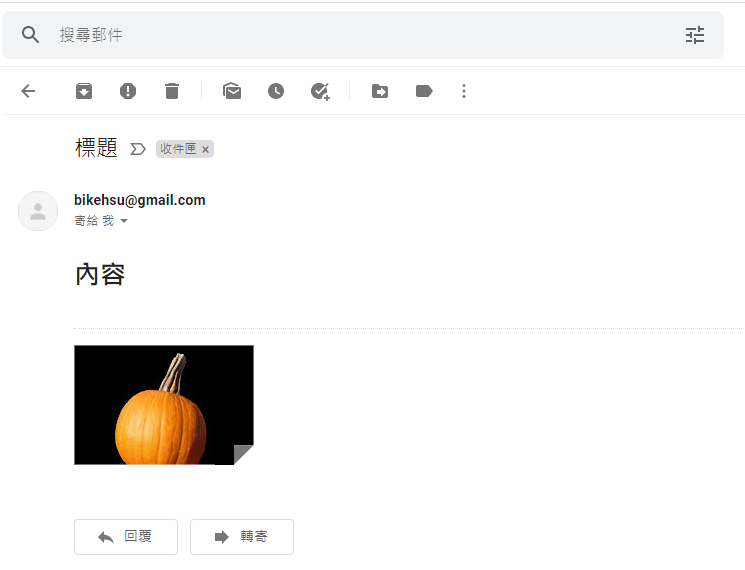
message.Subject = "標題";
message.Body = $"<h1>內容</h1>";
message.FromAddress = "bikehsu@gmail.com";
message.IsHtml = true;
message.ToRecipients = "bikehsu@gmail.com";
message.Attachments = new List<Attachment>();
string filePath = @"C:\Users\bike\Pictures\Vegetable_pumpkin.jpg"; //要附加的檔案
Attachment attachment1 = new Attachment(filePath);
message.Attachments.Add(attachment1);
SendEmail(message, service);
Console.WriteLine("OK");
return true;
}
async Task<GmailService> GetGmailService()
{
UserCredential credential = null;
var credentialRoot = Path.Combine(SecretPath, "Credentials");
if (!Directory.Exists(credentialRoot))
{
Directory.CreateDirectory(credentialRoot);
}
string filePath = Path.Combine(credentialRoot, Username);
using (var stream = new FileStream(Path.Combine(SecretPath, "client_secret.json"), FileMode.Open, FileAccess.Read))
{
credential = await GoogleWebAuthorizationBroker.AuthorizeAsync(
GoogleClientSecrets.Load(stream).Secrets,
Scopes,
Username,
CancellationToken.None,
new FileDataStore(filePath));
}
var service = new GmailService(new BaseClientService.Initializer()
{
HttpClientInitializer = credential,
ApplicationName = "Send Mail",
});
return service;
}
public class GmailMessage
{
public string FromAddress { get; set; }
public string ToRecipients { get; set; }
public string Subject { get; set; }
public string Body { get; set; }
public bool IsHtml { get; set; }
public List<System.Net.Mail.Attachment> Attachments { get; set; }
}
public static void SendEmail(GmailMessage email, GmailService service)
{
var mailMessage = new System.Net.Mail.MailMessage();
mailMessage.From = new System.Net.Mail.MailAddress(email.FromAddress);
mailMessage.To.Add(email.ToRecipients);
mailMessage.ReplyToList.Add(email.FromAddress);
mailMessage.Subject = email.Subject;
mailMessage.Body = email.Body;
mailMessage.IsBodyHtml = email.IsHtml;
if (email.Attachments != null)
{
foreach (System.Net.Mail.Attachment attachment in email.Attachments)
{
mailMessage.Attachments.Add(attachment);
}
}
var mimeMessage = MimeKit.MimeMessage.CreateFromMailMessage(mailMessage);
var gmailMessage = new Google.Apis.Gmail.v1.Data.Message
{
Raw = Encode(mimeMessage)
};
Google.Apis.Gmail.v1.UsersResource.MessagesResource.SendRequest request = service.Users.Messages.Send(gmailMessage, "me");
request.Execute();
}
public static string Encode(MimeMessage mimeMessage)
{
using (MemoryStream ms = new MemoryStream())
{
mimeMessage.WriteTo(ms);
return Convert.ToBase64String(ms.GetBuffer())
.TrimEnd('=')
.Replace('+', '-')
.Replace('/', '_');
}
}
收到的信件:
結論:
使用 Gmail API 最大的原因是要增加安全性,和舊的 smtp 不同的地方是,使用 gmail api 之後,客戶不需要提供 gmail 的帳號和密碼就可以讓系統使用 gmail 發送信件,不過由於 refresh_token 的效期問題,可能會造成無法發送通知信而沒有任何人發現的情況,整個實用性會變的很低。
另一個還沒有測試的部份是應用程的啟用。這個審核不知道會不很麻煩,不過可以而知的時,整個流程會花更多的時間。
取代的做法: 可能要改用 Amazon 的 SES 來寄信,而且為了避免每個小網站都要跑 SES 的建立流程,準備來寫一個 API 給各網站使用,可以發送簡單的通知信。
以上的程式碼可以在這裡下載: https://github.com/bikehsu/GmailTest
Bike, 2022/4/10 下午 09:31:15
Lucene.Net是一套C#開源全文索引庫,其主要包含了:
· Index : 提供索引的管理與詞組的排序
· Search : 提供查詢相關功能
· Store : 支援資料儲存管理,包括I/O操作
· Util : 共用套件
· Documents : 負責描述索引儲存時的文件結構管理
· QueryParsers : 提供查詢語法
· Analysis : 負責分析內容
要達到高效能的全文檢索讓機器可以明白我們的語言,最重要的關鍵就是"分詞器"了。
試想一下這一句話你會如何拆分成一段一段的關鍵字呢?
"一天一蘋果,醫生遠離我"
還有英文版本
"An apple a day, doctor keep me away."
中文版本的拆分:
"一天"、"一"、"蘋果"、"醫生"、"遠離"、"我"
英文版本的拆分:
"apple"、"day"、"doctor"、"keep"、"me"、"away"
有沒有注意到不同語系所分析出來的關鍵字有一點不一樣呢?
而在Lucene中分詞的工作會交給Analysis來完成,
不過我們可以依照不同的語系去選擇想使用的分詞器(Analyzer)!
首先簡單說明一下Lucene的實作流程
1. 確認主要搜尋的語系來決定使用的分詞器(analyzer)
2. 建立Document依照analyzer匯入資料
(前置完成)
3. 建立IndexSearcher導入準備好的Document
4. 建立Parser來分析SearchValue
5. 使用IndexSearcher分析Parser取得結果(Hits)
*本專案使用的是Lucene.Net 3.0.3*
接下來我們來建立一個提供查詢使用的Document。
如此一來我們就建立好Lucene的基本配備囉!
其中analyzer的部分我們使用Lucene.Net預設,
要特別注意的是,其處理中文語系的能力非常之爛!
之後再寫一篇文章深入探討。
再來值得一提的是
前兩個參數就是Key跟Value,可以簡單理解為欄位與其內容。
後面兩個參數是重點!
Store: 代表是否儲存這個Key的Value
例如在google打上台南美食會搜索出許多不同的文章連結,
不過google給你的資料中最重要的不是文章內容(Description),
而是哪一篇文章(Name)與台南美食最有關係。
假如今天我只要回傳一個列表而不用提示文章中有哪些內容,
那麼我就可以選擇給"Description" Field.Store.No來節省空間。
Index:
· NO - 不加入索引,這個內容只需要隨著結果出爐,不需要在查詢的時候被考慮。
· ANALYZED、NOT_ANALYZED - 是否使用分詞
· NO_NORMS - 關閉權重功能
或許許多人會對權重功能(NORMS)感到疑惑,
簡單的舉個例子
{ Id=1, Key="蘋果", Value="一天一蘋果,醫生遠離我。"}
{ Id=2, Key="橘子", Value="醫生給娜美最珍貴的寶藏。"}
{ Id=3, Key="梨子", Value="我是梨子,比蘋果蘋果好吃多囉!"}
當我搜尋"蘋果"的時候結果會是
{ Id=1, MatchKey=1, MatchValue=1, Score=(1*5) + (1*2) = 7}
{ Id=3, MatchKey=0, MatchValue=1, Score=(0*5) + (2*2) = 4}
有發現了嗎?
雖然同樣都對中兩個結果但是Id 1的資料Key值中有包含關鍵字,
因此得到較高的分數排在Id 3前方
準備好Document了,我們可以開始來實際使用看看囉!
最後的結果(Hits),是需要再回到Document去撈出對應的資料喔!
是不是非常簡單呢?
筆者寫了一個簡單的範例在GitHub上,秉持著追求新技術的心使用了.Net 6,還請各位大大多多包涵。
有中英文兩種Repository,只需要在上方的DI注入切換就可以囉!
GitHub連結: https://github.com/g13579112000/Lucene
筆者第一次撰寫這種教學文章,有哪邊錯誤的非常歡迎一起來討論指教。
之後有機會再撰寫Lucene更深入的應用方面,
例如權重的分配與分詞器的選擇與使用。
感謝您的閱讀。
參考文獻:
1.黑暗大大的全文檢索筆記: https://blog.darkthread.net/blog/lucene-net-notes-1/
2.使用.Net實現全文檢索: https://blog.csdn.net/huwei2003/article/details/53408388
3.伊凡的部落格: http://irfen.me/5-lucene4-9-learning-record-lucene-analysis-tokenizer/
4.純淨天空代碼範例: https://vimsky.com/zh-tw/examples/detail/csharp-ex-Lucene.Net.Documents-Document---class.html
· Index : 提供索引的管理與詞組的排序
· Search : 提供查詢相關功能
· Store : 支援資料儲存管理,包括I/O操作
· Util : 共用套件
· Documents : 負責描述索引儲存時的文件結構管理
· QueryParsers : 提供查詢語法
· Analysis : 負責分析內容
要達到高效能的全文檢索讓機器可以明白我們的語言,最重要的關鍵就是"分詞器"了。
試想一下這一句話你會如何拆分成一段一段的關鍵字呢?
"一天一蘋果,醫生遠離我"
還有英文版本
"An apple a day, doctor keep me away."
中文版本的拆分:
"一天"、"一"、"蘋果"、"醫生"、"遠離"、"我"
英文版本的拆分:
"apple"、"day"、"doctor"、"keep"、"me"、"away"
有沒有注意到不同語系所分析出來的關鍵字有一點不一樣呢?
而在Lucene中分詞的工作會交給Analysis來完成,
不過我們可以依照不同的語系去選擇想使用的分詞器(Analyzer)!
首先簡單說明一下Lucene的實作流程
1. 確認主要搜尋的語系來決定使用的分詞器(analyzer)
2. 建立Document依照analyzer匯入資料
(前置完成)
3. 建立IndexSearcher導入準備好的Document
4. 建立Parser來分析SearchValue
5. 使用IndexSearcher分析Parser取得結果(Hits)
*本專案使用的是Lucene.Net 3.0.3*
接下來我們來建立一個提供查詢使用的Document。
 // 取得或建立Lucene文件資料夾

        if (!File.Exists(_dir.FullName))

        {

            System.IO.Directory.CreateDirectory(_dir.FullName);

        }

        // Asp.Net Core需要於Nuget安裝System.Configuration.ConfigurationManager提供用戶端應用程式的組態檔存取

        Lucene.Net.Store.Directory directory = FSDirectory.Open(_dir);

        // 選擇分詞器

        var analyzer = new StandardAnalyzer(Lucene.Net.Util.Version.LUCENE_CURRENT);

        // 資料來源

        var repository = new Repository();

        // 依照指定的文件結構來建立

        var indexWriter = new IndexWriter(directory, analyzer, true, IndexWriter.MaxFieldLength.LIMITED);

        foreach (var index in repository)

        {

            var document = new Document();

            document.Add(new Field("Id", index.Id.ToString(), Field.Store.YES, Field.Index.NO));

            document.Add(new Field("Name", index.Name, Field.Store.YES, Field.Index.ANALYZED));

            document.Add(new Field("Description", index.Description, Field.Store.NO, Field.Index.ANALYZED));

            indexWriter.AddDocument(document);

        }

        indexWriter.Optimize();

        indexWriter.Commit();

        indexWriter.Dispose();
如此一來我們就建立好Lucene的基本配備囉!
其中analyzer的部分我們使用Lucene.Net預設,
要特別注意的是,其處理中文語系的能力非常之爛!
之後再寫一篇文章深入探討。
再來值得一提的是
document.Add(new Field("Id", index.Id.ToString(), Field.Store.YES, Field.Index.NO));前兩個參數就是Key跟Value,可以簡單理解為欄位與其內容。
後面兩個參數是重點!
Store: 代表是否儲存這個Key的Value
例如在google打上台南美食會搜索出許多不同的文章連結,
不過google給你的資料中最重要的不是文章內容(Description),
而是哪一篇文章(Name)與台南美食最有關係。
假如今天我只要回傳一個列表而不用提示文章中有哪些內容,
那麼我就可以選擇給"Description" Field.Store.No來節省空間。
Index:
· NO - 不加入索引,這個內容只需要隨著結果出爐,不需要在查詢的時候被考慮。
· ANALYZED、NOT_ANALYZED - 是否使用分詞
· NO_NORMS - 關閉權重功能
或許許多人會對權重功能(NORMS)感到疑惑,
簡單的舉個例子
{ Id=1, Key="蘋果", Value="一天一蘋果,醫生遠離我。"}
{ Id=2, Key="橘子", Value="醫生給娜美最珍貴的寶藏。"}
{ Id=3, Key="梨子", Value="我是梨子,比蘋果蘋果好吃多囉!"}
當我搜尋"蘋果"的時候結果會是
{ Id=1, MatchKey=1, MatchValue=1, Score=(1*5) + (1*2) = 7}
{ Id=3, MatchKey=0, MatchValue=1, Score=(0*5) + (2*2) = 4}
有發現了嗎?
雖然同樣都對中兩個結果但是Id 1的資料Key值中有包含關鍵字,
因此得到較高的分數排在Id 3前方
準備好Document了,我們可以開始來實際使用看看囉!
// 決定所要搜索的欄位

        var parser = new QueryParser(Lucene.Net.Util.Version.LUCENE_CURRENT, "Description", analyzer).Parse(searchValue);

        // 提供剛剛建立的Document

        var indexSearcher = new IndexSearcher(directory);

        // 搜尋取出結果的數量

        var queryLimit = 20;

        // 開始搜尋!

        var hits = indexSearcher.Search(parser, queryLimit);

        if (!hits.ScoreDocs.Any())

        {

            Console.WriteLine("查無相關結果。");

            return;

        }

        Document doc;

        foreach (var hit in hits.ScoreDocs)

        {

            doc = indexSearcher.Doc(hit.Doc);

            Console.WriteLine("Score :" + hit.Score + ", Id :" + doc.Get("Id") + ", Name :" + doc.Get("Name") + ", Description :" + doc.Get("Description"));

        }
最後的結果(Hits),是需要再回到Document去撈出對應的資料喔!
是不是非常簡單呢?
筆者寫了一個簡單的範例在GitHub上,秉持著追求新技術的心使用了.Net 6,還請各位大大多多包涵。
有中英文兩種Repository,只需要在上方的DI注入切換就可以囉!
GitHub連結: https://github.com/g13579112000/Lucene
筆者第一次撰寫這種教學文章,有哪邊錯誤的非常歡迎一起來討論指教。
之後有機會再撰寫Lucene更深入的應用方面,
例如權重的分配與分詞器的選擇與使用。
感謝您的閱讀。
參考文獻:
1.黑暗大大的全文檢索筆記: https://blog.darkthread.net/blog/lucene-net-notes-1/
2.使用.Net實現全文檢索: https://blog.csdn.net/huwei2003/article/details/53408388
3.伊凡的部落格: http://irfen.me/5-lucene4-9-learning-record-lucene-analysis-tokenizer/
4.純淨天空代碼範例: https://vimsky.com/zh-tw/examples/detail/csharp-ex-Lucene.Net.Documents-Document---class.html
梨子, 2022/2/24 下午 08:23:46
加構獨立的 API Server 時, 要使用 Cookie 認証必需有以下條件:
1. Web Server 和 API Server 有相同的父網域.
2. Cookie 的網域指定到相同的父網域.
3. 在 API 的 Application 中允許 CORS Request, 需要修改 Startup.cs
3.1 在 ConfigureServices 中要加入 AddCors, 而且要記得 AllowCredentials()
3.2 在 Configure 中, 要加入 app.UseCors("Cors(PolicyName"), 記得要在 UseAuthorization() 之前.
4. 在 Client 端要加上 withCredentials: true
1. Web Server 和 API Server 有相同的父網域.
2. Cookie 的網域指定到相同的父網域.
3. 在 API 的 Application 中允許 CORS Request, 需要修改 Startup.cs
3.1 在 ConfigureServices 中要加入 AddCors, 而且要記得 AllowCredentials()
        public void ConfigureServices(IServiceCollection services)

        {

            services.AddCors(options =>

            {

                options.AddPolicy(name: "Cors(PolicyName",

                                 builder =>

                                 {

                                     builder.WithOrigins("https://web1.yourdomain.com",

                                                         "https://web2.yourdomain.com")

                                     .AllowCredentials();

                                 });

            });


            services.AddControllers()

                .AddNewtonsoftJson(opt =>

                 opt.SerializerSettings.ContractResolver = new CamelCasePropertyNamesContractResolver());
3.2 在 Configure 中, 要加入 app.UseCors("Cors(PolicyName"), 記得要在 UseAuthorization() 之前.
        public void Configure(IApplicationBuilder app, IWebHostEnvironment env)

        {

            app.UseExceptionMiddleware();


            app.UseHttpsRedirection();


            app.UseHttpsRedirection();


            app.UseRouting();


            app.UseCors(MyAllowSpecificOrigins);


            app.UseAuthorization();
4. 在 Client 端要加上 withCredentials: true
                            $.ajax({

                                url: apiRoot + "apiurl",

                                type: 'GET',

                                dataType: 'json', // 預期從server接收的資料型態

                                success: function (res) {

                                    console.log("success: ");

                                    console.log(res);

                                },

                                xhrFields: {

                                    withCredentials: true

                                },

                                error: function (XMLHttpRequest, textStatus, errorThrown) {

                                    alert("發生錯誤");

                                }

});Bike, 2021/10/24 下午 05:17:54
以下的程式碼, 直接 alert(this.errorMessages); 會造成 chrome 卡住..
使用 setTimeout 延後 alert 可以解決這個問題. 但必需延後足夠的時間. 已知 200 ms 依然會卡住.
使用 setTimeout 延後 alert 可以解決這個問題. 但必需延後足夠的時間. 已知 200 ms 依然會卡住.
    errorMessages: "",


    failProcess: function (ret) {

        console.log("failProcess start: " + new Date().getSeconds() + "." + new Date().getMilliseconds());

        var json = ret.responseJSON;

        if (json && json.invalidatedPayloads) {

            var errors = json.invalidatedPayloads.filter(function F(x) {

                return x.messages.length > 0

            });


            console.log("bdfore add class: " + new Date().getSeconds() + "." + new Date().getMilliseconds());


            errors.map(function (x) {

                return $("[name='" + x.name + "']").addClass("error");

            });


            console.log("after add class: " + new Date().getSeconds() + "." + new Date().getMilliseconds());


            errorMessages = errors.map(function (x) {

                    return x.messages.join('\r\n');

            }).join('\r\n');


            console.log("afger build errorMessages: " + new Date().getSeconds() + "." + new Date().getMilliseconds());

            console.log(errorMessages);


            //alert(this.errorMessages);


            window.setTimeout(api.alertError, 500);


            console.log("after alert: " + new Date().getSeconds() + "." + new Date().getMilliseconds());

        }


        console.log("failProcess end: " + new Date().getSeconds() + "." + new Date().getMilliseconds());

    },
Bike, 2021/9/29 下午 08:45:07