頁數 1 / 3
下一頁
搜尋 chrome 結果:
<!DOCTYPE html>

<html lang="en">

<head>

    <meta charset="UTF-8">

    <meta name="viewport" content="width=device-width, initial-scale=1.0">

    <title>BLE Printer Test</title>

    <script src="https://cdn.jsdelivr.net/npm/iconv-lite-umd@0.6.10/lib/iconv-lite-umd.js"></script>

</head>

<body>

    <h1>BLE Printer Test 123</h1>

    <button id="printTestButton">Test Print</button>

    <button id="printAgain">Print Again</button>

    <pre id="log"></pre>

    <script>

        // Function to log messages on the page

        function logMessage(message) {

            const logElement = document.getElementById('log');

            logElement.textContent += message + '\n';

        }

        var device;

        var server;

        var service;

        var characteristic;

        var name = 'T58_6752'; // 藍芽設備的名稱

        var uuid = 0x1800; //service UUID (用 BLE Scanner 找到的)

        var characteristicUuid = 0x2A00; // characteristic UUID (用 BLE Scanner 找到的)

        // Function to connect to BLE printer and send test data


        async function connectAndTestPrint() {


            try {

                logMessage("Requesting Bluetooth device...");


                // Request the BLE device

                device = await navigator.bluetooth.requestDevice({

                    //acceptAllDevices: true,

                    filters: [

                        { name: name }

                    ],

                    optionalServices: [uuid] // Replace with the correct service UUID

                });


                logMessage(`Device selected: ${device.name}`);

                logMessage(`Device uuid: ${device.id}`);


                await printAgain();


            } catch (error) {

                logMessage(`Error: ${error.message}`);

            }

        }


        // 转码方法

        function stringToGbk(str) {

            const ranges = [

                [0xA1, 0xA9, 0xA1, 0xFE],

                [0xB0, 0xF7, 0xA1, 0xFE],

                [0x81, 0xA0, 0x40, 0xFE],

                [0xAA, 0xFE, 0x40, 0xA0],

                [0xA8, 0xA9, 0x40, 0xA0],

                [0xAA, 0xAF, 0xA1, 0xFE],

                [0xF8, 0xFE, 0xA1, 0xFE],

                [0xA1, 0xA7, 0x40, 0xA0],

            ]

            const codes = new Uint16Array(23940)

            let i = 0


            for (const [b1Begin, b1End, b2Begin, b2End] of ranges) {

                for (let b2 = b2Begin; b2 <= b2End; b2++) {

                    if (b2 !== 0x7F) {

                        for (let b1 = b1Begin; b1 <= b1End; b1++) {

                            codes[i++] = b2 << 8 | b1

                        }

                    }

                }

            }

            const cstr = new TextDecoder('gbk').decode(codes)


            // 编码表

            const table = new Uint16Array(65536)

            for (let i = 0; i < cstr.length; i++) {

                table[cstr.charCodeAt(i)] = codes[i]

            }

            const buf = new Uint8Array(str.length * 2)

            let n = 0


            for (let i = 0; i < str.length; i++) {

                const code = str.charCodeAt(i)

                if (code < 0x80) {

                    buf[n++] = code

                } else {

                    const gbk = table[code]

                    buf[n++] = gbk & 0xFF

                    buf[n++] = gbk >> 8

                }

            }

            u8buf = buf.subarray(0, n)

            // console.log(u8buf);

            return u8buf

        }


        async function printAgain() {

            // Connect to the GATT server

            server = await device.gatt.connect();

            logMessage("Connected to GATT server.");


            // Get the printer service

            service = await server.getPrimaryService(uuid); // Replace with your printer's service UUID

            logMessage("Printer service retrieved.");


            // Get the characteristic for writing data

            characteristic = await service.getCharacteristic(characteristicUuid); // Replace with the correct characteristic UUID

            logMessage("Printer characteristic retrieved.");


            // Prepare test print data

            const encoder = new TextEncoder();

            const testData = encoder.encode("TEST PRINT: Hello from Web Bluetooth!\n");

            const finalData = encoder.encode("--\n--\n \n \n");


            const setFontSize = new Uint8Array([0x1D, 0x21, 0x11]); // GS ! n

            const setFontSize2 = new Uint8Array([0x1D, 0x21, 0x22]); // GS ! n

            const setFontSize3 = new Uint8Array([0x1D, 0x21, 0x33]); // GS ! n


            // Write test data to the printer

            logMessage("Sending test data to printer...");


            await characteristic.writeValue(new Uint8Array([0x1D, 0x21, 0x00]));

            await characteristic.writeValue(encoder.encode("1x1!\n"));

            await characteristic.writeValue(setFontSize);

            await characteristic.writeValue(encoder.encode("2x2!\n"));

            await characteristic.writeValue(setFontSize2);

            await characteristic.writeValue(encoder.encode("3x3!\n"));

            await characteristic.writeValue(setFontSize3);

            await characteristic.writeValue(encoder.encode("4x4!\n"));


            const initPrinter = new Uint8Array([0x1B, 0x40]); // ESC @

            await characteristic.writeValue(initPrinter);


            // 3. 設置字符集為 GBK

            const setGBK = new Uint8Array([0x1B, 0x74, 0x11]); // ESC t 0x11 (GBK)

            await characteristic.writeValue(setGBK);


            const text = "繁體中文測試\n \n";

            const encodedText = stringToGbk(text);

            await characteristic.writeValue(encodedText);

            logMessage("Test data sent successfully!");


            // QrCode 列印

            const qrData = "https://example.com"; // Your QR code data

            const qrDataLength = qrData.length + 3;

            const pL = qrDataLength & 0xFF; // Low byte

            const pH = (qrDataLength >> 8) & 0xFF; // High byte


            const commands = [

                0x1B, 0x40, // Initialize printer

                0x1D, 0x28, 0x6B, pL, pH, 0x31, 0x50, 0x30, ...new TextEncoder().encode(qrData), // Store data

                0x1D, 0x28, 0x6B, 0x03, 0x00, 0x31, 0x51, 0x30 // Print QR code

            ];


            const buffer = new Uint8Array(commands);

            await characteristic.writeValue(buffer);

            logMessage("QrCode sent successfully!");


            await characteristic.writeValue(finalData);

            logMessage("finalData sent successfully!");


            // Disconnect the GATT server

            server.disconnect();

            logMessage("Disconnected from printer.");

        }


        // Bind the function to the button

        document.getElementById('printTestButton').addEventListener('click', connectAndTestPrint);

        document.getElementById('printAgain').addEventListener('click', printAgain);

    </script>

</body>

</html>
Bike, 2025/1/2 下午 02:20:15
試了這兩個 Sample:
https://learn.microsoft.com/en-us/training/modules/store-local-data/4-exercise-store-data-locally-with-sqlite
和
https://blazorhelpwebsite.com/ViewBlogPost/61
結果專案在 Windows 環境下都可以正常執行,但切換到 Android Emulator 就無法存檔。
在查了很多資料後,發現需要裝額外的 Package,需安裝的 Package 如下:
其它的發現為:
1. 雙點專案,就可以開啟 csproj 檔案。下方的 ItemGroup 就是已安裝的 package
2. 可以把 chrome 連接到 Android Emulator 的方法,在網址列輸入以下指令:
chrome://inspect/#devices
https://learn.microsoft.com/en-us/training/modules/store-local-data/4-exercise-store-data-locally-with-sqlite
和
https://blazorhelpwebsite.com/ViewBlogPost/61
結果專案在 Windows 環境下都可以正常執行,但切換到 Android Emulator 就無法存檔。
在查了很多資料後,發現需要裝額外的 Package,需安裝的 Package 如下:
    <ItemGroup>

     <PackageReference Include="sqlite-net-pcl" Version="1.8.116" />

     <PackageReference Include="SQLiteNetExtensions.Async" Version="2.1.0" />

     <PackageReference Include="SQLitePCLRaw.bundle_green" Version="2.1.4" />

     <PackageReference Include="SQLitePCLRaw.core" Version="2.1.4" />

     <PackageReference Include="SQLitePCLRaw.lib.e_sqlite3" Version="2.1.4" />

     <PackageReference Include="SQLitePCLRaw.provider.dynamic_cdecl" Version="2.1.4" />

     <PackageReference Include="System.Data.DataSetExtensions" Version="4.5.0" />

    </ItemGroup>
其它的發現為:
1. 雙點專案,就可以開啟 csproj 檔案。下方的 ItemGroup 就是已安裝的 package
2. 可以把 chrome 連接到 Android Emulator 的方法,在網址列輸入以下指令:
chrome://inspect/#devices
Bike, 2023/2/12 下午 05:09:11
問題:
在開出新分頁後,無法讀取 sessionStorage 的資料
可能原因:
Chrome 某個版本,Stop cloning sessionStorage for windows opened with noopener
a标签_blank默认 rel="noopener" ,所以a标签需要加入rel=“opener” 而才能像window.open("同源页面")这种方式新开的页面会复制之前的sessionStorage
解決方法:
開新分頁前,加入 rel=“opener”參數即可。
例:
參考:
面试官:你确定多窗口之间sessionStorage不能共享状态吗???
在開出新分頁後,無法讀取 sessionStorage 的資料
可能原因:
Chrome 某個版本,Stop cloning sessionStorage for windows opened with noopener
a标签_blank默认 rel="noopener" ,所以a标签需要加入rel=“opener” 而才能像window.open("同源页面")这种方式新开的页面会复制之前的sessionStorage
解決方法:
開新分頁前,加入 rel=“opener”參數即可。
例:
<a href="http://..." target="_blank" rel="opener">Link</a>
$(".hlkPrint").click(function () {

    $("form").setPostDataToStorage();


    $("form").attr("rel", "opener");

    $("form").attr("target", "_blank");

    $("form").attr("action", "xxxxx.aspx");

    $("form").submit();

});
參考:
面试官:你确定多窗口之间sessionStorage不能共享状态吗???
Reiko, 2022/12/1 下午 05:57:23
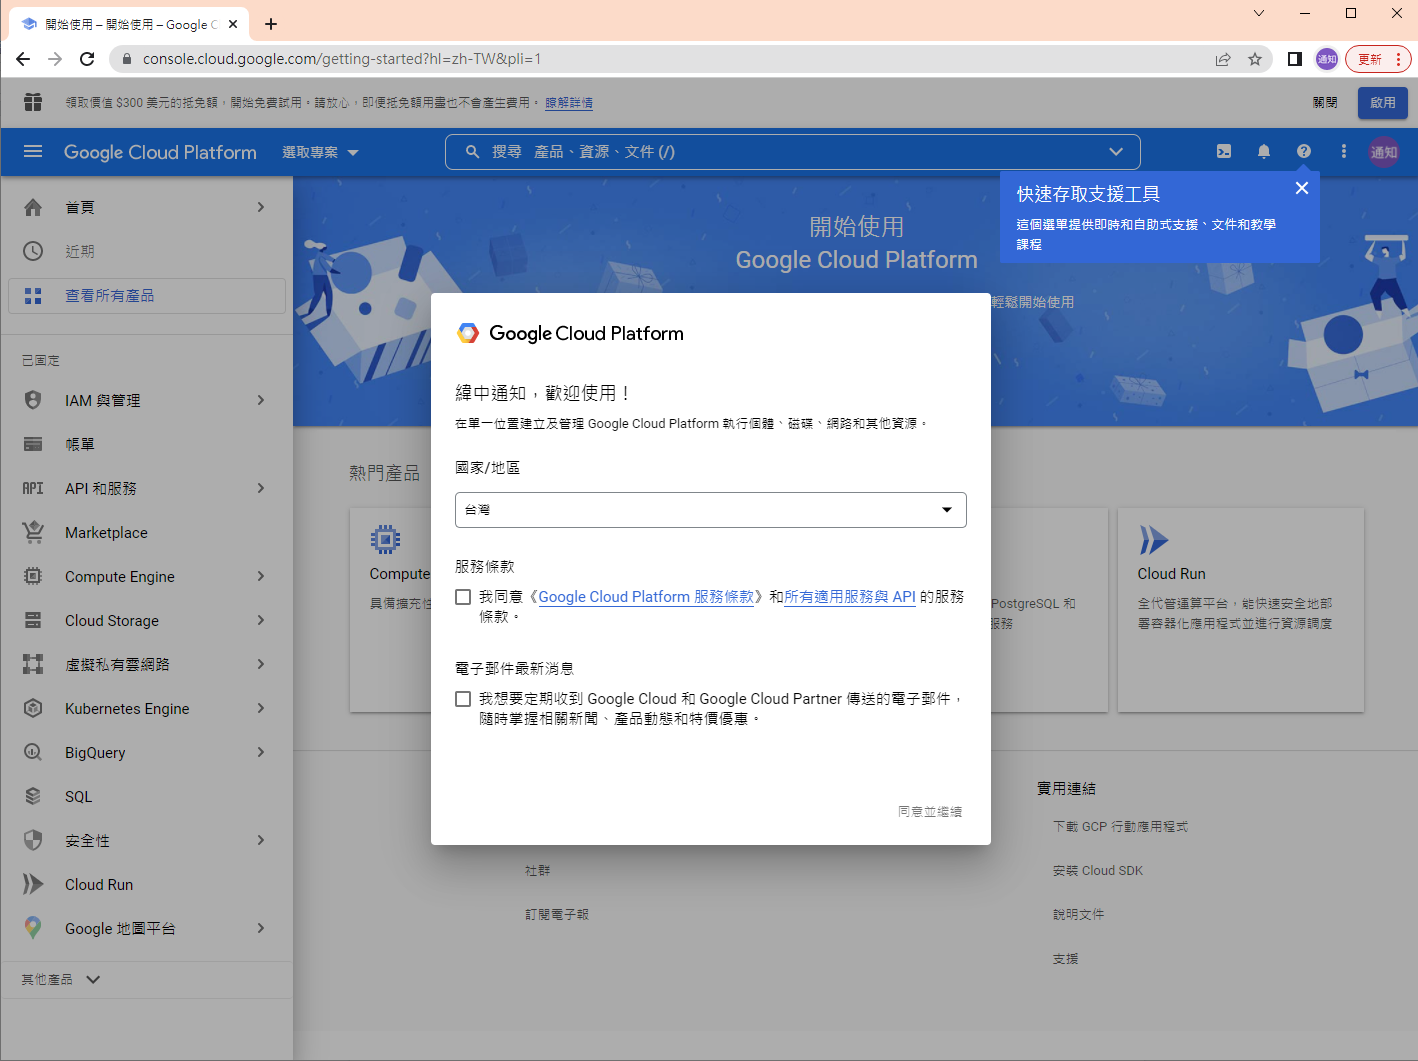
這裡是我測試 Gmail API 和 Google API 憑証的一些記錄。
如果你的目的是要使用 Gmail Api 取代舊的 Gmail SMTP 來發送通知信,建議你先跳到最下方看一下結論。
如果你是想要看一下 Gmail API 和 Google API 憑証的使用方法,可以看一下這篇文章。
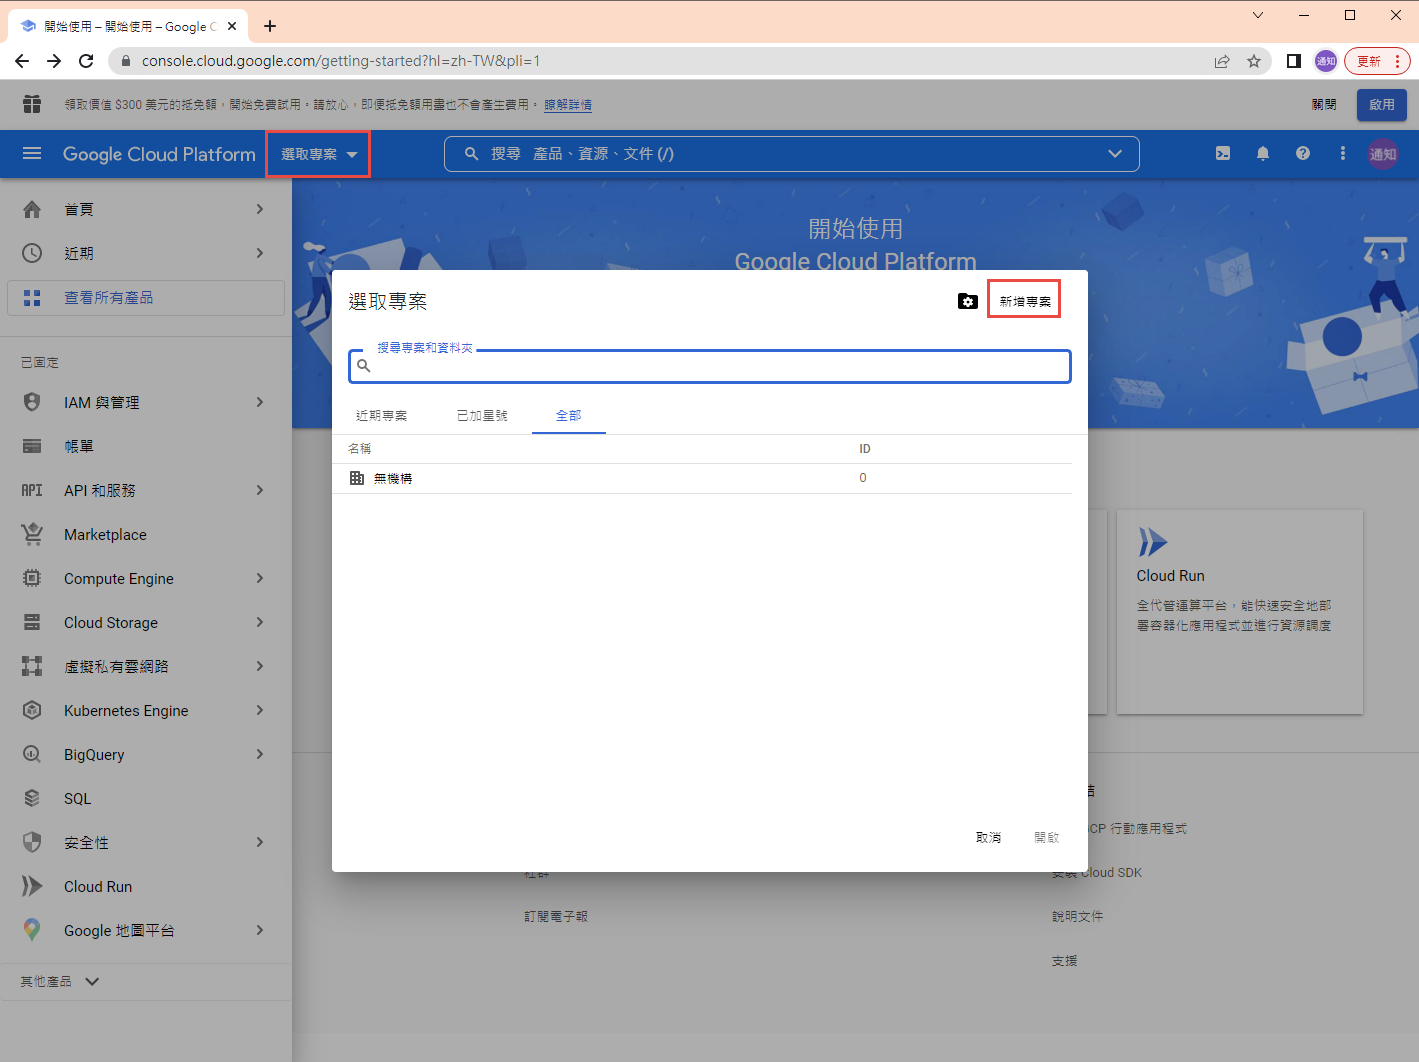
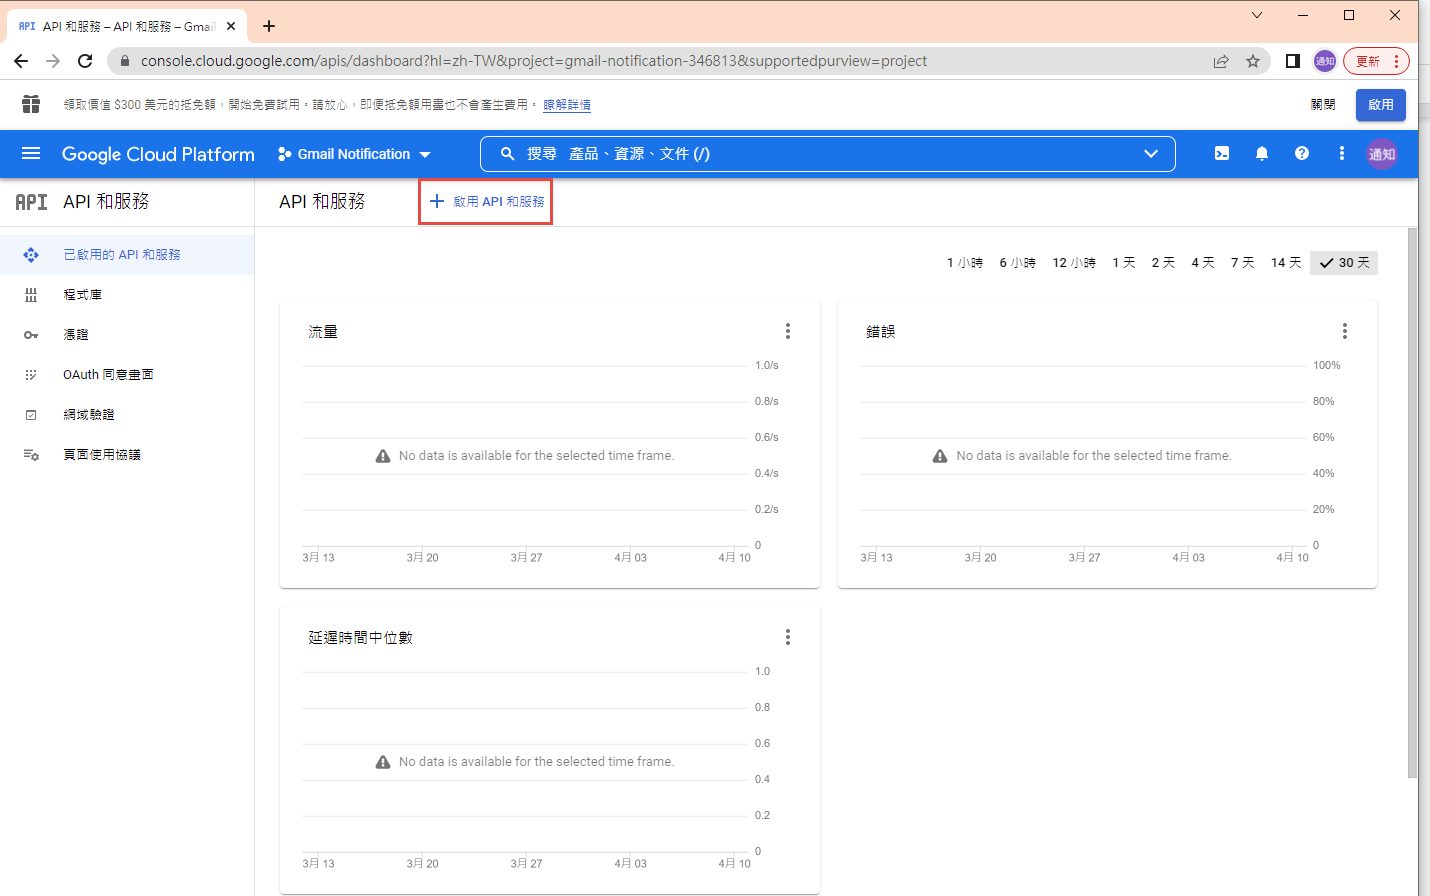
1. 在 google cloud platform 建立新的專案.
https://console.cloud.google.com/

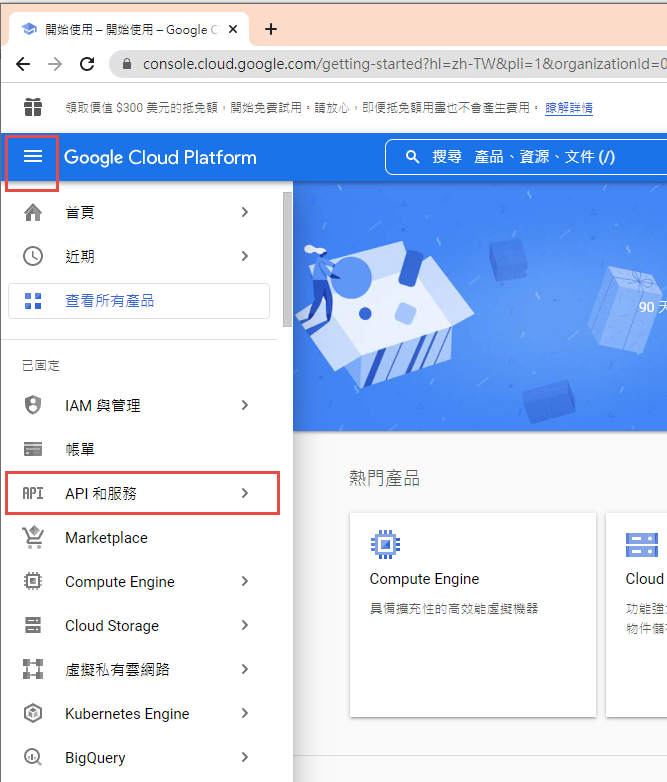
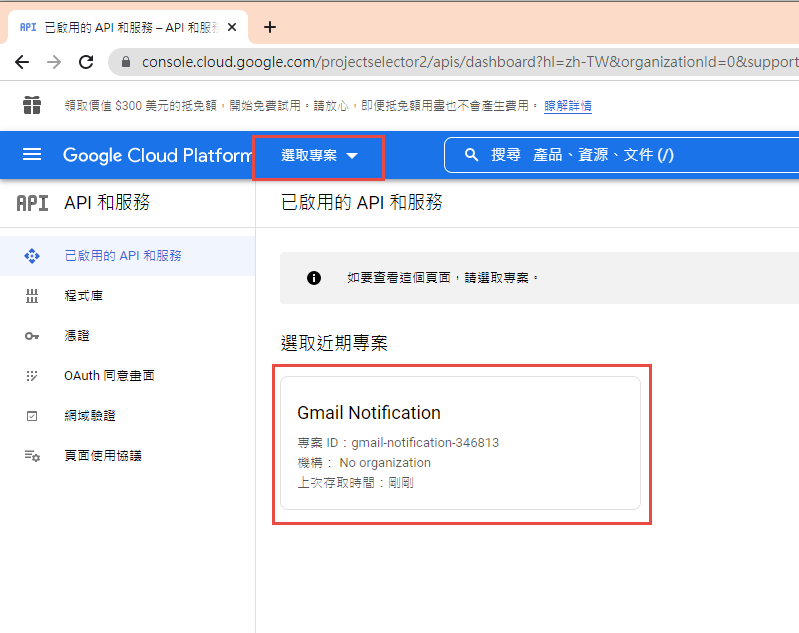
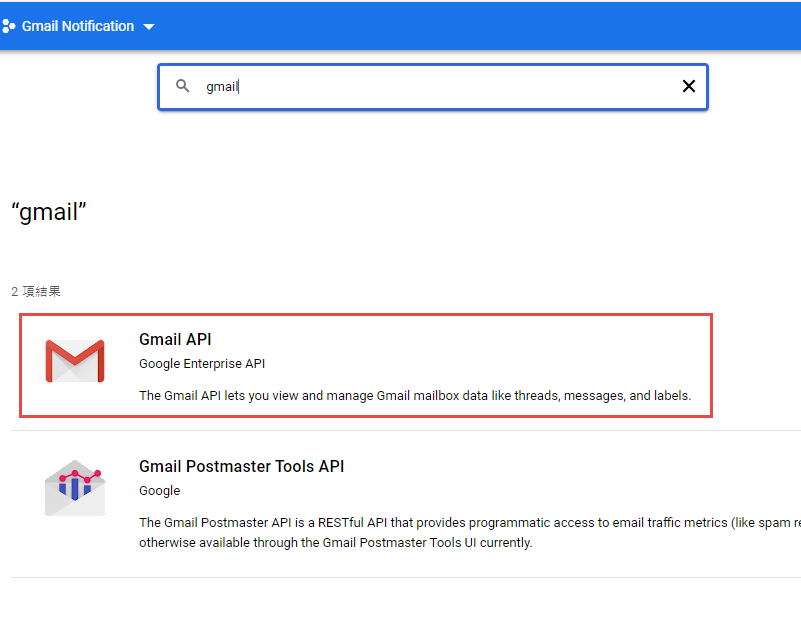
啟用 Gmail API


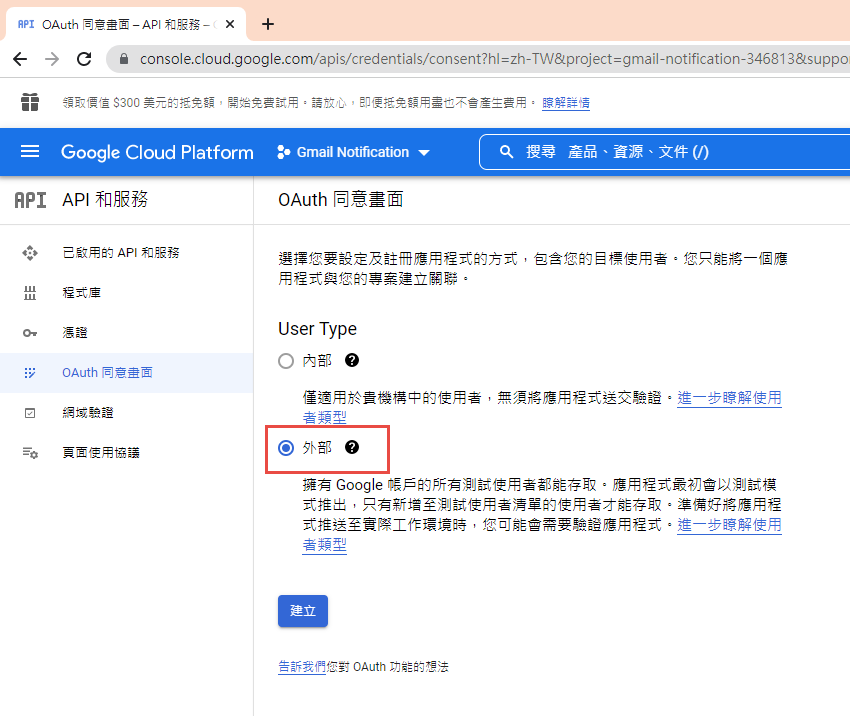
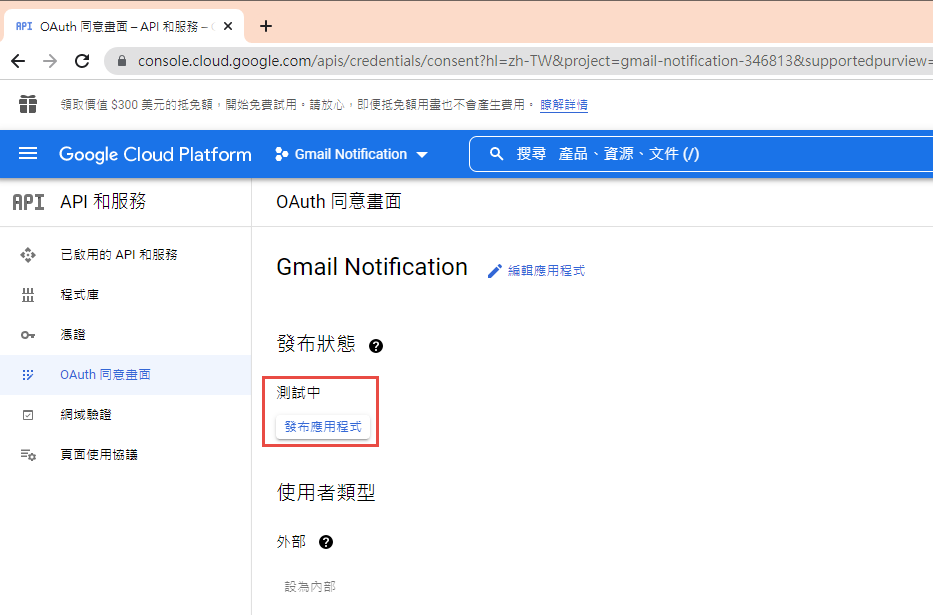
因為我們要透過 OAuth 取得使用者授權,所以要設定使用 OAuth 的同意畫面。
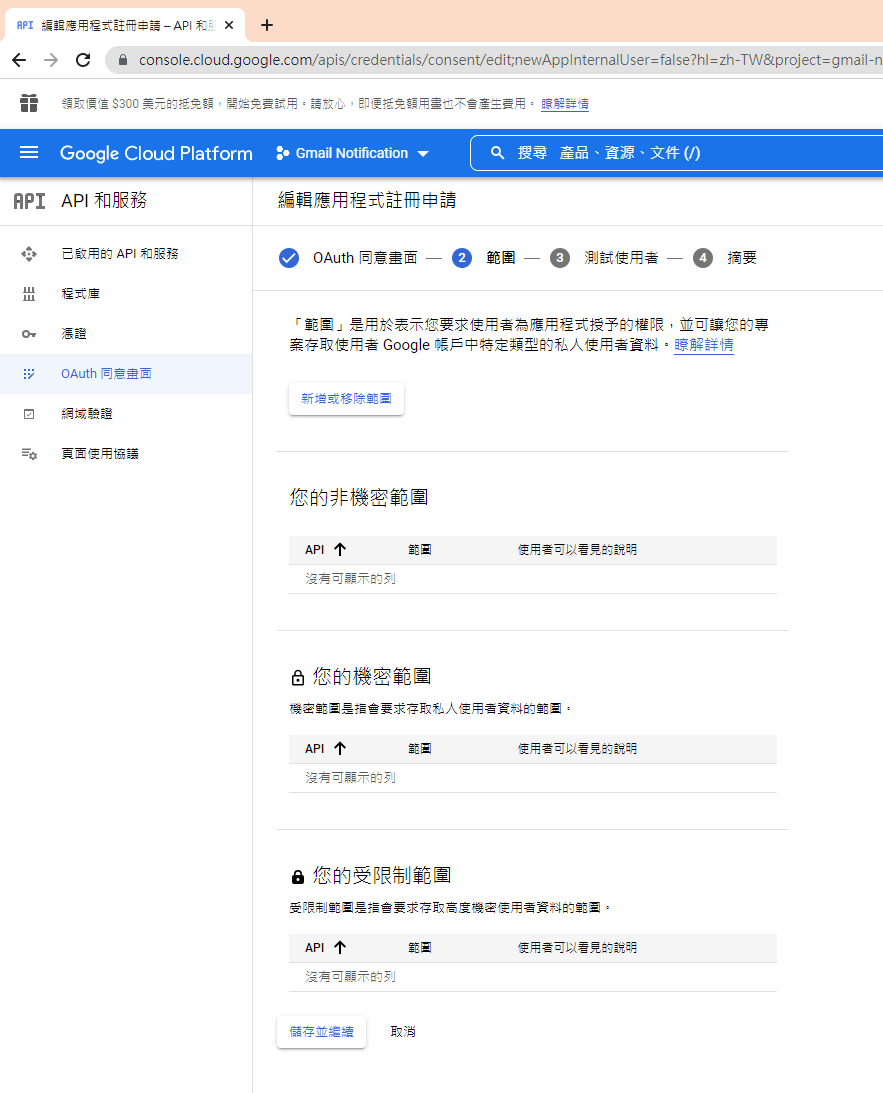
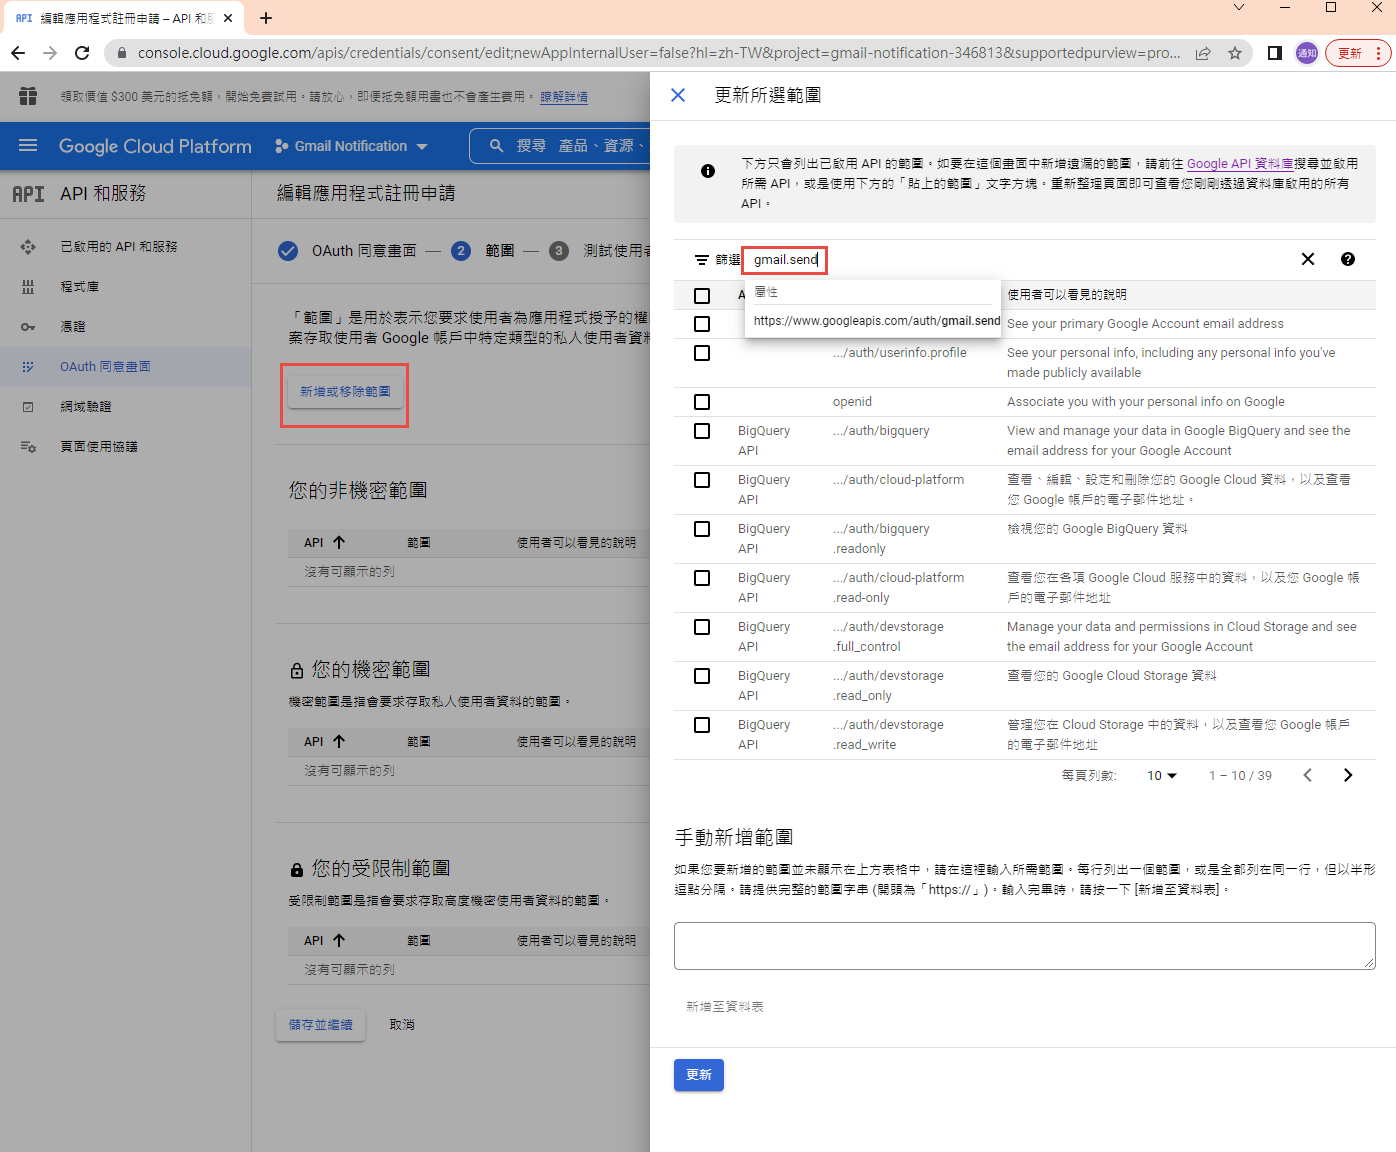
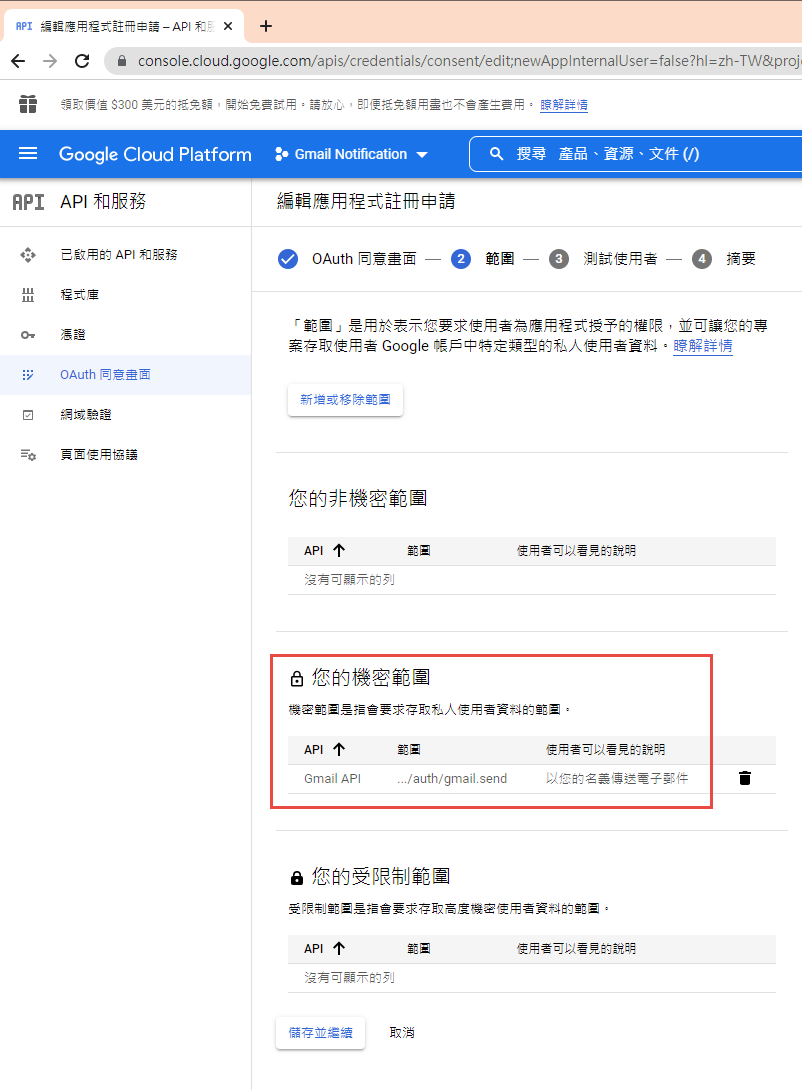
指定授權的範圍
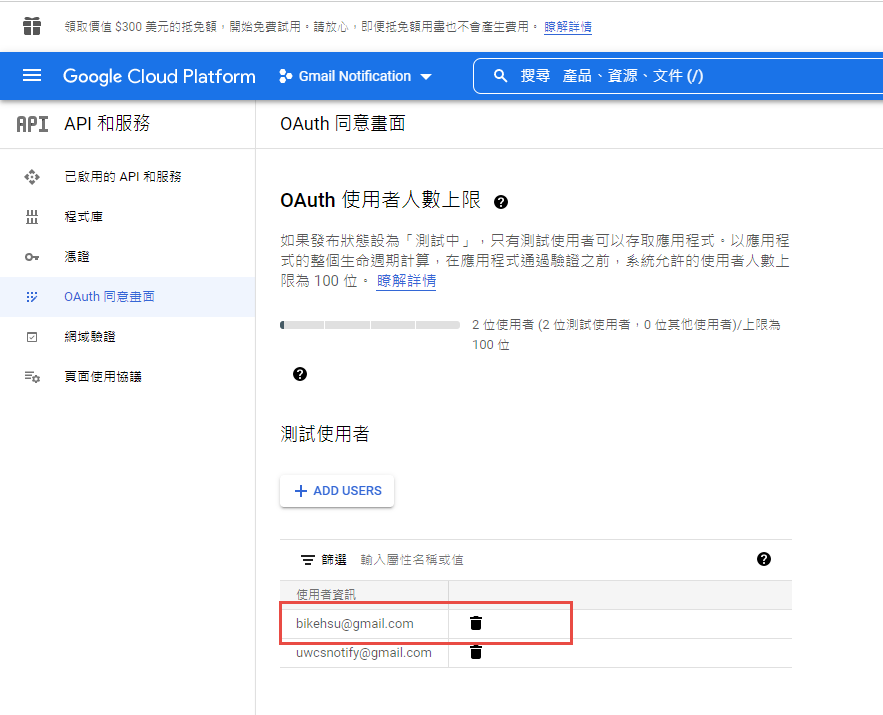
因為剛建立的專案,不會被公開,所以要指定測試使用者
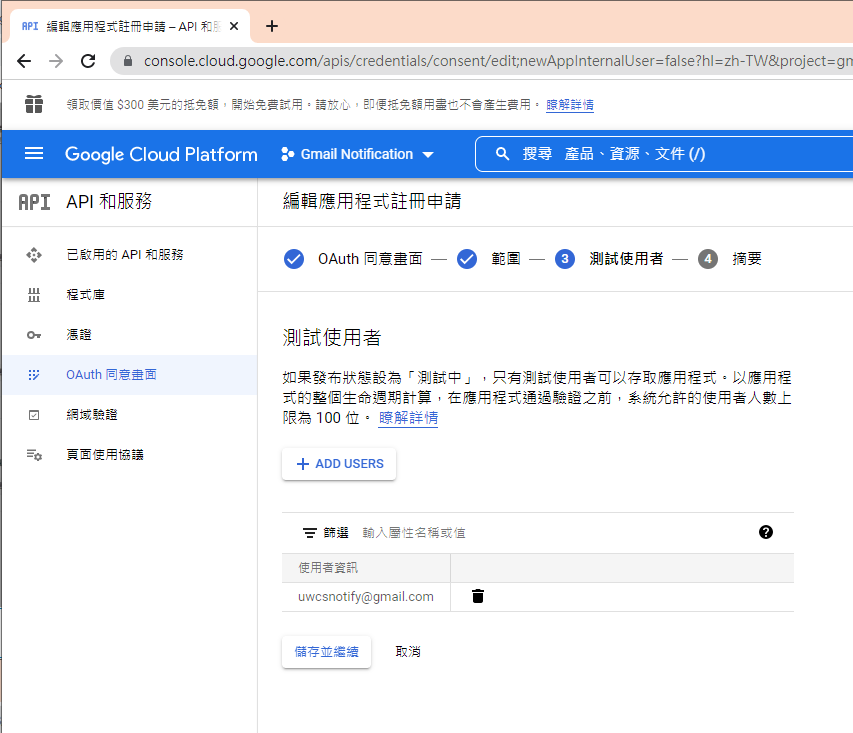
如果要給任意使用者,必需經過發布的流程,但準備工作有點麻煩,所以這次就不發布了。
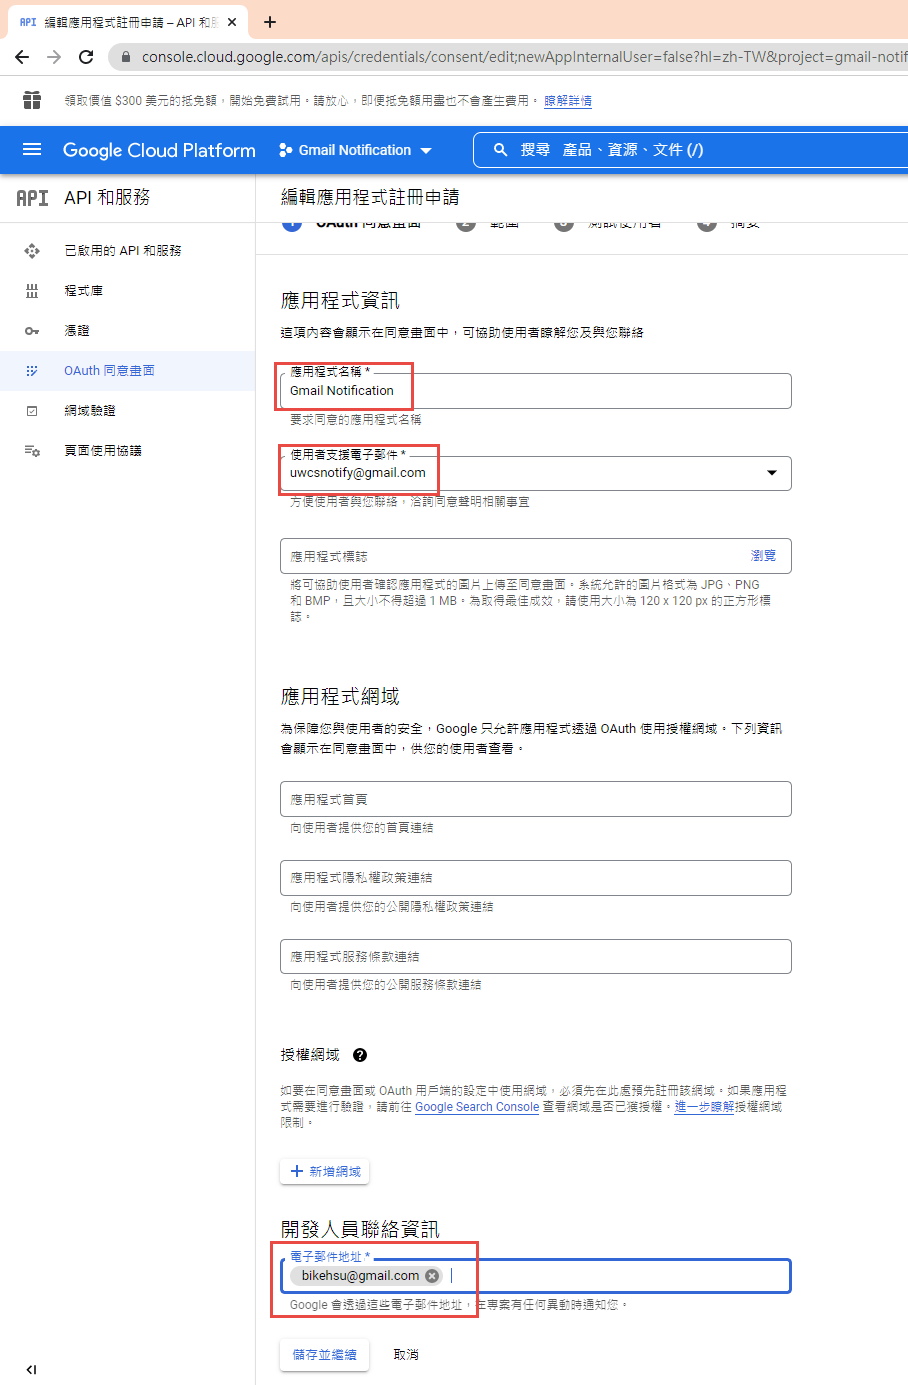
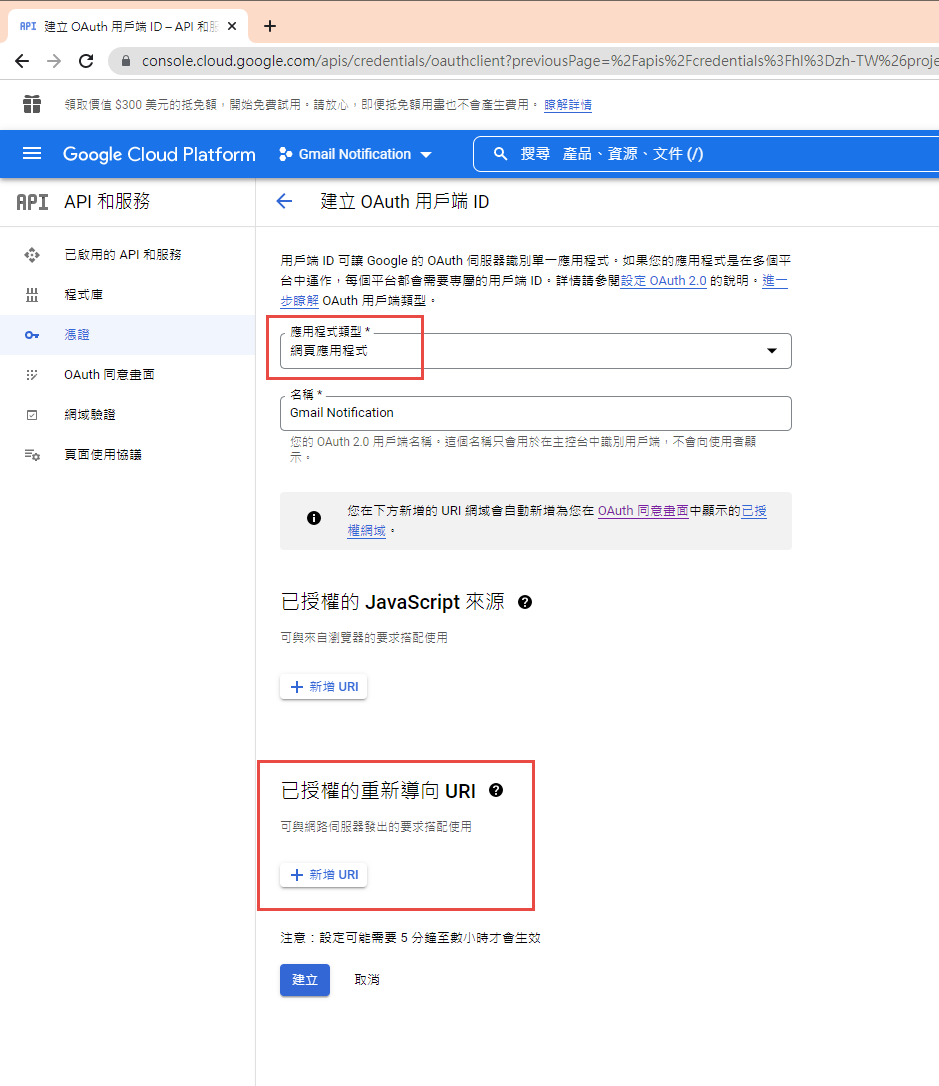
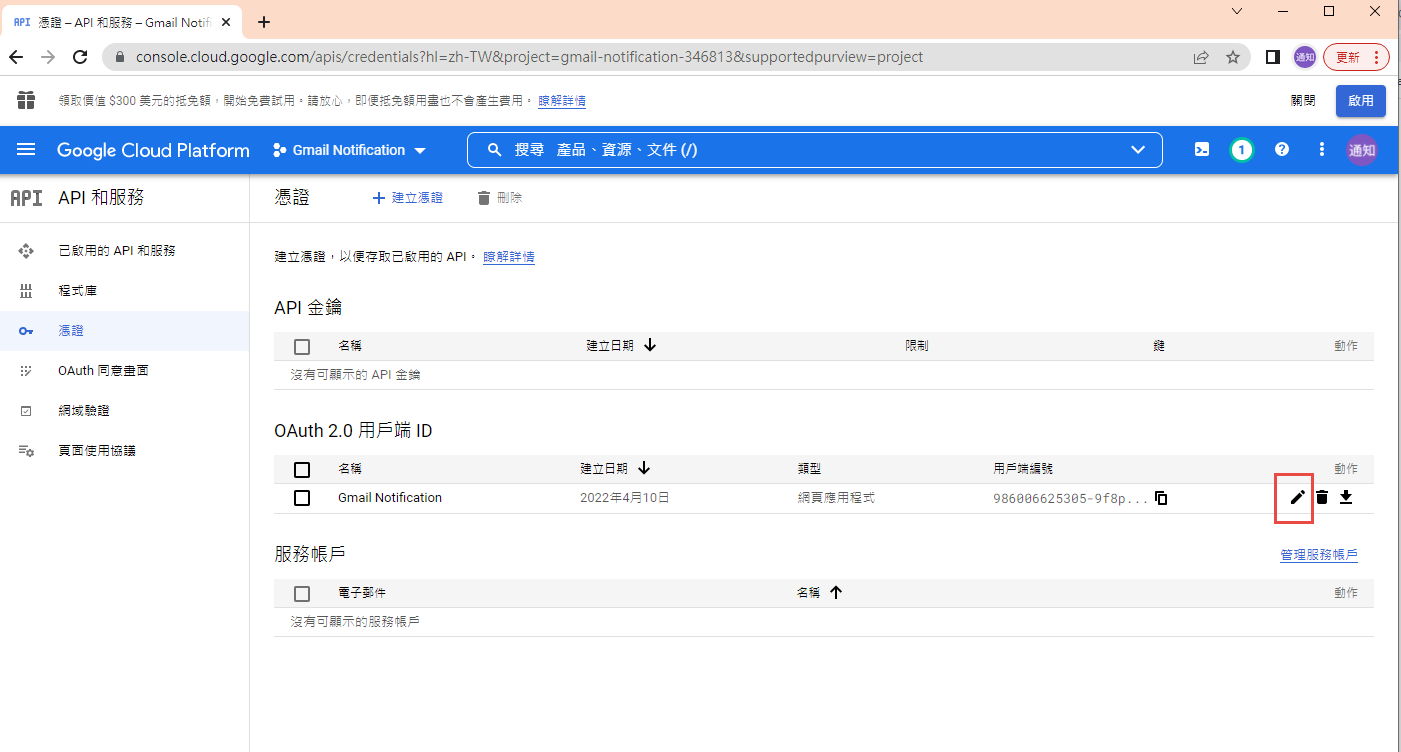
建立 OAuth 2.0 用戶端 ID 憑証

這裡除了名稱外,還有一個設定重導 Uri 的項目。現在不填寫,但稍後要回來補這個資料。
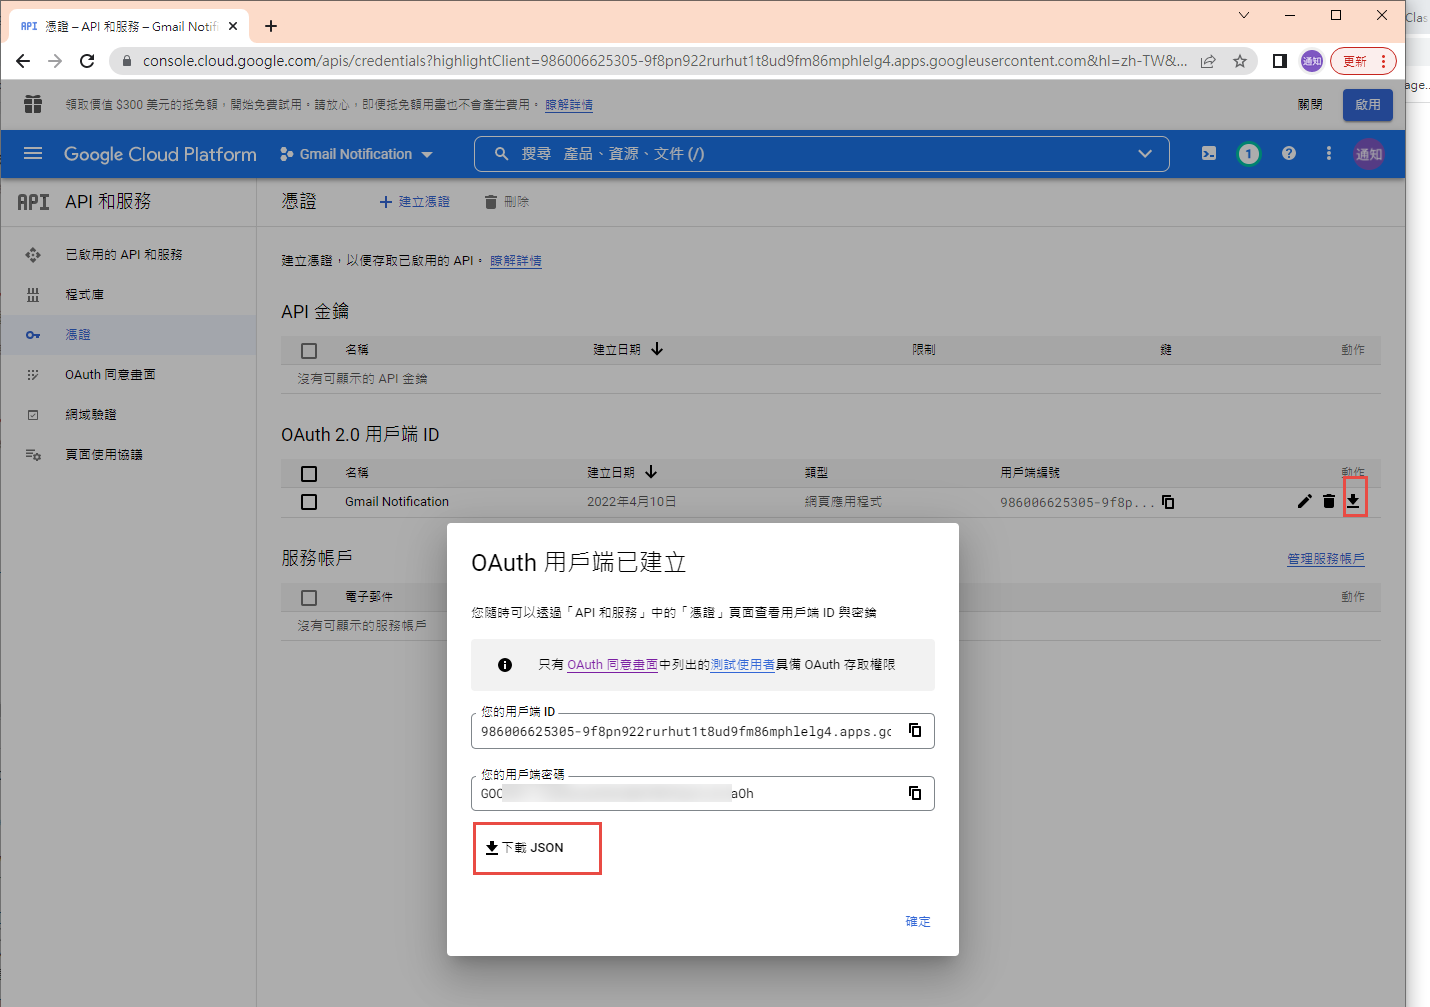
下載 json 之後,命名為 client_secret.json 保留後續使用。
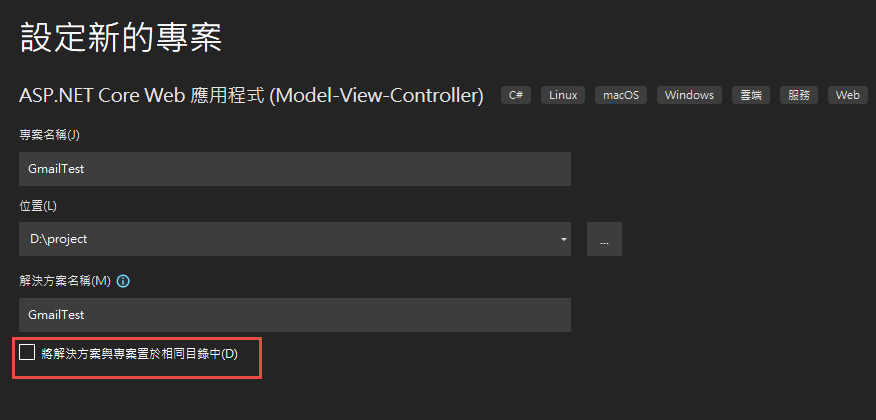
再來就要建立專案了. 用 VS2022 建立一個新專案

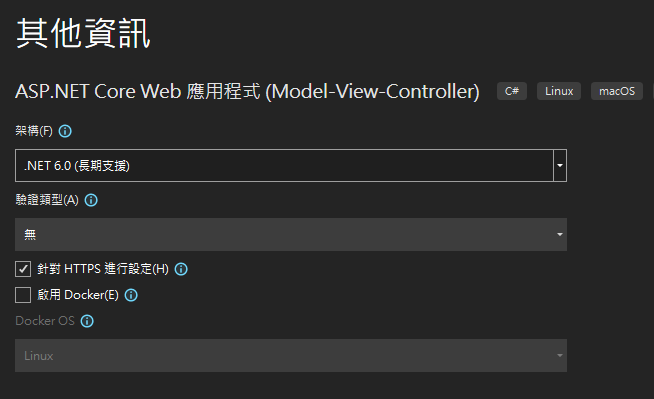
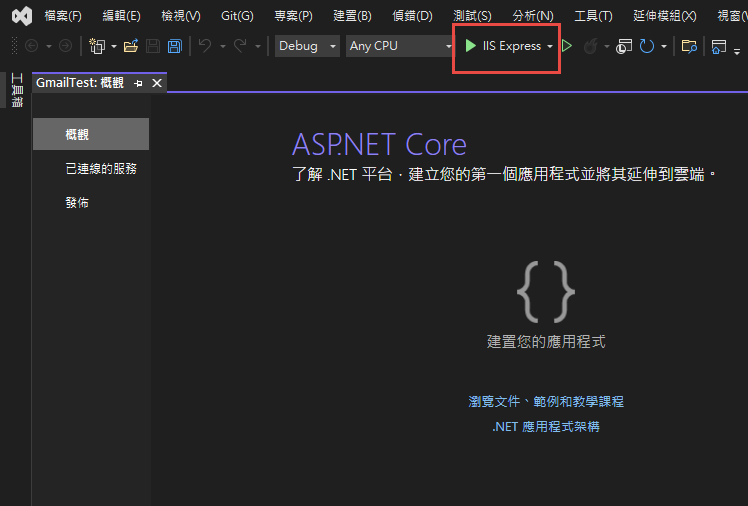
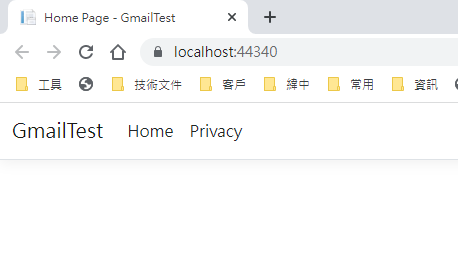
記錄網址, 本測試專案是 https://localhost:44340/ ,請依實際網址為準。
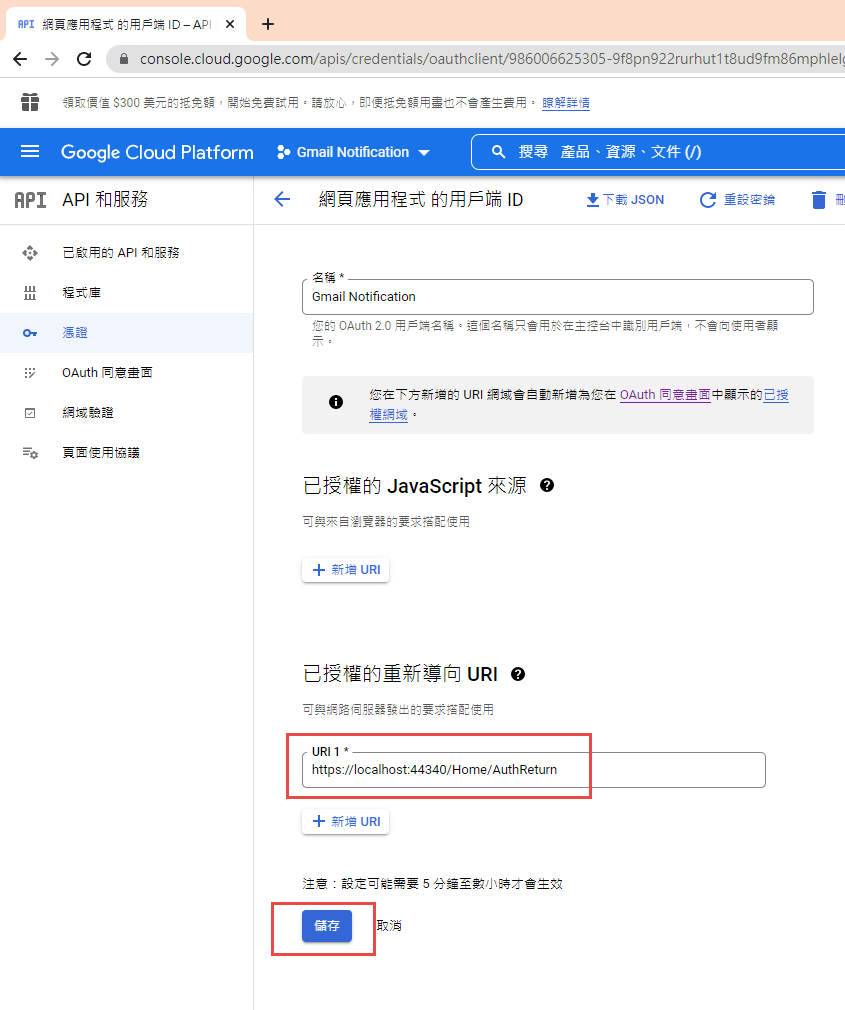
回到 OAuth 2.0 用戶端 ID 的設定頁. 在已授權的重新導向 URI 中填入 https://localhost:44340/Home/AuthReturn (填入的網址依實際專案的狀況,可能會有變化)
在 VS2022 中,使用 Nuget 安裝套件: (有漏的再麻煩和我說)
Google.Apis.Gmail.v1
Google.Apis.Auth
MimeKit (發送 gmail 時使用)
建立認証用的網址:
建立一個 Action, 用來取得認証用的網址:
執行結果:
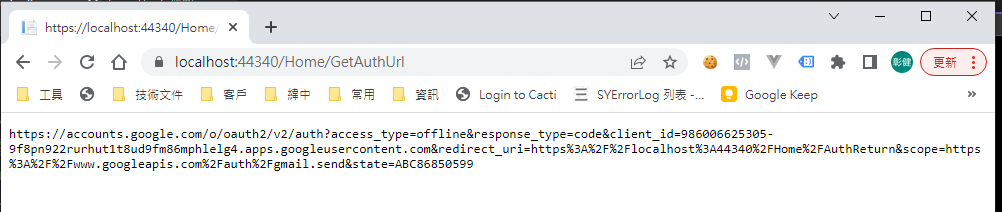
用 chrome 開啟產生的網址:
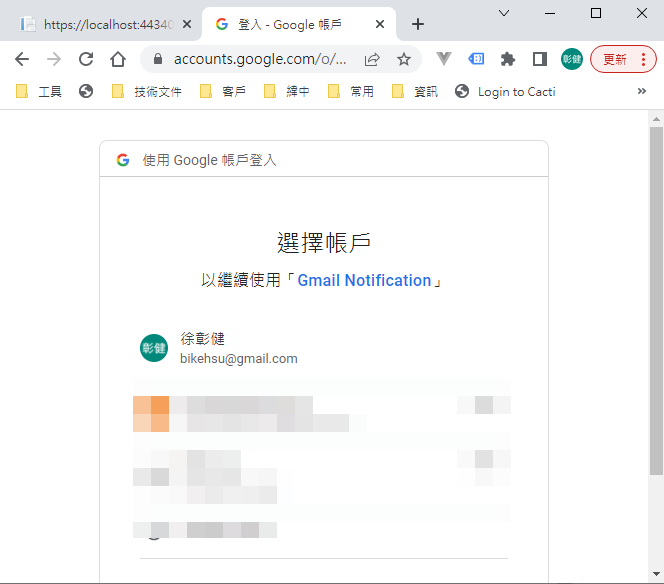
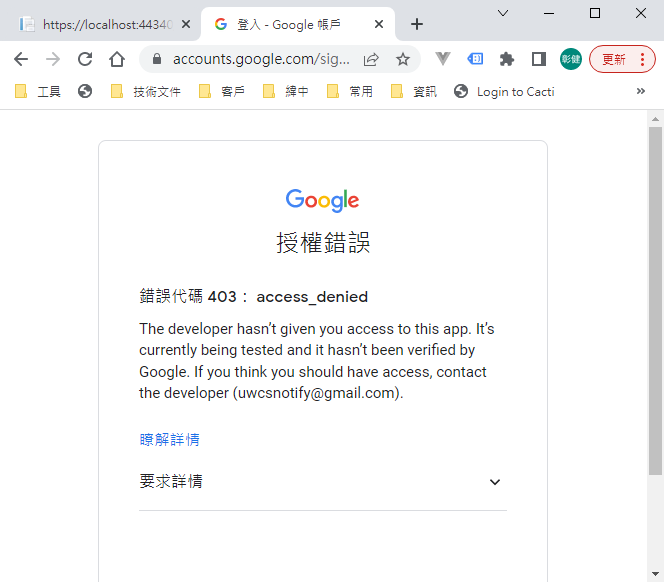
選取任一帳號,如果出現以下錯誤,請回到 "OAuth 同意畫面" 去新增測試使用者
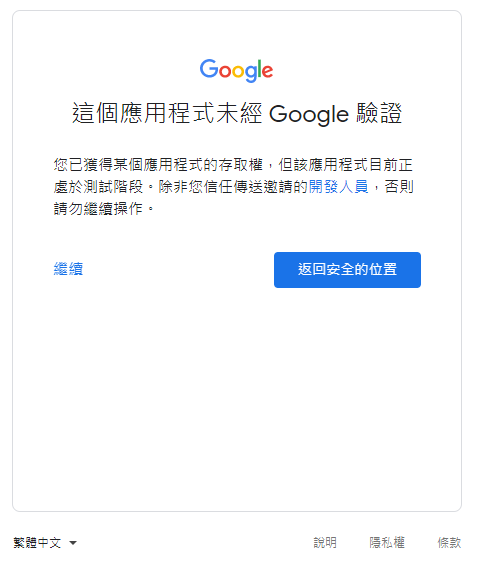
因為應用程式尚未發布,所以會看到警告,勇敢的繼續下去
這裡會要求授權使用你的名義發送信件。(這是在程式中取得授權的項目 Scopes 中所指定的)

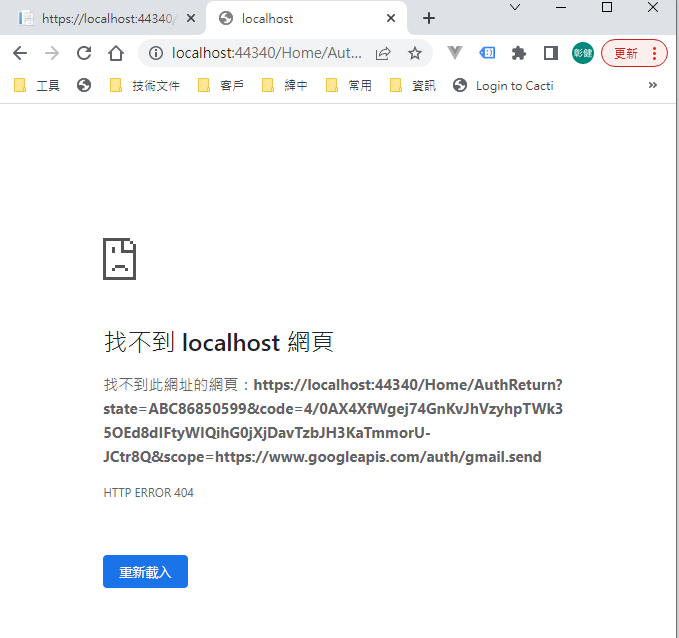
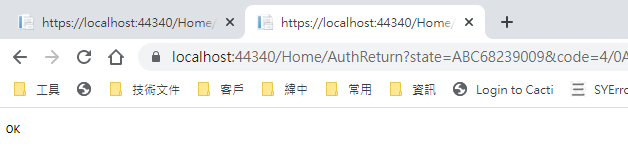
再繼續之後,會被重導至我們在 redirectUri 指定的網址。因為我們尚未完成,所以會看到錯誤,順便也可以看一下,會帶回哪一些參數。有 state, code, scope,共三個。
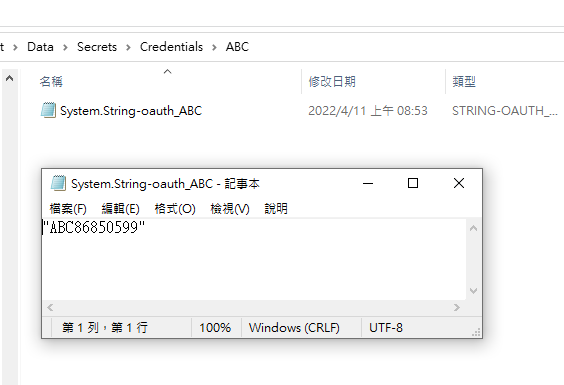
順便看一下,google 的套件會在 Credentials 的目錄下幫使用者建立一個目錄,在完成驗証前,會先放一個 System.String-oauth_XXX 的檔案,裡面的值和回傳的 state 是一樣的,這個應該是用來驗証回傳資料的。
接下來我們要新增 Action "AuthReturn" 如下:
再跑一次上面的流程,最後回到 AuthReturn
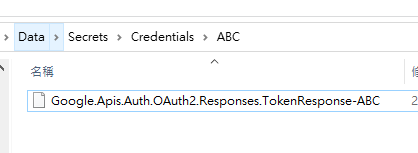
在 D:\project\GmailTest\Data\Secrets\Credentials\ABC 裡面會產生一個檔案: 這個就是我們的 token 了。
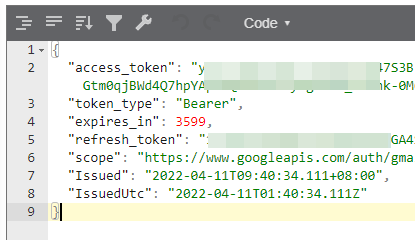
看一下裡面的內容, 有 access_token, refresh_token, scope 等等, 用途應該很好猜了.. 不知道各項目的目途也沒有關係。只要有這個 token 就可以了。
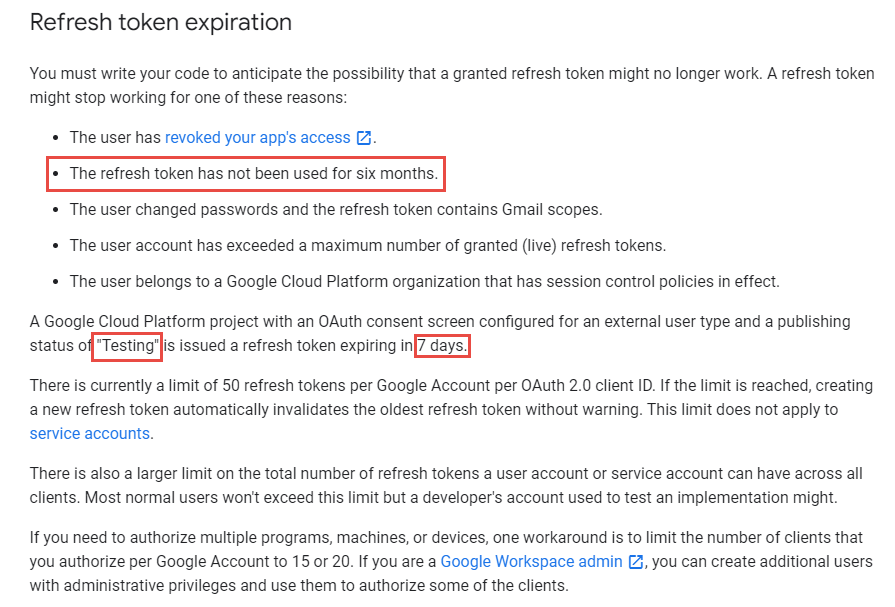
refresh_token 的效期請參考以下文件:
https://developers.google.com/identity/protocols/oauth2 。也可以參考下圖, 若是要用 gmail api 來發送通知信(例如連絡我們),紅色的地方是比較令人困擾的,例如 6 個月以上,沒有人留言,原來留下的 refresh_token 就失效了。使用者必需重新建立一個 refresh_token 。
最後來使用 gmail api 發送通知信, 直接看程式碼如下: 在這個過程中遇到最大的問題除了憑証問題之外,另一個問題是編碼。直到最後找到可以用 MimeKit 把 System.Net.Mail.MailMessage 編碼成 Gmail API 的格式才解決。程式碼如下:
收到的信件:
結論:
使用 Gmail API 最大的原因是要增加安全性,和舊的 smtp 不同的地方是,使用 gmail api 之後,客戶不需要提供 gmail 的帳號和密碼就可以讓系統使用 gmail 發送信件,不過由於 refresh_token 的效期問題,可能會造成無法發送通知信而沒有任何人發現的情況,整個實用性會變的很低。
另一個還沒有測試的部份是應用程的啟用。這個審核不知道會不很麻煩,不過可以而知的時,整個流程會花更多的時間。
取代的做法: 可能要改用 Amazon 的 SES 來寄信,而且為了避免每個小網站都要跑 SES 的建立流程,準備來寫一個 API 給各網站使用,可以發送簡單的通知信。
以上的程式碼可以在這裡下載: https://github.com/bikehsu/GmailTest
如果你的目的是要使用 Gmail Api 取代舊的 Gmail SMTP 來發送通知信,建議你先跳到最下方看一下結論。
如果你是想要看一下 Gmail API 和 Google API 憑証的使用方法,可以看一下這篇文章。
1. 在 google cloud platform 建立新的專案.
https://console.cloud.google.com/
啟用 Gmail API
因為我們要透過 OAuth 取得使用者授權,所以要設定使用 OAuth 的同意畫面。
指定授權的範圍
因為剛建立的專案,不會被公開,所以要指定測試使用者
如果要給任意使用者,必需經過發布的流程,但準備工作有點麻煩,所以這次就不發布了。
建立 OAuth 2.0 用戶端 ID 憑証
這裡除了名稱外,還有一個設定重導 Uri 的項目。現在不填寫,但稍後要回來補這個資料。
下載 json 之後,命名為 client_secret.json 保留後續使用。
再來就要建立專案了. 用 VS2022 建立一個新專案
記錄網址, 本測試專案是 https://localhost:44340/ ,請依實際網址為準。
回到 OAuth 2.0 用戶端 ID 的設定頁. 在已授權的重新導向 URI 中填入 https://localhost:44340/Home/AuthReturn (填入的網址依實際專案的狀況,可能會有變化)
在 VS2022 中,使用 Nuget 安裝套件: (有漏的再麻煩和我說)
Google.Apis.Gmail.v1
Google.Apis.Auth
MimeKit (發送 gmail 時使用)
建立認証用的網址:
建立一個 Action, 用來取得認証用的網址:
        /// <summary>

        /// 取得授權的項目

        /// </summary>

        static string[] Scopes = { GmailService.Scope.GmailSend };


        // 和登入 google 的帳號無關

        // 任意值,若未來有使用者認証,可使用使用者編號或登入帳號。

        string Username = "ABC";


        /// <summary>

        /// 存放 client_secret 和 credential 的地方

        /// </summary>

        string SecretPath = @"D:\project\GmailTest\Data\Secrets";


        /// <summary>

        /// 認証完成後回傳的網址, 必需和 OAuth 2.0 Client Id 中填寫的 "已授權的重新導向 URI" 相同。

        /// </summary>

        string RedirectUri = $"https://localhost:44340/Home/AuthReturn";


        /// <summary>

        /// 取得認証用的網址

        /// </summary>

        /// <returns></returns>

        public async Task<string> GetAuthUrl()

        {

            using (var stream = new FileStream(Path.Combine(SecretPath, "client_secret.json"), FileMode.Open, FileAccess.Read))

            {

                FileDataStore dataStore = null;

                var credentialRoot = Path.Combine(SecretPath, "Credentials");

                if (!Directory.Exists(credentialRoot))

                {

                    Directory.CreateDirectory(credentialRoot);

                }


                //存放 credential 的地方,每個 username 會建立一個目錄。

                string filePath = Path.Combine(credentialRoot, Username);

                dataStore = new FileDataStore(filePath);


                IAuthorizationCodeFlow flow = new GoogleAuthorizationCodeFlow(new GoogleAuthorizationCodeFlow.Initializer

                {

                    ClientSecrets = GoogleClientSecrets.Load(stream).Secrets,

                    Scopes = Scopes,

                    DataStore = dataStore

                });


                var authResult = await new AuthorizationCodeWebApp(flow, RedirectUri, Username)

                .AuthorizeAsync(Username, CancellationToken.None);


                return authResult.RedirectUri;

            }

        }
執行結果:
用 chrome 開啟產生的網址:
選取任一帳號,如果出現以下錯誤,請回到 "OAuth 同意畫面" 去新增測試使用者
因為應用程式尚未發布,所以會看到警告,勇敢的繼續下去
這裡會要求授權使用你的名義發送信件。(這是在程式中取得授權的項目 Scopes 中所指定的)
再繼續之後,會被重導至我們在 redirectUri 指定的網址。因為我們尚未完成,所以會看到錯誤,順便也可以看一下,會帶回哪一些參數。有 state, code, scope,共三個。
順便看一下,google 的套件會在 Credentials 的目錄下幫使用者建立一個目錄,在完成驗証前,會先放一個 System.String-oauth_XXX 的檔案,裡面的值和回傳的 state 是一樣的,這個應該是用來驗証回傳資料的。
接下來我們要新增 Action "AuthReturn" 如下:
        public async Task<string> AuthReturn(AuthorizationCodeResponseUrl authorizationCode)

        {

            string[] scopes = new[] { GmailService.Scope.GmailSend };


            using (var stream = new FileStream(Path.Combine(SecretPath, "client_secret.json"), FileMode.Open, FileAccess.Read))

            {

                //確認 credential 的目錄已建立.

                var credentialRoot = Path.Combine(SecretPath, "Credentials");

                if (!Directory.Exists(credentialRoot))

                {

                    Directory.CreateDirectory(credentialRoot);

                }


                //暫存憑証用目錄

                string tempPath = Path.Combine(credentialRoot, authorizationCode.State);


                IAuthorizationCodeFlow flow = new GoogleAuthorizationCodeFlow(

                new GoogleAuthorizationCodeFlow.Initializer

                {

                    ClientSecrets = GoogleClientSecrets.Load(stream).Secrets,

                    Scopes = scopes,

                    DataStore = new FileDataStore(tempPath)

                });


                //這個動作應該是要把 code 換成 token

                await flow.ExchangeCodeForTokenAsync(Username, authorizationCode.Code, RedirectUri, CancellationToken.None).ConfigureAwait(false);


                if (!string.IsNullOrWhiteSpace(authorizationCode.State))

                {

                    string newPath = Path.Combine(credentialRoot, Username);

                    if (tempPath.ToLower() != newPath.ToLower())

                    {

                        if (Directory.Exists(newPath))

                            Directory.Delete(newPath, true);


                        Directory.Move(tempPath, newPath);

                    }

                }


                return "OK";

            }

        }
再跑一次上面的流程,最後回到 AuthReturn
在 D:\project\GmailTest\Data\Secrets\Credentials\ABC 裡面會產生一個檔案: 這個就是我們的 token 了。
看一下裡面的內容, 有 access_token, refresh_token, scope 等等, 用途應該很好猜了.. 不知道各項目的目途也沒有關係。只要有這個 token 就可以了。
refresh_token 的效期請參考以下文件:
https://developers.google.com/identity/protocols/oauth2 。也可以參考下圖, 若是要用 gmail api 來發送通知信(例如連絡我們),紅色的地方是比較令人困擾的,例如 6 個月以上,沒有人留言,原來留下的 refresh_token 就失效了。使用者必需重新建立一個 refresh_token 。
最後來使用 gmail api 發送通知信, 直接看程式碼如下: 在這個過程中遇到最大的問題除了憑証問題之外,另一個問題是編碼。直到最後找到可以用 MimeKit 把 System.Net.Mail.MailMessage 編碼成 Gmail API 的格式才解決。程式碼如下:
public async Task<bool> SendTestMail()
{
var service = await GetGmailService();
GmailMessage message = new GmailMessage();
message.Subject = "標題";
message.Body = $"<h1>內容</h1>";
message.FromAddress = "bikehsu@gmail.com";
message.IsHtml = true;
message.ToRecipients = "bikehsu@gmail.com";
message.Attachments = new List<Attachment>();
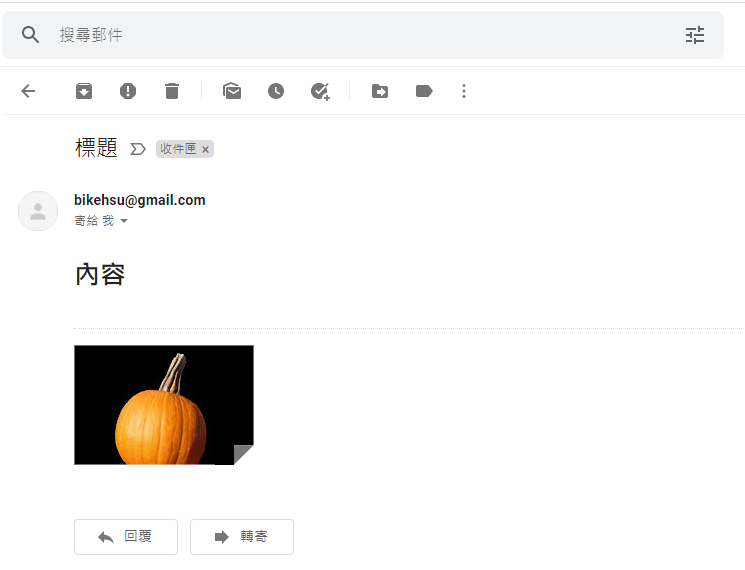
string filePath = @"C:\Users\bike\Pictures\Vegetable_pumpkin.jpg"; //要附加的檔案
Attachment attachment1 = new Attachment(filePath);
message.Attachments.Add(attachment1);
SendEmail(message, service);
Console.WriteLine("OK");
return true;
}
async Task<GmailService> GetGmailService()
{
UserCredential credential = null;
var credentialRoot = Path.Combine(SecretPath, "Credentials");
if (!Directory.Exists(credentialRoot))
{
Directory.CreateDirectory(credentialRoot);
}
string filePath = Path.Combine(credentialRoot, Username);
using (var stream = new FileStream(Path.Combine(SecretPath, "client_secret.json"), FileMode.Open, FileAccess.Read))
{
credential = await GoogleWebAuthorizationBroker.AuthorizeAsync(
GoogleClientSecrets.Load(stream).Secrets,
Scopes,
Username,
CancellationToken.None,
new FileDataStore(filePath));
}
var service = new GmailService(new BaseClientService.Initializer()
{
HttpClientInitializer = credential,
ApplicationName = "Send Mail",
});
return service;
}
public class GmailMessage
{
public string FromAddress { get; set; }
public string ToRecipients { get; set; }
public string Subject { get; set; }
public string Body { get; set; }
public bool IsHtml { get; set; }
public List<System.Net.Mail.Attachment> Attachments { get; set; }
}
public static void SendEmail(GmailMessage email, GmailService service)
{
var mailMessage = new System.Net.Mail.MailMessage();
mailMessage.From = new System.Net.Mail.MailAddress(email.FromAddress);
mailMessage.To.Add(email.ToRecipients);
mailMessage.ReplyToList.Add(email.FromAddress);
mailMessage.Subject = email.Subject;
mailMessage.Body = email.Body;
mailMessage.IsBodyHtml = email.IsHtml;
if (email.Attachments != null)
{
foreach (System.Net.Mail.Attachment attachment in email.Attachments)
{
mailMessage.Attachments.Add(attachment);
}
}
var mimeMessage = MimeKit.MimeMessage.CreateFromMailMessage(mailMessage);
var gmailMessage = new Google.Apis.Gmail.v1.Data.Message
{
Raw = Encode(mimeMessage)
};
Google.Apis.Gmail.v1.UsersResource.MessagesResource.SendRequest request = service.Users.Messages.Send(gmailMessage, "me");
request.Execute();
}
public static string Encode(MimeMessage mimeMessage)
{
using (MemoryStream ms = new MemoryStream())
{
mimeMessage.WriteTo(ms);
return Convert.ToBase64String(ms.GetBuffer())
.TrimEnd('=')
.Replace('+', '-')
.Replace('/', '_');
}
}
收到的信件:
結論:
使用 Gmail API 最大的原因是要增加安全性,和舊的 smtp 不同的地方是,使用 gmail api 之後,客戶不需要提供 gmail 的帳號和密碼就可以讓系統使用 gmail 發送信件,不過由於 refresh_token 的效期問題,可能會造成無法發送通知信而沒有任何人發現的情況,整個實用性會變的很低。
另一個還沒有測試的部份是應用程的啟用。這個審核不知道會不很麻煩,不過可以而知的時,整個流程會花更多的時間。
取代的做法: 可能要改用 Amazon 的 SES 來寄信,而且為了避免每個小網站都要跑 SES 的建立流程,準備來寫一個 API 給各網站使用,可以發送簡單的通知信。
以上的程式碼可以在這裡下載: https://github.com/bikehsu/GmailTest
Bike, 2022/4/10 下午 09:31:15
Browser:
safari in iphone
chrome in iphone
chrome in android
in Line (APP)
in FB (APP)
HTML:
form target="_blank"
window.open
link target="_blank"
Trigger:
onclick in tag
.click with jquery
submit button
safari in iphone
chrome in iphone
chrome in android
in Line (APP)
in FB (APP)
HTML:
form target="_blank"
window.open
link target="_blank"
Trigger:
onclick in tag
.click with jquery
submit button
Bike, 2022/2/11 上午 09:13:12
以下的程式碼, 直接 alert(this.errorMessages); 會造成 chrome 卡住..
使用 setTimeout 延後 alert 可以解決這個問題. 但必需延後足夠的時間. 已知 200 ms 依然會卡住.
使用 setTimeout 延後 alert 可以解決這個問題. 但必需延後足夠的時間. 已知 200 ms 依然會卡住.
    errorMessages: "",


    failProcess: function (ret) {

        console.log("failProcess start: " + new Date().getSeconds() + "." + new Date().getMilliseconds());

        var json = ret.responseJSON;

        if (json && json.invalidatedPayloads) {

            var errors = json.invalidatedPayloads.filter(function F(x) {

                return x.messages.length > 0

            });


            console.log("bdfore add class: " + new Date().getSeconds() + "." + new Date().getMilliseconds());


            errors.map(function (x) {

                return $("[name='" + x.name + "']").addClass("error");

            });


            console.log("after add class: " + new Date().getSeconds() + "." + new Date().getMilliseconds());


            errorMessages = errors.map(function (x) {

                    return x.messages.join('\r\n');

            }).join('\r\n');


            console.log("afger build errorMessages: " + new Date().getSeconds() + "." + new Date().getMilliseconds());

            console.log(errorMessages);


            //alert(this.errorMessages);


            window.setTimeout(api.alertError, 500);


            console.log("after alert: " + new Date().getSeconds() + "." + new Date().getMilliseconds());

        }


        console.log("failProcess end: " + new Date().getSeconds() + "." + new Date().getMilliseconds());

    },
Bike, 2021/9/29 下午 08:45:07
1. Asp.Net Session 會造成 Block
2. ashx 和 aspx 在 Session 的預設值是不同的.
3. Clinet 的非同步和 Session 造成的 block 的差異
4. 靜態物件也會互相等待(Browser concurrent connetion 的限制, Edge:8個 Connection, Chrome: 6 個, 2019/4 的測試)
5.ashx 和 aspx 的 session 閞關方式.
6. asp.net 的 session 是看 Cookie, 嘗試做 session hijack
額外追加: 服務的三個 Level(告知, 陪同完成, 詢問並給予進一步的建議)
2. ashx 和 aspx 在 Session 的預設值是不同的.
3. Clinet 的非同步和 Session 造成的 block 的差異
4. 靜態物件也會互相等待(Browser concurrent connetion 的限制, Edge:8個 Connection, Chrome: 6 個, 2019/4 的測試)
5.ashx 和 aspx 的 session 閞關方式.
6. asp.net 的 session 是看 Cookie, 嘗試做 session hijack
額外追加: 服務的三個 Level(告知, 陪同完成, 詢問並給予進一步的建議)
Bike, 2019/5/2 下午 02:41:33
注意事項 (為避免產出結果和預期有重大差異, 請詳讀以下內容):
1. 若後台有使用 HTML 編輯器, 以 CKEditor 現有功能為準. 編輯器所見內容和前台實際內容可能有差異, 此為無法避免之情況, 請僅慎使用, 建議以文字模式編輯, 以避免跑版.
2. 驗收以 Chrome, IE, Safari, Firefox 結案時間的最新兩個版本為準(IE 目前為 IE Edge 及 IE 11). 手機以前 10 大廠牌兩年內出版的手機為準.
3. Android 手機僅測試 Chrome, IOS 手機僅測試 Safari. 其它手機預設瀏覽器或 APP 內建流覽器不包括在驗收範圍之內.
4. 若需要文件, 除報價有說明外, 應另外計費, 若合約中包括程式檔案說明, 僅限我方建立之程式檔案, 引用之公開套件不另做文件說明.
5. 若客戶要求資安弱點掃瞄, 或通過特別認証, 應另外計費.
6. 本公司盡力維護程式品質, 但無法保証無 Bug, 上線前請完整測試. 若上線後才發現之 Bug, 本公司僅負責修復, 無法提供額外賠償.
7. 主機代管限制
圖檔以經 Cloudfalre 為準. 若需更高品質可代為申請 amazon 的 CDN 服務.
Email 不保証送達, 若需更高品質可代為申請 amazon 的 SES 服務.
每月 1000 張訂單為限, 超過後要另外計算費用.
8. 網站代管, 資料備份以一天一次為準, 如需增加頻率, 另外協議後計價.
9. 搜尋建議使用 Google 的 site search(但偶爾會有廣告, 出現機率很小), 若要自行客製, 合約未明確規定時, 以各單元分開搜尋為準, 例如產品及新聞的搜尋結果會分成兩個搜尋結果頁面, 排序為依等定欄位排序, 比對方式為所輸入的文字明確比對.
Bike, 2018/6/20 下午 07:49:31
用 Chrome 下載網頁時, JS 檔的副檔名會被加上 ".下載", 要移除很多檔案的副檔名時, 可以用以下的 Batch
@echo off
for /R "C:\Path\HTML_files" %%f in (*.下載) do (
ren "%%f" "%%~nf"
)
pause
@echo off
for /R "C:\Path\HTML_files" %%f in (*.下載) do (
ren "%%f" "%%~nf"
)
pause
Bike, 2016/12/19 下午 12:52:56
錯誤訊息如下, 完全沒有錯誤訊息, 以及沒有錯誤的程式碼位置
查了一下,原來網址後面多了空白 (%20) , 也就是 ? 前面多了空白
只是exception物件會自作聰明把他濾掉了,反而從 exception log 看不到資料
測試過,userd可以正常看網站,只是server會有不斷 excetion產生,有點煩
網路上雖有一些解法,但我想還是要求下廣告時,要注意網址問題
<Item time="2016-01-11T05:39:01" page="/fr/iconic-bright-cushion-spf-50-pa-nude-perfection-compact-foundation/p/5490/c/30"
url="http://www.shopunt.com/fr/iconic-bright-cushion-spf-50-pa-nude-perfection-compact-foundation/p/5490/c/30?utm_source=edm&utm_medium=email&utm_content=20160107_cushion_4&utm_campaign=makeup&OutAD_Id=5825" username="Not Member" browserName="Chrome" browserVersion="34.0" userAgent="Mozilla/5.0 (Linux; Android 5.1.1; SAMSUNG SM-N915FY Build/LMY47X) AppleWebKit/537.36 (KHTML, like Gecko) SamsungBrowser/2.1 Chrome/34.0.1847.76 Mobile Safari/537.36" RemoteIP="37.160.206.7" Ref="No Ref" RequestType="GET" Ver="3">
<ErrMsg>
</ErrMsg>
<ErrStack> 於 System.Web.CachedPathData.ValidatePath(String physicalPath)
於 System.Web.HttpApplication.PipelineStepManager.ValidateHelper(HttpContext context)</ErrStack>
<Post>
</Post>
<Cookie>
</Cookie>
</Item>
查了一下,原來網址後面多了空白 (%20) , 也就是 ? 前面多了空白
只是exception物件會自作聰明把他濾掉了,反而從 exception log 看不到資料
測試過,userd可以正常看網站,只是server會有不斷 excetion產生,有點煩
網路上雖有一些解法,但我想還是要求下廣告時,要注意網址問題
darren, 2016/1/11 上午 09:51:49