頁數 1 / 2
下一頁
搜尋 Chrome 結果:
<!DOCTYPE html>

<html lang="en">

<head>

    <meta charset="UTF-8">

    <meta name="viewport" content="width=device-width, initial-scale=1.0">

    <title>BLE Printer Test</title>

    <script src="https://cdn.jsdelivr.net/npm/iconv-lite-umd@0.6.10/lib/iconv-lite-umd.js"></script>

</head>

<body>

    <h1>BLE Printer Test 123</h1>

    <button id="printTestButton">Test Print</button>

    <button id="printAgain">Print Again</button>

    <pre id="log"></pre>

    <script>

        // Function to log messages on the page

        function logMessage(message) {

            const logElement = document.getElementById('log');

            logElement.textContent += message + '\n';

        }

        var device;

        var server;

        var service;

        var characteristic;

        var name = 'T58_6752'; // 藍芽設備的名稱

        var uuid = 0x1800; //service UUID (用 BLE Scanner 找到的)

        var characteristicUuid = 0x2A00; // characteristic UUID (用 BLE Scanner 找到的)

        // Function to connect to BLE printer and send test data


        async function connectAndTestPrint() {


            try {

                logMessage("Requesting Bluetooth device...");


                // Request the BLE device

                device = await navigator.bluetooth.requestDevice({

                    //acceptAllDevices: true,

                    filters: [

                        { name: name }

                    ],

                    optionalServices: [uuid] // Replace with the correct service UUID

                });


                logMessage(`Device selected: ${device.name}`);

                logMessage(`Device uuid: ${device.id}`);


                await printAgain();


            } catch (error) {

                logMessage(`Error: ${error.message}`);

            }

        }


        // 转码方法

        function stringToGbk(str) {

            const ranges = [

                [0xA1, 0xA9, 0xA1, 0xFE],

                [0xB0, 0xF7, 0xA1, 0xFE],

                [0x81, 0xA0, 0x40, 0xFE],

                [0xAA, 0xFE, 0x40, 0xA0],

                [0xA8, 0xA9, 0x40, 0xA0],

                [0xAA, 0xAF, 0xA1, 0xFE],

                [0xF8, 0xFE, 0xA1, 0xFE],

                [0xA1, 0xA7, 0x40, 0xA0],

            ]

            const codes = new Uint16Array(23940)

            let i = 0


            for (const [b1Begin, b1End, b2Begin, b2End] of ranges) {

                for (let b2 = b2Begin; b2 <= b2End; b2++) {

                    if (b2 !== 0x7F) {

                        for (let b1 = b1Begin; b1 <= b1End; b1++) {

                            codes[i++] = b2 << 8 | b1

                        }

                    }

                }

            }

            const cstr = new TextDecoder('gbk').decode(codes)


            // 编码表

            const table = new Uint16Array(65536)

            for (let i = 0; i < cstr.length; i++) {

                table[cstr.charCodeAt(i)] = codes[i]

            }

            const buf = new Uint8Array(str.length * 2)

            let n = 0


            for (let i = 0; i < str.length; i++) {

                const code = str.charCodeAt(i)

                if (code < 0x80) {

                    buf[n++] = code

                } else {

                    const gbk = table[code]

                    buf[n++] = gbk & 0xFF

                    buf[n++] = gbk >> 8

                }

            }

            u8buf = buf.subarray(0, n)

            // console.log(u8buf);

            return u8buf

        }


        async function printAgain() {

            // Connect to the GATT server

            server = await device.gatt.connect();

            logMessage("Connected to GATT server.");


            // Get the printer service

            service = await server.getPrimaryService(uuid); // Replace with your printer's service UUID

            logMessage("Printer service retrieved.");


            // Get the characteristic for writing data

            characteristic = await service.getCharacteristic(characteristicUuid); // Replace with the correct characteristic UUID

            logMessage("Printer characteristic retrieved.");


            // Prepare test print data

            const encoder = new TextEncoder();

            const testData = encoder.encode("TEST PRINT: Hello from Web Bluetooth!\n");

            const finalData = encoder.encode("--\n--\n \n \n");


            const setFontSize = new Uint8Array([0x1D, 0x21, 0x11]); // GS ! n

            const setFontSize2 = new Uint8Array([0x1D, 0x21, 0x22]); // GS ! n

            const setFontSize3 = new Uint8Array([0x1D, 0x21, 0x33]); // GS ! n


            // Write test data to the printer

            logMessage("Sending test data to printer...");


            await characteristic.writeValue(new Uint8Array([0x1D, 0x21, 0x00]));

            await characteristic.writeValue(encoder.encode("1x1!\n"));

            await characteristic.writeValue(setFontSize);

            await characteristic.writeValue(encoder.encode("2x2!\n"));

            await characteristic.writeValue(setFontSize2);

            await characteristic.writeValue(encoder.encode("3x3!\n"));

            await characteristic.writeValue(setFontSize3);

            await characteristic.writeValue(encoder.encode("4x4!\n"));


            const initPrinter = new Uint8Array([0x1B, 0x40]); // ESC @

            await characteristic.writeValue(initPrinter);


            // 3. 設置字符集為 GBK

            const setGBK = new Uint8Array([0x1B, 0x74, 0x11]); // ESC t 0x11 (GBK)

            await characteristic.writeValue(setGBK);


            const text = "繁體中文測試\n \n";

            const encodedText = stringToGbk(text);

            await characteristic.writeValue(encodedText);

            logMessage("Test data sent successfully!");


            // QrCode 列印

            const qrData = "https://example.com"; // Your QR code data

            const qrDataLength = qrData.length + 3;

            const pL = qrDataLength & 0xFF; // Low byte

            const pH = (qrDataLength >> 8) & 0xFF; // High byte


            const commands = [

                0x1B, 0x40, // Initialize printer

                0x1D, 0x28, 0x6B, pL, pH, 0x31, 0x50, 0x30, ...new TextEncoder().encode(qrData), // Store data

                0x1D, 0x28, 0x6B, 0x03, 0x00, 0x31, 0x51, 0x30 // Print QR code

            ];


            const buffer = new Uint8Array(commands);

            await characteristic.writeValue(buffer);

            logMessage("QrCode sent successfully!");


            await characteristic.writeValue(finalData);

            logMessage("finalData sent successfully!");


            // Disconnect the GATT server

            server.disconnect();

            logMessage("Disconnected from printer.");

        }


        // Bind the function to the button

        document.getElementById('printTestButton').addEventListener('click', connectAndTestPrint);

        document.getElementById('printAgain').addEventListener('click', printAgain);

    </script>

</body>

</html>
Bike, 2025/1/2 下午 02:20:15
試了這兩個 Sample:
https://learn.microsoft.com/en-us/training/modules/store-local-data/4-exercise-store-data-locally-with-sqlite
和
https://blazorhelpwebsite.com/ViewBlogPost/61
結果專案在 Windows 環境下都可以正常執行,但切換到 Android Emulator 就無法存檔。
在查了很多資料後,發現需要裝額外的 Package,需安裝的 Package 如下:
其它的發現為:
1. 雙點專案,就可以開啟 csproj 檔案。下方的 ItemGroup 就是已安裝的 package
2. 可以把 chrome 連接到 Android Emulator 的方法,在網址列輸入以下指令:
chrome://inspect/#devices
https://learn.microsoft.com/en-us/training/modules/store-local-data/4-exercise-store-data-locally-with-sqlite
和
https://blazorhelpwebsite.com/ViewBlogPost/61
結果專案在 Windows 環境下都可以正常執行,但切換到 Android Emulator 就無法存檔。
在查了很多資料後,發現需要裝額外的 Package,需安裝的 Package 如下:
    <ItemGroup>

     <PackageReference Include="sqlite-net-pcl" Version="1.8.116" />

     <PackageReference Include="SQLiteNetExtensions.Async" Version="2.1.0" />

     <PackageReference Include="SQLitePCLRaw.bundle_green" Version="2.1.4" />

     <PackageReference Include="SQLitePCLRaw.core" Version="2.1.4" />

     <PackageReference Include="SQLitePCLRaw.lib.e_sqlite3" Version="2.1.4" />

     <PackageReference Include="SQLitePCLRaw.provider.dynamic_cdecl" Version="2.1.4" />

     <PackageReference Include="System.Data.DataSetExtensions" Version="4.5.0" />

    </ItemGroup>
其它的發現為:
1. 雙點專案,就可以開啟 csproj 檔案。下方的 ItemGroup 就是已安裝的 package
2. 可以把 chrome 連接到 Android Emulator 的方法,在網址列輸入以下指令:
chrome://inspect/#devices
Bike, 2023/2/12 下午 05:09:11
問題:
在開出新分頁後,無法讀取 sessionStorage 的資料
可能原因:
Chrome 某個版本,Stop cloning sessionStorage for windows opened with noopener
a标签_blank默认 rel="noopener" ,所以a标签需要加入rel=“opener” 而才能像window.open("同源页面")这种方式新开的页面会复制之前的sessionStorage
解決方法:
開新分頁前,加入 rel=“opener”參數即可。
例:
參考:
面试官:你确定多窗口之间sessionStorage不能共享状态吗???
在開出新分頁後,無法讀取 sessionStorage 的資料
可能原因:
Chrome 某個版本,Stop cloning sessionStorage for windows opened with noopener
a标签_blank默认 rel="noopener" ,所以a标签需要加入rel=“opener” 而才能像window.open("同源页面")这种方式新开的页面会复制之前的sessionStorage
解決方法:
開新分頁前,加入 rel=“opener”參數即可。
例:
<a href="http://..." target="_blank" rel="opener">Link</a>
$(".hlkPrint").click(function () {

    $("form").setPostDataToStorage();


    $("form").attr("rel", "opener");

    $("form").attr("target", "_blank");

    $("form").attr("action", "xxxxx.aspx");

    $("form").submit();

});
參考:
面试官:你确定多窗口之间sessionStorage不能共享状态吗???
Reiko, 2022/12/1 下午 05:57:23
這裡是我測試 Gmail API 和 Google API 憑証的一些記錄。
如果你的目的是要使用 Gmail Api 取代舊的 Gmail SMTP 來發送通知信,建議你先跳到最下方看一下結論。
如果你是想要看一下 Gmail API 和 Google API 憑証的使用方法,可以看一下這篇文章。
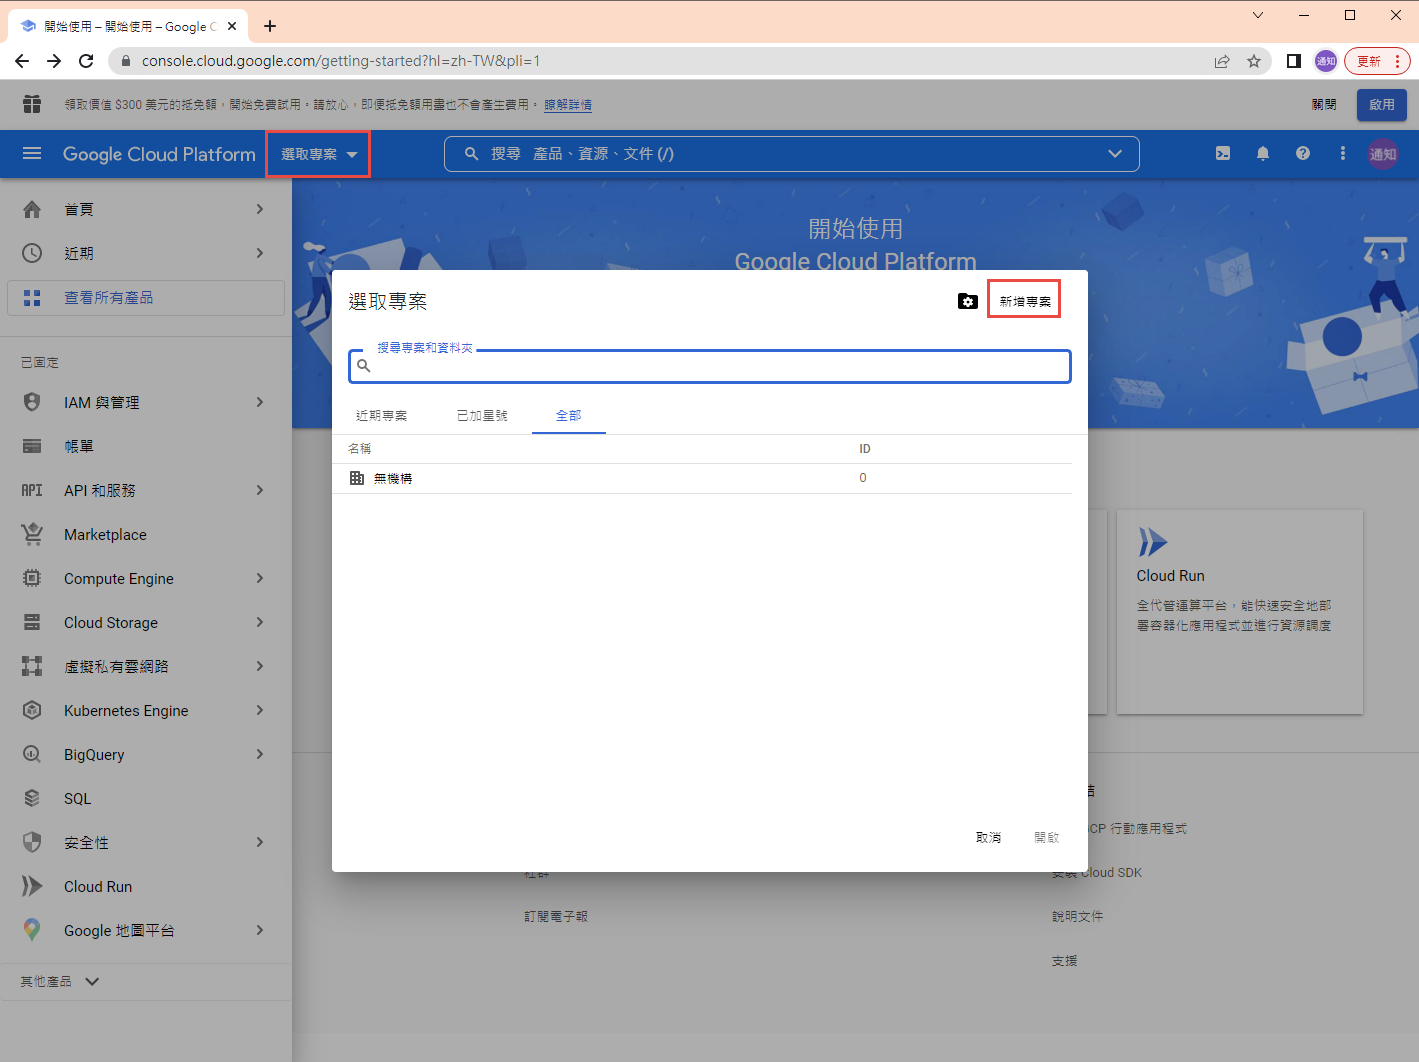
1. 在 google cloud platform 建立新的專案.
https://console.cloud.google.com/
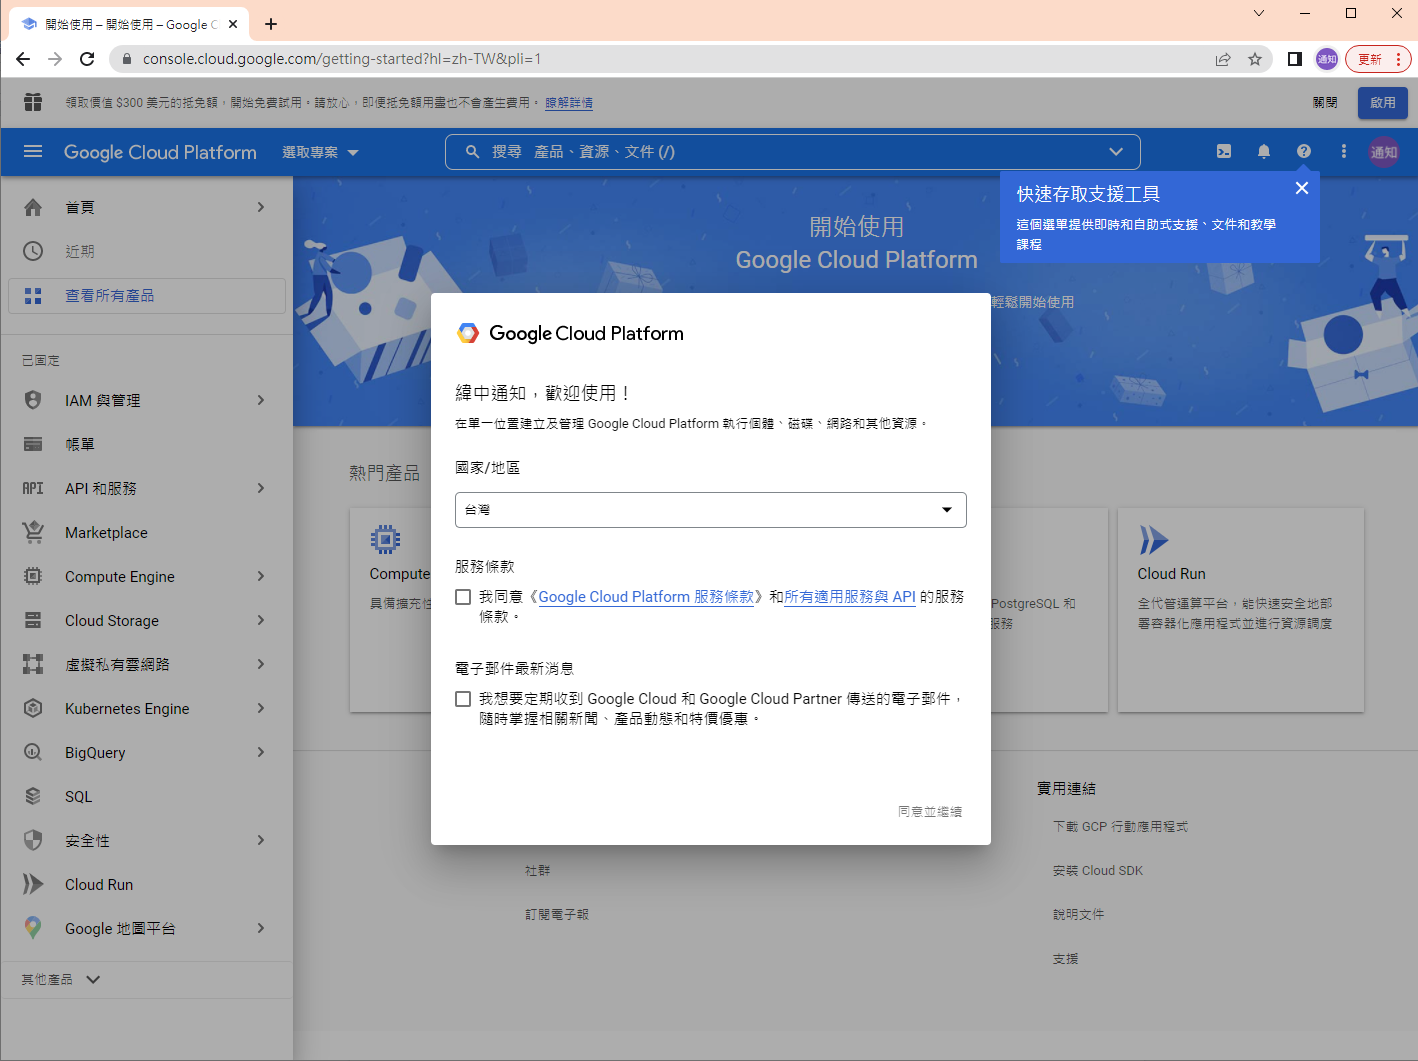

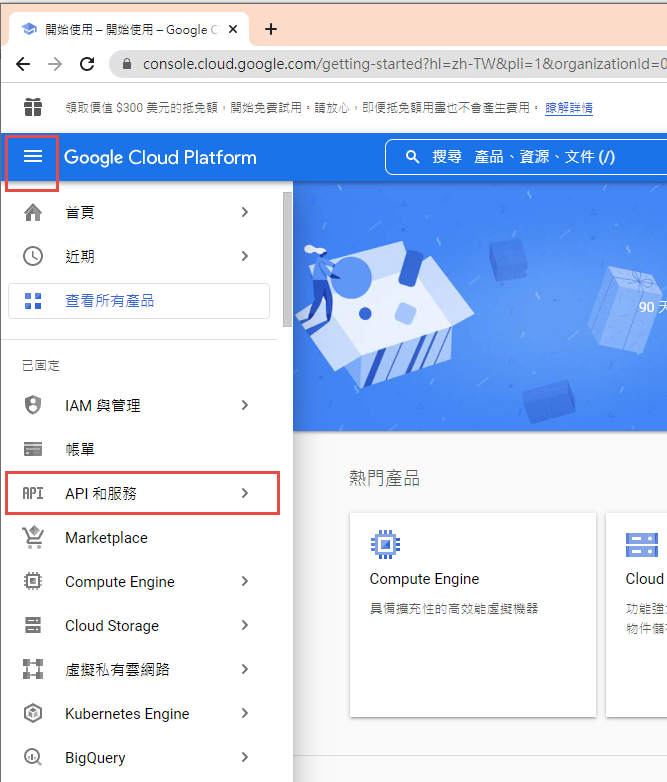
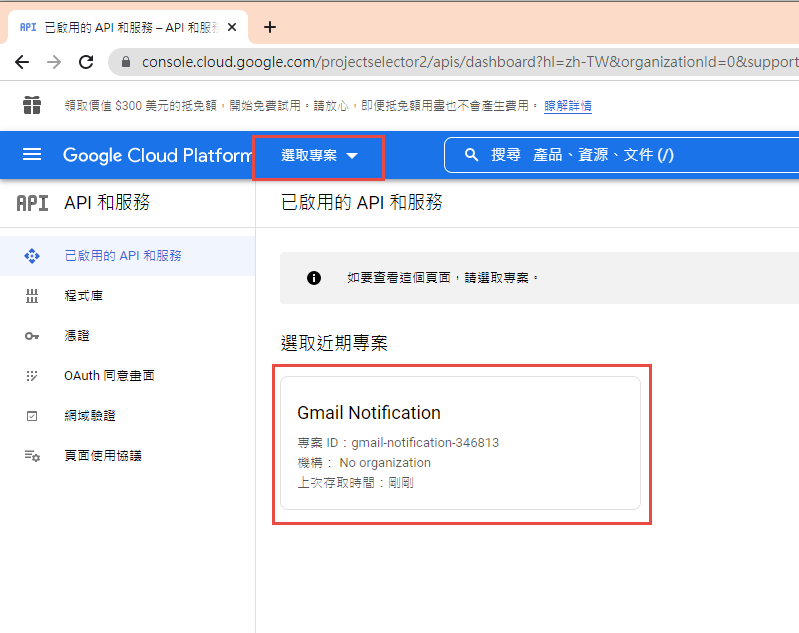
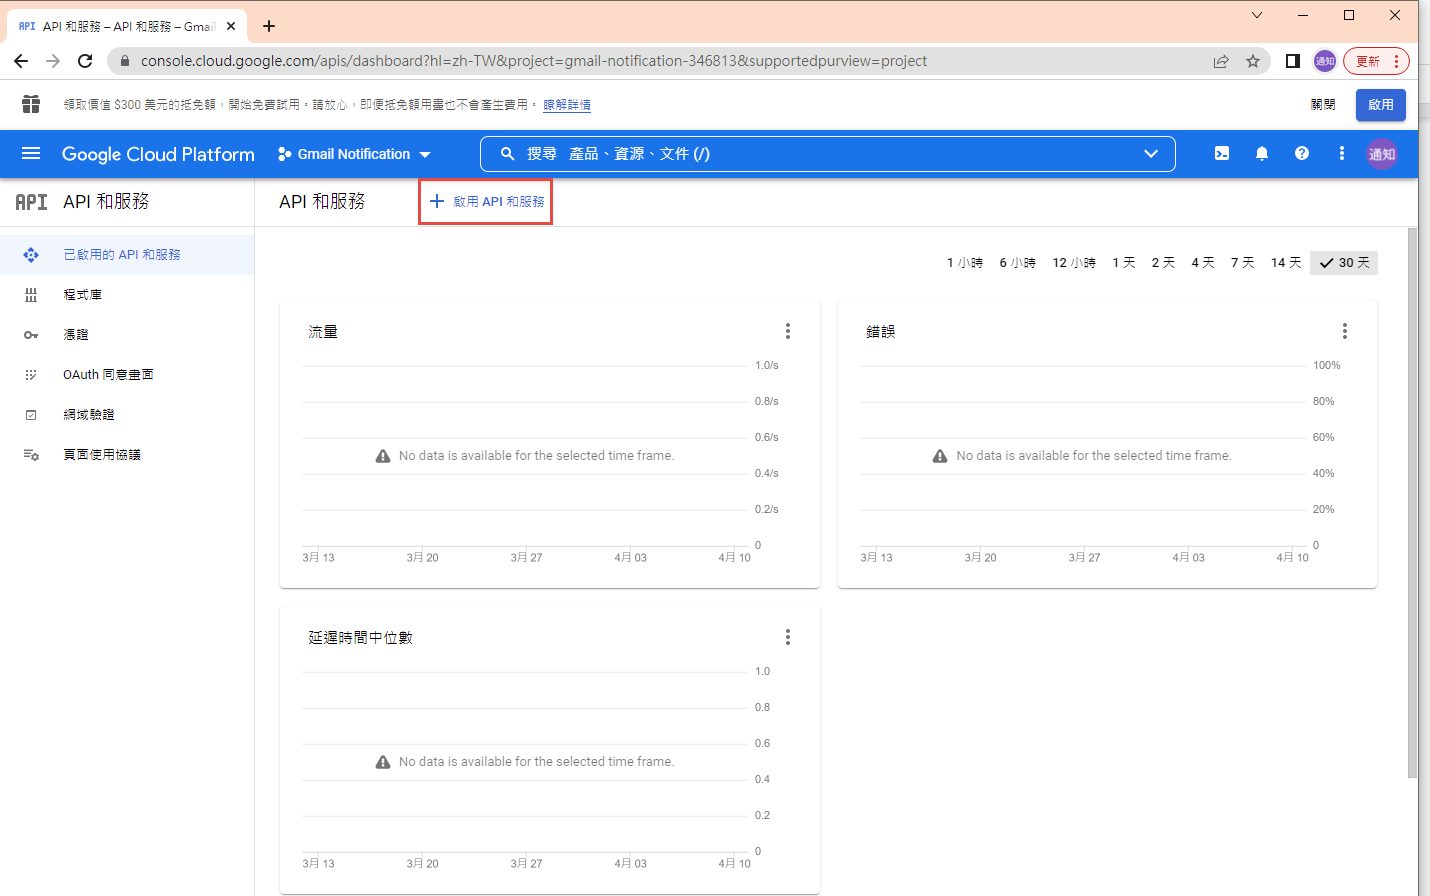
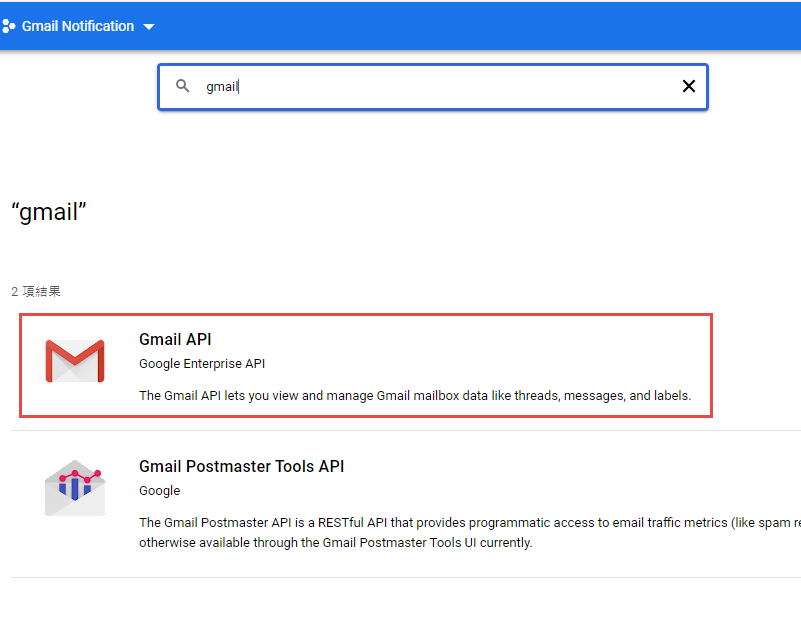
啟用 Gmail API


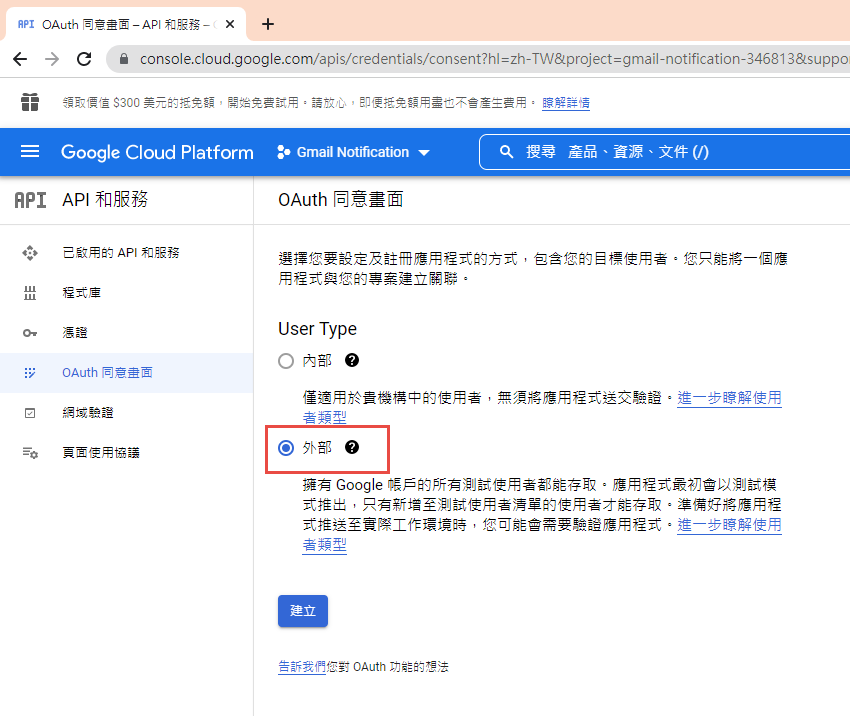
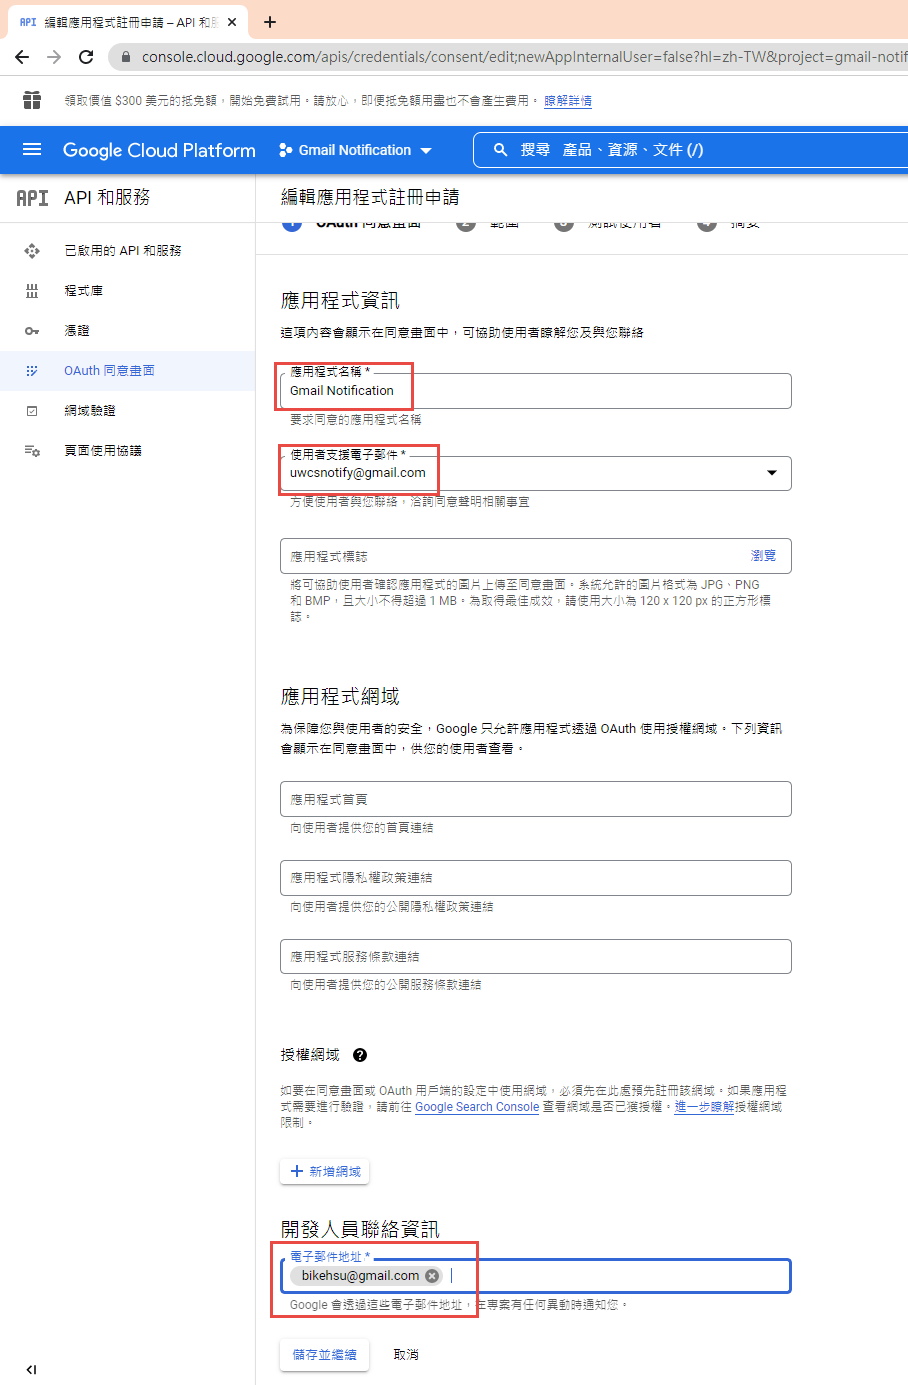
因為我們要透過 OAuth 取得使用者授權,所以要設定使用 OAuth 的同意畫面。
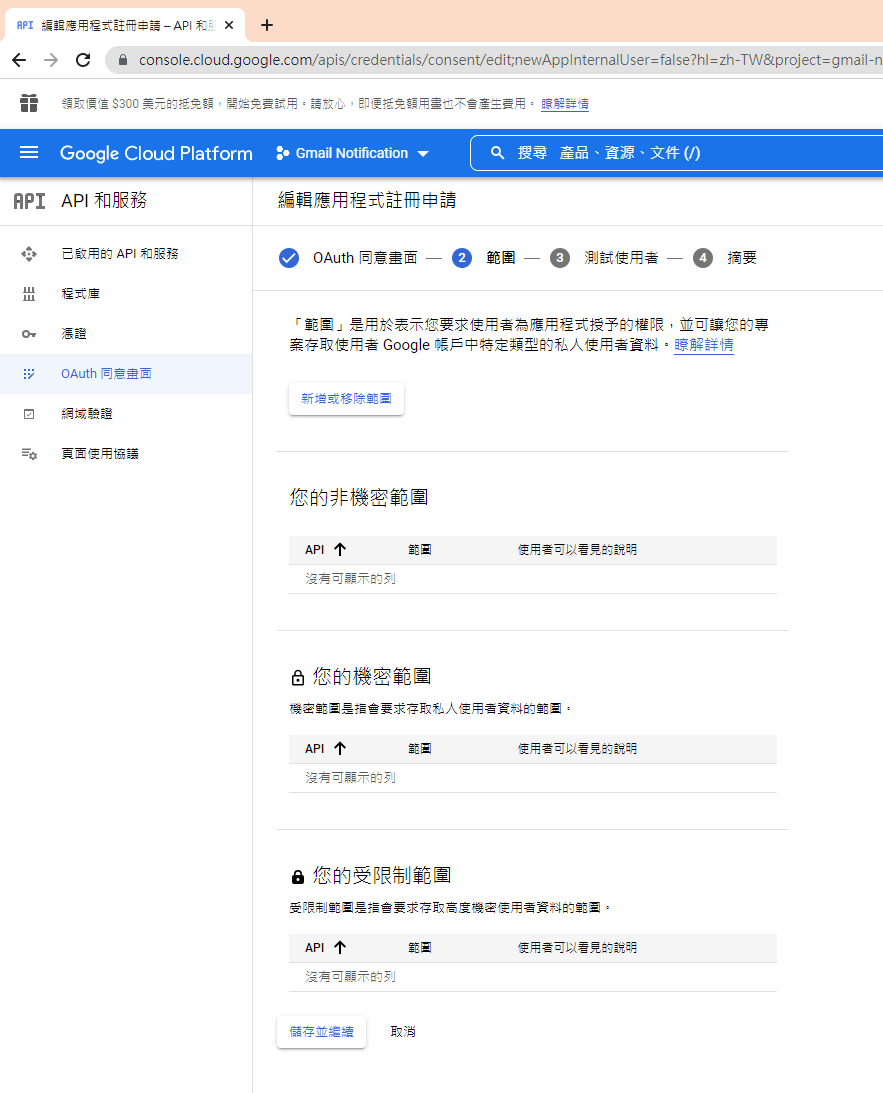
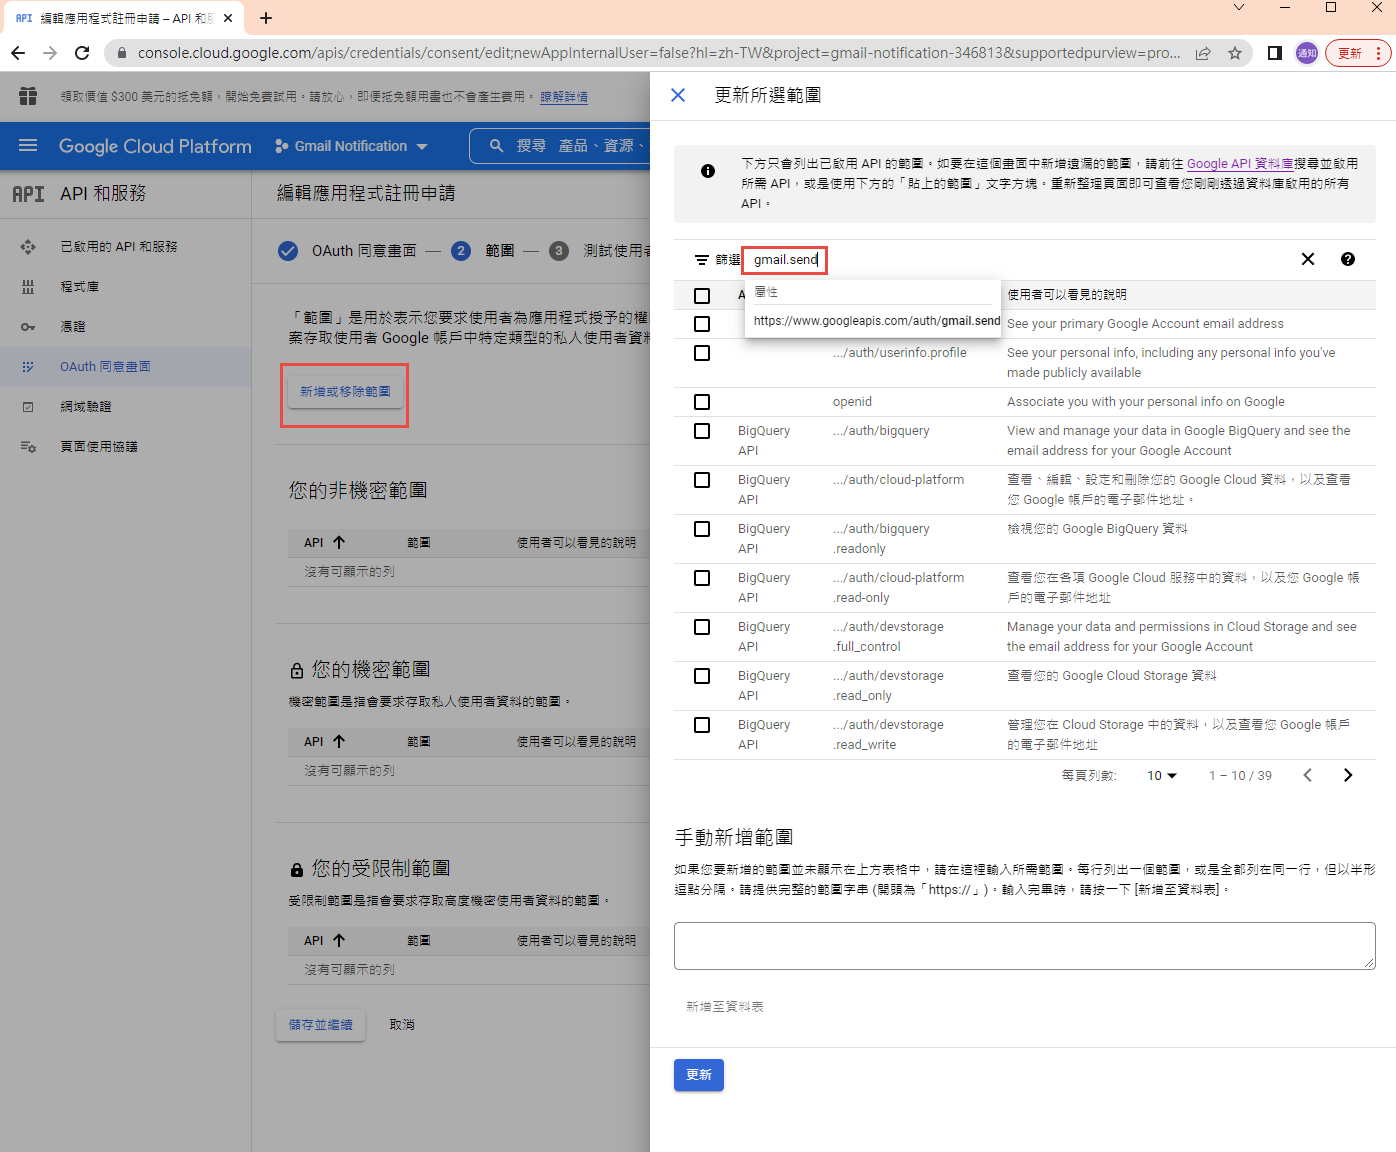
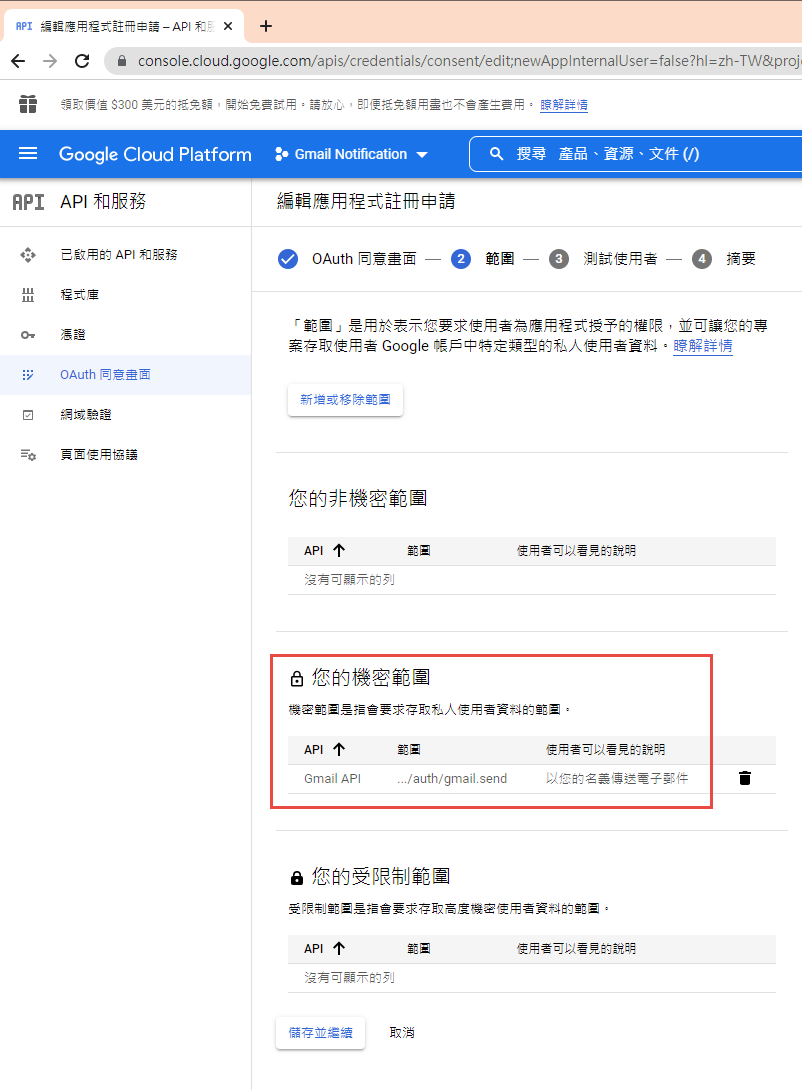
指定授權的範圍
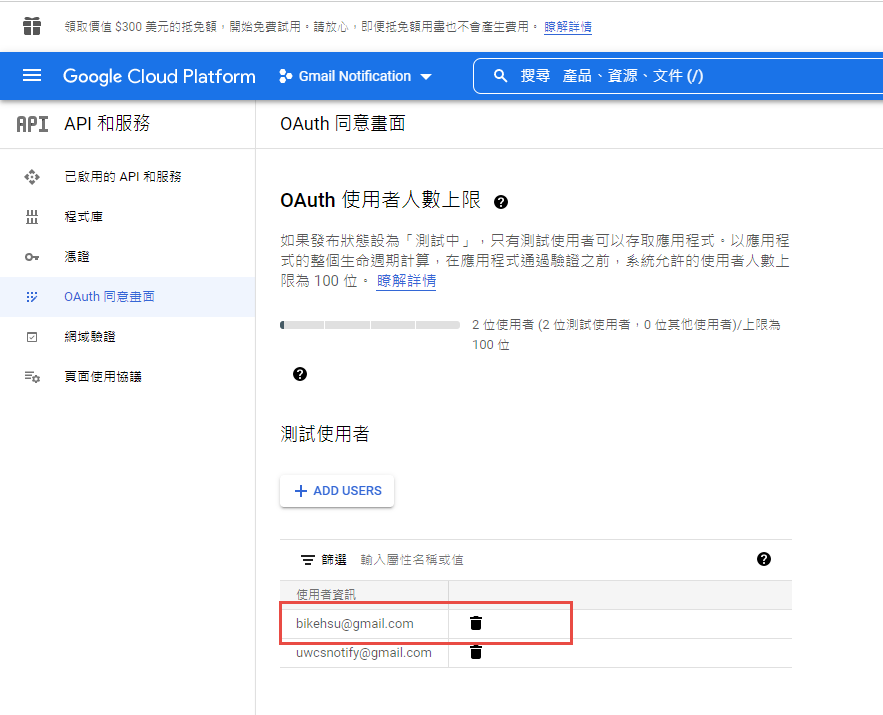
因為剛建立的專案,不會被公開,所以要指定測試使用者
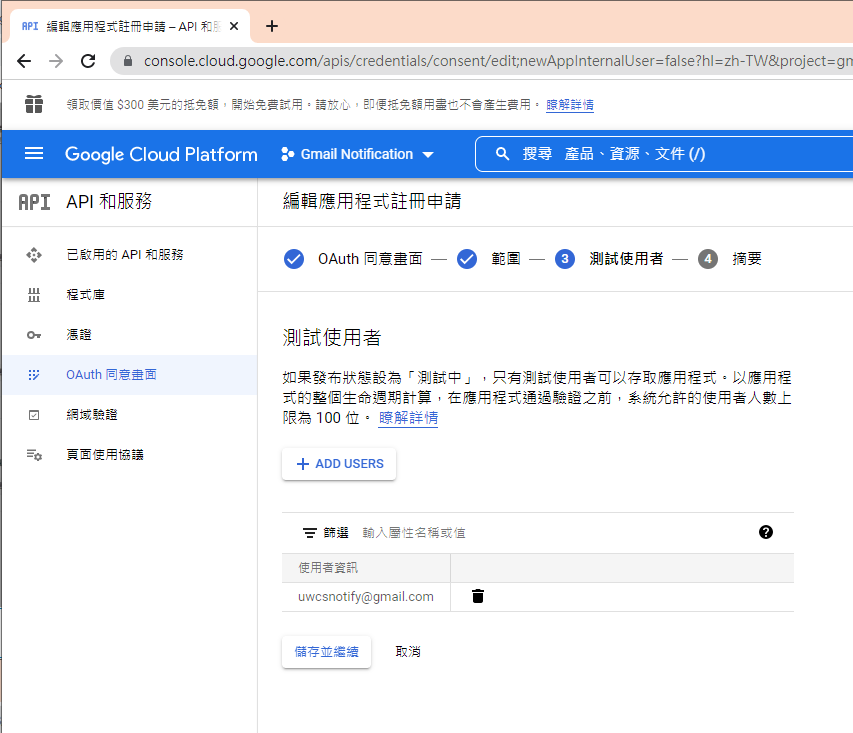
如果要給任意使用者,必需經過發布的流程,但準備工作有點麻煩,所以這次就不發布了。
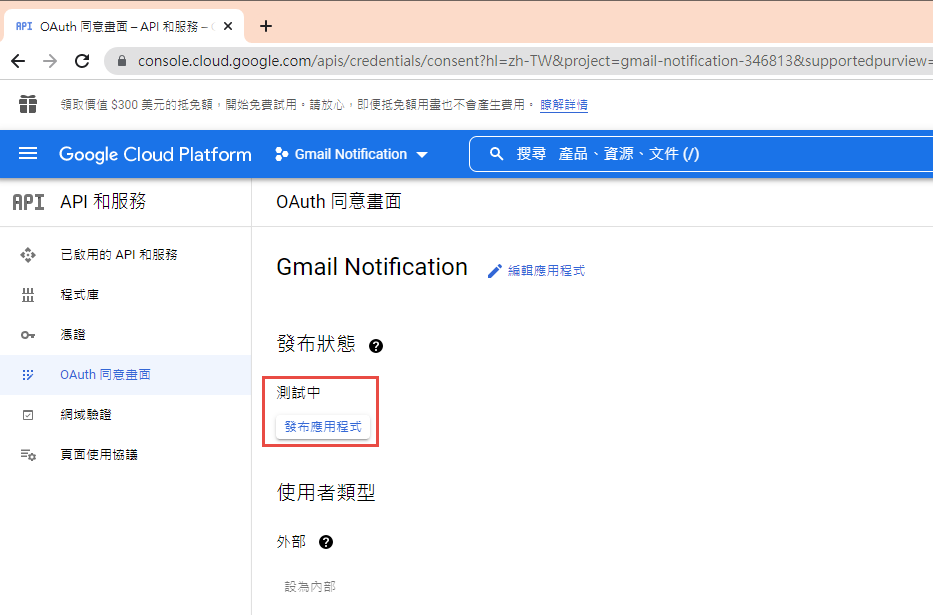
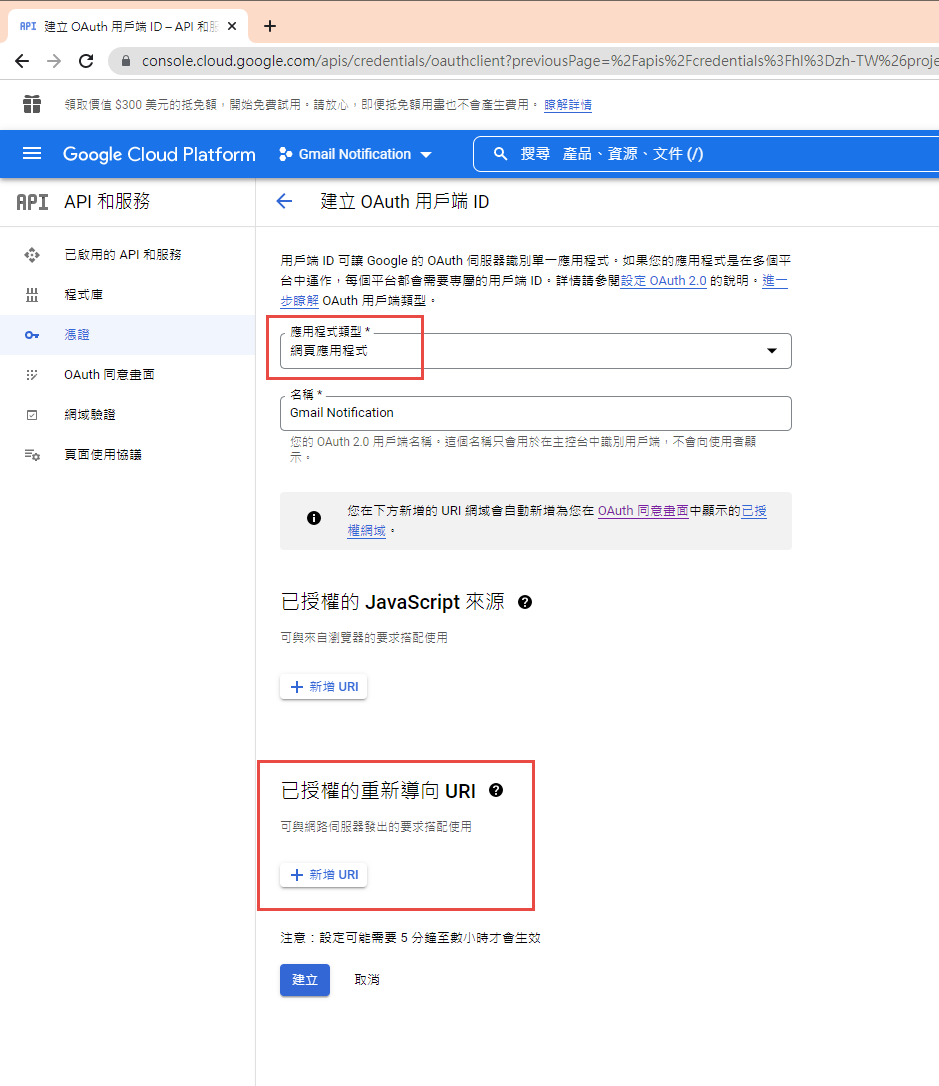
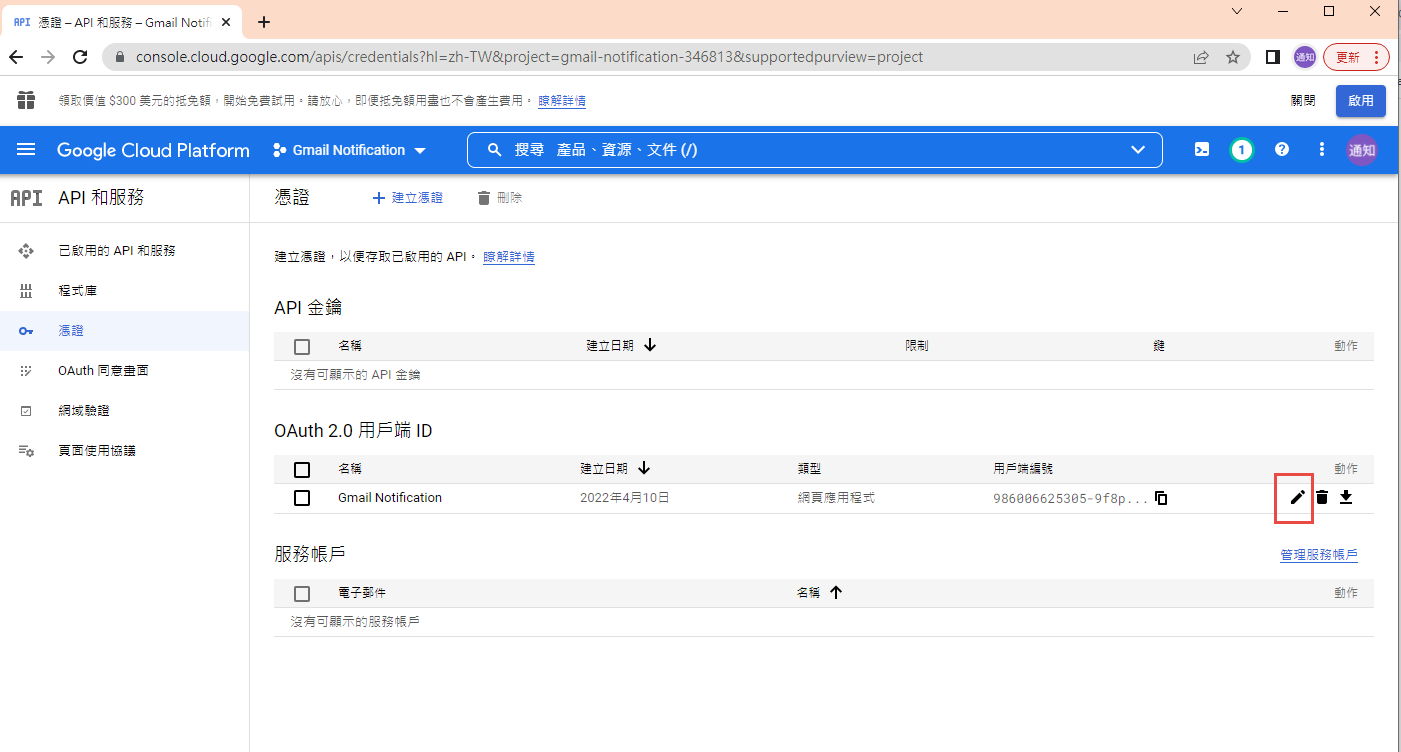
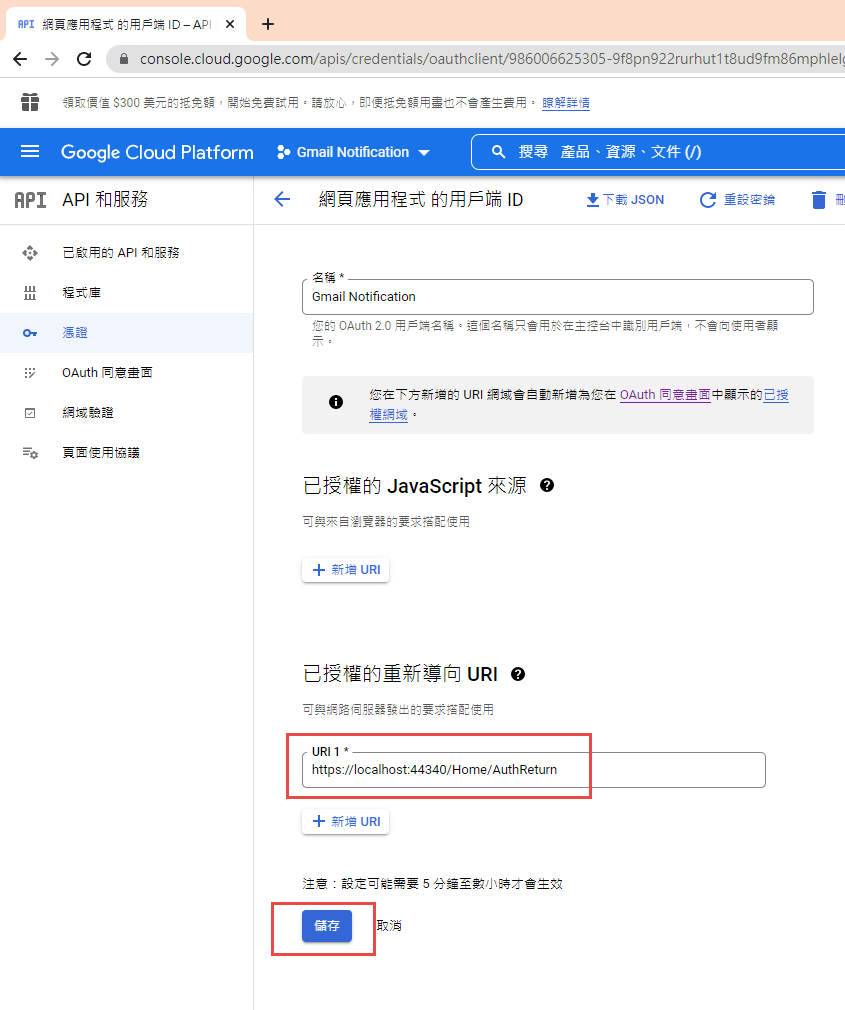
建立 OAuth 2.0 用戶端 ID 憑証

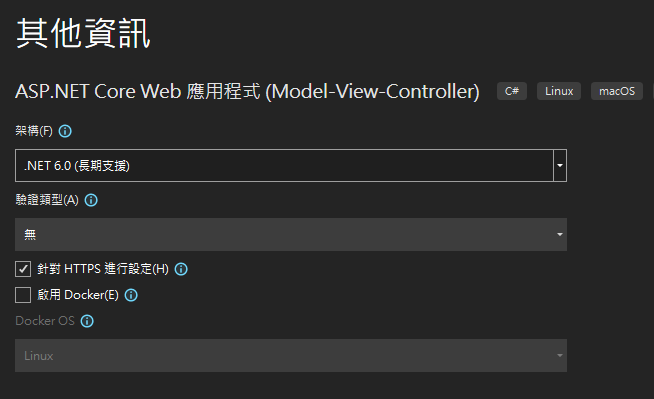
這裡除了名稱外,還有一個設定重導 Uri 的項目。現在不填寫,但稍後要回來補這個資料。
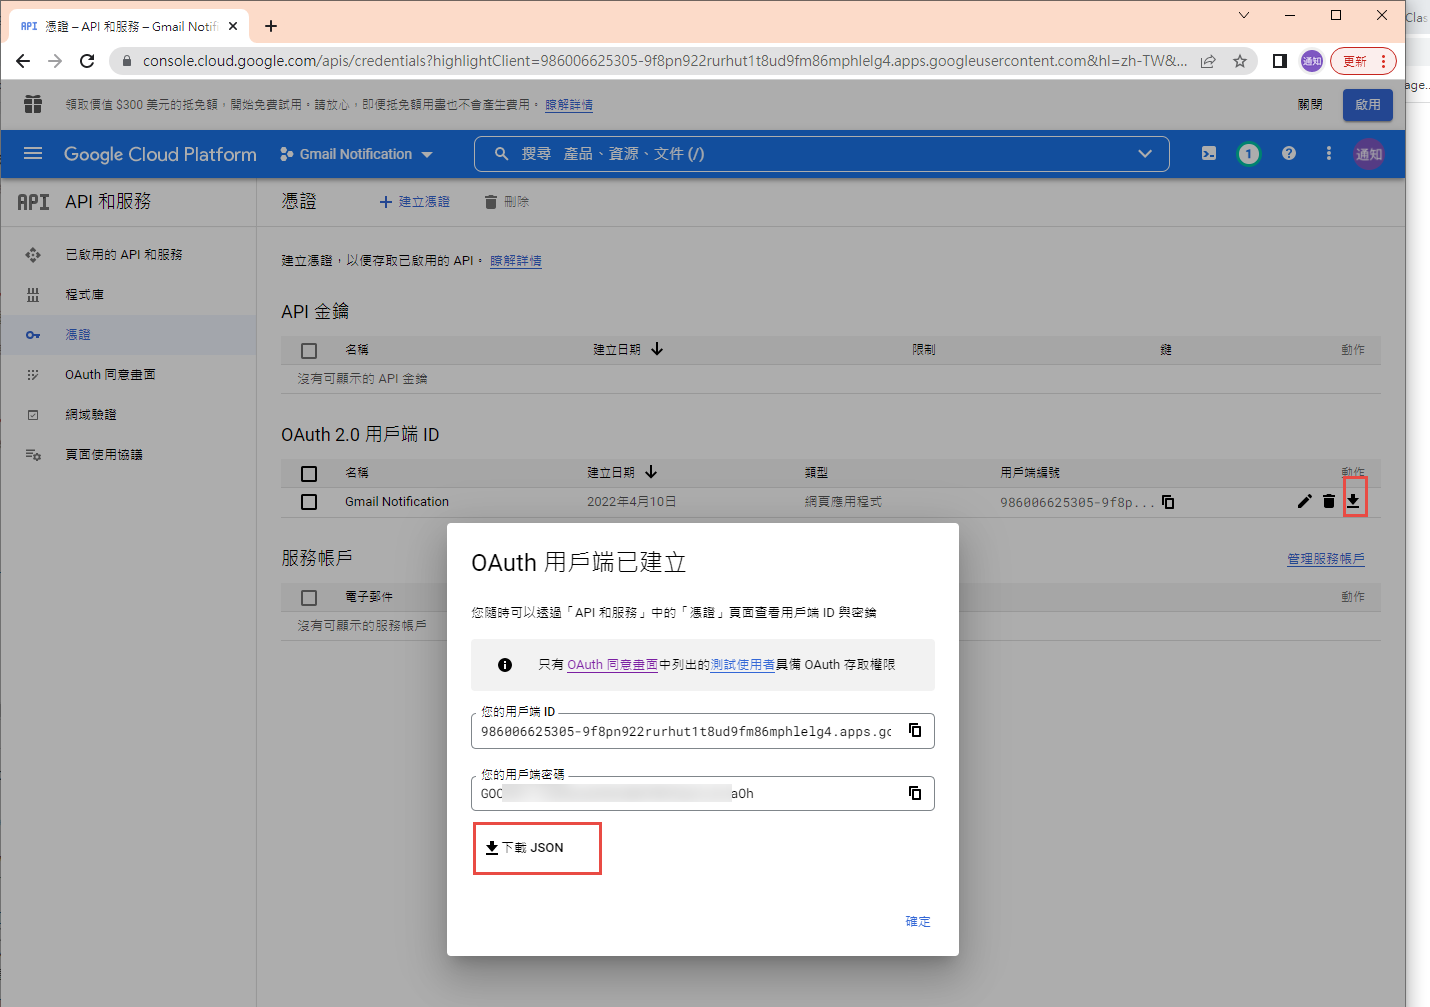
下載 json 之後,命名為 client_secret.json 保留後續使用。
再來就要建立專案了. 用 VS2022 建立一個新專案

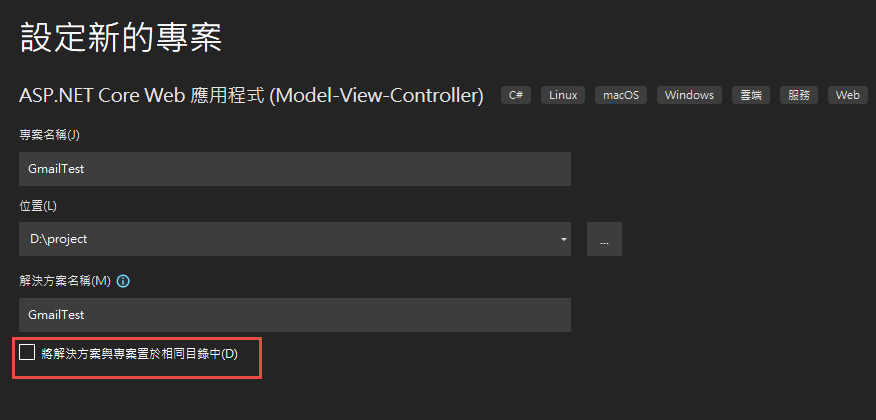
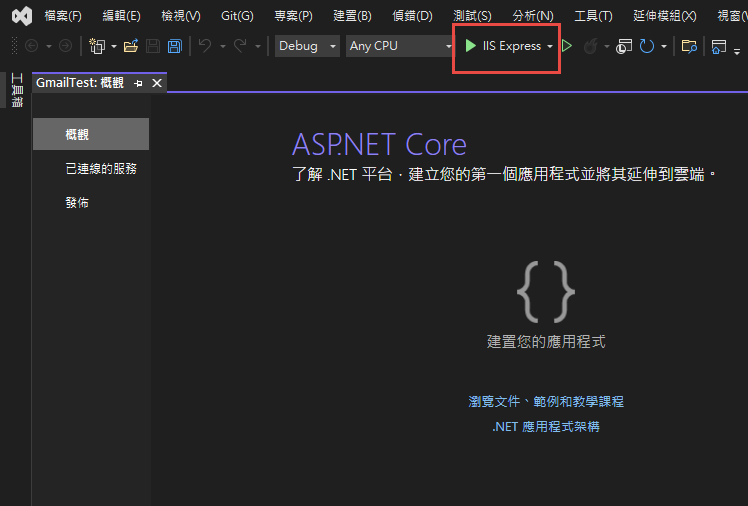
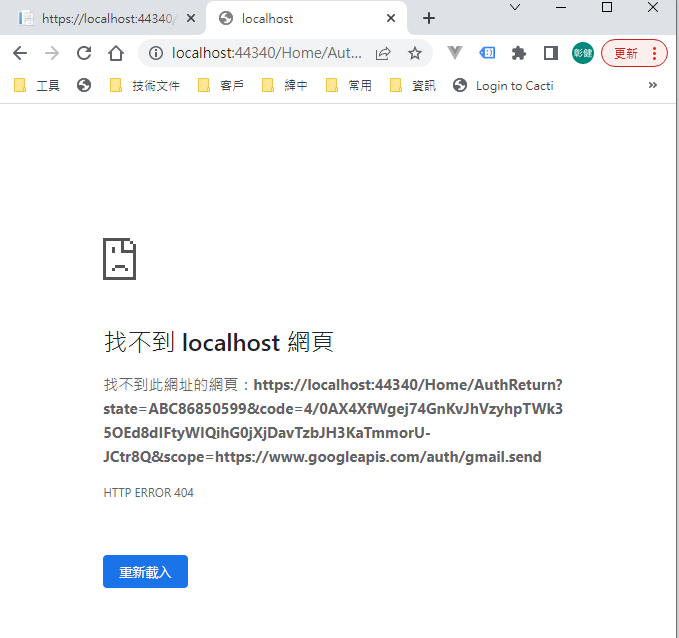
記錄網址, 本測試專案是 https://localhost:44340/ ,請依實際網址為準。
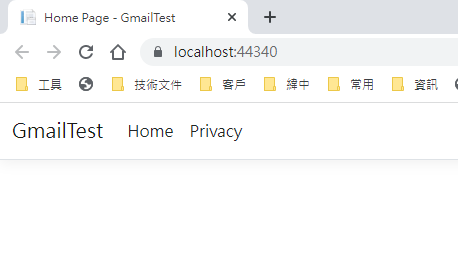
回到 OAuth 2.0 用戶端 ID 的設定頁. 在已授權的重新導向 URI 中填入 https://localhost:44340/Home/AuthReturn (填入的網址依實際專案的狀況,可能會有變化)
在 VS2022 中,使用 Nuget 安裝套件: (有漏的再麻煩和我說)
Google.Apis.Gmail.v1
Google.Apis.Auth
MimeKit (發送 gmail 時使用)
建立認証用的網址:
建立一個 Action, 用來取得認証用的網址:
執行結果:
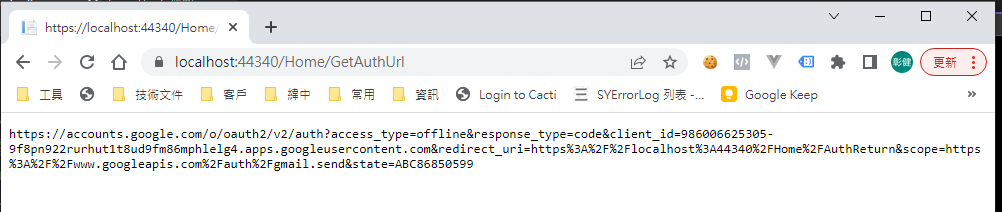
用 chrome 開啟產生的網址:
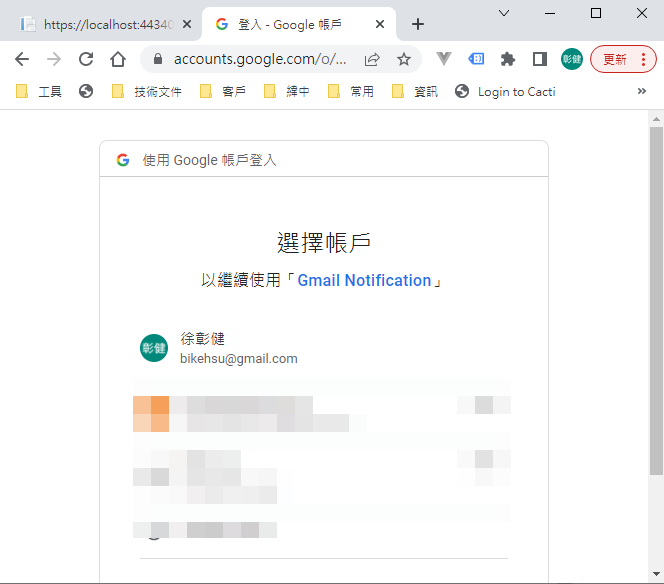
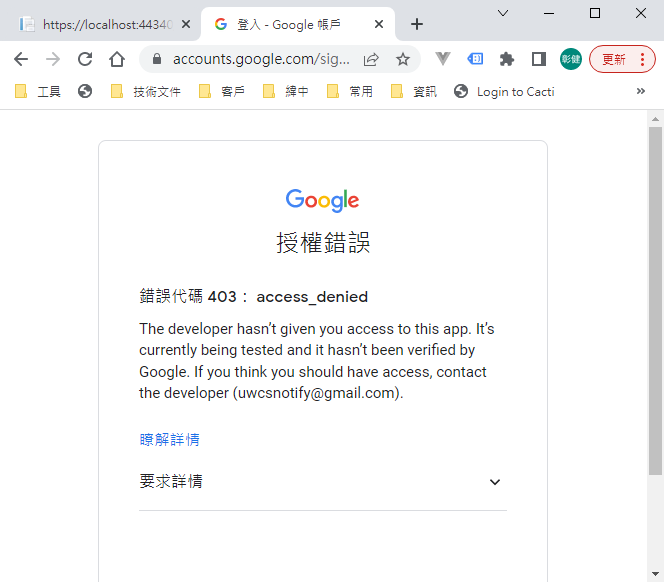
選取任一帳號,如果出現以下錯誤,請回到 "OAuth 同意畫面" 去新增測試使用者
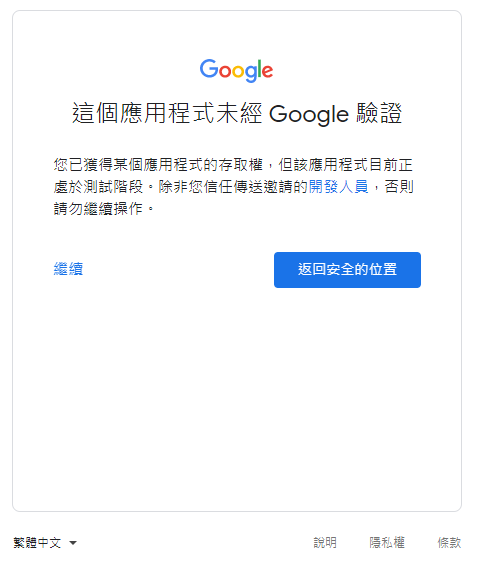
因為應用程式尚未發布,所以會看到警告,勇敢的繼續下去
這裡會要求授權使用你的名義發送信件。(這是在程式中取得授權的項目 Scopes 中所指定的)

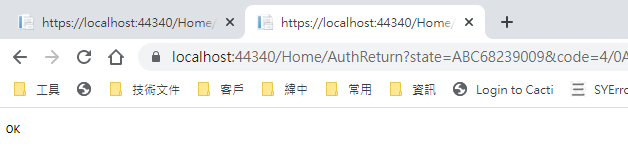
再繼續之後,會被重導至我們在 redirectUri 指定的網址。因為我們尚未完成,所以會看到錯誤,順便也可以看一下,會帶回哪一些參數。有 state, code, scope,共三個。
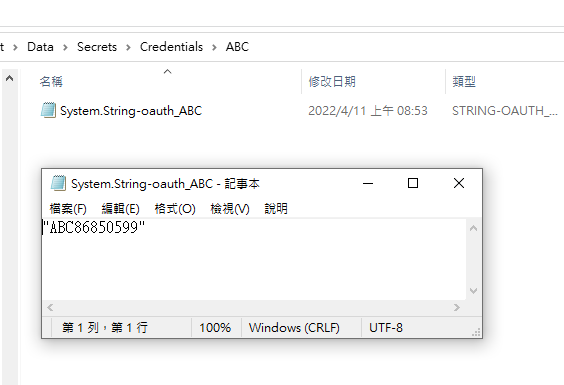
順便看一下,google 的套件會在 Credentials 的目錄下幫使用者建立一個目錄,在完成驗証前,會先放一個 System.String-oauth_XXX 的檔案,裡面的值和回傳的 state 是一樣的,這個應該是用來驗証回傳資料的。
接下來我們要新增 Action "AuthReturn" 如下:
再跑一次上面的流程,最後回到 AuthReturn
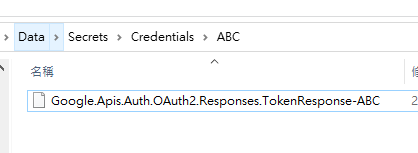
在 D:\project\GmailTest\Data\Secrets\Credentials\ABC 裡面會產生一個檔案: 這個就是我們的 token 了。
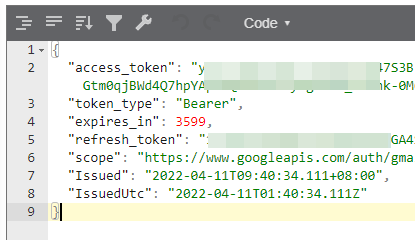
看一下裡面的內容, 有 access_token, refresh_token, scope 等等, 用途應該很好猜了.. 不知道各項目的目途也沒有關係。只要有這個 token 就可以了。
refresh_token 的效期請參考以下文件:
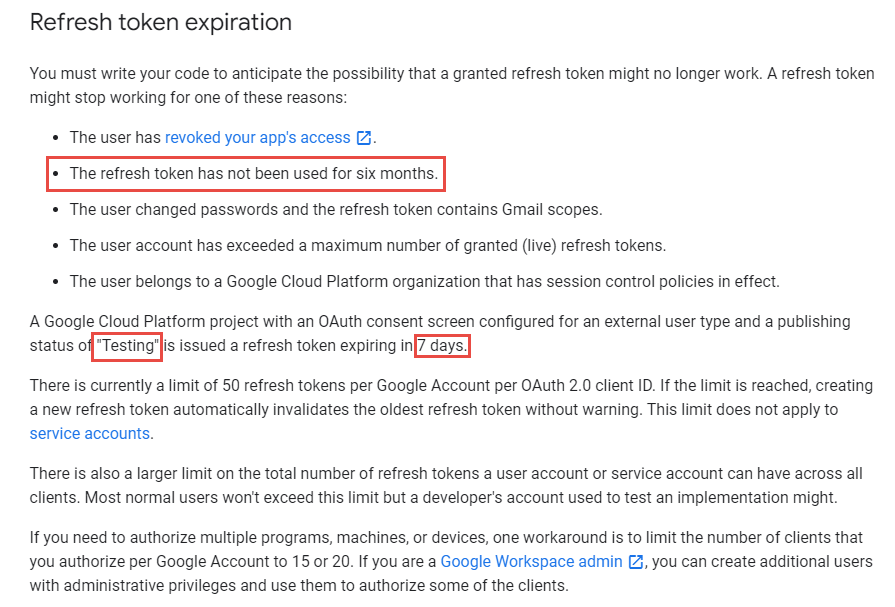
https://developers.google.com/identity/protocols/oauth2 。也可以參考下圖, 若是要用 gmail api 來發送通知信(例如連絡我們),紅色的地方是比較令人困擾的,例如 6 個月以上,沒有人留言,原來留下的 refresh_token 就失效了。使用者必需重新建立一個 refresh_token 。
最後來使用 gmail api 發送通知信, 直接看程式碼如下: 在這個過程中遇到最大的問題除了憑証問題之外,另一個問題是編碼。直到最後找到可以用 MimeKit 把 System.Net.Mail.MailMessage 編碼成 Gmail API 的格式才解決。程式碼如下:
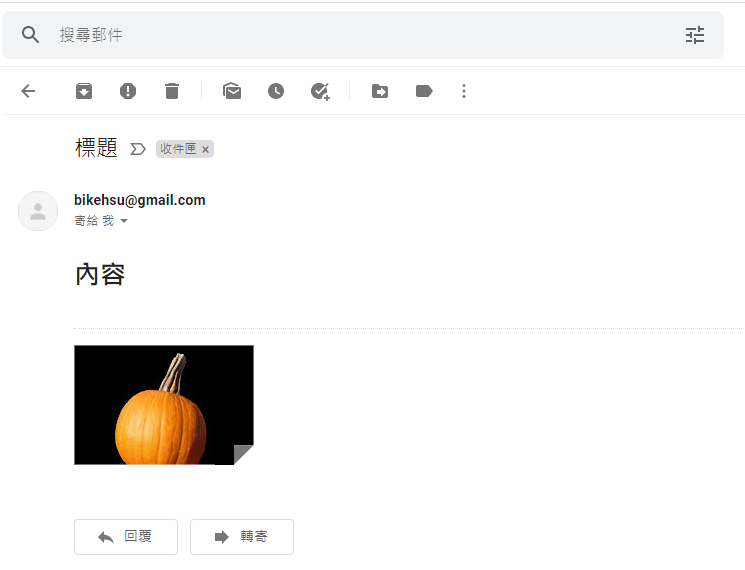
收到的信件:
結論:
使用 Gmail API 最大的原因是要增加安全性,和舊的 smtp 不同的地方是,使用 gmail api 之後,客戶不需要提供 gmail 的帳號和密碼就可以讓系統使用 gmail 發送信件,不過由於 refresh_token 的效期問題,可能會造成無法發送通知信而沒有任何人發現的情況,整個實用性會變的很低。
另一個還沒有測試的部份是應用程的啟用。這個審核不知道會不很麻煩,不過可以而知的時,整個流程會花更多的時間。
取代的做法: 可能要改用 Amazon 的 SES 來寄信,而且為了避免每個小網站都要跑 SES 的建立流程,準備來寫一個 API 給各網站使用,可以發送簡單的通知信。
以上的程式碼可以在這裡下載: https://github.com/bikehsu/GmailTest
如果你的目的是要使用 Gmail Api 取代舊的 Gmail SMTP 來發送通知信,建議你先跳到最下方看一下結論。
如果你是想要看一下 Gmail API 和 Google API 憑証的使用方法,可以看一下這篇文章。
1. 在 google cloud platform 建立新的專案.
https://console.cloud.google.com/
啟用 Gmail API
因為我們要透過 OAuth 取得使用者授權,所以要設定使用 OAuth 的同意畫面。
指定授權的範圍
因為剛建立的專案,不會被公開,所以要指定測試使用者
如果要給任意使用者,必需經過發布的流程,但準備工作有點麻煩,所以這次就不發布了。
建立 OAuth 2.0 用戶端 ID 憑証
這裡除了名稱外,還有一個設定重導 Uri 的項目。現在不填寫,但稍後要回來補這個資料。
下載 json 之後,命名為 client_secret.json 保留後續使用。
再來就要建立專案了. 用 VS2022 建立一個新專案
記錄網址, 本測試專案是 https://localhost:44340/ ,請依實際網址為準。
回到 OAuth 2.0 用戶端 ID 的設定頁. 在已授權的重新導向 URI 中填入 https://localhost:44340/Home/AuthReturn (填入的網址依實際專案的狀況,可能會有變化)
在 VS2022 中,使用 Nuget 安裝套件: (有漏的再麻煩和我說)
Google.Apis.Gmail.v1
Google.Apis.Auth
MimeKit (發送 gmail 時使用)
建立認証用的網址:
建立一個 Action, 用來取得認証用的網址:
        /// <summary>

        /// 取得授權的項目

        /// </summary>

        static string[] Scopes = { GmailService.Scope.GmailSend };


        // 和登入 google 的帳號無關

        // 任意值,若未來有使用者認証,可使用使用者編號或登入帳號。

        string Username = "ABC";


        /// <summary>

        /// 存放 client_secret 和 credential 的地方

        /// </summary>

        string SecretPath = @"D:\project\GmailTest\Data\Secrets";


        /// <summary>

        /// 認証完成後回傳的網址, 必需和 OAuth 2.0 Client Id 中填寫的 "已授權的重新導向 URI" 相同。

        /// </summary>

        string RedirectUri = $"https://localhost:44340/Home/AuthReturn";


        /// <summary>

        /// 取得認証用的網址

        /// </summary>

        /// <returns></returns>

        public async Task<string> GetAuthUrl()

        {

            using (var stream = new FileStream(Path.Combine(SecretPath, "client_secret.json"), FileMode.Open, FileAccess.Read))

            {

                FileDataStore dataStore = null;

                var credentialRoot = Path.Combine(SecretPath, "Credentials");

                if (!Directory.Exists(credentialRoot))

                {

                    Directory.CreateDirectory(credentialRoot);

                }


                //存放 credential 的地方,每個 username 會建立一個目錄。

                string filePath = Path.Combine(credentialRoot, Username);

                dataStore = new FileDataStore(filePath);


                IAuthorizationCodeFlow flow = new GoogleAuthorizationCodeFlow(new GoogleAuthorizationCodeFlow.Initializer

                {

                    ClientSecrets = GoogleClientSecrets.Load(stream).Secrets,

                    Scopes = Scopes,

                    DataStore = dataStore

                });


                var authResult = await new AuthorizationCodeWebApp(flow, RedirectUri, Username)

                .AuthorizeAsync(Username, CancellationToken.None);


                return authResult.RedirectUri;

            }

        }
執行結果:
用 chrome 開啟產生的網址:
選取任一帳號,如果出現以下錯誤,請回到 "OAuth 同意畫面" 去新增測試使用者
因為應用程式尚未發布,所以會看到警告,勇敢的繼續下去
這裡會要求授權使用你的名義發送信件。(這是在程式中取得授權的項目 Scopes 中所指定的)
再繼續之後,會被重導至我們在 redirectUri 指定的網址。因為我們尚未完成,所以會看到錯誤,順便也可以看一下,會帶回哪一些參數。有 state, code, scope,共三個。
順便看一下,google 的套件會在 Credentials 的目錄下幫使用者建立一個目錄,在完成驗証前,會先放一個 System.String-oauth_XXX 的檔案,裡面的值和回傳的 state 是一樣的,這個應該是用來驗証回傳資料的。
接下來我們要新增 Action "AuthReturn" 如下:
        public async Task<string> AuthReturn(AuthorizationCodeResponseUrl authorizationCode)

        {

            string[] scopes = new[] { GmailService.Scope.GmailSend };


            using (var stream = new FileStream(Path.Combine(SecretPath, "client_secret.json"), FileMode.Open, FileAccess.Read))

            {

                //確認 credential 的目錄已建立.

                var credentialRoot = Path.Combine(SecretPath, "Credentials");

                if (!Directory.Exists(credentialRoot))

                {

                    Directory.CreateDirectory(credentialRoot);

                }


                //暫存憑証用目錄

                string tempPath = Path.Combine(credentialRoot, authorizationCode.State);


                IAuthorizationCodeFlow flow = new GoogleAuthorizationCodeFlow(

                new GoogleAuthorizationCodeFlow.Initializer

                {

                    ClientSecrets = GoogleClientSecrets.Load(stream).Secrets,

                    Scopes = scopes,

                    DataStore = new FileDataStore(tempPath)

                });


                //這個動作應該是要把 code 換成 token

                await flow.ExchangeCodeForTokenAsync(Username, authorizationCode.Code, RedirectUri, CancellationToken.None).ConfigureAwait(false);


                if (!string.IsNullOrWhiteSpace(authorizationCode.State))

                {

                    string newPath = Path.Combine(credentialRoot, Username);

                    if (tempPath.ToLower() != newPath.ToLower())

                    {

                        if (Directory.Exists(newPath))

                            Directory.Delete(newPath, true);


                        Directory.Move(tempPath, newPath);

                    }

                }


                return "OK";

            }

        }
再跑一次上面的流程,最後回到 AuthReturn
在 D:\project\GmailTest\Data\Secrets\Credentials\ABC 裡面會產生一個檔案: 這個就是我們的 token 了。
看一下裡面的內容, 有 access_token, refresh_token, scope 等等, 用途應該很好猜了.. 不知道各項目的目途也沒有關係。只要有這個 token 就可以了。
refresh_token 的效期請參考以下文件:
https://developers.google.com/identity/protocols/oauth2 。也可以參考下圖, 若是要用 gmail api 來發送通知信(例如連絡我們),紅色的地方是比較令人困擾的,例如 6 個月以上,沒有人留言,原來留下的 refresh_token 就失效了。使用者必需重新建立一個 refresh_token 。
最後來使用 gmail api 發送通知信, 直接看程式碼如下: 在這個過程中遇到最大的問題除了憑証問題之外,另一個問題是編碼。直到最後找到可以用 MimeKit 把 System.Net.Mail.MailMessage 編碼成 Gmail API 的格式才解決。程式碼如下:
        public async Task<bool> SendTestMail()

        {

            var service = await GetGmailService();


            GmailMessage message = new GmailMessage();

            message.Subject = "標題";

            message.Body = $"<h1>內容</h1>";

            message.FromAddress = "bikehsu@gmail.com";

            message.IsHtml = true;

            message.ToRecipients = "bikehsu@gmail.com";

            message.Attachments = new List<Attachment>();


            string filePath = @"C:\Users\bike\Pictures\Vegetable_pumpkin.jpg";    //要附加的檔案

            Attachment attachment1 = new Attachment(filePath);

            message.Attachments.Add(attachment1);


            SendEmail(message, service);

            Console.WriteLine("OK");


            return true;

        }


        async Task<GmailService> GetGmailService()

        {

            UserCredential credential = null;


            var credentialRoot = Path.Combine(SecretPath, "Credentials");

            if (!Directory.Exists(credentialRoot))

            {

                Directory.CreateDirectory(credentialRoot);

            }


            string filePath = Path.Combine(credentialRoot, Username);


            using (var stream = new FileStream(Path.Combine(SecretPath, "client_secret.json"), FileMode.Open, FileAccess.Read))

            {

                credential = await GoogleWebAuthorizationBroker.AuthorizeAsync(

                GoogleClientSecrets.Load(stream).Secrets,

                Scopes,

                Username,

                CancellationToken.None,

                new FileDataStore(filePath));

            }


            var service = new GmailService(new BaseClientService.Initializer()

            {

                HttpClientInitializer = credential,

                ApplicationName = "Send Mail",

            });


            return service;

        }


        public class GmailMessage

        {

            public string FromAddress { get; set; }

            public string ToRecipients { get; set; }


            public string Subject { get; set; }

            public string Body { get; set; }

            public bool IsHtml { get; set; }


            public List<System.Net.Mail.Attachment> Attachments { get; set; }

        }


        public static void SendEmail(GmailMessage email, GmailService service)

        {

            var mailMessage = new System.Net.Mail.MailMessage();

            mailMessage.From = new System.Net.Mail.MailAddress(email.FromAddress);

            mailMessage.To.Add(email.ToRecipients);

            mailMessage.ReplyToList.Add(email.FromAddress);

            mailMessage.Subject = email.Subject;

            mailMessage.Body = email.Body;

            mailMessage.IsBodyHtml = email.IsHtml;


            if (email.Attachments != null)

            {

                foreach (System.Net.Mail.Attachment attachment in email.Attachments)

                {

                    mailMessage.Attachments.Add(attachment);

                }

            }


            var mimeMessage = MimeKit.MimeMessage.CreateFromMailMessage(mailMessage);


            var gmailMessage = new Google.Apis.Gmail.v1.Data.Message

            {

                Raw = Encode(mimeMessage)

            };


            Google.Apis.Gmail.v1.UsersResource.MessagesResource.SendRequest request = service.Users.Messages.Send(gmailMessage, "me");


            request.Execute();

        }


        public static string Encode(MimeMessage mimeMessage)

        {

            using (MemoryStream ms = new MemoryStream())

            {

                mimeMessage.WriteTo(ms);

                return Convert.ToBase64String(ms.GetBuffer())

                    .TrimEnd('=')

                    .Replace('+', '-')

                    .Replace('/', '_');

            }

        }
收到的信件:
結論:
使用 Gmail API 最大的原因是要增加安全性,和舊的 smtp 不同的地方是,使用 gmail api 之後,客戶不需要提供 gmail 的帳號和密碼就可以讓系統使用 gmail 發送信件,不過由於 refresh_token 的效期問題,可能會造成無法發送通知信而沒有任何人發現的情況,整個實用性會變的很低。
另一個還沒有測試的部份是應用程的啟用。這個審核不知道會不很麻煩,不過可以而知的時,整個流程會花更多的時間。
取代的做法: 可能要改用 Amazon 的 SES 來寄信,而且為了避免每個小網站都要跑 SES 的建立流程,準備來寫一個 API 給各網站使用,可以發送簡單的通知信。
以上的程式碼可以在這裡下載: https://github.com/bikehsu/GmailTest
Bike, 2022/4/10 下午 09:31:15
Browser:
safari in iphone
chrome in iphone
chrome in android
in Line (APP)
in FB (APP)
HTML:
form target="_blank"
window.open
link target="_blank"
Trigger:
onclick in tag
.click with jquery
submit button
safari in iphone
chrome in iphone
chrome in android
in Line (APP)
in FB (APP)
HTML:
form target="_blank"
window.open
link target="_blank"
Trigger:
onclick in tag
.click with jquery
submit button
Bike, 2022/2/11 上午 09:13:12
以下的程式碼, 直接 alert(this.errorMessages); 會造成 chrome 卡住..
使用 setTimeout 延後 alert 可以解決這個問題. 但必需延後足夠的時間. 已知 200 ms 依然會卡住.
使用 setTimeout 延後 alert 可以解決這個問題. 但必需延後足夠的時間. 已知 200 ms 依然會卡住.
    errorMessages: "",


    failProcess: function (ret) {

        console.log("failProcess start: " + new Date().getSeconds() + "." + new Date().getMilliseconds());

        var json = ret.responseJSON;

        if (json && json.invalidatedPayloads) {

            var errors = json.invalidatedPayloads.filter(function F(x) {

                return x.messages.length > 0

            });


            console.log("bdfore add class: " + new Date().getSeconds() + "." + new Date().getMilliseconds());


            errors.map(function (x) {

                return $("[name='" + x.name + "']").addClass("error");

            });


            console.log("after add class: " + new Date().getSeconds() + "." + new Date().getMilliseconds());


            errorMessages = errors.map(function (x) {

                    return x.messages.join('\r\n');

            }).join('\r\n');


            console.log("afger build errorMessages: " + new Date().getSeconds() + "." + new Date().getMilliseconds());

            console.log(errorMessages);


            //alert(this.errorMessages);


            window.setTimeout(api.alertError, 500);


            console.log("after alert: " + new Date().getSeconds() + "." + new Date().getMilliseconds());

        }


        console.log("failProcess end: " + new Date().getSeconds() + "." + new Date().getMilliseconds());

    },
Bike, 2021/9/29 下午 08:45:07
用 Chrome 下載網頁時, JS 檔的副檔名會被加上 ".下載", 要移除很多檔案的副檔名時, 可以用以下的 Batch
@echo off
for /R "C:\Path\HTML_files" %%f in (*.下載) do (
ren "%%f" "%%~nf"
)
pause
@echo off
for /R "C:\Path\HTML_files" %%f in (*.下載) do (
ren "%%f" "%%~nf"
)
pause
Bike, 2016/12/19 下午 12:52:56
對於網頁加速的問題,已經被廣泛的討論了
主要在於減少 request 數以及減低網路傳輸的時間
也因此發展出一些技巧或技術,例如 css sprite, 資料gzip 等
瀏覽器也把連線數限制從2條變成6條,以加快網頁顯示的速度
然而若要網頁能有本質上的提升,則是該把 HTTP 這個老通訊協定升級了
(目前是HTTP/1.1, 1999年)
由Google Chrome推廣的 SPDY 標準,已經改良並訂為 HTTP/2 的標準 (2015年初定案)
他的重點在於 (如果我理解得沒錯的話,歡迎指正)
1. http header 也可壓縮 (HTTP1.1 header 無法壓縮)
2. 一個 connection 可以傳輸多個Content (HTTP1.1 一個request 一個 content)
3. 可以 Server Push 資料
4. 可以向下相容 1.1
實測上,可以讓網頁載入速度提升約 30%
目前,大部分瀏覽器已經支援 HTTP/2 標準,然而 Server 端的步調就緩慢許多
微軟的 IIS 要到 10 才支援,目前只有 windows 10 才有
Windows Server則要明年 2016 才有支援
相反於微軟,其他非微軟的開發速度上就快多了 例如 Node.js
---------------------------------------------------------
測試上,可以用 Chrome 的開發模式 把 protocol 欄位勾選顯示
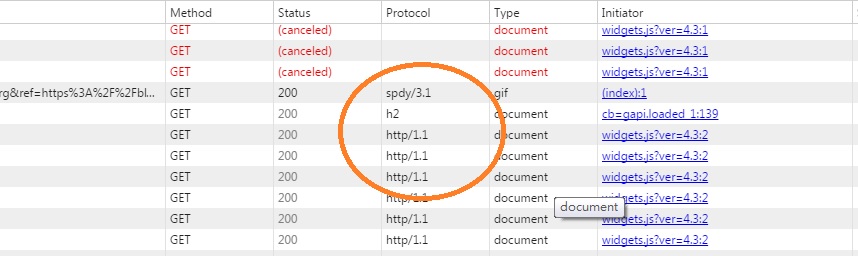
h2 就是 http/2
darren, 2015/8/31 上午 11:09:11
location.reload()
Chrome 最新的版本
會把 本來的表單重送,所以我在
UW.WU.ShowMessageAndRefresh
更改為
Chrome 最新的版本
會把 本來的表單重送,所以我在
UW.WU.ShowMessageAndRefresh
System.Web.HttpContext.Current.Response.Write("location.reload()" & vbCrLf)
更改為
System.Web.HttpContext.Current.Response.Write("location.href=location.href" & vbCrLf)
瞇瞇, 2014/10/20 下午 03:17:32