頁數 1 / 7
下一頁
搜尋 18 結果:
<!DOCTYPE html>

<html lang="en">

<head>

    <meta charset="UTF-8">

    <meta name="viewport" content="width=device-width, initial-scale=1.0">

    <title>BLE Printer Test</title>

    <script src="https://cdn.jsdelivr.net/npm/iconv-lite-umd@0.6.10/lib/iconv-lite-umd.js"></script>

</head>

<body>

    <h1>BLE Printer Test 123</h1>

    <button id="printTestButton">Test Print</button>

    <button id="printAgain">Print Again</button>

    <pre id="log"></pre>

    <script>

        // Function to log messages on the page

        function logMessage(message) {

            const logElement = document.getElementById('log');

            logElement.textContent += message + '\n';

        }

        var device;

        var server;

        var service;

        var characteristic;

        var name = 'T58_6752'; // 藍芽設備的名稱

        var uuid = 0x1800; //service UUID (用 BLE Scanner 找到的)

        var characteristicUuid = 0x2A00; // characteristic UUID (用 BLE Scanner 找到的)

        // Function to connect to BLE printer and send test data


        async function connectAndTestPrint() {


            try {

                logMessage("Requesting Bluetooth device...");


                // Request the BLE device

                device = await navigator.bluetooth.requestDevice({

                    //acceptAllDevices: true,

                    filters: [

                        { name: name }

                    ],

                    optionalServices: [uuid] // Replace with the correct service UUID

                });


                logMessage(`Device selected: ${device.name}`);

                logMessage(`Device uuid: ${device.id}`);


                await printAgain();


            } catch (error) {

                logMessage(`Error: ${error.message}`);

            }

        }


        // 转码方法

        function stringToGbk(str) {

            const ranges = [

                [0xA1, 0xA9, 0xA1, 0xFE],

                [0xB0, 0xF7, 0xA1, 0xFE],

                [0x81, 0xA0, 0x40, 0xFE],

                [0xAA, 0xFE, 0x40, 0xA0],

                [0xA8, 0xA9, 0x40, 0xA0],

                [0xAA, 0xAF, 0xA1, 0xFE],

                [0xF8, 0xFE, 0xA1, 0xFE],

                [0xA1, 0xA7, 0x40, 0xA0],

            ]

            const codes = new Uint16Array(23940)

            let i = 0


            for (const [b1Begin, b1End, b2Begin, b2End] of ranges) {

                for (let b2 = b2Begin; b2 <= b2End; b2++) {

                    if (b2 !== 0x7F) {

                        for (let b1 = b1Begin; b1 <= b1End; b1++) {

                            codes[i++] = b2 << 8 | b1

                        }

                    }

                }

            }

            const cstr = new TextDecoder('gbk').decode(codes)


            // 编码表

            const table = new Uint16Array(65536)

            for (let i = 0; i < cstr.length; i++) {

                table[cstr.charCodeAt(i)] = codes[i]

            }

            const buf = new Uint8Array(str.length * 2)

            let n = 0


            for (let i = 0; i < str.length; i++) {

                const code = str.charCodeAt(i)

                if (code < 0x80) {

                    buf[n++] = code

                } else {

                    const gbk = table[code]

                    buf[n++] = gbk & 0xFF

                    buf[n++] = gbk >> 8

                }

            }

            u8buf = buf.subarray(0, n)

            // console.log(u8buf);

            return u8buf

        }


        async function printAgain() {

            // Connect to the GATT server

            server = await device.gatt.connect();

            logMessage("Connected to GATT server.");


            // Get the printer service

            service = await server.getPrimaryService(uuid); // Replace with your printer's service UUID

            logMessage("Printer service retrieved.");


            // Get the characteristic for writing data

            characteristic = await service.getCharacteristic(characteristicUuid); // Replace with the correct characteristic UUID

            logMessage("Printer characteristic retrieved.");


            // Prepare test print data

            const encoder = new TextEncoder();

            const testData = encoder.encode("TEST PRINT: Hello from Web Bluetooth!\n");

            const finalData = encoder.encode("--\n--\n \n \n");


            const setFontSize = new Uint8Array([0x1D, 0x21, 0x11]); // GS ! n

            const setFontSize2 = new Uint8Array([0x1D, 0x21, 0x22]); // GS ! n

            const setFontSize3 = new Uint8Array([0x1D, 0x21, 0x33]); // GS ! n


            // Write test data to the printer

            logMessage("Sending test data to printer...");


            await characteristic.writeValue(new Uint8Array([0x1D, 0x21, 0x00]));

            await characteristic.writeValue(encoder.encode("1x1!\n"));

            await characteristic.writeValue(setFontSize);

            await characteristic.writeValue(encoder.encode("2x2!\n"));

            await characteristic.writeValue(setFontSize2);

            await characteristic.writeValue(encoder.encode("3x3!\n"));

            await characteristic.writeValue(setFontSize3);

            await characteristic.writeValue(encoder.encode("4x4!\n"));


            const initPrinter = new Uint8Array([0x1B, 0x40]); // ESC @

            await characteristic.writeValue(initPrinter);


            // 3. 設置字符集為 GBK

            const setGBK = new Uint8Array([0x1B, 0x74, 0x11]); // ESC t 0x11 (GBK)

            await characteristic.writeValue(setGBK);


            const text = "繁體中文測試\n \n";

            const encodedText = stringToGbk(text);

            await characteristic.writeValue(encodedText);

            logMessage("Test data sent successfully!");


            // QrCode 列印

            const qrData = "https://example.com"; // Your QR code data

            const qrDataLength = qrData.length + 3;

            const pL = qrDataLength & 0xFF; // Low byte

            const pH = (qrDataLength >> 8) & 0xFF; // High byte


            const commands = [

                0x1B, 0x40, // Initialize printer

                0x1D, 0x28, 0x6B, pL, pH, 0x31, 0x50, 0x30, ...new TextEncoder().encode(qrData), // Store data

                0x1D, 0x28, 0x6B, 0x03, 0x00, 0x31, 0x51, 0x30 // Print QR code

            ];


            const buffer = new Uint8Array(commands);

            await characteristic.writeValue(buffer);

            logMessage("QrCode sent successfully!");


            await characteristic.writeValue(finalData);

            logMessage("finalData sent successfully!");


            // Disconnect the GATT server

            server.disconnect();

            logMessage("Disconnected from printer.");

        }


        // Bind the function to the button

        document.getElementById('printTestButton').addEventListener('click', connectAndTestPrint);

        document.getElementById('printAgain').addEventListener('click', printAgain);

    </script>

</body>

</html>
Bike, 2025/1/2 下午 02:20:15
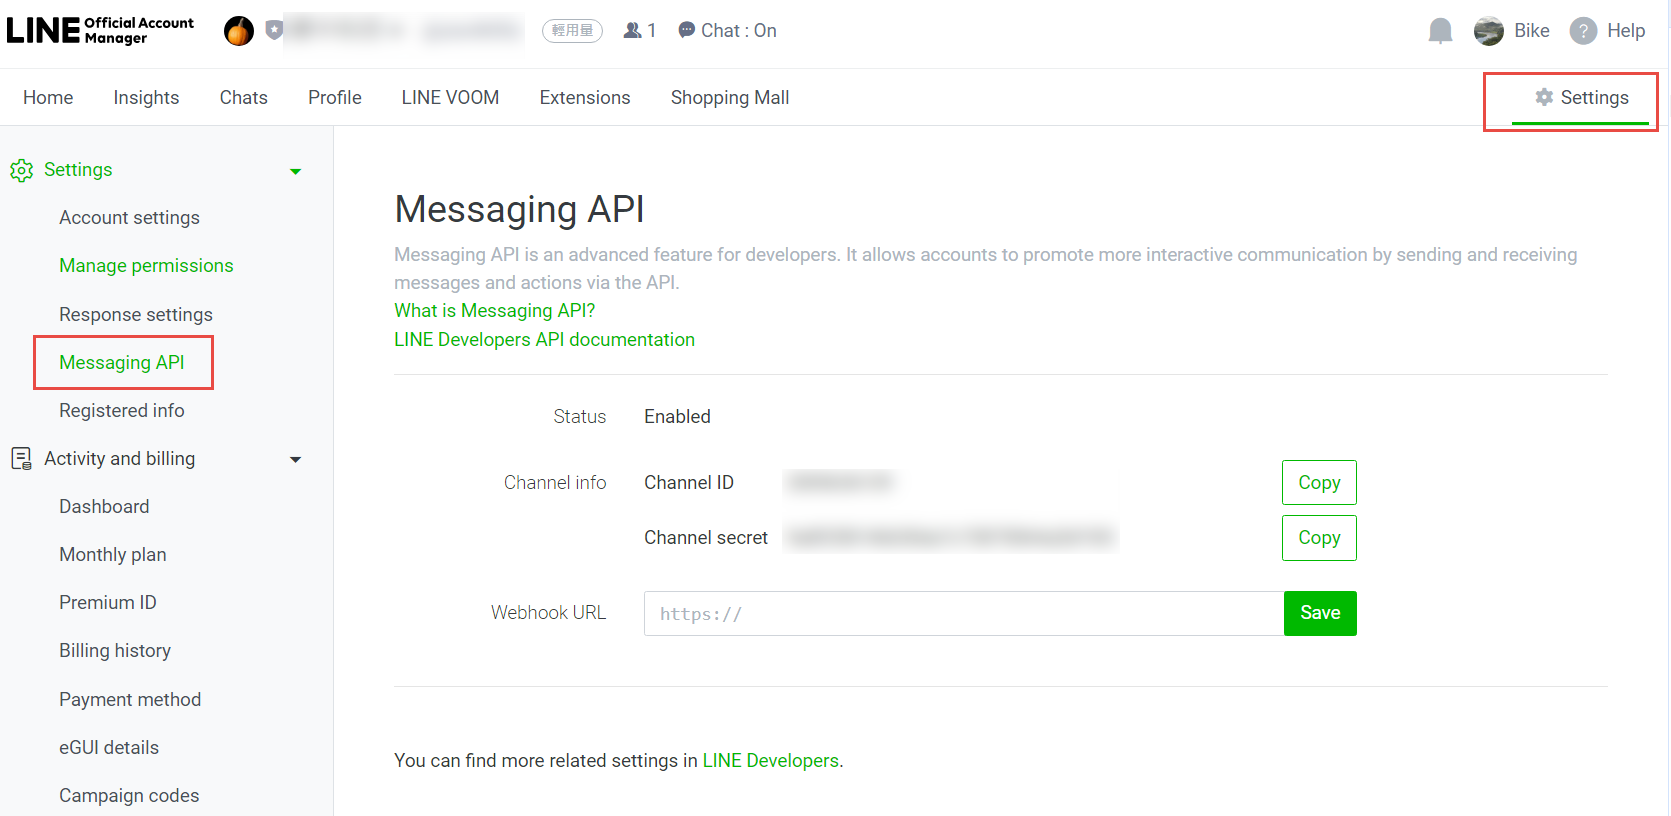
每次都找不到,在這裡記錄一下。
進入 Official Account Manager 之後,點右上方的 Setting,在左側選單有 Message API
進入 Official Account Manager 之後,點右上方的 Setting,在左側選單有 Message API
Bike, 2024/6/17 上午 10:22:44
使用 putty 連線到 ubuntu 後,使用 vi 編輯設定檔,註解會變成深藍色,幾乎看不到
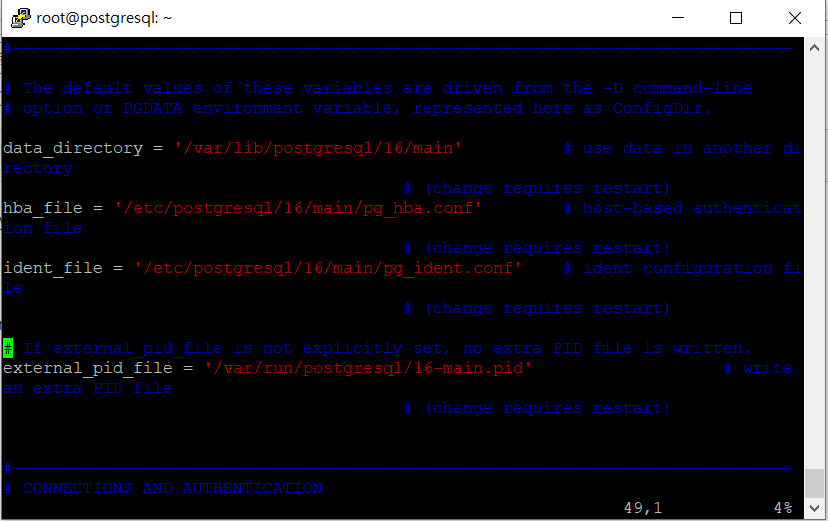
要改顏色可以用以下的指令:
vi ~/.vimrc
加入一行
colorscheme desert
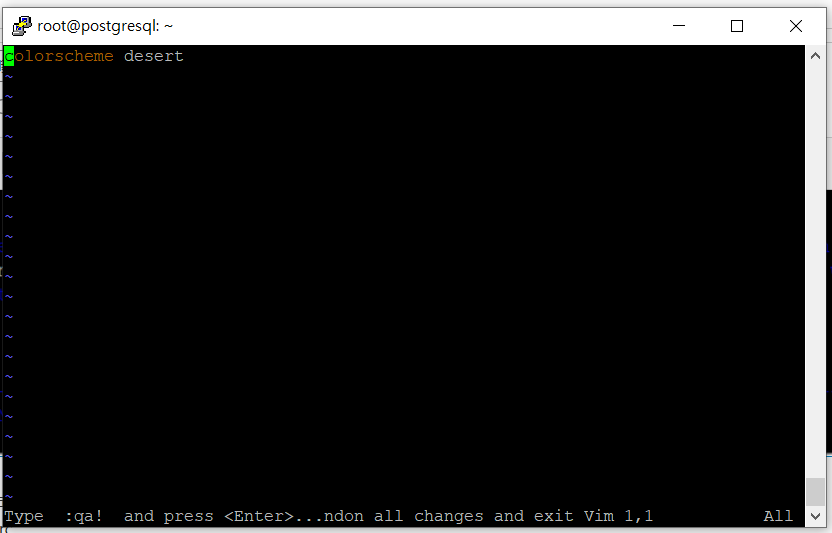
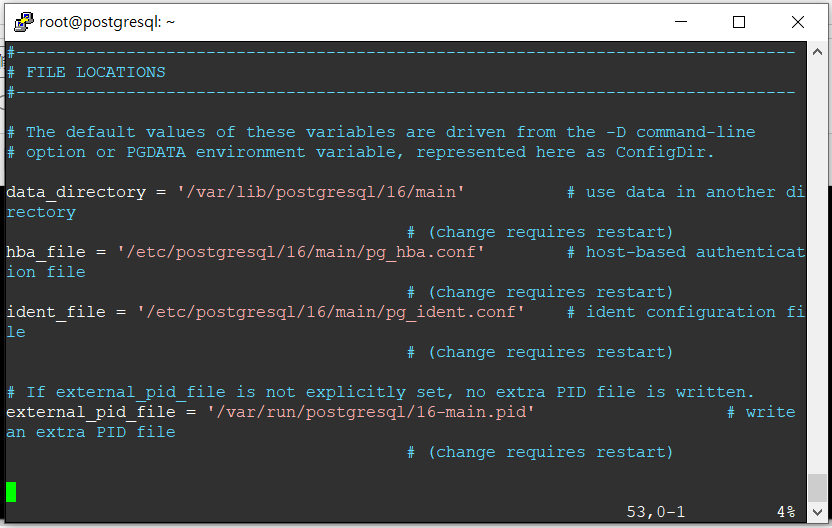
結果:
要改顏色可以用以下的指令:
vi ~/.vimrc
加入一行
colorscheme desert
結果:
Bike, 2024/6/14 上午 08:20:43
1. 使用 "具名的 ConnectionString"時,必需在 ODBC Data Sources (32-bit) 中設定,不是 ODBC Data Sources (64-bit)

2. 若日期或數字欄位為 Null 時,會無法轉換,此時必需用 "寫入查詢來指定要傳送的資料"

2. 若日期或數字欄位為 Null 時,會無法轉換,此時必需用 "寫入查詢來指定要傳送的資料"
Bike, 2024/2/17 下午 04:03:59
Entity Framework 提供了 ExecuteSqlRawAsync 和 FromSqlRaw 之後,可以和 Dapper 非常類似的用法。
我們在用 Dapper 時。最常用的就是 sql command 加上一個物件做為參數,就可以執行 CRUD 的動作。
其實用 Entity Framework 的 ExecuteSqlRawAsync 和 FromSqlRaw 也可以逹到幾乎一樣的效果。
ExecuteSqlRawAsync 和 FromSqlRaw 接受的參數是 object array (其實是 Microsoft.Data.SqlClient.SqlParameter 的 array)
所以我們先做一個 Object to Microsoft.Data.SqlClient.SqlParameter Array 的擴充, 可參考: https://gist.github.com/aliozgur/75182b2e9b0a58b83443
不過很奇怪的是,原作者提供的擴充轉出來的會是 System.Data.SqlClient.SqlParameter Array 無法直接使用於 ExecuteSqlRawAsync 和 FromSqlRaw,所以要稍微改一下,把 using System.Data.SqlClient; 改為 using Microsoft.Data.SqlClient; 即可:

另外,我們再自行 對 DbContext 做一個擴充如下:
最後的結果可以做到以下的效果: (res3 和 res4 是配合 FormattableString 的範例 )

範例程式碼:
我們在用 Dapper 時。最常用的就是 sql command 加上一個物件做為參數,就可以執行 CRUD 的動作。
其實用 Entity Framework 的 ExecuteSqlRawAsync 和 FromSqlRaw 也可以逹到幾乎一樣的效果。
ExecuteSqlRawAsync 和 FromSqlRaw 接受的參數是 object array (其實是 Microsoft.Data.SqlClient.SqlParameter 的 array)
所以我們先做一個 Object to Microsoft.Data.SqlClient.SqlParameter Array 的擴充, 可參考: https://gist.github.com/aliozgur/75182b2e9b0a58b83443
不過很奇怪的是,原作者提供的擴充轉出來的會是 System.Data.SqlClient.SqlParameter Array 無法直接使用於 ExecuteSqlRawAsync 和 FromSqlRaw,所以要稍微改一下,把 using System.Data.SqlClient; 改為 using Microsoft.Data.SqlClient; 即可:
另外,我們再自行 對 DbContext 做一個擴充如下:
        /// <summary>

        /// 會把物件 Parameter 的各 Property 帶入 SQL 中.

        /// </summary>

        /// <param name="dbct"></param>

        /// <param name="sql"></param>

        /// <param name="parameters"></param>

        /// <returns></returns>

        public static async Task<int> ExecuteParameterSqlAsync(this DbContext dbct, string sql, object parameters)

        {

            return await dbct.Database.ExecuteSqlRawAsync(sql, parameters.ToSqlParamsArray());

        }
最後的結果可以做到以下的效果: (res3 和 res4 是配合 FormattableString 的範例 )
範例程式碼:
        public async Task<object> EfTest()

        {

            var dbct = Ds.NewContext.GvContext;

            var insertSql = @"Insert into ProfileEvent(JobId,[Name],GvShoplineId,LiShoplineId,Phone,Email,LineId,GaClientId)

            Values(@JobId, @Name, null , null , null , @Email, @GaClientId , @GaClientId )";


            //執行 SQL 的原生寫法

            await dbct.Database.ExecuteSqlRawAsync(insertSql, new object[]

            {

                new SqlParameter("@JobId", 10),

                new SqlParameter("@Email", "XX'TT"),

                new SqlParameter("@Name", "AA'BB"),

                new SqlParameter("@GaClientId", "GaClientId"),

            });


            //執行 SQL 的擴充寫法

            await dbct.ExecuteParameterSqlAsync(insertSql, new

            {

                JobId = 10,

                Email = "XX'TT",

                Name = "AA'BB",

                GaClientId = "GaClientId"

            });


            //關於查詢

            string name = "%'B%";

            //原生寫法

            var res1 = await dbct.ProfileEvents.FromSqlRaw("Select top 100 * from ProfileEvent where Name like @name",

                new object[]

                    {

                        new SqlParameter("@name", "%'B%")

                    })

                .ToListAsync();


            //擴充, object to SqlParameter array

            var res2 = await dbct.ProfileEvents.FromSqlRaw("Select top 100 * from ProfileEvent where Name like @name",

                new { name }.ToSqlParamsArray())

                .ToListAsync();


            var res3 = await dbct.ProfileEvents.FromSql($"Select top 100 * from ProfileEvent where Name like {name}")

                .ToListAsync();


            var res4 = await dbct.ProfileEvents.FromSqlInterpolated($"Select top 100 * from ProfileEvent where Name like {name}")

                .ToListAsync();


            return new { res1, res2, res3, res4 };

        }
Bike, 2023/5/6 下午 05:37:19
Console主控台的輸出,只要是非英文,都會是亂碼呈現

情況:

解決方法:
輸入:[Console]::OutputEncoding = [System.Text.Encoding]::UTF8


參考:
一次解決CONSOLE主控台輸出中文亂碼的編碼問題
【茶包射手日記】PowerShell 串接 EXE 輸出中文變亂碼
情況:
解決方法:
輸入:[Console]::OutputEncoding = [System.Text.Encoding]::UTF8
參考:
一次解決CONSOLE主控台輸出中文亂碼的編碼問題
【茶包射手日記】PowerShell 串接 EXE 輸出中文變亂碼
Reiko, 2023/2/13 下午 04:25:51
比較方式: 對相同的資料表讀取 1000 次,來比較速度。
資料庫為 MS SQL
這裡做了 4 個 Case:
Case 1:
使用 Entity Framework,DbContext 為每次 new 一個。
Case 2:
使用 Entity Framework,使用同一個 DbContext。
Case 3:
用 DAO,轉為 Data Table 的格式 (使用 DtFromSql)。
Case 4:
使用 Dapper。
專案啟動時的記憶體使用量約為: 123 MB

測試一:
第一次讀取
Case 1, 時間: 3673.0303 ms, 記憶體: 566 MB
Case 2, 時間: 3889.9379 ms, 記憶體: 304 MB (這個時間有時會測試到 3000 ms)
Case 3, 時間: 1665.7748 ms, 記憶體: 205 MB
Case 4, 時間: 1639.7211 ms, 記憶體: 193 MB
讀取五次
Case 1, 時間: 1984.6395, 記憶體: 544MB (有發生 GC)

Case 2, 時間: 2367.9792 ms, 記憶體: 627 MB (沒有發生 GC)

Case 3, 時間: 1395.1132 ms, 記憶體: 280 MB (有發生 GC)

Case 4, 時間: 1531.3555 ms, 記憶體: 271 MB

結果: Dapper 看來完勝,速度上和直接使用 DAO 轉進 Data Table 的速度相近。但 Dapper 傳回的結果已經轉換為物件 List, 操作上會更為方便。
Entity Framework 一如預期的較慢,且花費較多的記憶體。但和想像中最大的差異是,使用同一個 DbContext 比 new 1000 個 DbContext 的速度還要慢, 花費的記憶體在 GC 之後,差異不大。
所以不一定要用 DI 注入 DbContext, 在各 function 中一直傳遞 DbContext. 在 Static 的 function 中,可以安心的 new 一個 DbContext 出來使用吧,只是要記得用 using 哦,否則可能會有 connection 沒有關閉的問題。
資料庫為 MS SQL
這裡做了 4 個 Case:
Case 1:
使用 Entity Framework,DbContext 為每次 new 一個。
Case 2:
使用 Entity Framework,使用同一個 DbContext。
Case 3:
用 DAO,轉為 Data Table 的格式 (使用 DtFromSql)。
Case 4:
使用 Dapper。
專案啟動時的記憶體使用量約為: 123 MB
測試一:
第一次讀取
Case 1, 時間: 3673.0303 ms, 記憶體: 566 MB
Case 2, 時間: 3889.9379 ms, 記憶體: 304 MB (這個時間有時會測試到 3000 ms)
Case 3, 時間: 1665.7748 ms, 記憶體: 205 MB
Case 4, 時間: 1639.7211 ms, 記憶體: 193 MB
讀取五次
Case 1, 時間: 1984.6395, 記憶體: 544MB (有發生 GC)
Case 2, 時間: 2367.9792 ms, 記憶體: 627 MB (沒有發生 GC)
Case 3, 時間: 1395.1132 ms, 記憶體: 280 MB (有發生 GC)
Case 4, 時間: 1531.3555 ms, 記憶體: 271 MB
結果: Dapper 看來完勝,速度上和直接使用 DAO 轉進 Data Table 的速度相近。但 Dapper 傳回的結果已經轉換為物件 List, 操作上會更為方便。
Entity Framework 一如預期的較慢,且花費較多的記憶體。但和想像中最大的差異是,使用同一個 DbContext 比 new 1000 個 DbContext 的速度還要慢, 花費的記憶體在 GC 之後,差異不大。
所以不一定要用 DI 注入 DbContext, 在各 function 中一直傳遞 DbContext. 在 Static 的 function 中,可以安心的 new 一個 DbContext 出來使用吧,只是要記得用 using 哦,否則可能會有 connection 沒有關閉的問題。
Bike, 2022/7/18 上午 09:46:34
Visual Studio 在 建置專案時會出現很多警告:

要關閉它,可以在專的目錄下,建立一個 .editorconfig 檔內容如下:
dotnet_diagnostic.CS8618.severity = none
dotnet_diagnostic.CS8600.severity = silent

要關閉它,可以在專的目錄下,建立一個 .editorconfig 檔內容如下:
dotnet_diagnostic.CS8618.severity = none
dotnet_diagnostic.CS8600.severity = silent
Bike, 2022/4/19 下午 03:53:33
這裡是我測試 Gmail API 和 Google API 憑証的一些記錄。
如果你的目的是要使用 Gmail Api 取代舊的 Gmail SMTP 來發送通知信,建議你先跳到最下方看一下結論。
如果你是想要看一下 Gmail API 和 Google API 憑証的使用方法,可以看一下這篇文章。
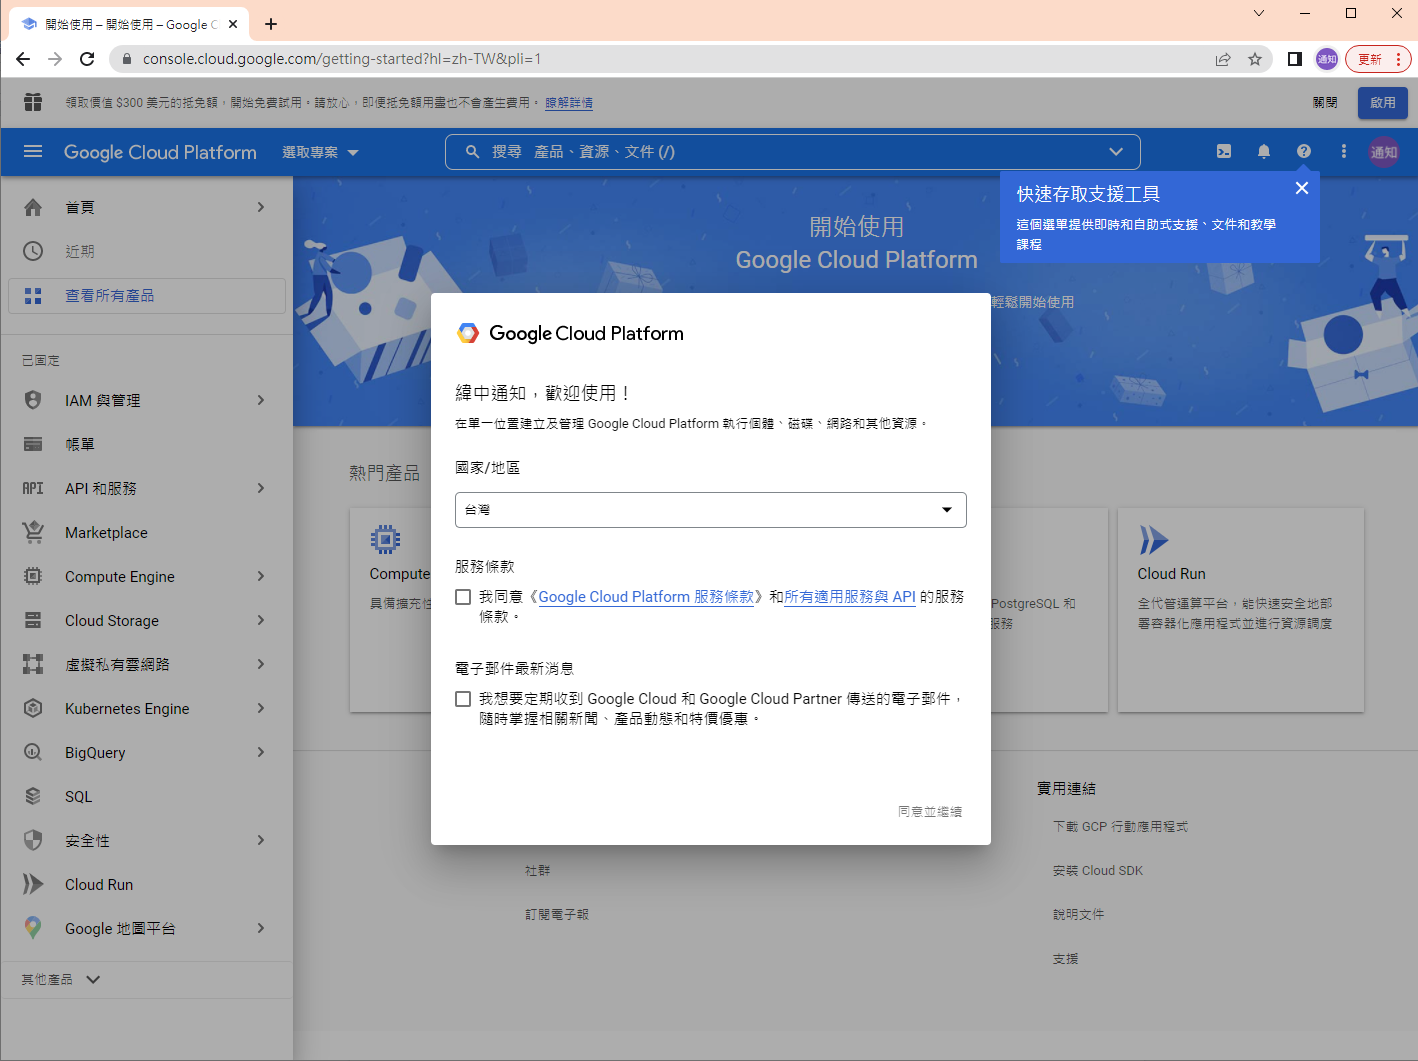
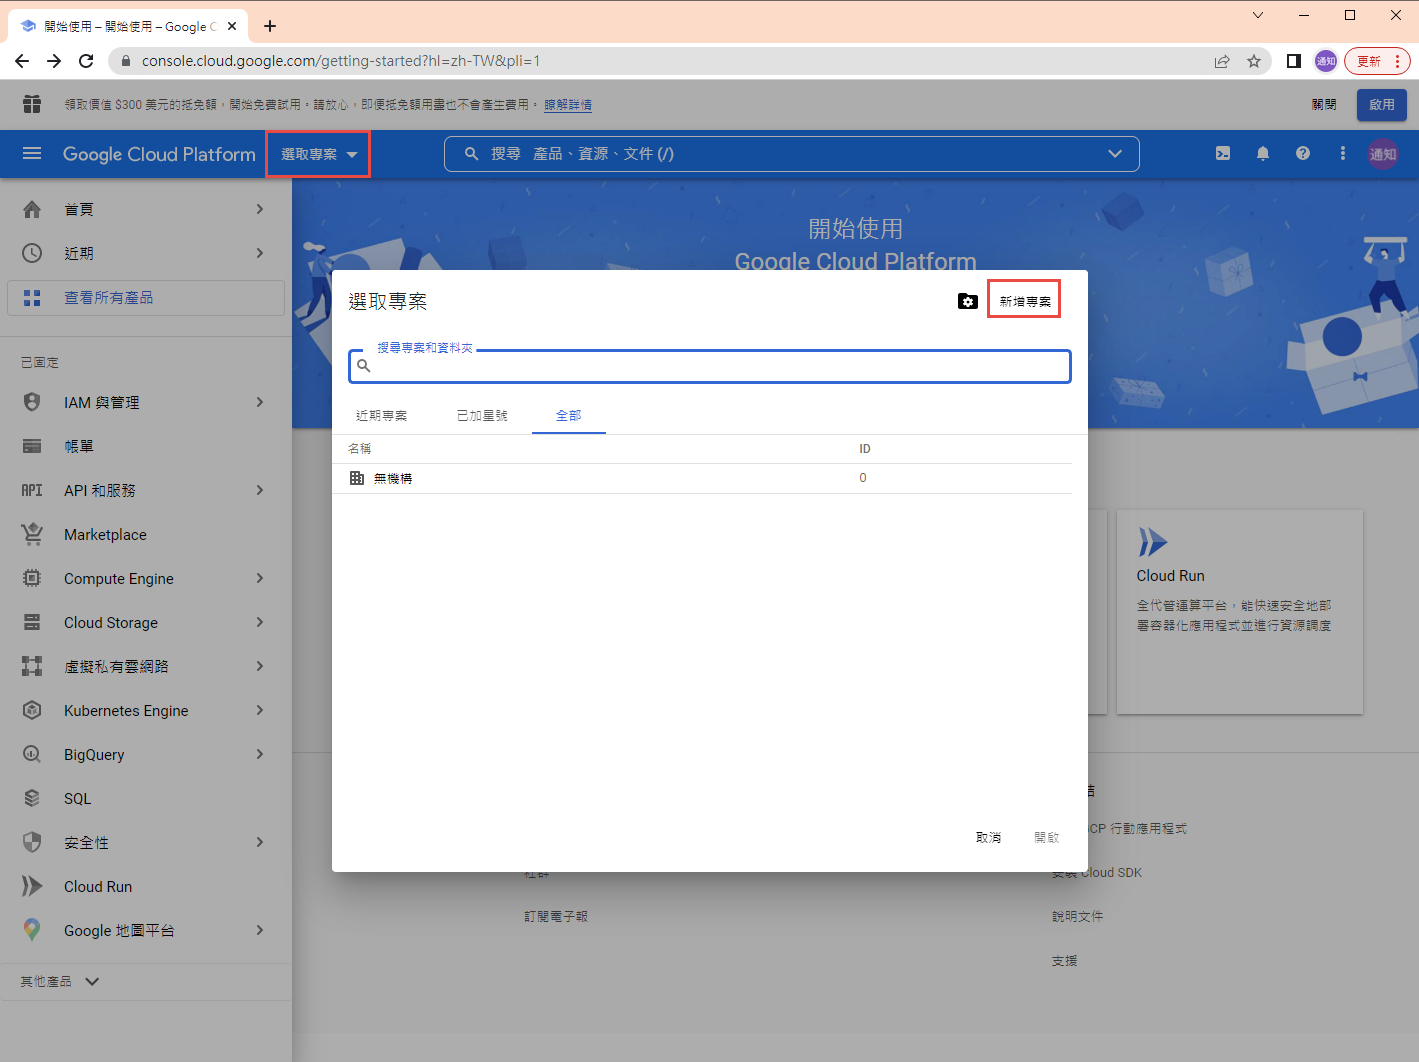
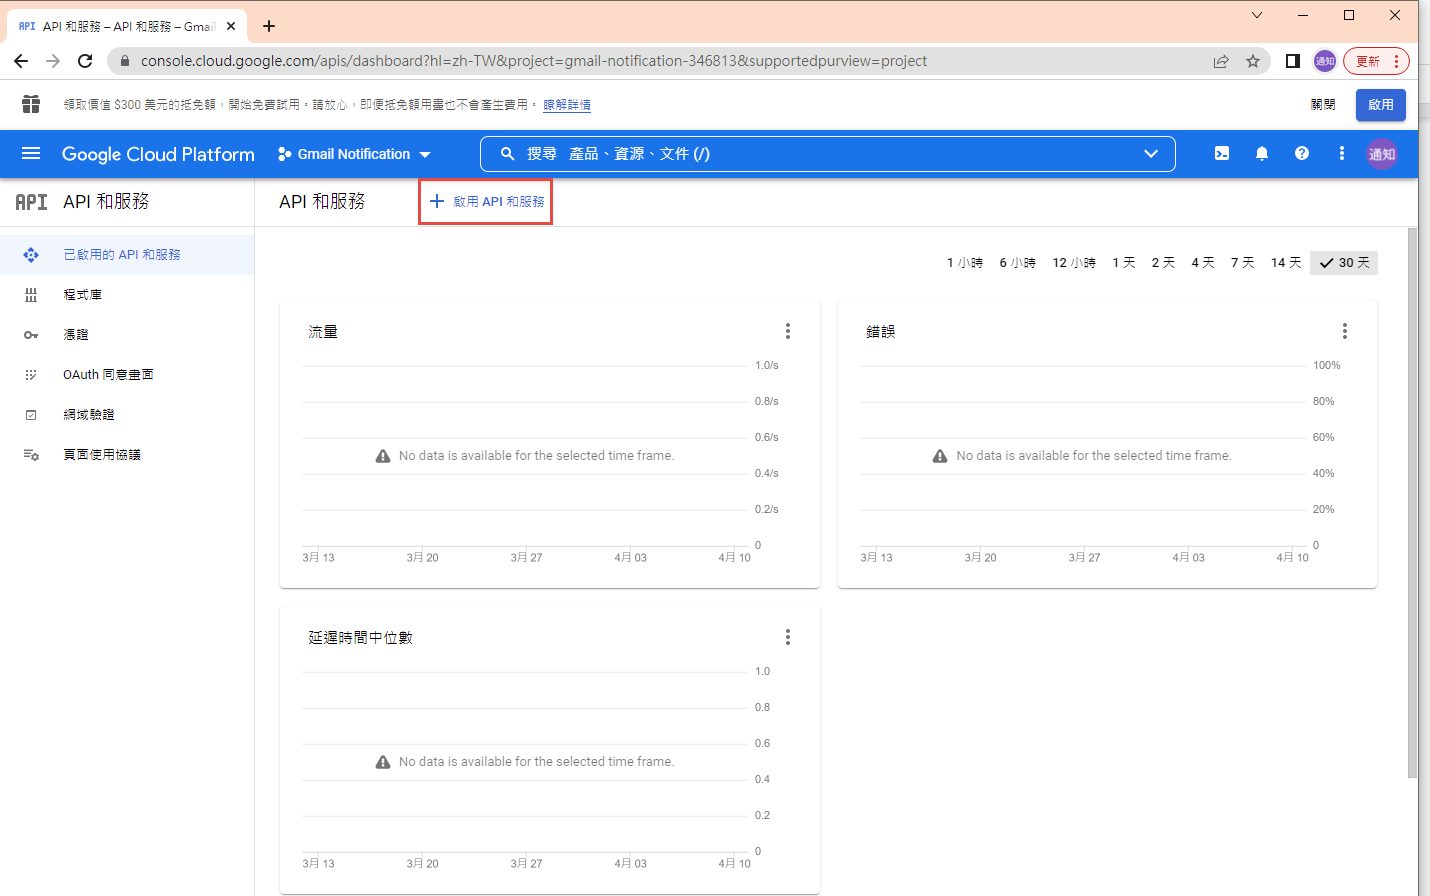
1. 在 google cloud platform 建立新的專案.
https://console.cloud.google.com/

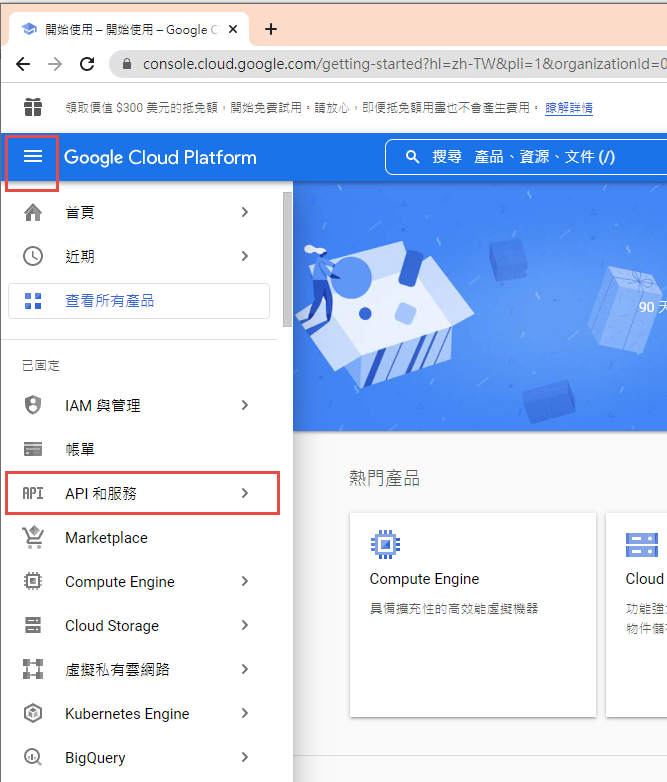
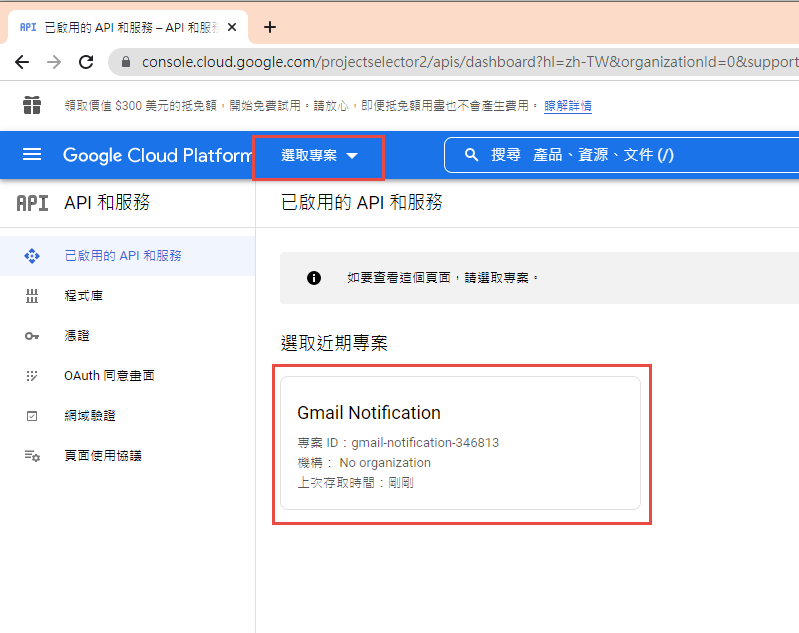
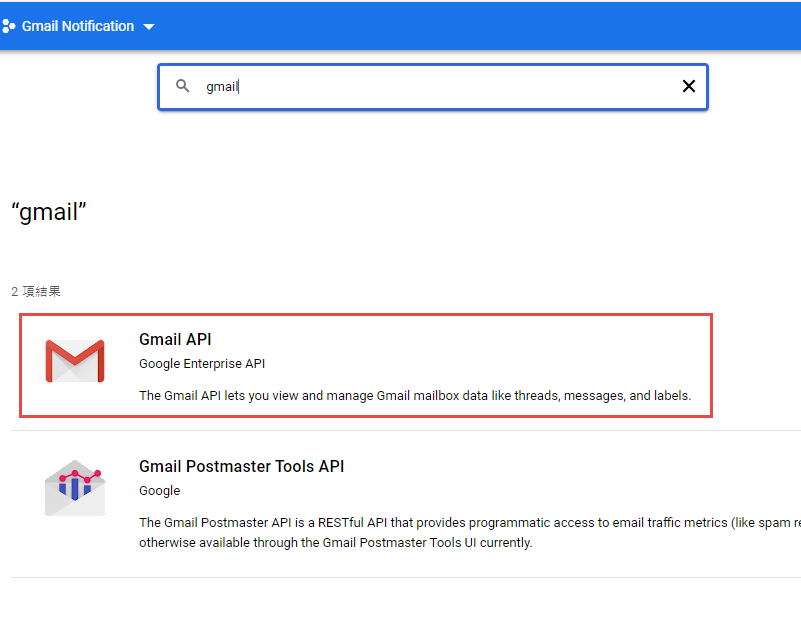
啟用 Gmail API


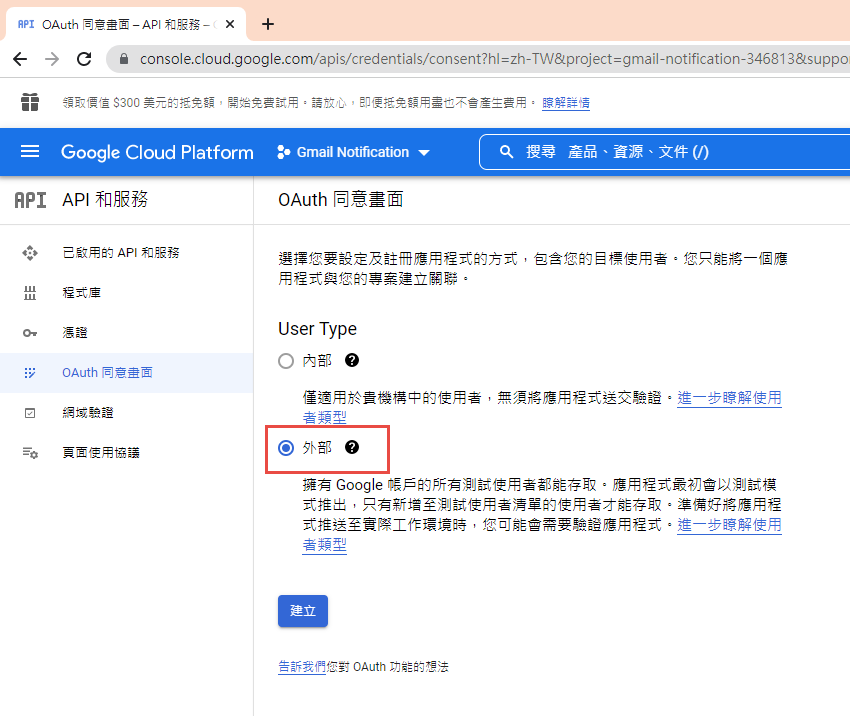
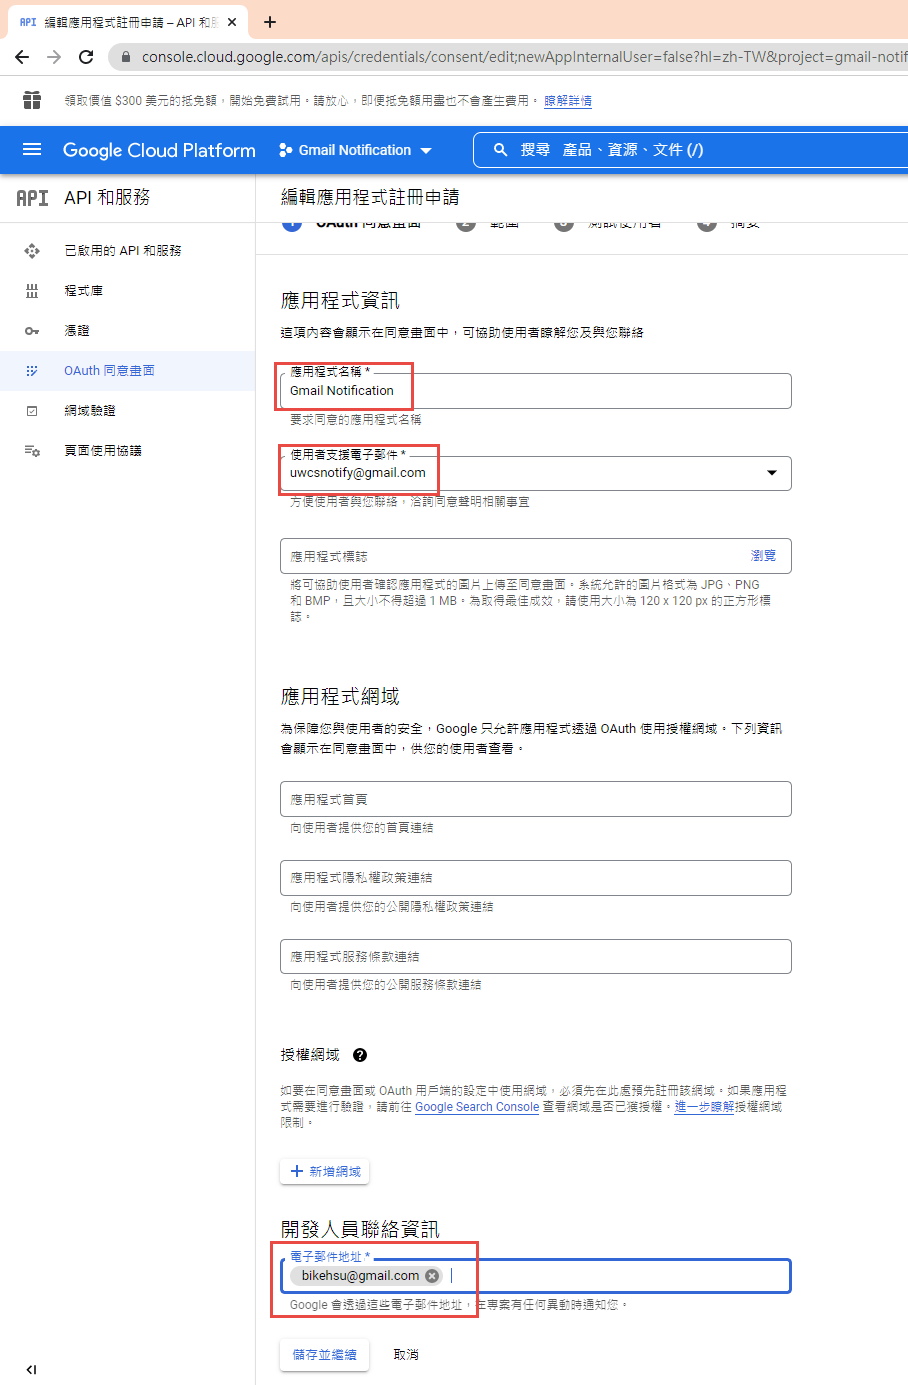
因為我們要透過 OAuth 取得使用者授權,所以要設定使用 OAuth 的同意畫面。
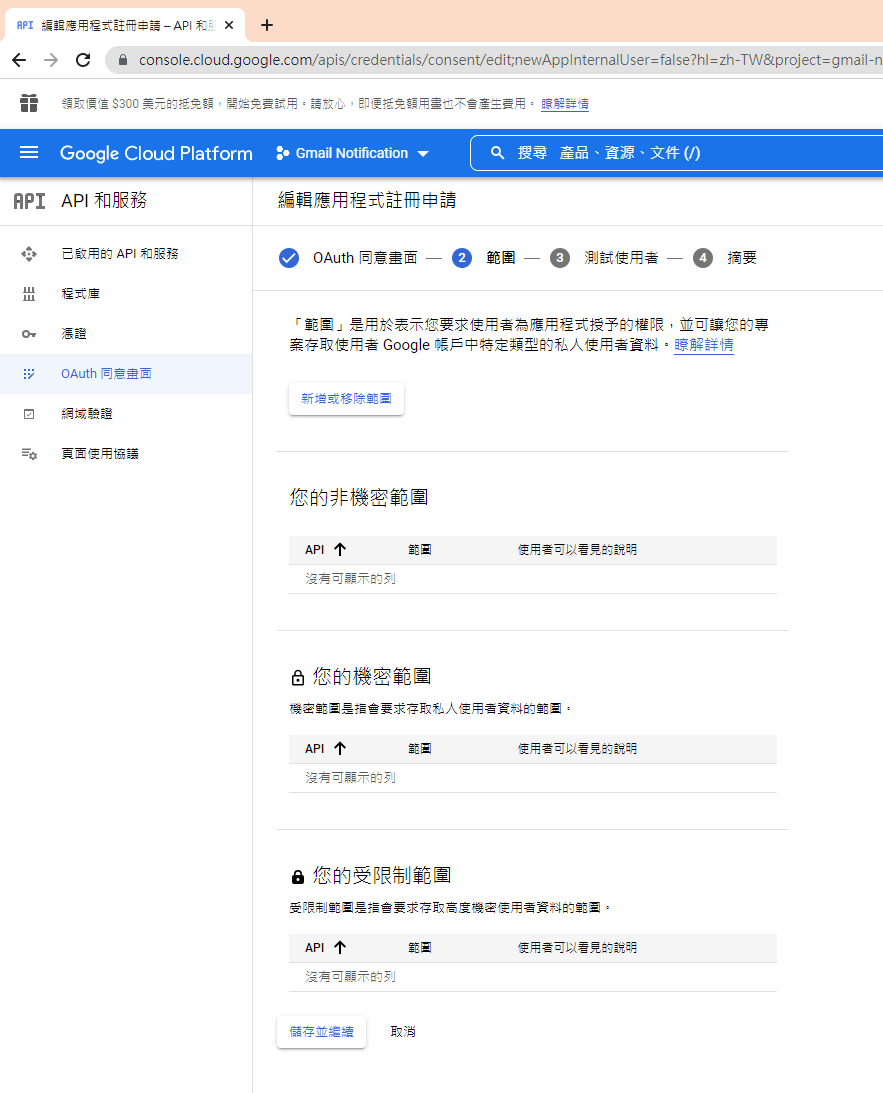
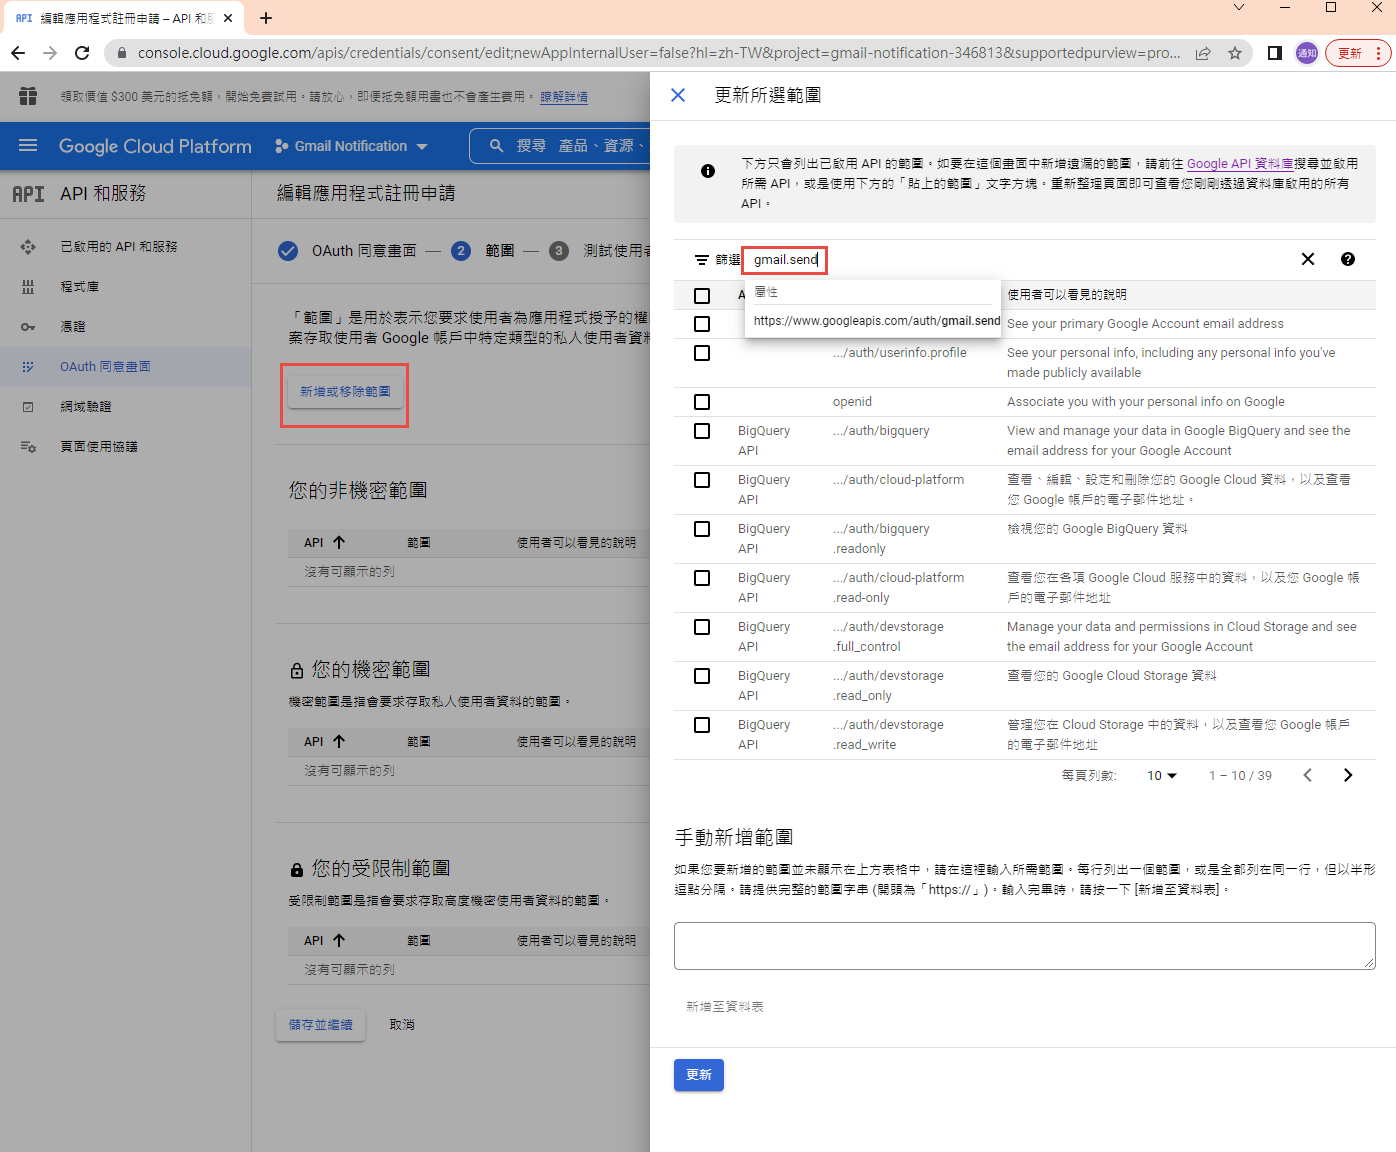
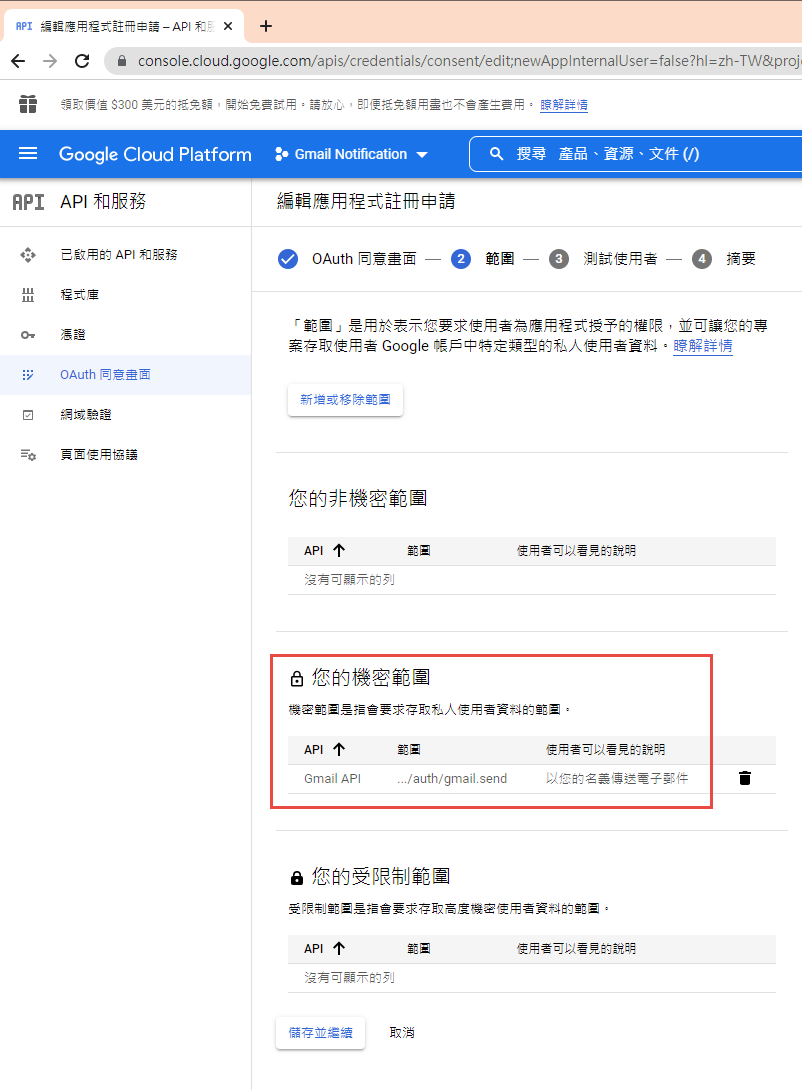
指定授權的範圍
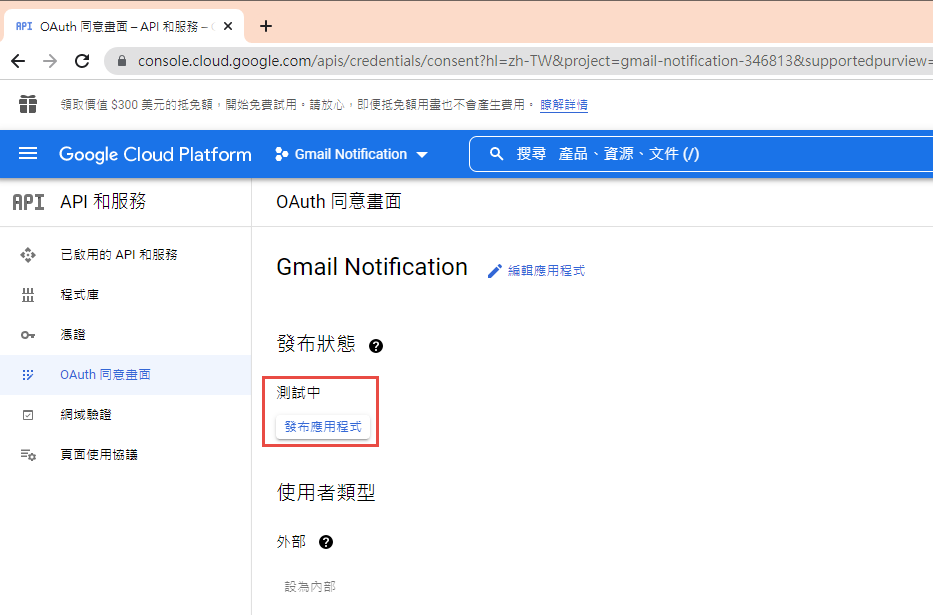
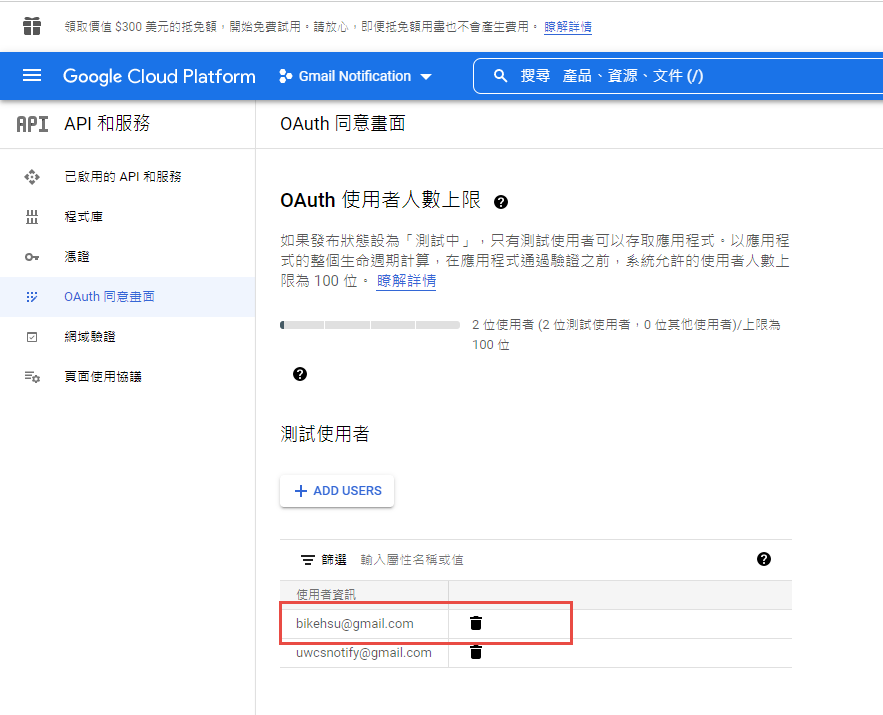
因為剛建立的專案,不會被公開,所以要指定測試使用者
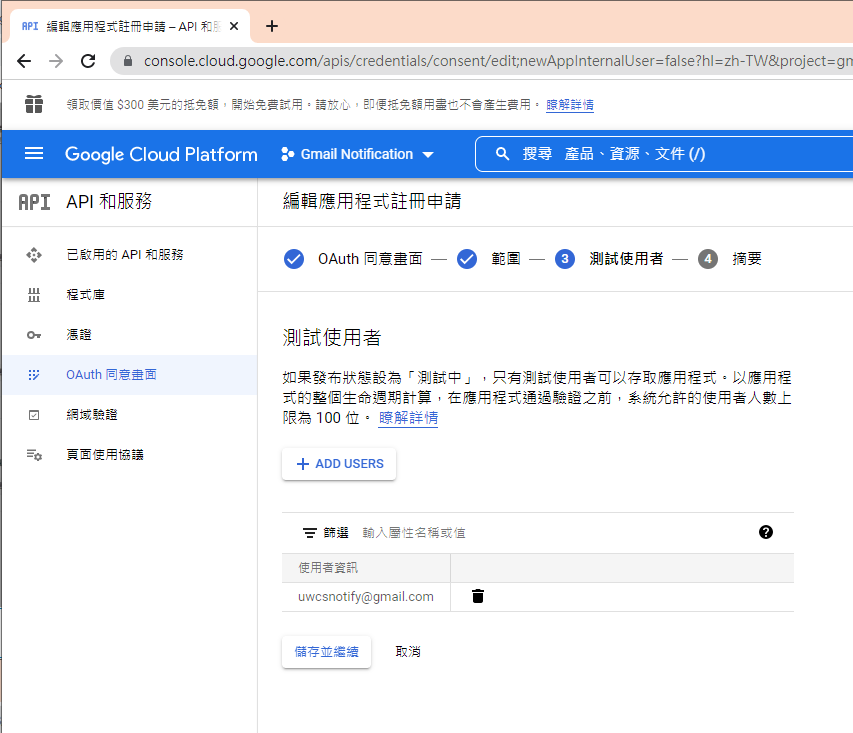
如果要給任意使用者,必需經過發布的流程,但準備工作有點麻煩,所以這次就不發布了。
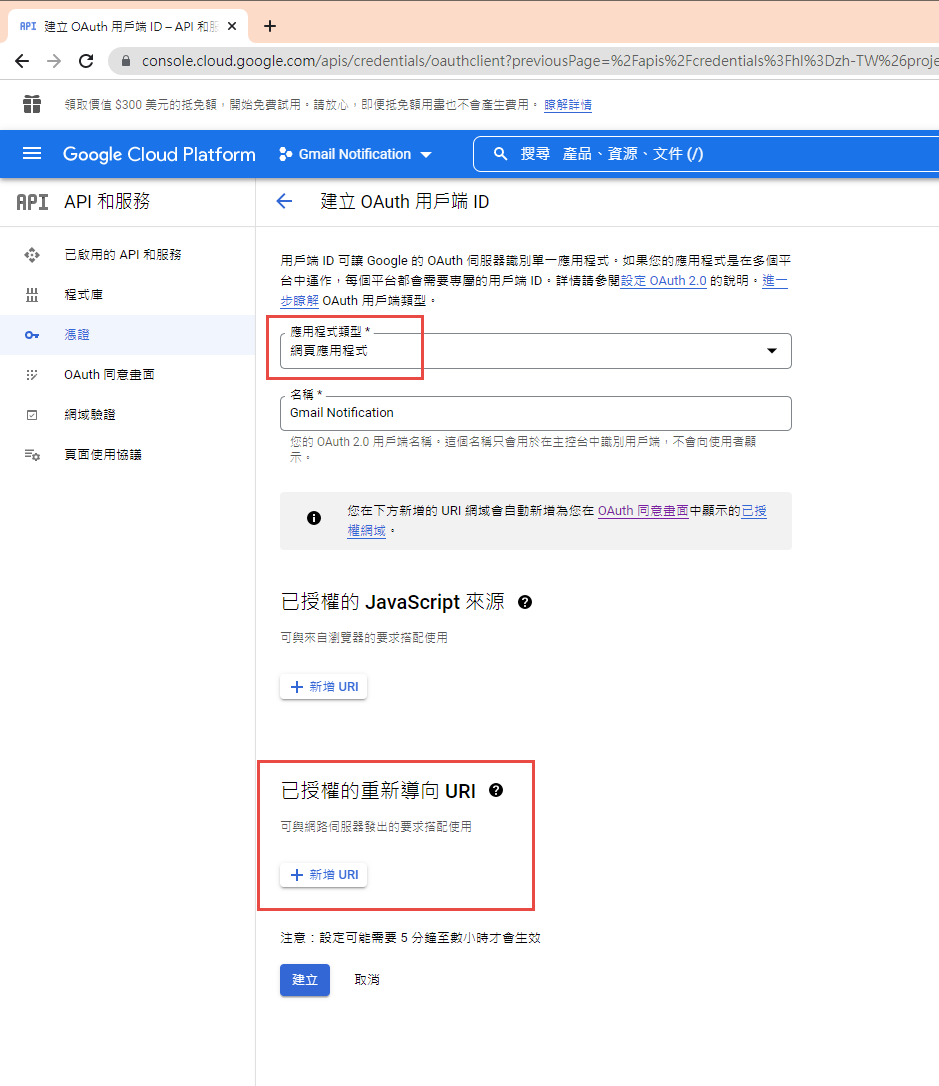
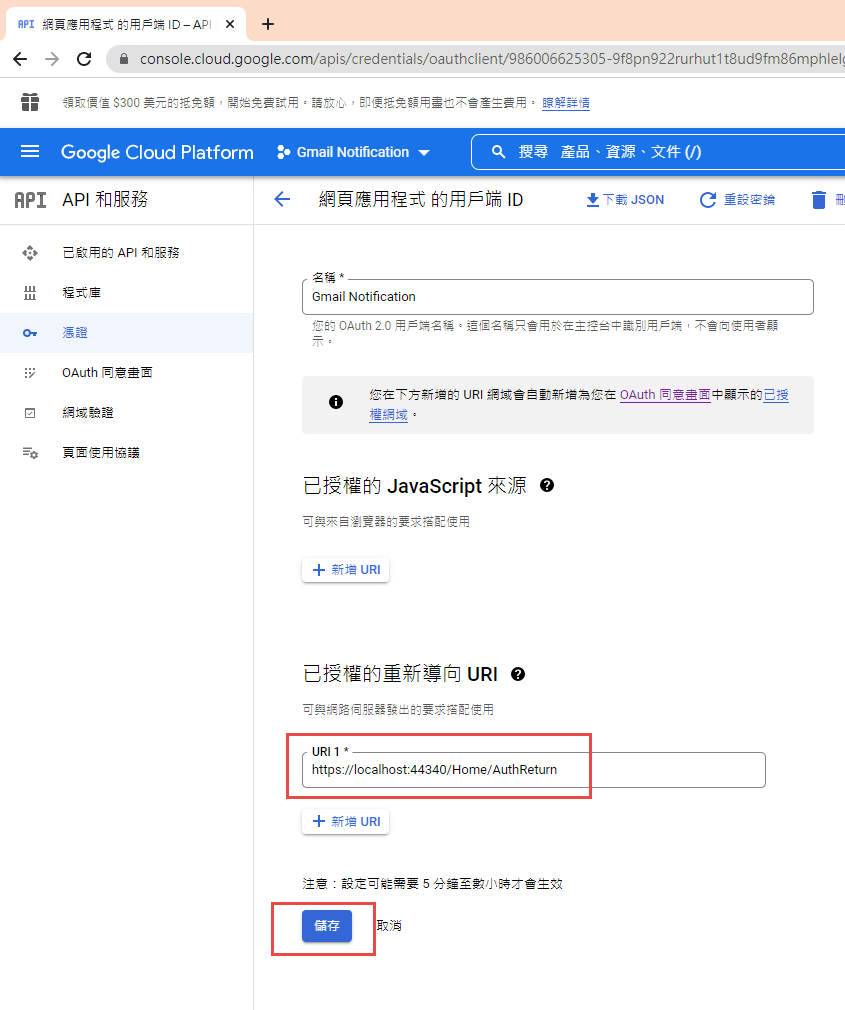
建立 OAuth 2.0 用戶端 ID 憑証

這裡除了名稱外,還有一個設定重導 Uri 的項目。現在不填寫,但稍後要回來補這個資料。
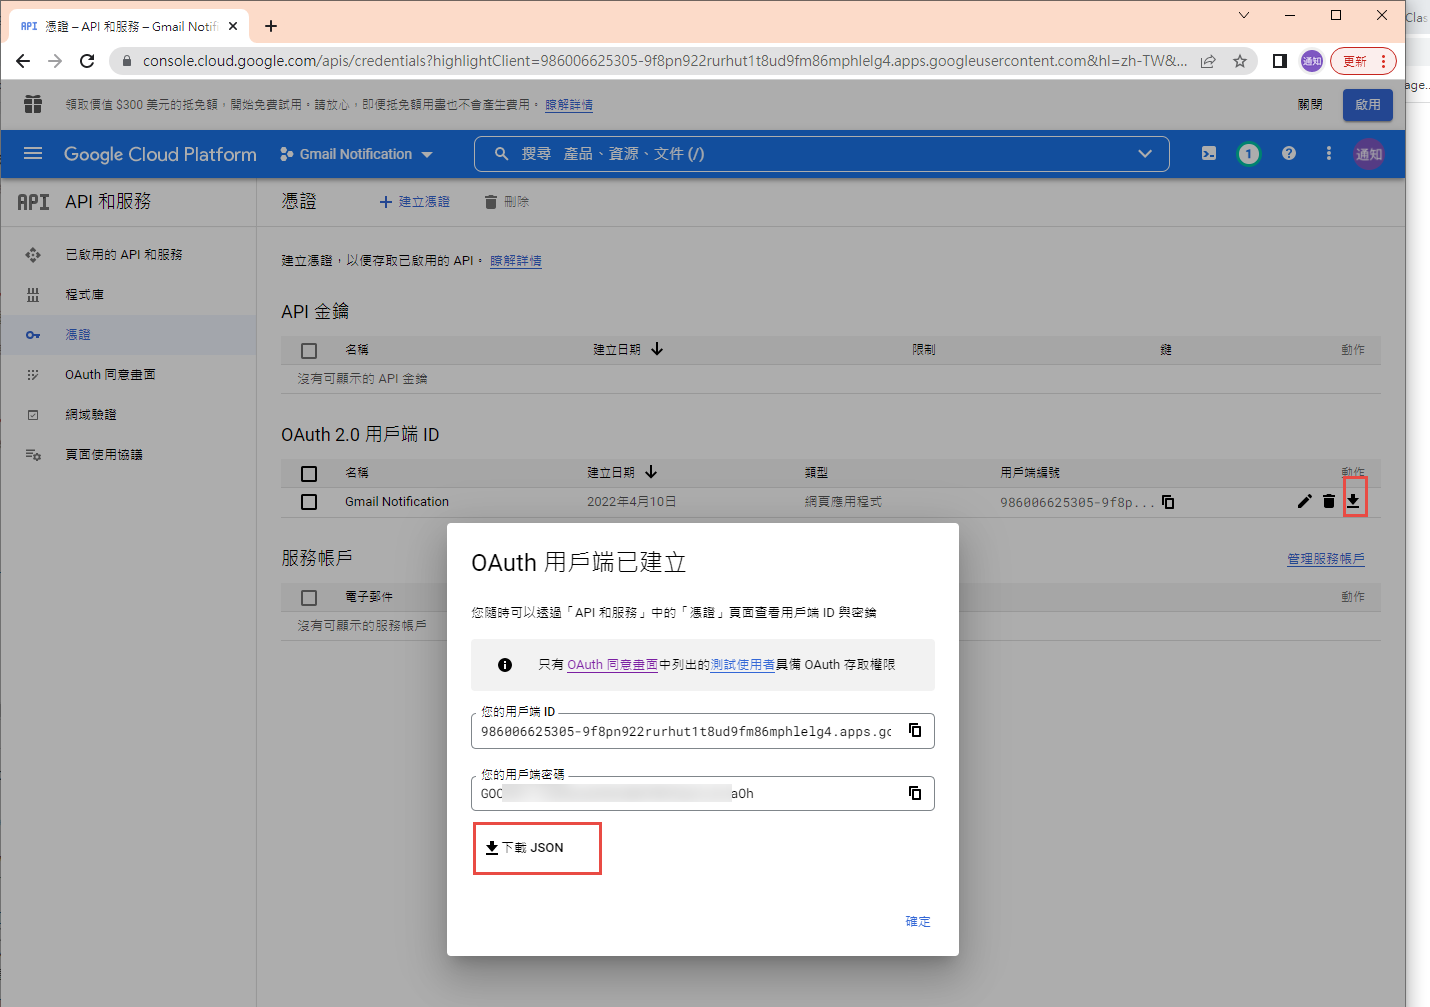
下載 json 之後,命名為 client_secret.json 保留後續使用。
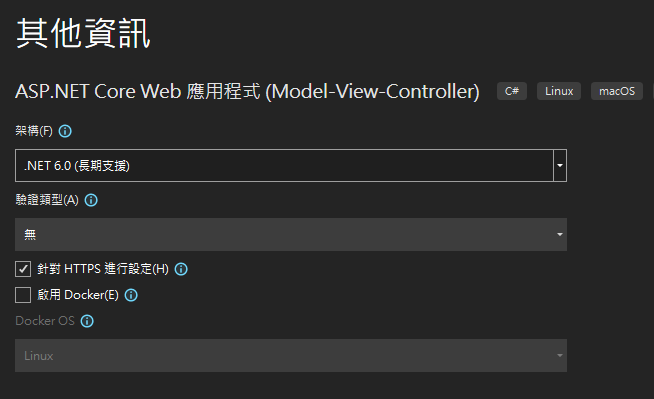
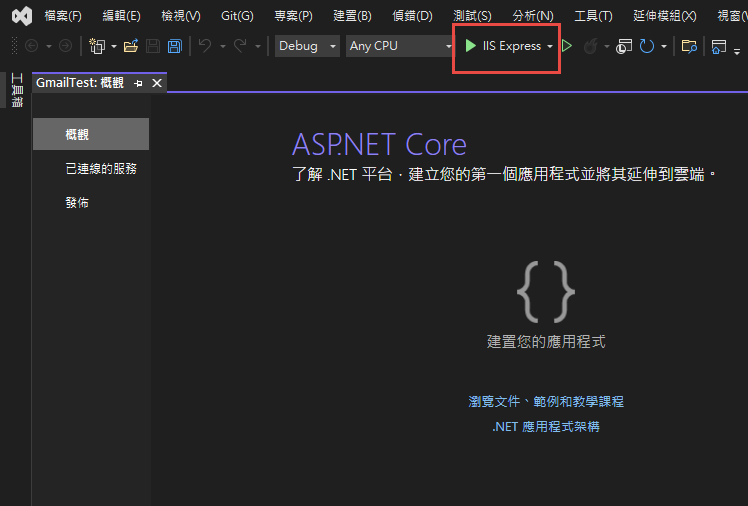
再來就要建立專案了. 用 VS2022 建立一個新專案

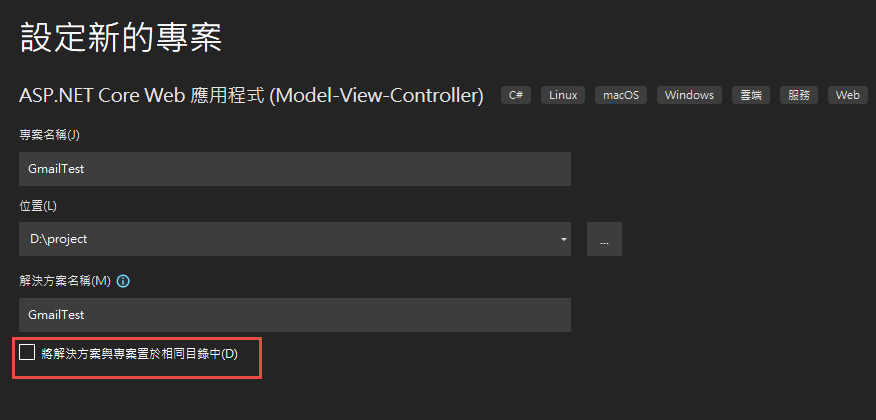
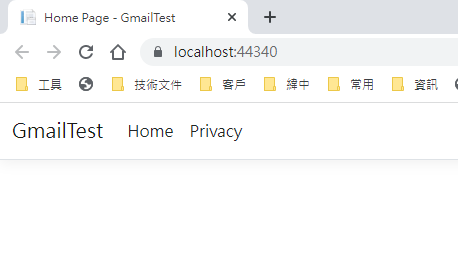
記錄網址, 本測試專案是 https://localhost:44340/ ,請依實際網址為準。
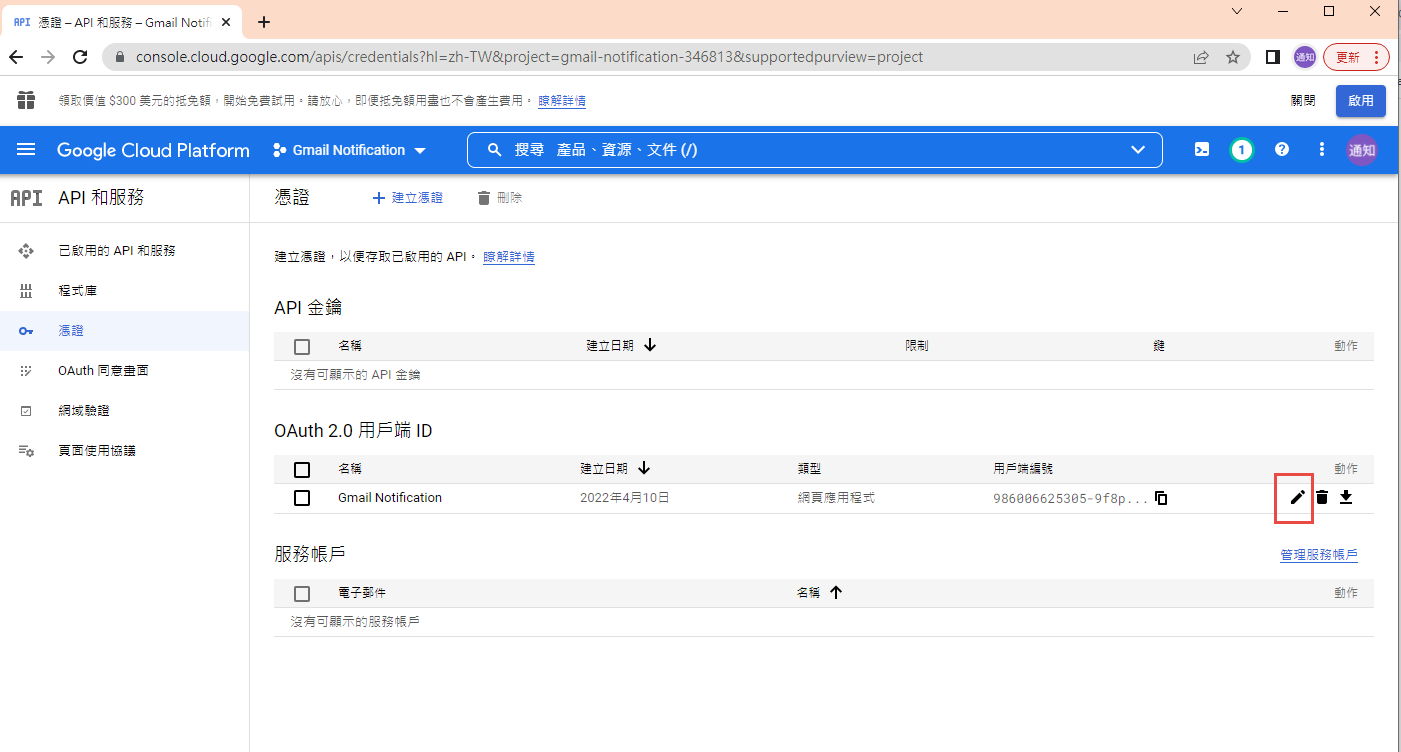
回到 OAuth 2.0 用戶端 ID 的設定頁. 在已授權的重新導向 URI 中填入 https://localhost:44340/Home/AuthReturn (填入的網址依實際專案的狀況,可能會有變化)
在 VS2022 中,使用 Nuget 安裝套件: (有漏的再麻煩和我說)
Google.Apis.Gmail.v1
Google.Apis.Auth
MimeKit (發送 gmail 時使用)
建立認証用的網址:
建立一個 Action, 用來取得認証用的網址:
執行結果:
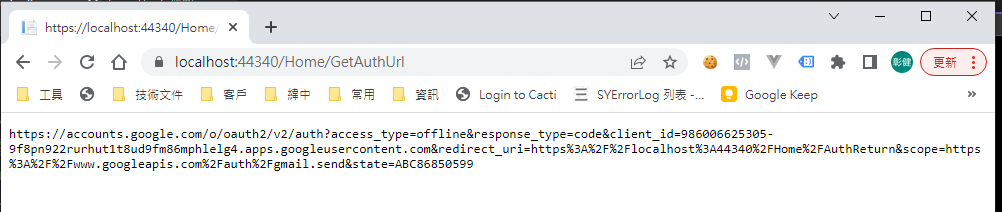
用 chrome 開啟產生的網址:
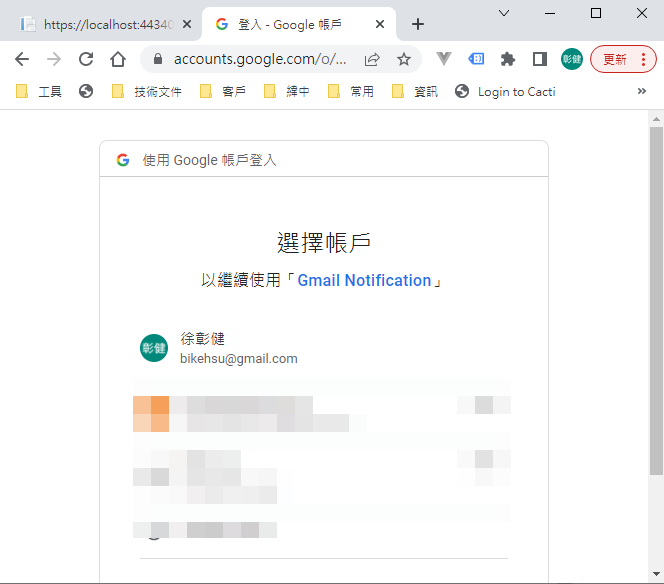
選取任一帳號,如果出現以下錯誤,請回到 "OAuth 同意畫面" 去新增測試使用者
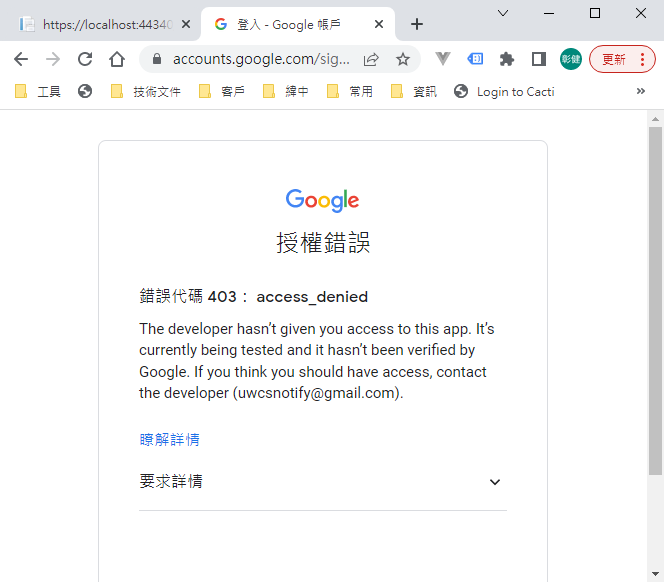
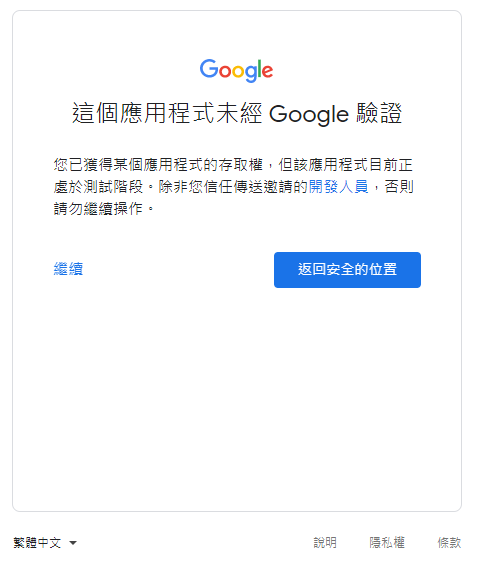
因為應用程式尚未發布,所以會看到警告,勇敢的繼續下去
這裡會要求授權使用你的名義發送信件。(這是在程式中取得授權的項目 Scopes 中所指定的)

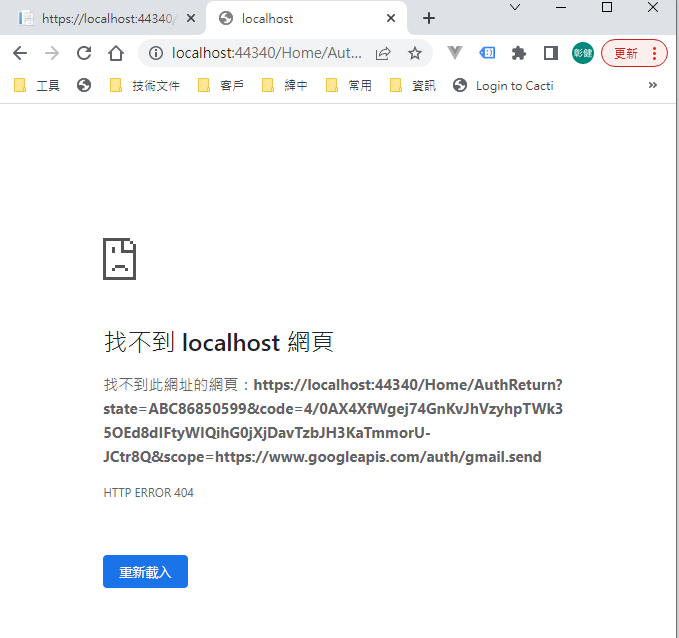
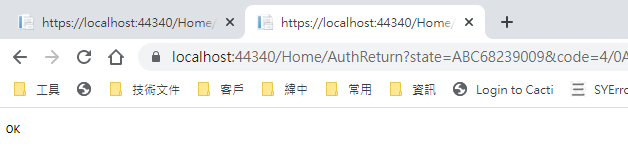
再繼續之後,會被重導至我們在 redirectUri 指定的網址。因為我們尚未完成,所以會看到錯誤,順便也可以看一下,會帶回哪一些參數。有 state, code, scope,共三個。
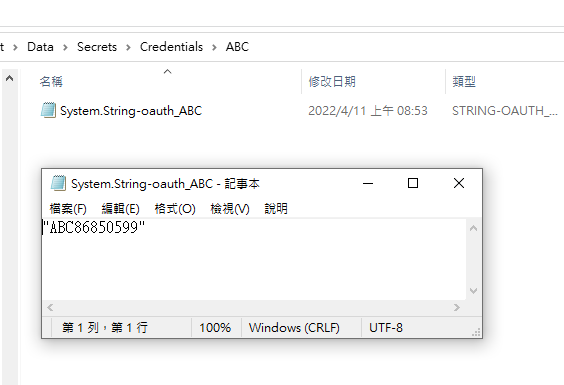
順便看一下,google 的套件會在 Credentials 的目錄下幫使用者建立一個目錄,在完成驗証前,會先放一個 System.String-oauth_XXX 的檔案,裡面的值和回傳的 state 是一樣的,這個應該是用來驗証回傳資料的。
接下來我們要新增 Action "AuthReturn" 如下:
再跑一次上面的流程,最後回到 AuthReturn
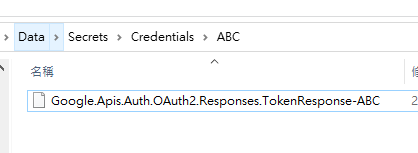
在 D:\project\GmailTest\Data\Secrets\Credentials\ABC 裡面會產生一個檔案: 這個就是我們的 token 了。
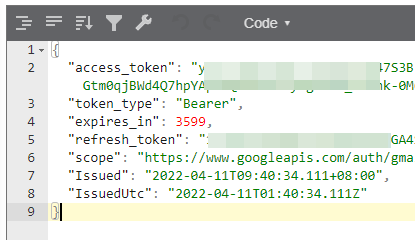
看一下裡面的內容, 有 access_token, refresh_token, scope 等等, 用途應該很好猜了.. 不知道各項目的目途也沒有關係。只要有這個 token 就可以了。
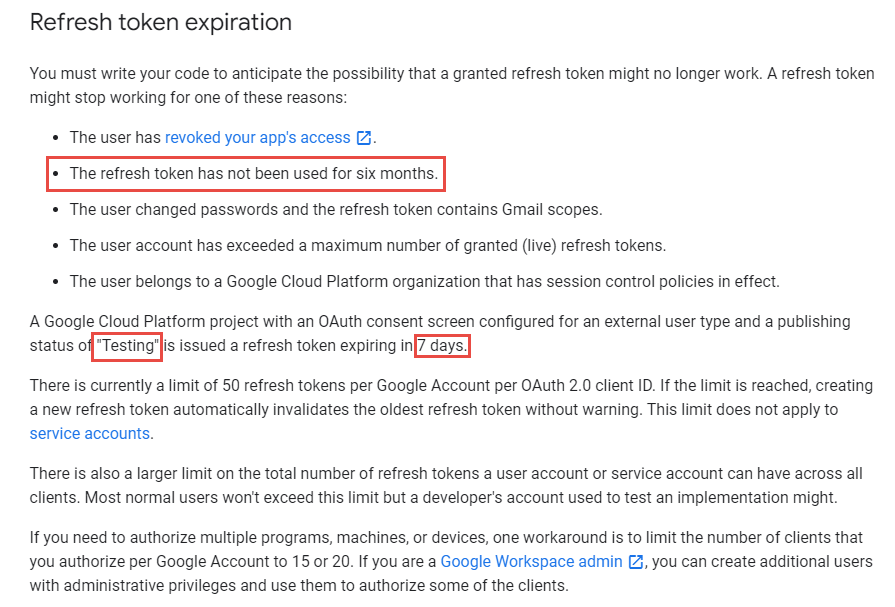
refresh_token 的效期請參考以下文件:
https://developers.google.com/identity/protocols/oauth2 。也可以參考下圖, 若是要用 gmail api 來發送通知信(例如連絡我們),紅色的地方是比較令人困擾的,例如 6 個月以上,沒有人留言,原來留下的 refresh_token 就失效了。使用者必需重新建立一個 refresh_token 。
最後來使用 gmail api 發送通知信, 直接看程式碼如下: 在這個過程中遇到最大的問題除了憑証問題之外,另一個問題是編碼。直到最後找到可以用 MimeKit 把 System.Net.Mail.MailMessage 編碼成 Gmail API 的格式才解決。程式碼如下:
收到的信件:
結論:
使用 Gmail API 最大的原因是要增加安全性,和舊的 smtp 不同的地方是,使用 gmail api 之後,客戶不需要提供 gmail 的帳號和密碼就可以讓系統使用 gmail 發送信件,不過由於 refresh_token 的效期問題,可能會造成無法發送通知信而沒有任何人發現的情況,整個實用性會變的很低。
另一個還沒有測試的部份是應用程的啟用。這個審核不知道會不很麻煩,不過可以而知的時,整個流程會花更多的時間。
取代的做法: 可能要改用 Amazon 的 SES 來寄信,而且為了避免每個小網站都要跑 SES 的建立流程,準備來寫一個 API 給各網站使用,可以發送簡單的通知信。
以上的程式碼可以在這裡下載: https://github.com/bikehsu/GmailTest
如果你的目的是要使用 Gmail Api 取代舊的 Gmail SMTP 來發送通知信,建議你先跳到最下方看一下結論。
如果你是想要看一下 Gmail API 和 Google API 憑証的使用方法,可以看一下這篇文章。
1. 在 google cloud platform 建立新的專案.
https://console.cloud.google.com/
啟用 Gmail API
因為我們要透過 OAuth 取得使用者授權,所以要設定使用 OAuth 的同意畫面。
指定授權的範圍
因為剛建立的專案,不會被公開,所以要指定測試使用者
如果要給任意使用者,必需經過發布的流程,但準備工作有點麻煩,所以這次就不發布了。
建立 OAuth 2.0 用戶端 ID 憑証
這裡除了名稱外,還有一個設定重導 Uri 的項目。現在不填寫,但稍後要回來補這個資料。
下載 json 之後,命名為 client_secret.json 保留後續使用。
再來就要建立專案了. 用 VS2022 建立一個新專案
記錄網址, 本測試專案是 https://localhost:44340/ ,請依實際網址為準。
回到 OAuth 2.0 用戶端 ID 的設定頁. 在已授權的重新導向 URI 中填入 https://localhost:44340/Home/AuthReturn (填入的網址依實際專案的狀況,可能會有變化)
在 VS2022 中,使用 Nuget 安裝套件: (有漏的再麻煩和我說)
Google.Apis.Gmail.v1
Google.Apis.Auth
MimeKit (發送 gmail 時使用)
建立認証用的網址:
建立一個 Action, 用來取得認証用的網址:
        /// <summary>

        /// 取得授權的項目

        /// </summary>

        static string[] Scopes = { GmailService.Scope.GmailSend };


        // 和登入 google 的帳號無關

        // 任意值,若未來有使用者認証,可使用使用者編號或登入帳號。

        string Username = "ABC";


        /// <summary>

        /// 存放 client_secret 和 credential 的地方

        /// </summary>

        string SecretPath = @"D:\project\GmailTest\Data\Secrets";


        /// <summary>

        /// 認証完成後回傳的網址, 必需和 OAuth 2.0 Client Id 中填寫的 "已授權的重新導向 URI" 相同。

        /// </summary>

        string RedirectUri = $"https://localhost:44340/Home/AuthReturn";


        /// <summary>

        /// 取得認証用的網址

        /// </summary>

        /// <returns></returns>

        public async Task<string> GetAuthUrl()

        {

            using (var stream = new FileStream(Path.Combine(SecretPath, "client_secret.json"), FileMode.Open, FileAccess.Read))

            {

                FileDataStore dataStore = null;

                var credentialRoot = Path.Combine(SecretPath, "Credentials");

                if (!Directory.Exists(credentialRoot))

                {

                    Directory.CreateDirectory(credentialRoot);

                }


                //存放 credential 的地方,每個 username 會建立一個目錄。

                string filePath = Path.Combine(credentialRoot, Username);

                dataStore = new FileDataStore(filePath);


                IAuthorizationCodeFlow flow = new GoogleAuthorizationCodeFlow(new GoogleAuthorizationCodeFlow.Initializer

                {

                    ClientSecrets = GoogleClientSecrets.Load(stream).Secrets,

                    Scopes = Scopes,

                    DataStore = dataStore

                });


                var authResult = await new AuthorizationCodeWebApp(flow, RedirectUri, Username)

                .AuthorizeAsync(Username, CancellationToken.None);


                return authResult.RedirectUri;

            }

        }
執行結果:
用 chrome 開啟產生的網址:
選取任一帳號,如果出現以下錯誤,請回到 "OAuth 同意畫面" 去新增測試使用者
因為應用程式尚未發布,所以會看到警告,勇敢的繼續下去
這裡會要求授權使用你的名義發送信件。(這是在程式中取得授權的項目 Scopes 中所指定的)
再繼續之後,會被重導至我們在 redirectUri 指定的網址。因為我們尚未完成,所以會看到錯誤,順便也可以看一下,會帶回哪一些參數。有 state, code, scope,共三個。
順便看一下,google 的套件會在 Credentials 的目錄下幫使用者建立一個目錄,在完成驗証前,會先放一個 System.String-oauth_XXX 的檔案,裡面的值和回傳的 state 是一樣的,這個應該是用來驗証回傳資料的。
接下來我們要新增 Action "AuthReturn" 如下:
        public async Task<string> AuthReturn(AuthorizationCodeResponseUrl authorizationCode)

        {

            string[] scopes = new[] { GmailService.Scope.GmailSend };


            using (var stream = new FileStream(Path.Combine(SecretPath, "client_secret.json"), FileMode.Open, FileAccess.Read))

            {

                //確認 credential 的目錄已建立.

                var credentialRoot = Path.Combine(SecretPath, "Credentials");

                if (!Directory.Exists(credentialRoot))

                {

                    Directory.CreateDirectory(credentialRoot);

                }


                //暫存憑証用目錄

                string tempPath = Path.Combine(credentialRoot, authorizationCode.State);


                IAuthorizationCodeFlow flow = new GoogleAuthorizationCodeFlow(

                new GoogleAuthorizationCodeFlow.Initializer

                {

                    ClientSecrets = GoogleClientSecrets.Load(stream).Secrets,

                    Scopes = scopes,

                    DataStore = new FileDataStore(tempPath)

                });


                //這個動作應該是要把 code 換成 token

                await flow.ExchangeCodeForTokenAsync(Username, authorizationCode.Code, RedirectUri, CancellationToken.None).ConfigureAwait(false);


                if (!string.IsNullOrWhiteSpace(authorizationCode.State))

                {

                    string newPath = Path.Combine(credentialRoot, Username);

                    if (tempPath.ToLower() != newPath.ToLower())

                    {

                        if (Directory.Exists(newPath))

                            Directory.Delete(newPath, true);


                        Directory.Move(tempPath, newPath);

                    }

                }


                return "OK";

            }

        }
再跑一次上面的流程,最後回到 AuthReturn
在 D:\project\GmailTest\Data\Secrets\Credentials\ABC 裡面會產生一個檔案: 這個就是我們的 token 了。
看一下裡面的內容, 有 access_token, refresh_token, scope 等等, 用途應該很好猜了.. 不知道各項目的目途也沒有關係。只要有這個 token 就可以了。
refresh_token 的效期請參考以下文件:
https://developers.google.com/identity/protocols/oauth2 。也可以參考下圖, 若是要用 gmail api 來發送通知信(例如連絡我們),紅色的地方是比較令人困擾的,例如 6 個月以上,沒有人留言,原來留下的 refresh_token 就失效了。使用者必需重新建立一個 refresh_token 。
最後來使用 gmail api 發送通知信, 直接看程式碼如下: 在這個過程中遇到最大的問題除了憑証問題之外,另一個問題是編碼。直到最後找到可以用 MimeKit 把 System.Net.Mail.MailMessage 編碼成 Gmail API 的格式才解決。程式碼如下:
public async Task<bool> SendTestMail()
{
var service = await GetGmailService();
GmailMessage message = new GmailMessage();
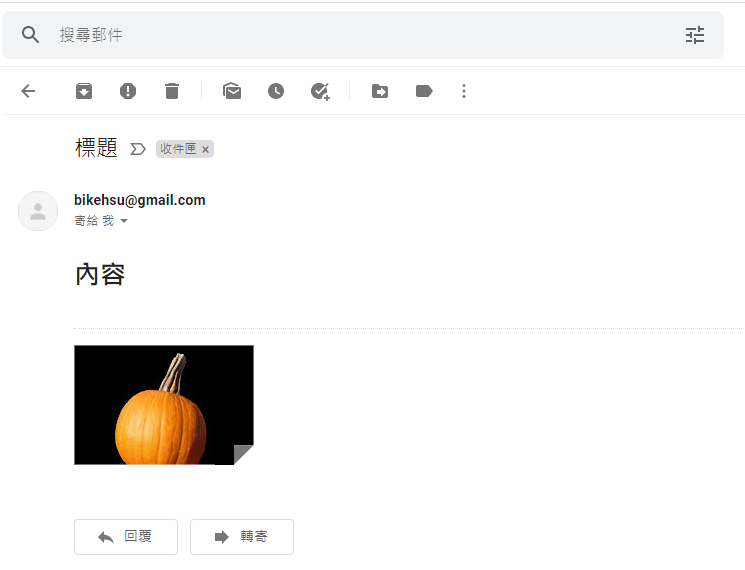
message.Subject = "標題";
message.Body = $"<h1>內容</h1>";
message.FromAddress = "bikehsu@gmail.com";
message.IsHtml = true;
message.ToRecipients = "bikehsu@gmail.com";
message.Attachments = new List<Attachment>();
string filePath = @"C:\Users\bike\Pictures\Vegetable_pumpkin.jpg"; //要附加的檔案
Attachment attachment1 = new Attachment(filePath);
message.Attachments.Add(attachment1);
SendEmail(message, service);
Console.WriteLine("OK");
return true;
}
async Task<GmailService> GetGmailService()
{
UserCredential credential = null;
var credentialRoot = Path.Combine(SecretPath, "Credentials");
if (!Directory.Exists(credentialRoot))
{
Directory.CreateDirectory(credentialRoot);
}
string filePath = Path.Combine(credentialRoot, Username);
using (var stream = new FileStream(Path.Combine(SecretPath, "client_secret.json"), FileMode.Open, FileAccess.Read))
{
credential = await GoogleWebAuthorizationBroker.AuthorizeAsync(
GoogleClientSecrets.Load(stream).Secrets,
Scopes,
Username,
CancellationToken.None,
new FileDataStore(filePath));
}
var service = new GmailService(new BaseClientService.Initializer()
{
HttpClientInitializer = credential,
ApplicationName = "Send Mail",
});
return service;
}
public class GmailMessage
{
public string FromAddress { get; set; }
public string ToRecipients { get; set; }
public string Subject { get; set; }
public string Body { get; set; }
public bool IsHtml { get; set; }
public List<System.Net.Mail.Attachment> Attachments { get; set; }
}
public static void SendEmail(GmailMessage email, GmailService service)
{
var mailMessage = new System.Net.Mail.MailMessage();
mailMessage.From = new System.Net.Mail.MailAddress(email.FromAddress);
mailMessage.To.Add(email.ToRecipients);
mailMessage.ReplyToList.Add(email.FromAddress);
mailMessage.Subject = email.Subject;
mailMessage.Body = email.Body;
mailMessage.IsBodyHtml = email.IsHtml;
if (email.Attachments != null)
{
foreach (System.Net.Mail.Attachment attachment in email.Attachments)
{
mailMessage.Attachments.Add(attachment);
}
}
var mimeMessage = MimeKit.MimeMessage.CreateFromMailMessage(mailMessage);
var gmailMessage = new Google.Apis.Gmail.v1.Data.Message
{
Raw = Encode(mimeMessage)
};
Google.Apis.Gmail.v1.UsersResource.MessagesResource.SendRequest request = service.Users.Messages.Send(gmailMessage, "me");
request.Execute();
}
public static string Encode(MimeMessage mimeMessage)
{
using (MemoryStream ms = new MemoryStream())
{
mimeMessage.WriteTo(ms);
return Convert.ToBase64String(ms.GetBuffer())
.TrimEnd('=')
.Replace('+', '-')
.Replace('/', '_');
}
}
收到的信件:
結論:
使用 Gmail API 最大的原因是要增加安全性,和舊的 smtp 不同的地方是,使用 gmail api 之後,客戶不需要提供 gmail 的帳號和密碼就可以讓系統使用 gmail 發送信件,不過由於 refresh_token 的效期問題,可能會造成無法發送通知信而沒有任何人發現的情況,整個實用性會變的很低。
另一個還沒有測試的部份是應用程的啟用。這個審核不知道會不很麻煩,不過可以而知的時,整個流程會花更多的時間。
取代的做法: 可能要改用 Amazon 的 SES 來寄信,而且為了避免每個小網站都要跑 SES 的建立流程,準備來寫一個 API 給各網站使用,可以發送簡單的通知信。
以上的程式碼可以在這裡下載: https://github.com/bikehsu/GmailTest
Bike, 2022/4/10 下午 09:31:15
首先尋找出一支欲調效的Table或Query

再來我們可以先使用左上方工具列 'Query' 內的 Explain Current Statement
便可以得到如以下的連結表

由圖中可以清楚的看見每一段Query後的資料量,並發現有數張表單是呈現紅色 'Full Table Scan'
,這代表該段Query對這張表單的每一行欄位都做了掃描。
再來我們在我們的Query前方加上 'EXPLAIN' 並執行

便得到了該段Query所關聯的表單與其詳細資訊
其中針對EXPLAIN的欄位說明如下:
table:關連到的資料表(Table)會顯示在此。
type:顯示使用了何種類型。從最優至最差的類型為const、eq_reg、ref、range、indexhe、ALL。
possible_keys:顯示可能使用到的索引。此為從WHERE語法中選擇一個適合的欄位名稱。
key:實際使用到的索引。如果為NULL,則是沒有使用索引。
key_len:使用索引的長度。長度越短 準確性越高。
ref:顯示那一列的索引被使用。一般是一個常數(const)。
rows:MySQL用來返回資料的筆數。
Extra:MySQL用來解析額外的查詢訊息。如果此欄位的值為:Using temporary和Using filesort,表示MySQL無法使用索引。
Extra為MySQL用來解析額外的查詢訊息,其中欄位值所代表的意義如下:
Distinct:當MySQL找到相關連的資料時,就不再搜尋。
Not exists:MySQL優化 LEFT JOIN,一旦找到符合的LEFT JOIN資料後,就不再搜尋。
Range checked for each Record(index map:#):無法找到理想的索引。此為最慢的使用索引。
Using filesort:當出現這個值時,表示此SELECT語法需要優化。因為MySQL必須進行額外的步驟來進行查詢。
Using index:返回的資料是從索引中資料,而不是從實際的資料中返回,當返回的資料都出現在索引中的資料時就會發生此情況。
Using temporary:同Using filesort,表示此SELECT語法需要進行優化。此為MySQL必須建立一個暫時的資料表(Table)來儲存結果,此情況會發生在針對不同的資料進行ORDER BY,而不是GROUP BY。
Using where:使用WHERE語法中的欄位來返回結果。
System:system資料表,此為const連接類型的特殊情況。
Const:資料表中的一個記錄的最大值能夠符合這個查詢。因為只有一行,這個值就是常數,因為MySQL會先讀這個值然後把它當做常數。
eq_ref:MySQL在連接查詢時,會從最前面的資料表,對每一個記錄的聯合,從資料表中讀取一個記錄,在查詢時會使用索引為主鍵或唯一鍵的全部。
ref:只有在查詢使用了非唯一鍵或主鍵時才會發生。
range:使用索引返回一個範圍的結果。例如:使用大於>或小於<查詢時發生。
index:此為針對索引中的資料進行查詢。
ALL:針對每一筆記錄進行完全掃描,此為最壞的情況,應該盡量避免。

我們可以注意到 `browse_history` 這個表單在Query中並沒有使用索引,
可以從上方的QueryString中發現該段Query的Left Join是查詢`product_id`這個欄位,前往這個Table並幫其建立Index來增加檢索效率。


步驟三的時候可以選擇複數欄位來建立Index,但是要注意的是在使用索引欄位作為條件時,如果該索引是複合索引,那麼必須使用到該索引中的第一個欄位作為條件時才能保證系統使用該索引,否則該索引將不會被使用,並且應儘可能的讓欄位順序與索引順序相一致。
再來是在Query語句中應該注意以下事項
1.避免在索引列上進行運算, 這將導致引擎放棄使用索引而進行全表掃描。
2.不使用NOT IN和<>操作, NOT IN和<>操作都不會使用索引將進行全表掃描。NOT IN可以NOT EXISTS代替,id<>9則可使用id>9 or id<9來代替。
3.檢查where條件與order by 欄位,避免全表掃描。
4.應儘量避免在 where 子句中對欄位進行 null 值判斷,否則將導致引擎放棄使用索引而進行全表掃描,如: 可以在num上設定預設值0,確保表中num列沒有null值,然後這樣查詢: select id from t where num = 0
5.應儘量避免在 where 子句中使用 or 來連線條件,如果一個欄位有索引,一個欄位沒有索引,將導致引擎放棄使用索引而進行全表掃描。可以拆分條件,進行子句的union all查詢,如: select id from t where num=10 or name = 'admin' 拆分 select id from t where num = 10 union all select id from t where name = 'admin'
6.in 和 not in 也要慎用,否則會導致全表掃描,如: select id from t where num in(1,2,3) 對於連續的數值,能用 between 就不要用 in 了: select id from t where num between 1 and 3,
用 exists 代替 in 是一個好的選擇: select num from a where num in(select num from b) 換成 select num from a where exists(select 1 from b where num=a.num)
7.like語句的%不要前置, 否則索引失效 將導致全表掃描。
8.如果在 where 子句中使用引數,也會導致全表掃描。 因為SQL只有在執行時才會解析區域性變數,但優化程式不能將訪問計劃的選擇推遲到執行時;它必須在編譯時進行選擇。然 而,如果在編譯時建立訪問計劃,變數的值還是未知的,因而無法作為索引選擇的輸入項。
9.應儘量避免在where子句中對欄位進行函式操作,這將導致引擎放棄使用索引而進行全表掃描。
10.不要在 where 子句中的“=”左邊進行函式、算術運算或其他表示式運算,否則系統將可能無法正確使用索引。
11.在使用索引欄位作為條件時,如果該索引是複合索引,那麼必須使用到該索引中的第一個欄位作為條件時才能保證系統使用該索引,否則該索引將不會被使用,並且應儘可能的讓欄位順序與索引順序相一致。
12.Update 語句,如果只更改1、2個欄位,不要Update全部欄位,否則頻繁呼叫會引起明顯的效能消耗,同時帶來大量日誌。
對於多張大資料量(這裡幾百條就算大了)的表JOIN,要先分頁再JOIN,否則邏輯讀會很高,效能很差。
13.select count(*) from table;這樣不帶任何條件的count會引起全表掃描,並且沒有任何業務意義,是一定要杜絕的。
14.任何地方都不要使用 select * from t ,用具體的欄位列表代替“*”,不要返回用不到的任何欄位。
15.避免頻繁建立和刪除臨時表,以減少系統表資源的消耗。臨時表並不是不可使用,適當地使用它們可以使某些例程更有效,例如,當需要重複引用大型表或常用表中的某個資料集時。但是,對於一次性事件, 最好使用匯出表。
16.在新建臨時表時,如果一次性插入資料量很大,那麼可以使用 select into 代替 create table,避免造成大量 log ,以提高速度;如果資料量不大,為了緩和系統表的資源,應先create table,然後insert。
17.儘量拆分大的 DELETE 或INSERT 語句,批量提交SQL語句。
18.儘量避免使用遊標,因為遊標的效率較差,如果遊標操作的資料超過1萬行,那麼就應該考慮改寫。
參考來源:
1. http://blog.twbryce.com/mysql-explain/
2. https://www.gushiciku.cn/pl/gkis/zh-tw
3. https://www.itread01.com/content/1548581229.html
再來我們可以先使用左上方工具列 'Query' 內的 Explain Current Statement
便可以得到如以下的連結表
由圖中可以清楚的看見每一段Query後的資料量,並發現有數張表單是呈現紅色 'Full Table Scan'
,這代表該段Query對這張表單的每一行欄位都做了掃描。
再來我們在我們的Query前方加上 'EXPLAIN' 並執行
便得到了該段Query所關聯的表單與其詳細資訊
其中針對EXPLAIN的欄位說明如下:
table:關連到的資料表(Table)會顯示在此。
type:顯示使用了何種類型。從最優至最差的類型為const、eq_reg、ref、range、indexhe、ALL。
possible_keys:顯示可能使用到的索引。此為從WHERE語法中選擇一個適合的欄位名稱。
key:實際使用到的索引。如果為NULL,則是沒有使用索引。
key_len:使用索引的長度。長度越短 準確性越高。
ref:顯示那一列的索引被使用。一般是一個常數(const)。
rows:MySQL用來返回資料的筆數。
Extra:MySQL用來解析額外的查詢訊息。如果此欄位的值為:Using temporary和Using filesort,表示MySQL無法使用索引。
Extra為MySQL用來解析額外的查詢訊息,其中欄位值所代表的意義如下:
Distinct:當MySQL找到相關連的資料時,就不再搜尋。
Not exists:MySQL優化 LEFT JOIN,一旦找到符合的LEFT JOIN資料後,就不再搜尋。
Range checked for each Record(index map:#):無法找到理想的索引。此為最慢的使用索引。
Using filesort:當出現這個值時,表示此SELECT語法需要優化。因為MySQL必須進行額外的步驟來進行查詢。
Using index:返回的資料是從索引中資料,而不是從實際的資料中返回,當返回的資料都出現在索引中的資料時就會發生此情況。
Using temporary:同Using filesort,表示此SELECT語法需要進行優化。此為MySQL必須建立一個暫時的資料表(Table)來儲存結果,此情況會發生在針對不同的資料進行ORDER BY,而不是GROUP BY。
Using where:使用WHERE語法中的欄位來返回結果。
System:system資料表,此為const連接類型的特殊情況。
Const:資料表中的一個記錄的最大值能夠符合這個查詢。因為只有一行,這個值就是常數,因為MySQL會先讀這個值然後把它當做常數。
eq_ref:MySQL在連接查詢時,會從最前面的資料表,對每一個記錄的聯合,從資料表中讀取一個記錄,在查詢時會使用索引為主鍵或唯一鍵的全部。
ref:只有在查詢使用了非唯一鍵或主鍵時才會發生。
range:使用索引返回一個範圍的結果。例如:使用大於>或小於<查詢時發生。
index:此為針對索引中的資料進行查詢。
ALL:針對每一筆記錄進行完全掃描,此為最壞的情況,應該盡量避免。
我們可以注意到 `browse_history` 這個表單在Query中並沒有使用索引,
可以從上方的QueryString中發現該段Query的Left Join是查詢`product_id`這個欄位,前往這個Table並幫其建立Index來增加檢索效率。
步驟三的時候可以選擇複數欄位來建立Index,但是要注意的是在使用索引欄位作為條件時,如果該索引是複合索引,那麼必須使用到該索引中的第一個欄位作為條件時才能保證系統使用該索引,否則該索引將不會被使用,並且應儘可能的讓欄位順序與索引順序相一致。
再來是在Query語句中應該注意以下事項
1.避免在索引列上進行運算, 這將導致引擎放棄使用索引而進行全表掃描。
2.不使用NOT IN和<>操作, NOT IN和<>操作都不會使用索引將進行全表掃描。NOT IN可以NOT EXISTS代替,id<>9則可使用id>9 or id<9來代替。
3.檢查where條件與order by 欄位,避免全表掃描。
4.應儘量避免在 where 子句中對欄位進行 null 值判斷,否則將導致引擎放棄使用索引而進行全表掃描,如: 可以在num上設定預設值0,確保表中num列沒有null值,然後這樣查詢: select id from t where num = 0
5.應儘量避免在 where 子句中使用 or 來連線條件,如果一個欄位有索引,一個欄位沒有索引,將導致引擎放棄使用索引而進行全表掃描。可以拆分條件,進行子句的union all查詢,如: select id from t where num=10 or name = 'admin' 拆分 select id from t where num = 10 union all select id from t where name = 'admin'
6.in 和 not in 也要慎用,否則會導致全表掃描,如: select id from t where num in(1,2,3) 對於連續的數值,能用 between 就不要用 in 了: select id from t where num between 1 and 3,
用 exists 代替 in 是一個好的選擇: select num from a where num in(select num from b) 換成 select num from a where exists(select 1 from b where num=a.num)
7.like語句的%不要前置, 否則索引失效 將導致全表掃描。
8.如果在 where 子句中使用引數,也會導致全表掃描。 因為SQL只有在執行時才會解析區域性變數,但優化程式不能將訪問計劃的選擇推遲到執行時;它必須在編譯時進行選擇。然 而,如果在編譯時建立訪問計劃,變數的值還是未知的,因而無法作為索引選擇的輸入項。
9.應儘量避免在where子句中對欄位進行函式操作,這將導致引擎放棄使用索引而進行全表掃描。
10.不要在 where 子句中的“=”左邊進行函式、算術運算或其他表示式運算,否則系統將可能無法正確使用索引。
11.在使用索引欄位作為條件時,如果該索引是複合索引,那麼必須使用到該索引中的第一個欄位作為條件時才能保證系統使用該索引,否則該索引將不會被使用,並且應儘可能的讓欄位順序與索引順序相一致。
12.Update 語句,如果只更改1、2個欄位,不要Update全部欄位,否則頻繁呼叫會引起明顯的效能消耗,同時帶來大量日誌。
對於多張大資料量(這裡幾百條就算大了)的表JOIN,要先分頁再JOIN,否則邏輯讀會很高,效能很差。
13.select count(*) from table;這樣不帶任何條件的count會引起全表掃描,並且沒有任何業務意義,是一定要杜絕的。
14.任何地方都不要使用 select * from t ,用具體的欄位列表代替“*”,不要返回用不到的任何欄位。
15.避免頻繁建立和刪除臨時表,以減少系統表資源的消耗。臨時表並不是不可使用,適當地使用它們可以使某些例程更有效,例如,當需要重複引用大型表或常用表中的某個資料集時。但是,對於一次性事件, 最好使用匯出表。
16.在新建臨時表時,如果一次性插入資料量很大,那麼可以使用 select into 代替 create table,避免造成大量 log ,以提高速度;如果資料量不大,為了緩和系統表的資源,應先create table,然後insert。
17.儘量拆分大的 DELETE 或INSERT 語句,批量提交SQL語句。
18.儘量避免使用遊標,因為遊標的效率較差,如果遊標操作的資料超過1萬行,那麼就應該考慮改寫。
參考來源:
1. http://blog.twbryce.com/mysql-explain/
2. https://www.gushiciku.cn/pl/gkis/zh-tw
3. https://www.itread01.com/content/1548581229.html
梨子, 2022/3/28 下午 09:00:29