頁數 1 / 5
下一頁
搜尋 url 結果:
理論上,阻擋 spider 掃網站 只要設定 robot.txt
但有些 spider 不一定會理會 robot.txt
這部分可以用 urlrewrite 處理
Baiduspider : 百度
claudebot@anthropic.com : AI 掃網站
SemrushBot :
Bytespider : 字節跳動
serpstatbot
當然這也只能防君子不防小人
如果有心人刻意要掃網站,改它的 UserAgent 一樣可以掃
但有些 spider 不一定會理會 robot.txt
這部分可以用 urlrewrite 處理
<rule name="BlockBadBots" stopProcessing="true">

<match url=".*" />

<conditions>

<add input="{HTTP_USER_AGENT}" pattern="Baiduspider|claudebot@anthropic\.com|SemrushBot|Bytespider|serpstatbot" />

</conditions>

<action type="CustomResponse" statusCode="403" statusReason="Forbidden" statusDescription="Access denied." />

</rule>
Baiduspider : 百度
claudebot@anthropic.com : AI 掃網站
SemrushBot :
Bytespider : 字節跳動
serpstatbot
當然這也只能防君子不防小人
如果有心人刻意要掃網站,改它的 UserAgent 一樣可以掃
darren, 2026/5/7 上午 11:04:17
因為想把同一網站下的靜態檔用另一個 domain 處理
但是 css 如果有設定下載字型檔 .ttf or .woff
就會出現 CORS 問題,其他 js, css,圖片就能正常
為了解決CORS的問題,其實只要 Response Header 要設定 Access-Control-Allow-Origin: *
或是設定特定網站 Access-Control-Allow-Origin: https://www.s3.com.tw
後來發現 IIS 網站可以設定 web.config 設定 response header 解決
當然要先裝一下 urlrewrite 2.0 才可以使用
只針對 font 類型的靜態檔
{REQUEST_URI} 也可以改為 {PATH_INFO}
但是 css 如果有設定下載字型檔 .ttf or .woff
就會出現 CORS 問題,其他 js, css,圖片就能正常
為了解決CORS的問題,其實只要 Response Header 要設定 Access-Control-Allow-Origin: *
或是設定特定網站 Access-Control-Allow-Origin: https://www.s3.com.tw
後來發現 IIS 網站可以設定 web.config 設定 response header 解決
當然要先裝一下 urlrewrite 2.0 才可以使用
只針對 font 類型的靜態檔
<configuration>

<system.webServer>

    <rewrite>

     <outboundRules>

        <rule name="Add CORS header for fonts" preCondition="IsFontFile">

         <match serverVariable="RESPONSE_Access-Control-Allow-Origin" pattern=".*" />

         <action type="Rewrite" value="*" />

        </rule>

        <preConditions>

         <preCondition name="IsFontFile">

            <add input="{REQUEST_URI}" pattern="\.woff2$|\.woff$|\.ttf$|\.eot$|\.otf$" />

         </preCondition>

        </preConditions>

     </outboundRules>

    </rewrite>

</system.webServer>

</configuration>
{REQUEST_URI} 也可以改為 {PATH_INFO}
darren, 2026/3/4 下午 05:02:35
IIS 如果要使用 reverse proxy server 服務,其實網路上已經有很多文章可以參考
這篇文章只是記錄一下安裝上要注意的事
過去安裝 IIS 套件 可以透過 Web Platform Installer 搜尋下載
但現在 IIS 的 Web Platform Installer 已經不讓人搜尋下載可安裝的套件
所以要直接去微軟網站找相關套件 可以用 IIS ARR 搜尋
https://www.iis.net/downloads/microsoft/application-request-routing
下載 requestRouter_amd64.msi 安裝這個 (3.0版 2021 年以後就沒有更新了)
安裝前,IIS也要預先安裝 URLRewrite 2 套件
安裝很簡單,msi 安裝後,IIS重啟就可以看到
IIS 的主機設定,可以看到 "Application Reuest Routing Cache" --> 點進後右邊有 Server Proxy Settings
proxy 的設定有一些地方要注意一下,避免未來採到雷
首先 當然先開啟 Enable proxy,下面針對一些要注意的屬性說明一下
1. Time-out : 預設120秒,如果你後端的站台有一些操作可能超過兩分鐘(例如處理報表),這個就調長一點
2. Reverse rewrite host in response header: 這個勾勾預設是開的,他的好意是同站台redirect(302) 到其他網頁,可以覆蓋
host 讓 client端能跑到正常的網址。但如果你是 redirect 到其他站台,建議把它關掉,不然後端網站如果下
redirect (302) 到別的站台,他會主動把 redirect網址 host 改為本站 (被雷過,所以要特別記下來)
3. Include TCP port from client IP: 這是一個 X-Forwarded-For 設定,預設是打開,這樣後端主機抓 client 來源 IP就會類似
"112.121.100.100:443" ,但後端網站在抓 client端IP通常不會管 port number,因此就會造成比對 IP 發生錯誤
所以建議還是把它關閉
4. Enable disk cache: 預設是勾勾打開,如果後端是靜態網站,例如圖片server,這個打開沒有問題,但如果後端網站是動態網站
那還是關掉
darren, 2025/1/10 上午 11:01:38
可以改用 await ($.get(url));
Bike, 2024/3/22 上午 11:21:47
改寫成可輸入多參數,效能也比較好的版本。
以下為測試碼,請自行依照專案需求做修改。
以下為測試碼,請自行依照專案需求做修改。
var root = "C://wdqd/qwewq";

var addPath = @"//\\/fwef/qwf";

var addPath2 = @"5fwfef/qwf";

var addPath3 = @"//fwef/qwf";

var addPath4 = @"\\\fwef/qwf";

var addPath5 = @"\\\\\/fwef/qwf";


var result = root.AddPath(addPath, addPath2, addPath3, addPath4, addPath5);


Console.WriteLine(result);


public static class Helper

{

    public static string AddPath(this string value, params string[] addPaths)

    {

        if (string.IsNullOrEmpty(value))

        {

            throw new Exception("起始目錄不可以為空字串");

        }


        if (value.Contains("..") || addPaths.Any(x => x.Contains("..")))

        {

            throw new Exception($"value: {value}, addPaths: {addPaths.Where(x => x.Contains("..")).ToOneString()} 檔名與路徑不可包含 ..");

        }


        var paths = addPaths.Select(x => x.Substring(x.FindLastContinuousCharPosition('/', '\\') + 1).SafeFilename()).ToList();


        if (paths.Any(x => System.IO.Path.IsPathRooted(x)))

        {

            throw new Exception("不可併入完整路徑 ..");

        }


        paths.Insert(0, value.SafeFilename());


        return System.IO.Path.Combine(paths.ToArray());

    }


    public static string ToOneString<T>(this IEnumerable<T> list, string separator = ",")

    {

        var strList = list.Select(x => x.ToString());

        return string.Join(separator, strList);

    }


    public static int FindLastContinuousCharPosition(this string input, params char[] targets)

    {

        int lastPosition = -1;


        for (int i = 0; i < input.Length; i++)

        {

            if (targets.Contains(input[i]))

            {

                lastPosition = i;

            }

            else

            {

                break;

            }

        }


        return lastPosition;

    }


    public static string SafeFilename(this string value)

    {

        return GetValidFilename(value);

    }


    public static string GetValidFilename(string value)

    {

        string ValidFilenameCharacters = @"0123456789abcdefghijklmnopqrstuvwxyzABCDEFGHIJKLMNOPQRSTUVWXYZ\-_$.@:/# ";

        if (value.Contains(".."))

        {

            throw new Exception("路徑中不可包含 .. ");

        }


        string newUrl = "";

        for (int i = 0; i < value.Length; i++)

        {

            var c = value.Substring(i, 1);

            int k = ValidFilenameCharacters.IndexOf(c);

            if (k < 0)

            {

                throw new Exception($"檔名 '{value}' 中有非法的字元 '" + c + "'。");

            }

            newUrl += ValidFilenameCharacters.Substring(k, 1);

        }


        return newUrl;

    }

}
梨子, 2023/8/28 上午 09:43:49
產生 FileStreamResult 物件的 function 如下: (目前置於 SU 之中,以便轉移)
輸出用的 Controller 和 Action 如下:
        static List<Brush> CaptchaBrushes = null;

        public static FileStreamResult CreateCaptcha(string captcha)

        {

            if (CaptchaBrushes == null)

            {

                CaptchaBrushes = new List<Brush>();

                CaptchaBrushes.Add(Brushes.White);

                CaptchaBrushes.Add(Brushes.Gold);

                CaptchaBrushes.Add(Brushes.LightSkyBlue);

                CaptchaBrushes.Add(Brushes.LimeGreen);

                CaptchaBrushes.Add(Brushes.AliceBlue);

                CaptchaBrushes.Add(Brushes.AntiqueWhite);

                CaptchaBrushes.Add(Brushes.BurlyWood);

                CaptchaBrushes.Add(Brushes.Silver);

            }


            int width = 90;

            int height = 45;


            //https://stackoverflow.com/questions/61365732/cannot-access-a-closed-stream-when-returning-filestreamresult-from-c-sharp-netc

            //Using statements close and unload the variable from memory set in the using statement which is why you are getting an error trying to access a closed memory stream.You don't need to use a using statement if you are just going to return the result at the end.


            //這個 memory stream 不用關閉或 dispose

            var ms = new MemoryStream();


            // 釋放所有在 GDI+ 所佔用的記憶體空間 ( 非常重要!! )

            using (Bitmap _bmp = new Bitmap(width, height))

            using (Graphics _graphics = Graphics.FromImage(_bmp))

            using (Font _font = new Font("Courier New", 24, FontStyle.Bold)) // _font 設定要出現在圖片上的文字字型、大小與樣式

            {

                // (封裝 GDI+ 繪圖介面) 所有繪圖作業都需透過 Graphics 物件進行操作

                _graphics.Clear(Color.Black);


                // 如果想啟用「反鋸齒」功能,可以將以下這行取消註解

                //_graphics.TextRenderingHint = TextRenderingHint.AntiAlias;


                // 將亂碼字串「繪製」到之前產生的 Graphics 「繪圖板」上

                var x = 10;

                for(var i = 0; i < captcha.Length; i++)

                {

                    _graphics.DrawString(captcha.Substring(i, 1), _font, CaptchaBrushes[Su.MathUtil.GetRandomInt(CaptchaBrushes.Count)], x, Su.MathUtil.GetRandomInt(15));

                    x += 10 + Su.MathUtil.GetRandomInt(10);

                }


                // 畫線


                _graphics.DrawLine(new Pen(CaptchaBrushes[Su.MathUtil.GetRandomInt(CaptchaBrushes.Count)], 1),

                    Su.MathUtil.GetRandomInt(0, Convert.ToInt32((width * 0.9 / 2))), 0, Su.MathUtil.GetRandomInt(Convert.ToInt32(width / 2), Convert.ToInt32(width * 1.9 / 2)), height);


                _graphics.DrawLine(new Pen(CaptchaBrushes[Su.MathUtil.GetRandomInt(CaptchaBrushes.Count)], 1),

                    Su.MathUtil.GetRandomInt(Convert.ToInt32(width / 2), Convert.ToInt32(width * 1.9 / 2)), 0, Su.MathUtil.GetRandomInt(0, Convert.ToInt32((width * 0.9 / 2))), height);


                _graphics.DrawLine(new Pen(CaptchaBrushes[Su.MathUtil.GetRandomInt(CaptchaBrushes.Count)], 1),

                    0,

                    Su.MathUtil.GetRandomInt(height / 2),

                    width,

                    height / 2 + Su.MathUtil.GetRandomInt(height / 2)

                    );


                _graphics.DrawLine(new Pen(CaptchaBrushes[Su.MathUtil.GetRandomInt(CaptchaBrushes.Count)], 1),

                 0,

                 height / 2 + Su.MathUtil.GetRandomInt(height / 2),

                 width,

                    Su.MathUtil.GetRandomInt(height / 2)

                 );


                _bmp.Save(ms, System.Drawing.Imaging.ImageFormat.Jpeg);

            }


            ms.Seek(0, SeekOrigin.Begin);


            // Controller 的型別為 FileResult

            return new FileStreamResult(ms, "image/jpeg")

            { FileDownloadName = $"{DateTime.Now.Ymdhmsf()}.jpg" };

        }
輸出用的 Controller 和 Action 如下:
namespace Web.Controllers

{

    public class CaptchaController : Controller

    {

        [Route("captcha")]

        public async Task<FileStreamResult> Index()

        {

            //產生 Captcha 並存入 Session 之中。目前是四位數字

            string captcha = (await Ah.ReGetAsync<object>("api/kol/create-captcha-code")).ToString();


            //產生圖檔並回傳 FileStreamResult

            return Su.Wu.CreateCaptcha(captcha);

        }

    }

}
Bike, 2022/9/25 下午 10:03:44
接到弱掃報告指出以下的程式碼會造成危害:
string Url = WebConfigurationManager.AppSettings["SkyShopCheckoutURL"] + $"/api/token/ {Su.Fsc.SessionId}"; ServicePointManager.SecurityProtocol = SecurityProtocolType.Tls12;
HttpClient client = Su.Wu.GetClient();
var response = await client.GetAsync(Url);
var message = await response.Content.ReadAsStringAsync(); result = JsonConvert.DeserializeObject(message);
沒想到吧...
Bike, 2022/9/23 上午 05:40:51
這裡是我測試 Gmail API 和 Google API 憑証的一些記錄。
如果你的目的是要使用 Gmail Api 取代舊的 Gmail SMTP 來發送通知信,建議你先跳到最下方看一下結論。
如果你是想要看一下 Gmail API 和 Google API 憑証的使用方法,可以看一下這篇文章。
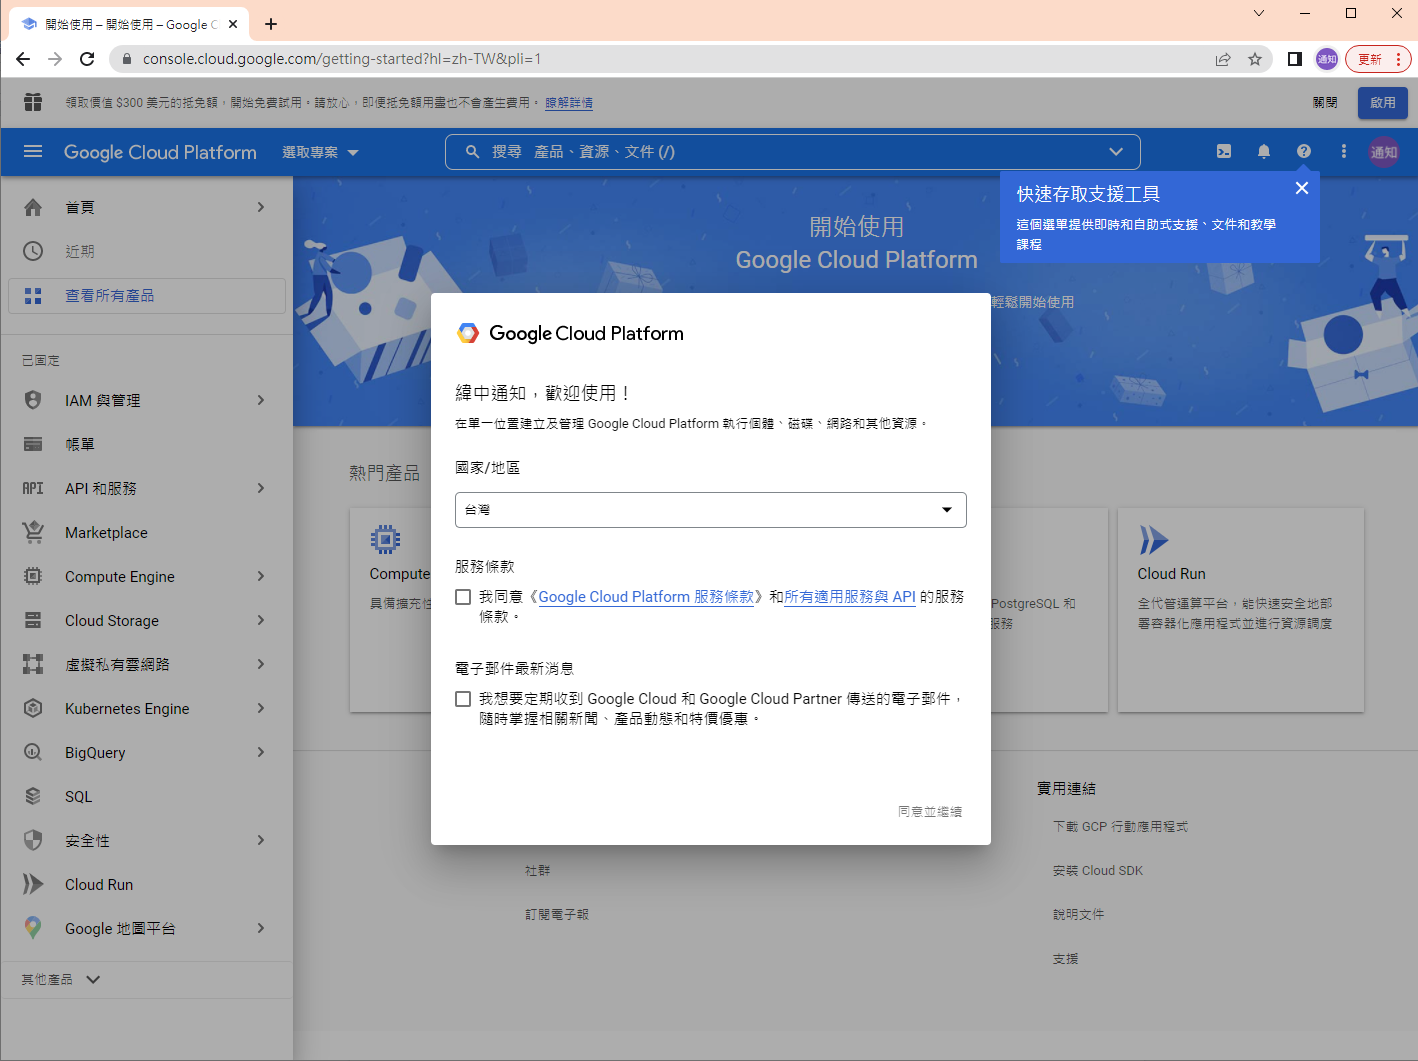
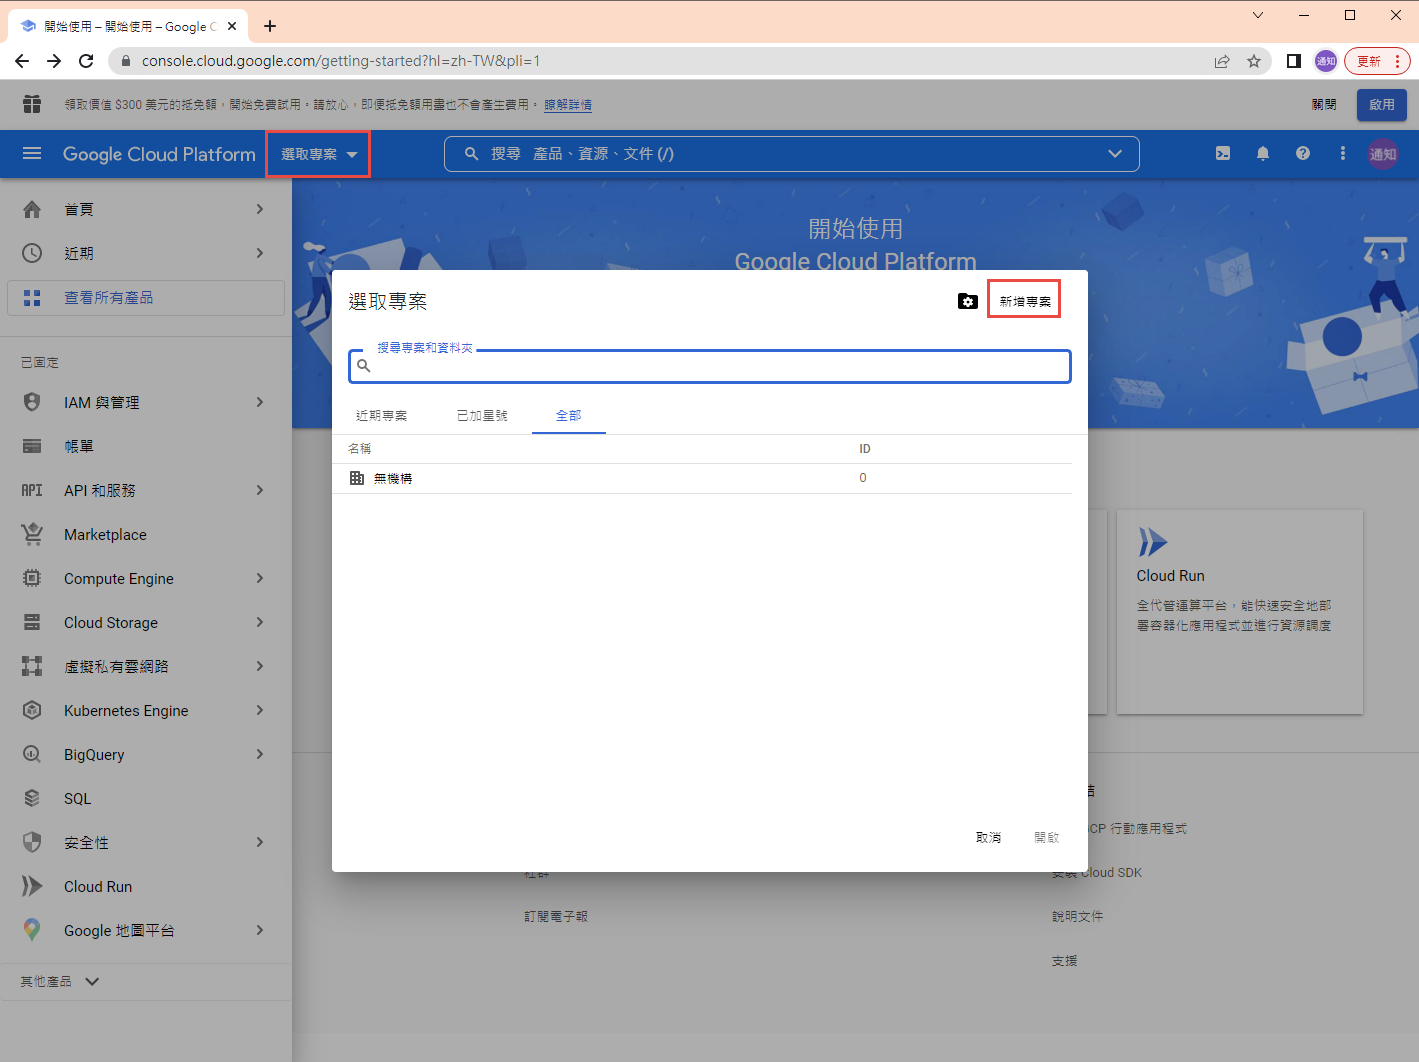
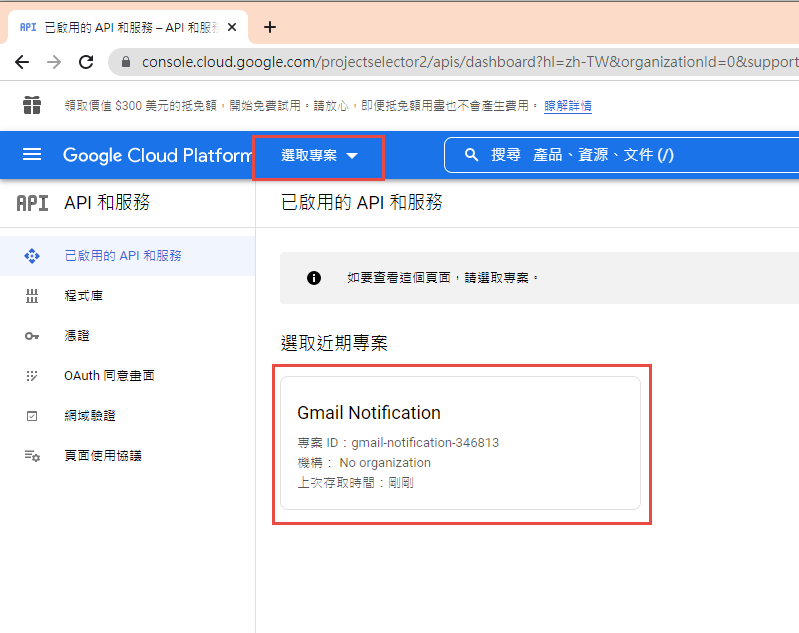
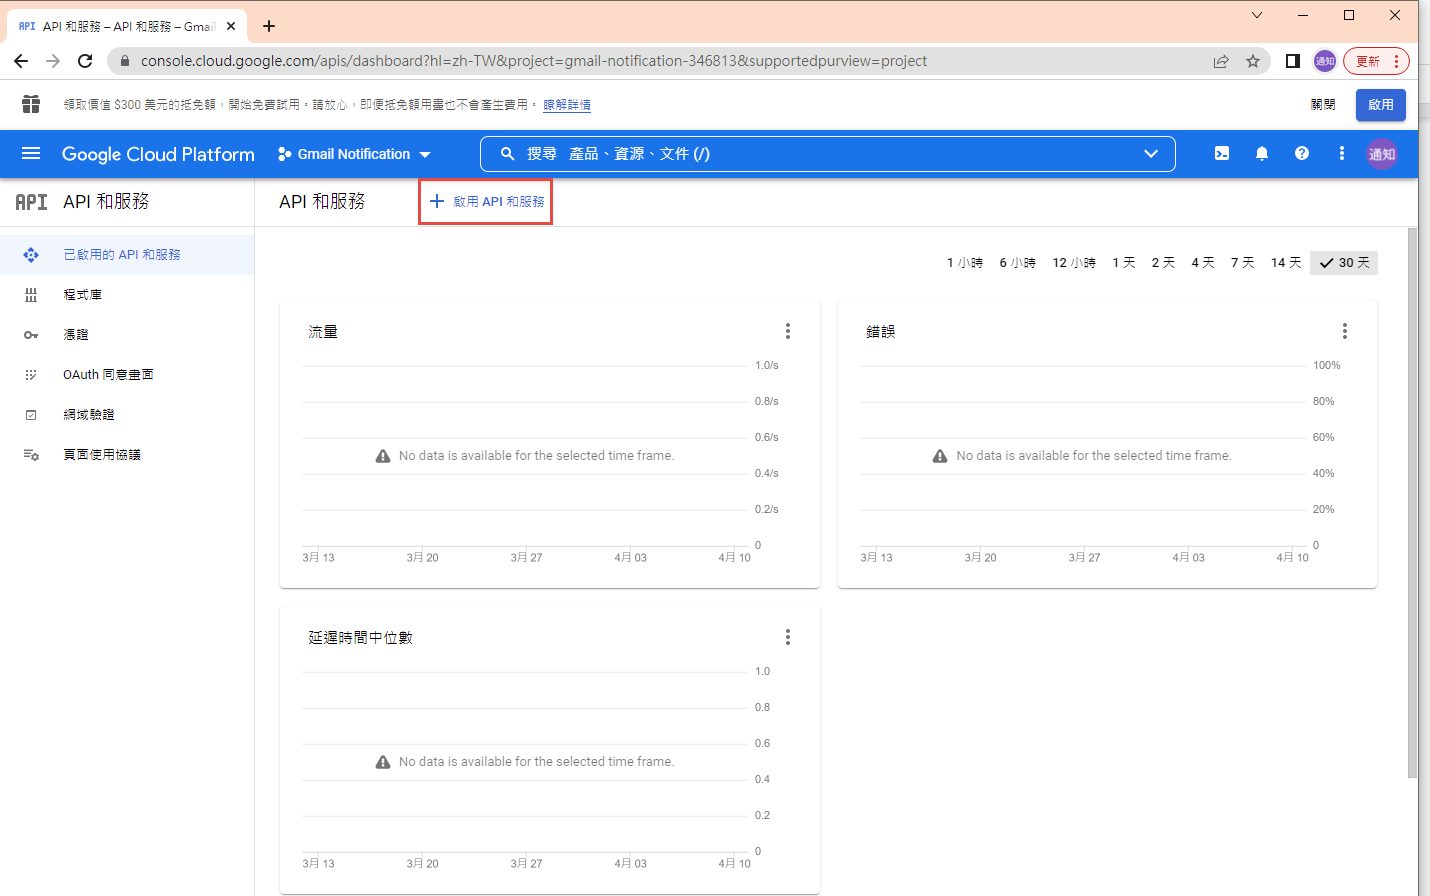
1. 在 google cloud platform 建立新的專案.
https://console.cloud.google.com/

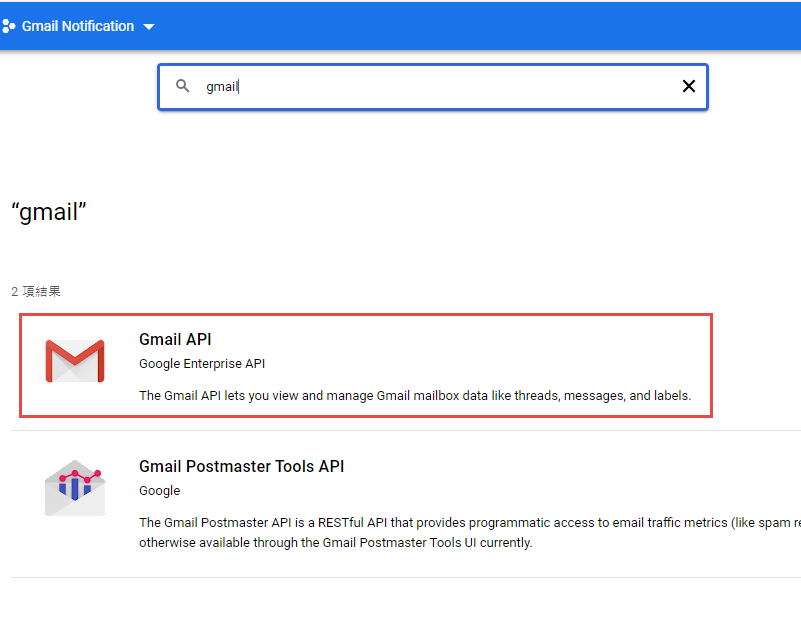
啟用 Gmail API


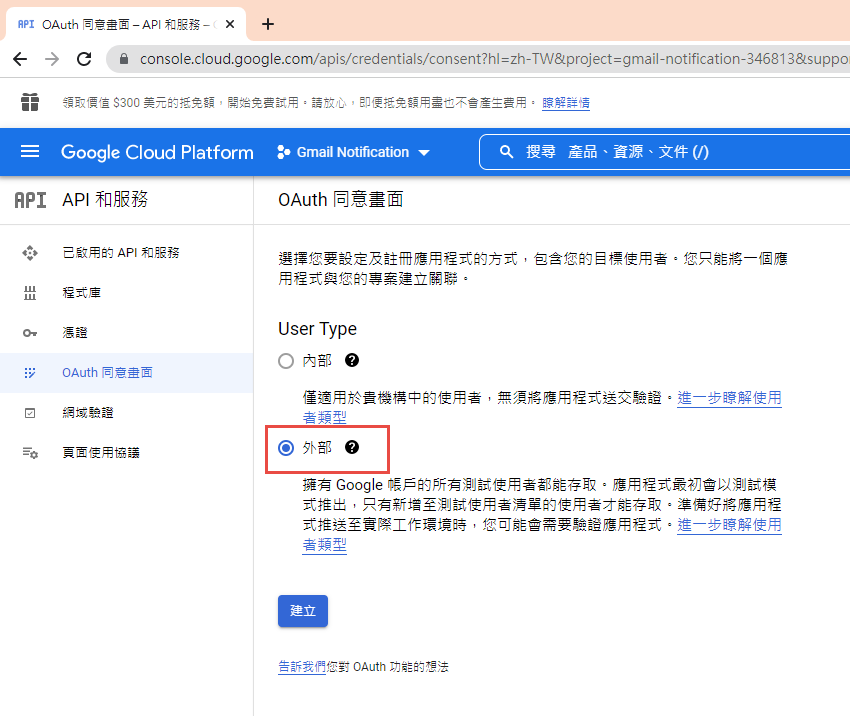
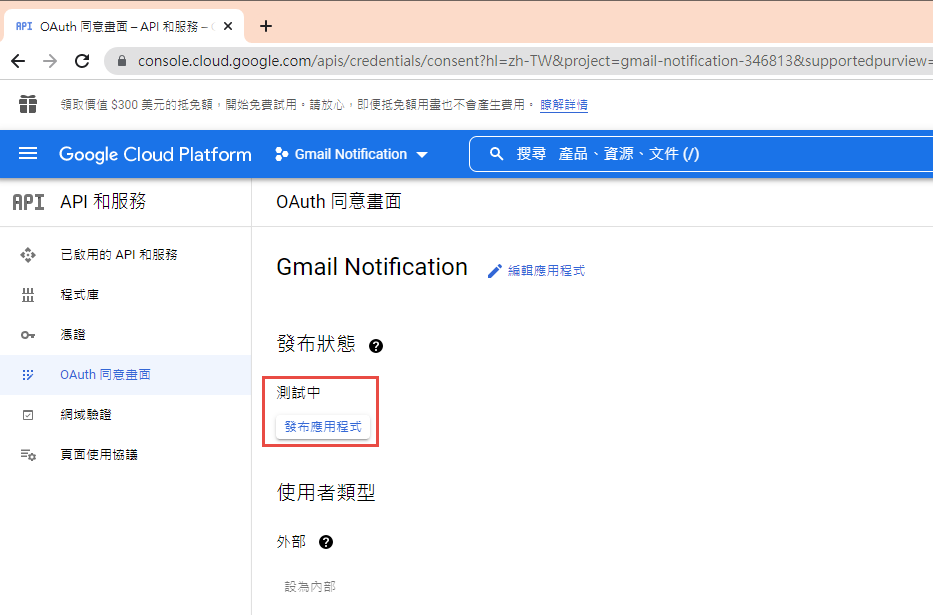
因為我們要透過 OAuth 取得使用者授權,所以要設定使用 OAuth 的同意畫面。
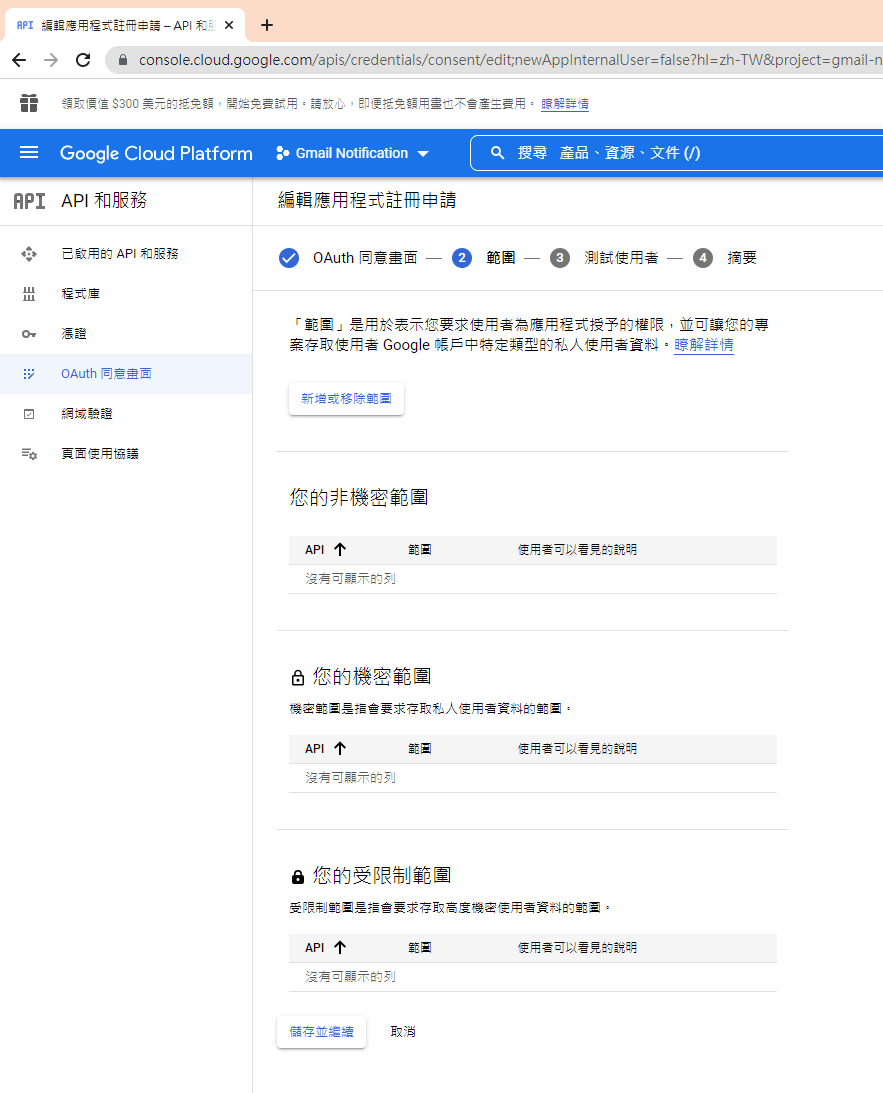
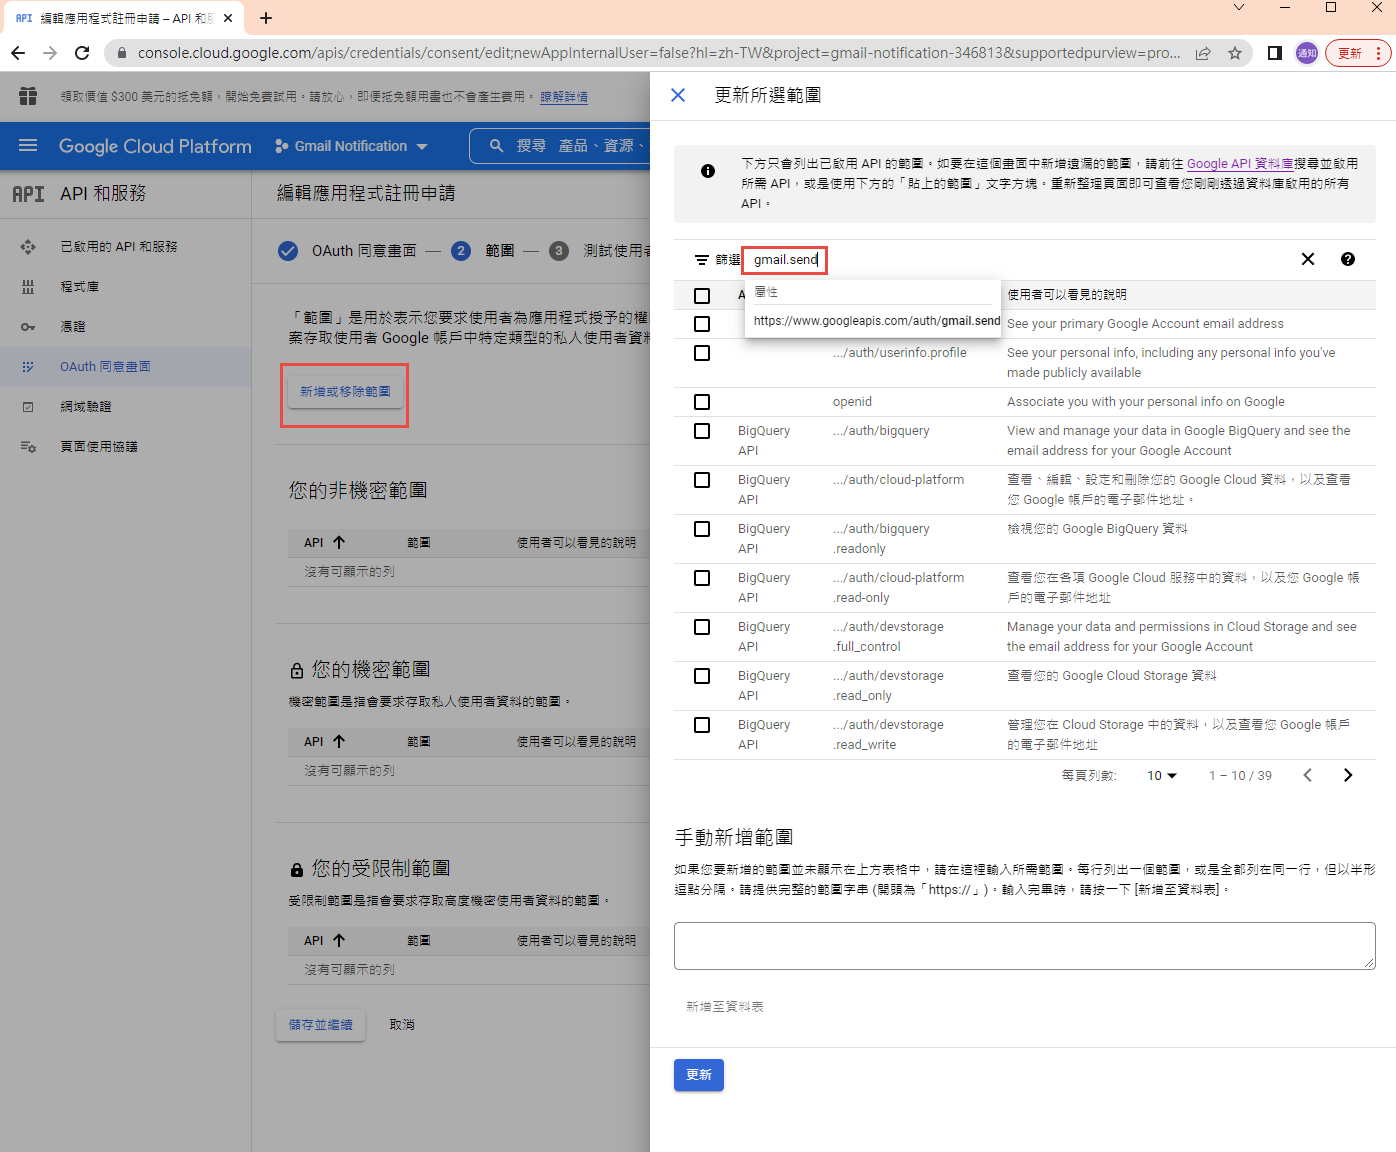
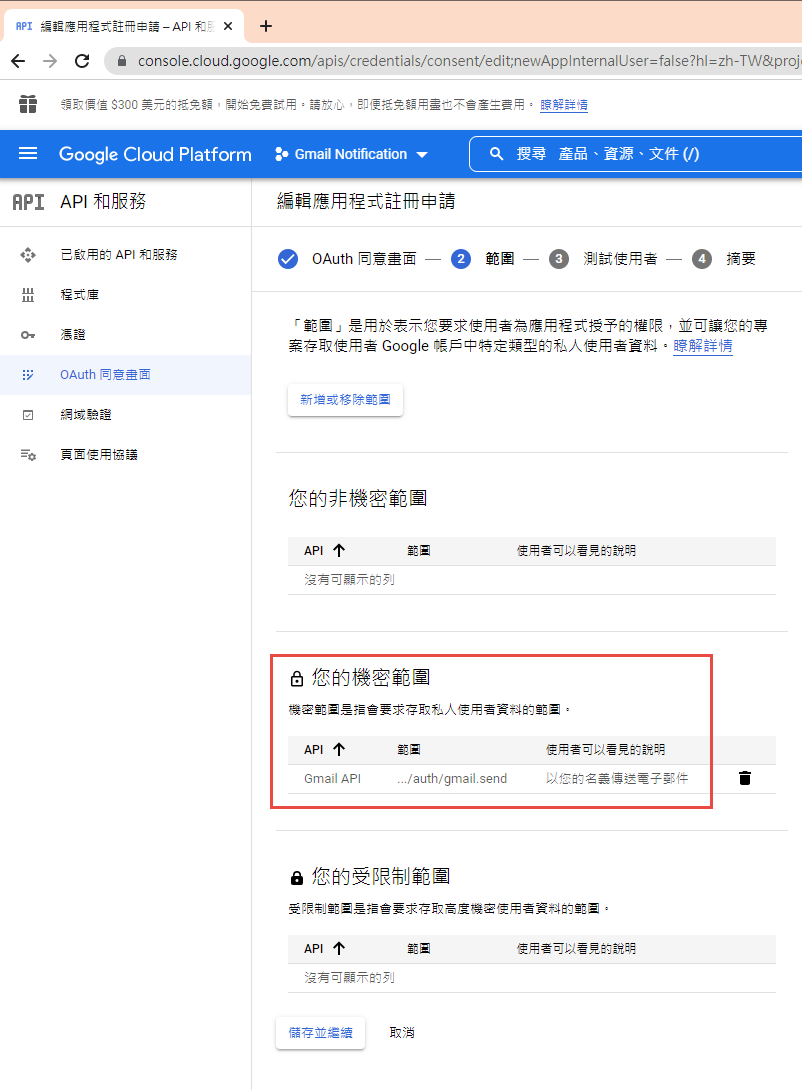
指定授權的範圍
因為剛建立的專案,不會被公開,所以要指定測試使用者
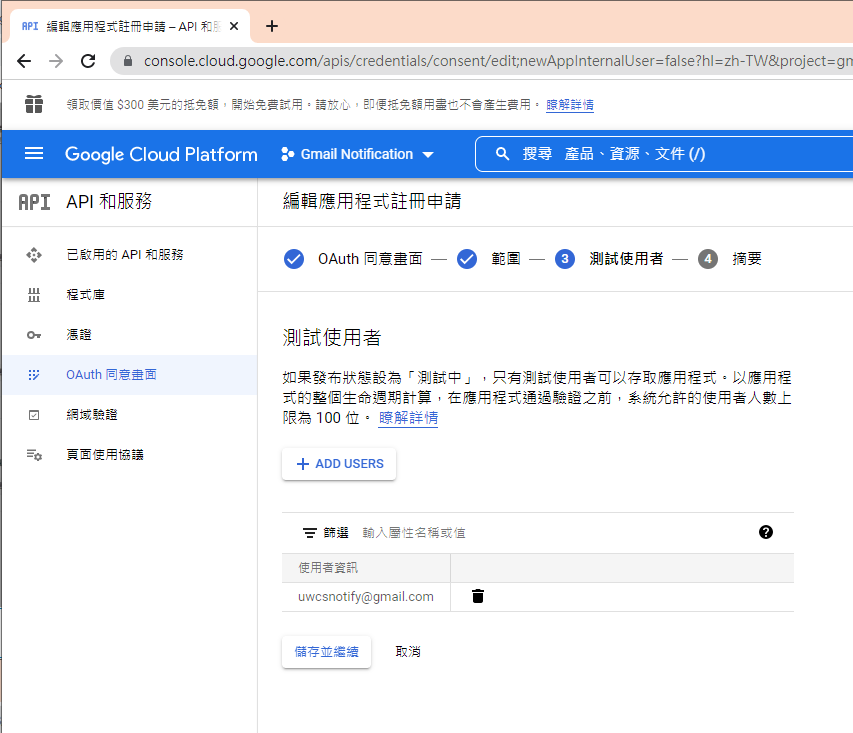
如果要給任意使用者,必需經過發布的流程,但準備工作有點麻煩,所以這次就不發布了。
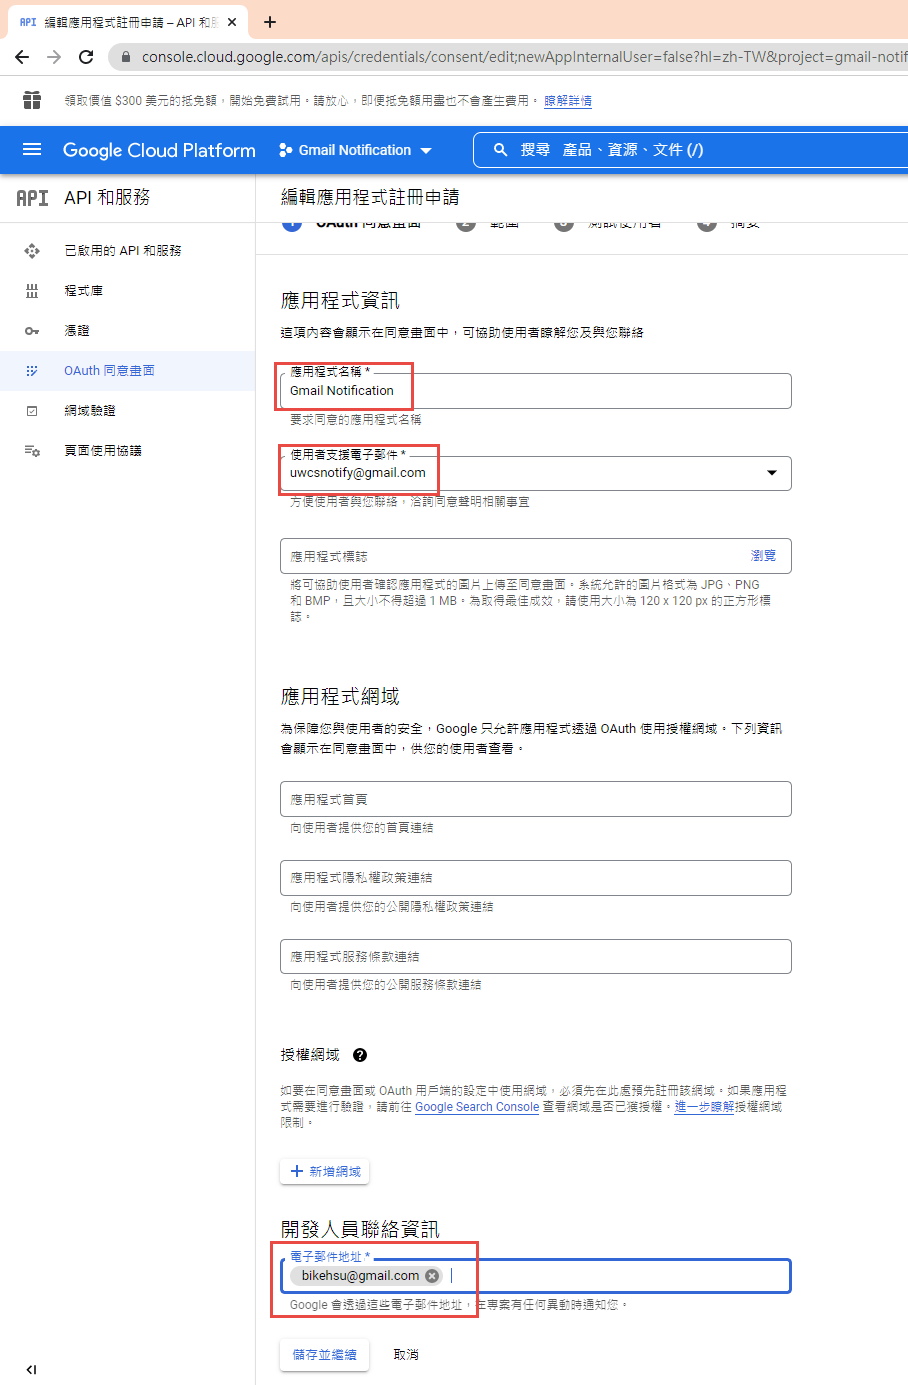
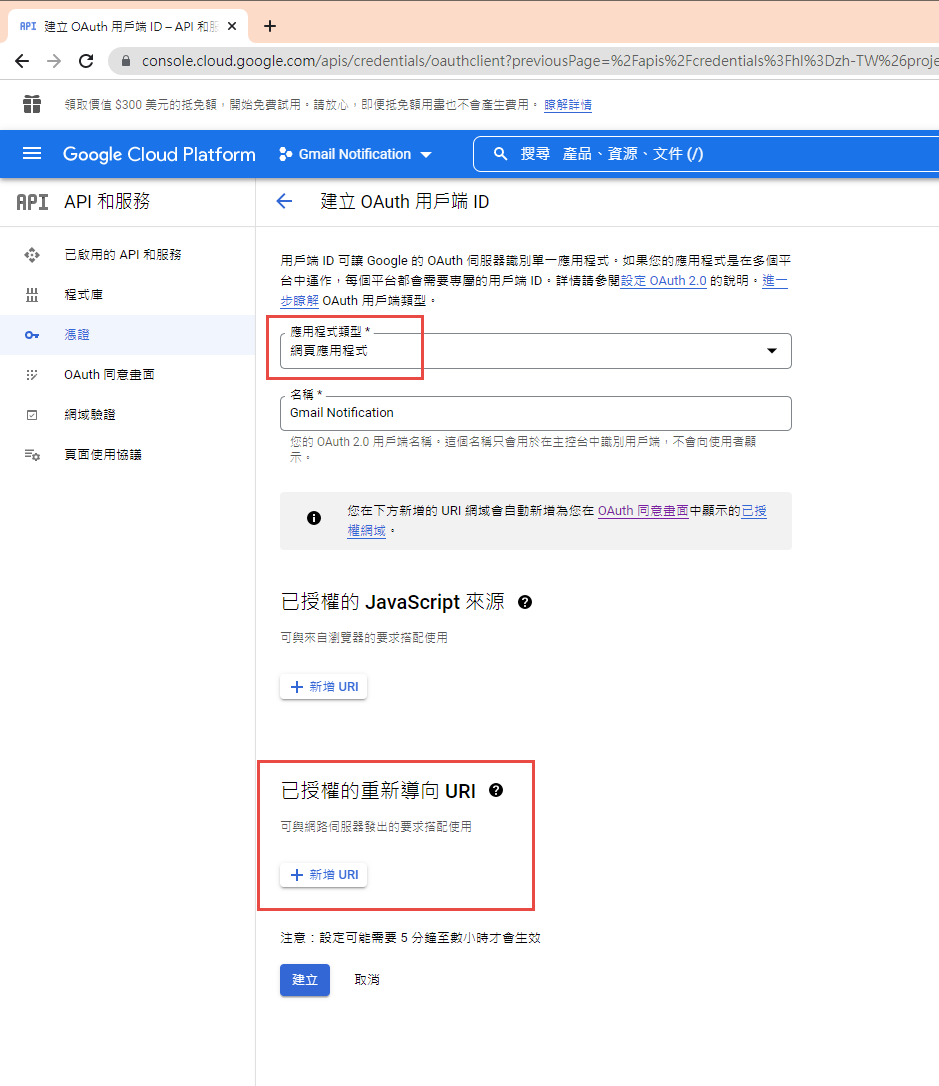
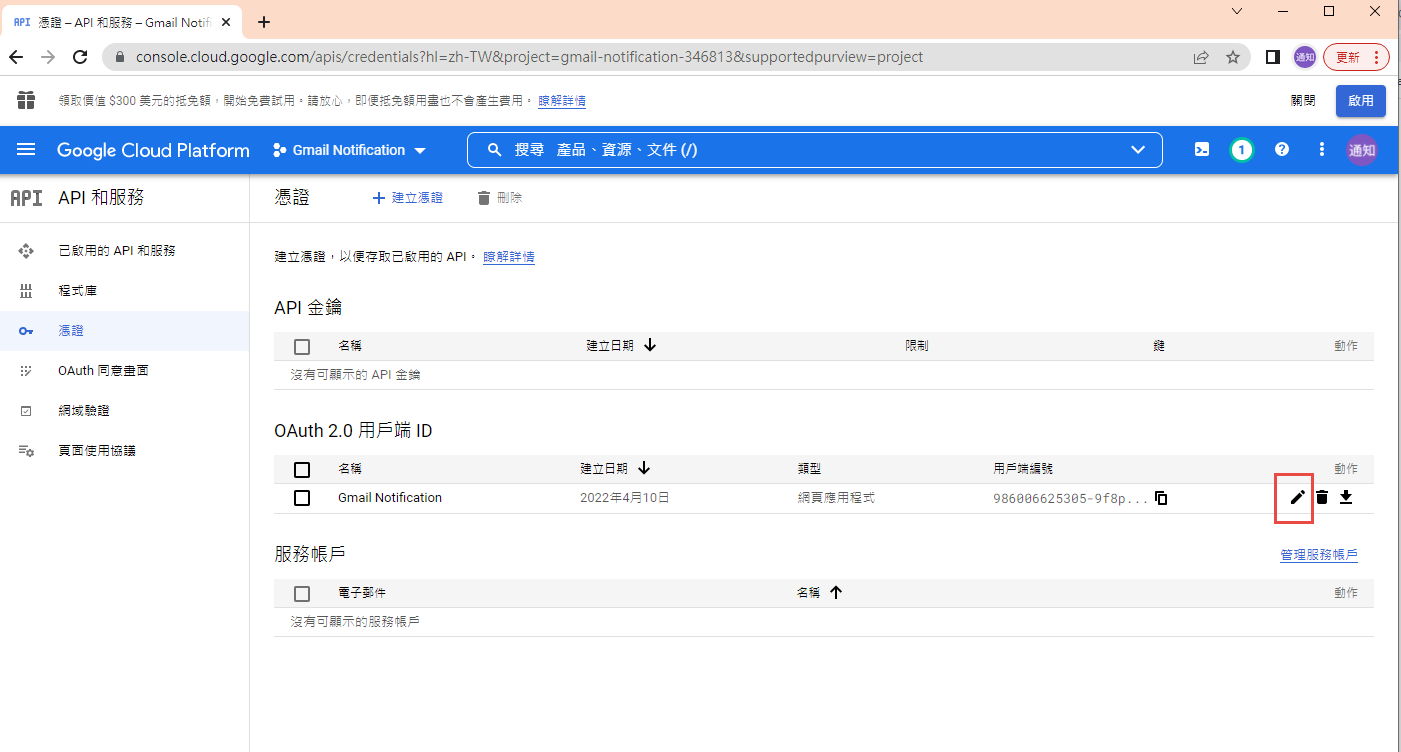
建立 OAuth 2.0 用戶端 ID 憑証

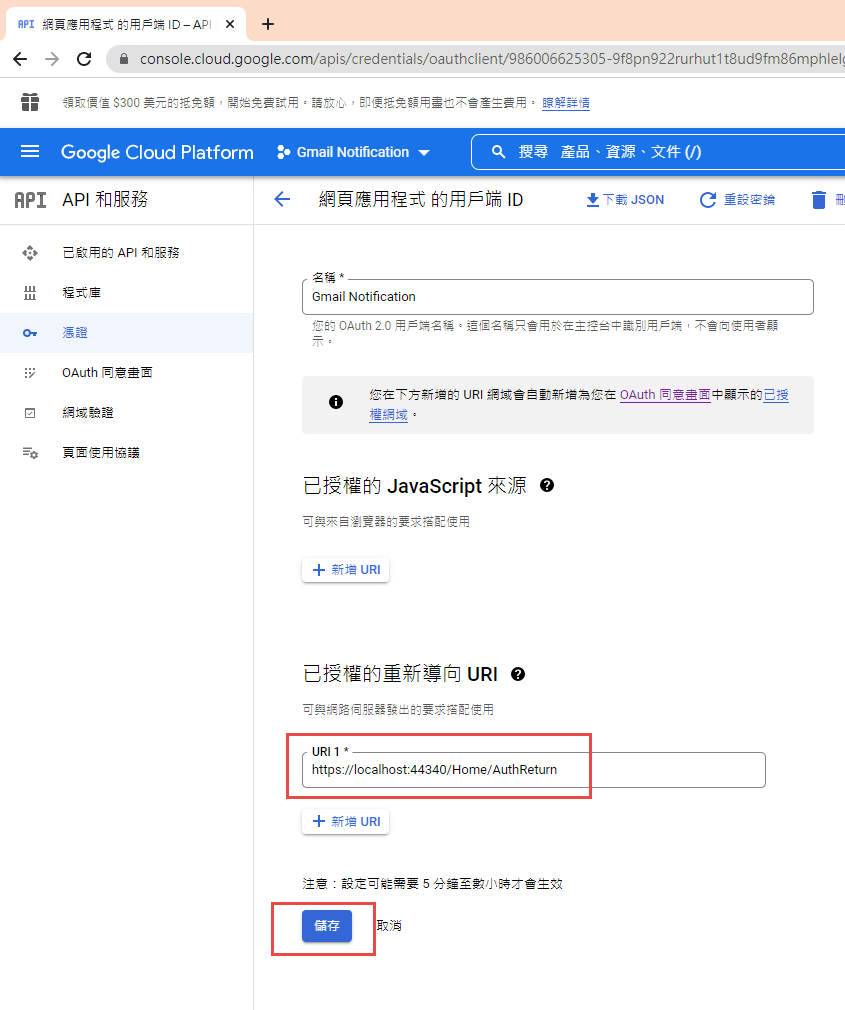
這裡除了名稱外,還有一個設定重導 Uri 的項目。現在不填寫,但稍後要回來補這個資料。
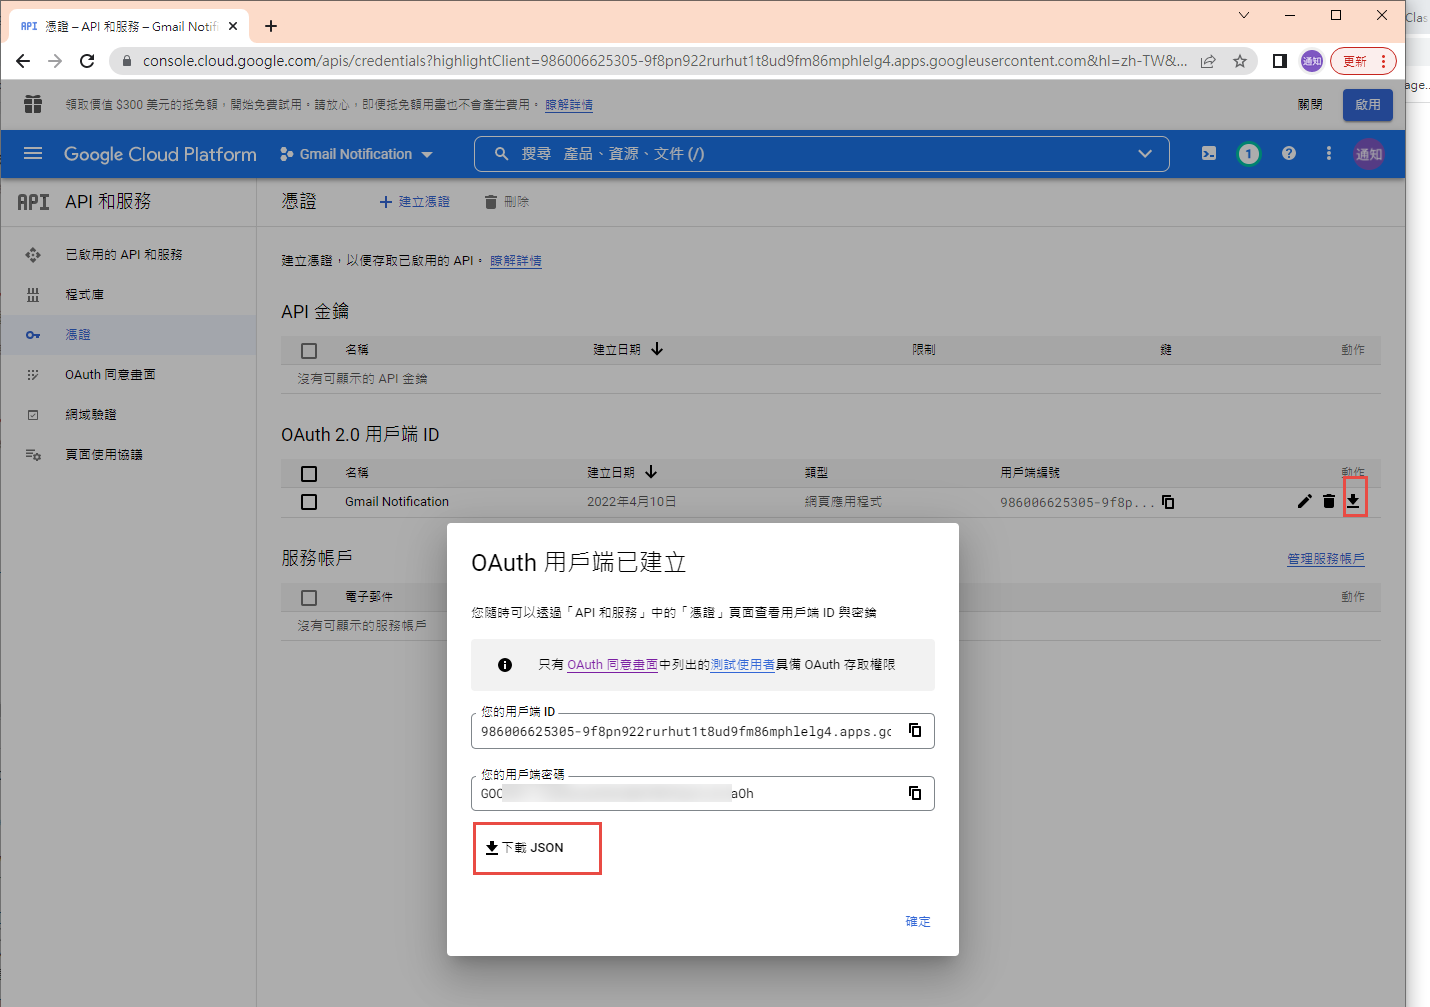
下載 json 之後,命名為 client_secret.json 保留後續使用。
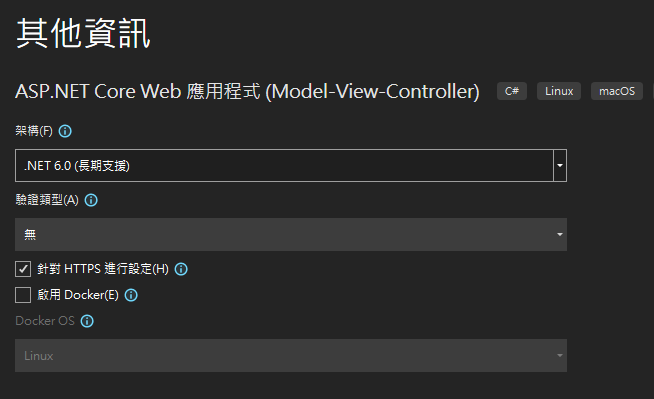
再來就要建立專案了. 用 VS2022 建立一個新專案

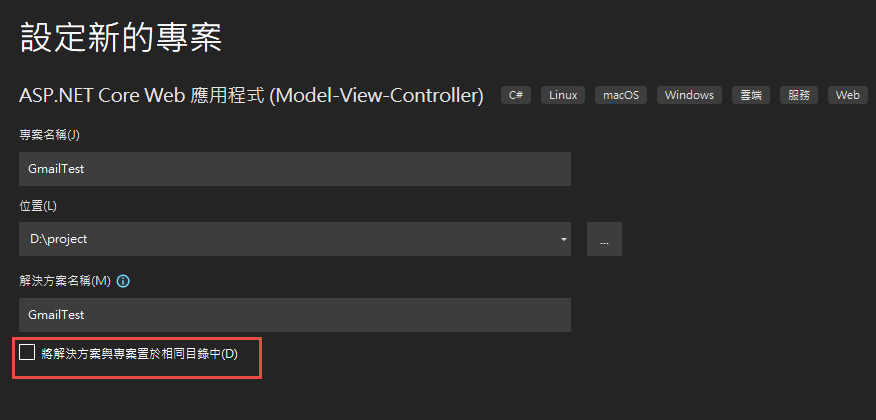
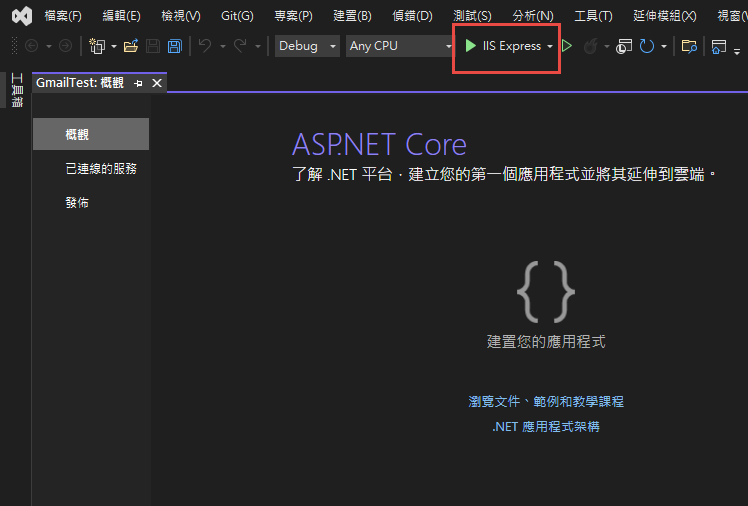
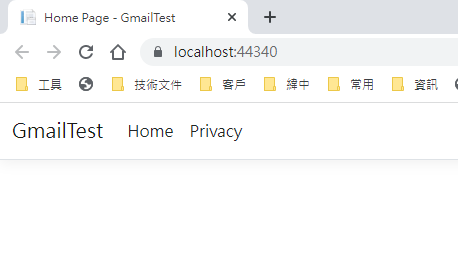
記錄網址, 本測試專案是 https://localhost:44340/ ,請依實際網址為準。
回到 OAuth 2.0 用戶端 ID 的設定頁. 在已授權的重新導向 URI 中填入 https://localhost:44340/Home/AuthReturn (填入的網址依實際專案的狀況,可能會有變化)
在 VS2022 中,使用 Nuget 安裝套件: (有漏的再麻煩和我說)
Google.Apis.Gmail.v1
Google.Apis.Auth
MimeKit (發送 gmail 時使用)
建立認証用的網址:
建立一個 Action, 用來取得認証用的網址:
執行結果:
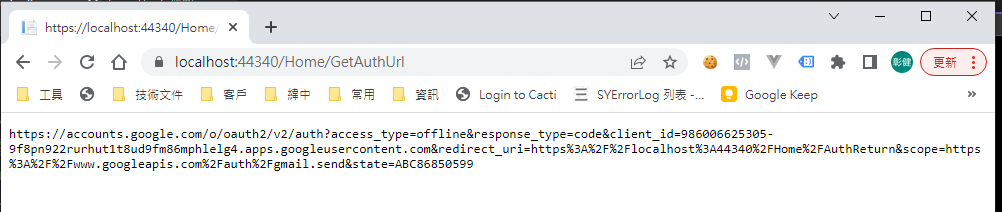
用 chrome 開啟產生的網址:
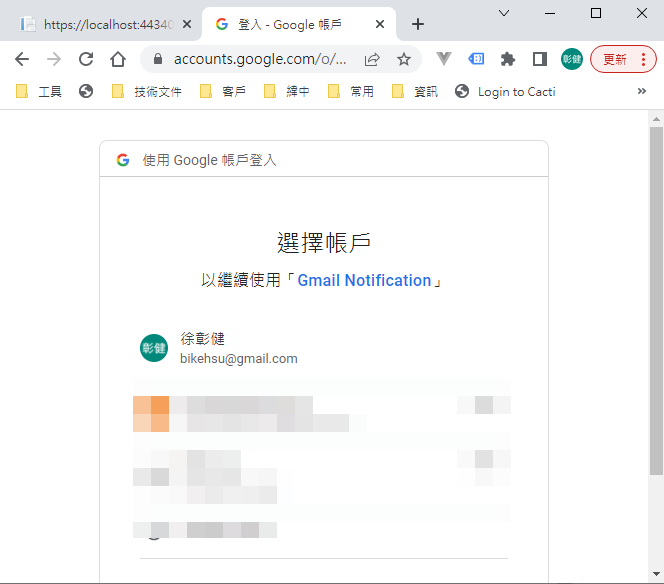
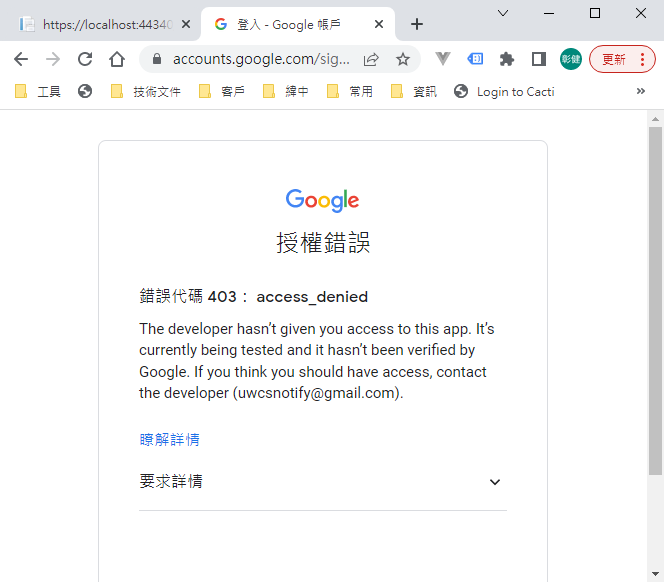
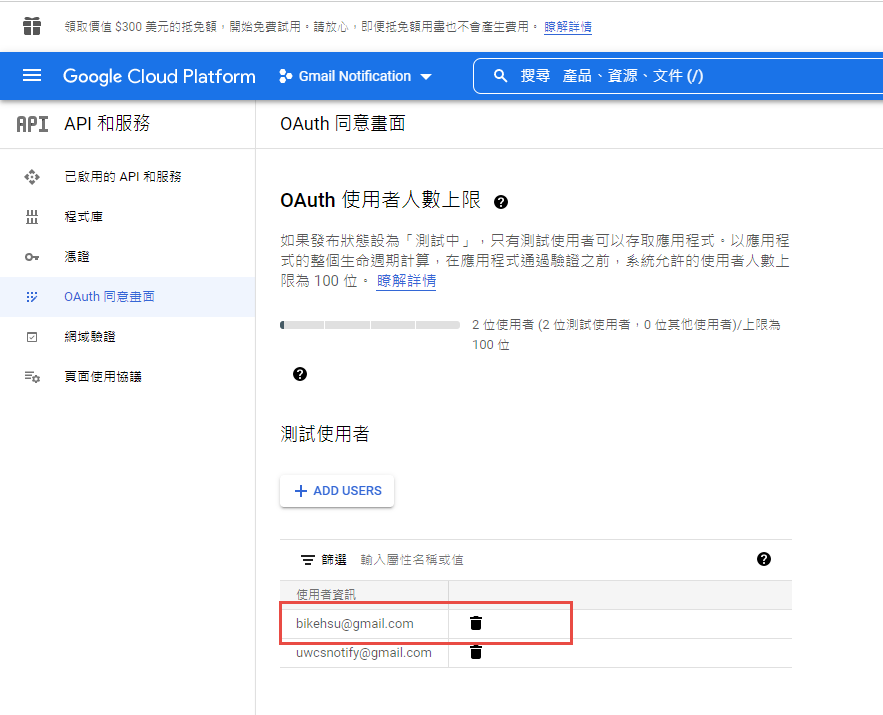
選取任一帳號,如果出現以下錯誤,請回到 "OAuth 同意畫面" 去新增測試使用者
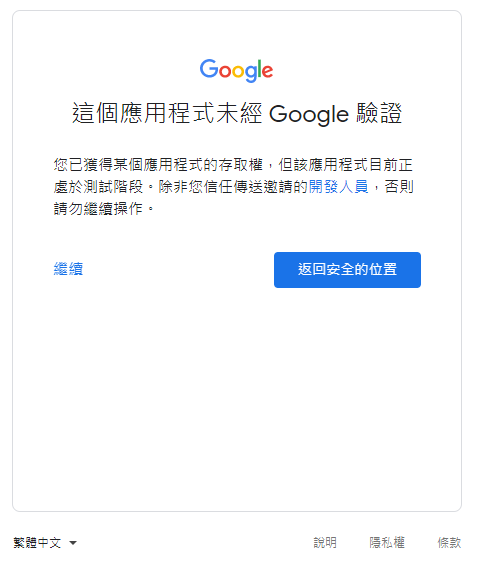
因為應用程式尚未發布,所以會看到警告,勇敢的繼續下去
這裡會要求授權使用你的名義發送信件。(這是在程式中取得授權的項目 Scopes 中所指定的)

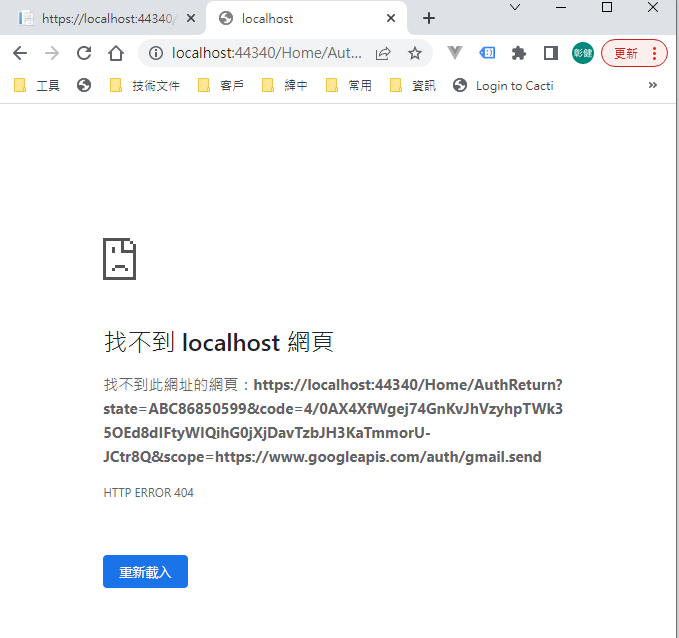
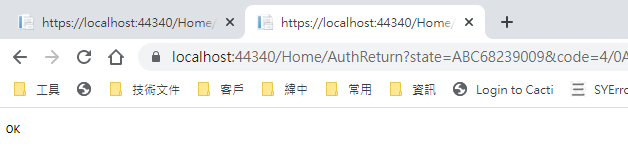
再繼續之後,會被重導至我們在 redirectUri 指定的網址。因為我們尚未完成,所以會看到錯誤,順便也可以看一下,會帶回哪一些參數。有 state, code, scope,共三個。
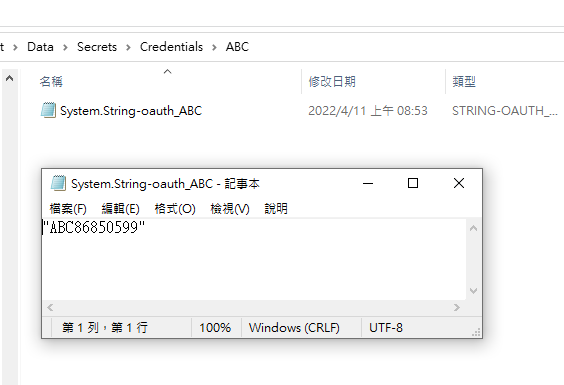
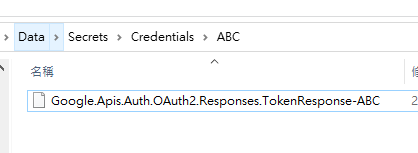
順便看一下,google 的套件會在 Credentials 的目錄下幫使用者建立一個目錄,在完成驗証前,會先放一個 System.String-oauth_XXX 的檔案,裡面的值和回傳的 state 是一樣的,這個應該是用來驗証回傳資料的。
接下來我們要新增 Action "AuthReturn" 如下:
再跑一次上面的流程,最後回到 AuthReturn
在 D:\project\GmailTest\Data\Secrets\Credentials\ABC 裡面會產生一個檔案: 這個就是我們的 token 了。
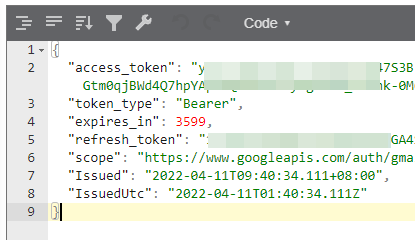
看一下裡面的內容, 有 access_token, refresh_token, scope 等等, 用途應該很好猜了.. 不知道各項目的目途也沒有關係。只要有這個 token 就可以了。
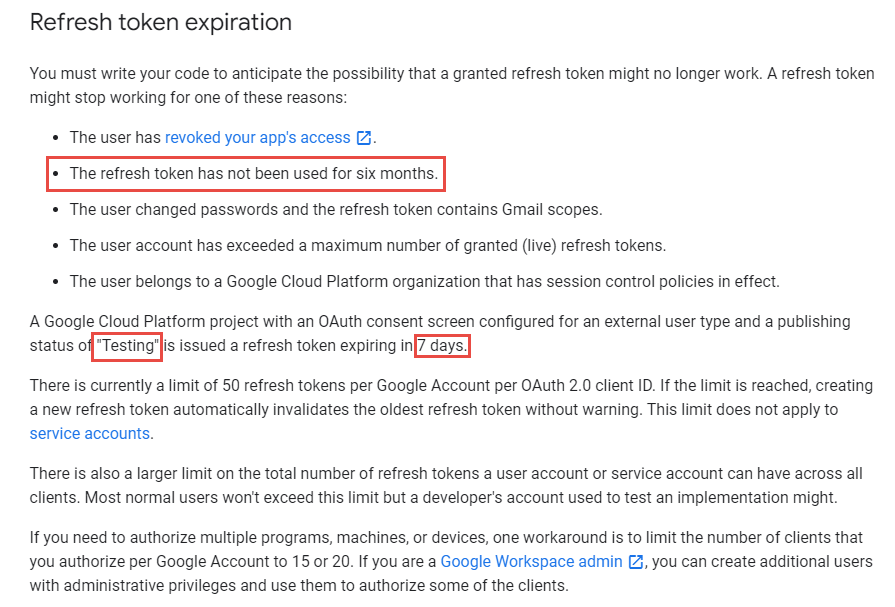
refresh_token 的效期請參考以下文件:
https://developers.google.com/identity/protocols/oauth2 。也可以參考下圖, 若是要用 gmail api 來發送通知信(例如連絡我們),紅色的地方是比較令人困擾的,例如 6 個月以上,沒有人留言,原來留下的 refresh_token 就失效了。使用者必需重新建立一個 refresh_token 。
最後來使用 gmail api 發送通知信, 直接看程式碼如下: 在這個過程中遇到最大的問題除了憑証問題之外,另一個問題是編碼。直到最後找到可以用 MimeKit 把 System.Net.Mail.MailMessage 編碼成 Gmail API 的格式才解決。程式碼如下:
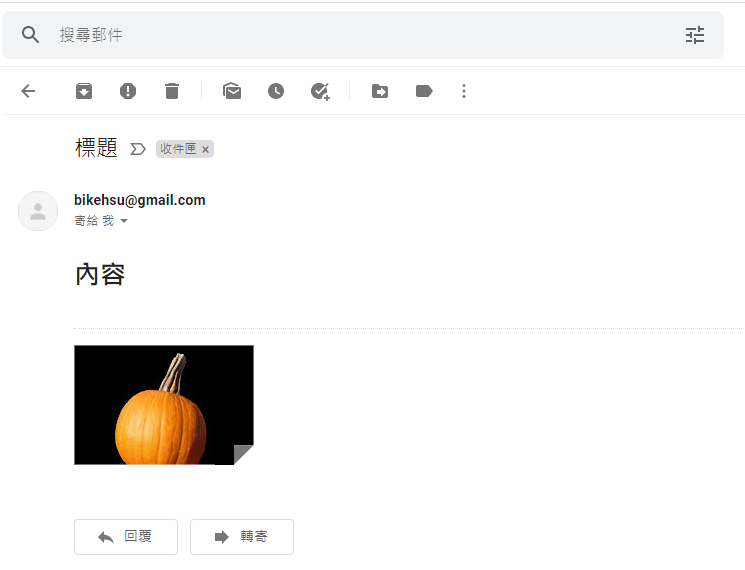
收到的信件:
結論:
使用 Gmail API 最大的原因是要增加安全性,和舊的 smtp 不同的地方是,使用 gmail api 之後,客戶不需要提供 gmail 的帳號和密碼就可以讓系統使用 gmail 發送信件,不過由於 refresh_token 的效期問題,可能會造成無法發送通知信而沒有任何人發現的情況,整個實用性會變的很低。
另一個還沒有測試的部份是應用程的啟用。這個審核不知道會不很麻煩,不過可以而知的時,整個流程會花更多的時間。
取代的做法: 可能要改用 Amazon 的 SES 來寄信,而且為了避免每個小網站都要跑 SES 的建立流程,準備來寫一個 API 給各網站使用,可以發送簡單的通知信。
以上的程式碼可以在這裡下載: https://github.com/bikehsu/GmailTest
如果你的目的是要使用 Gmail Api 取代舊的 Gmail SMTP 來發送通知信,建議你先跳到最下方看一下結論。
如果你是想要看一下 Gmail API 和 Google API 憑証的使用方法,可以看一下這篇文章。
1. 在 google cloud platform 建立新的專案.
https://console.cloud.google.com/
啟用 Gmail API
因為我們要透過 OAuth 取得使用者授權,所以要設定使用 OAuth 的同意畫面。
指定授權的範圍
因為剛建立的專案,不會被公開,所以要指定測試使用者
如果要給任意使用者,必需經過發布的流程,但準備工作有點麻煩,所以這次就不發布了。
建立 OAuth 2.0 用戶端 ID 憑証
這裡除了名稱外,還有一個設定重導 Uri 的項目。現在不填寫,但稍後要回來補這個資料。
下載 json 之後,命名為 client_secret.json 保留後續使用。
再來就要建立專案了. 用 VS2022 建立一個新專案
記錄網址, 本測試專案是 https://localhost:44340/ ,請依實際網址為準。
回到 OAuth 2.0 用戶端 ID 的設定頁. 在已授權的重新導向 URI 中填入 https://localhost:44340/Home/AuthReturn (填入的網址依實際專案的狀況,可能會有變化)
在 VS2022 中,使用 Nuget 安裝套件: (有漏的再麻煩和我說)
Google.Apis.Gmail.v1
Google.Apis.Auth
MimeKit (發送 gmail 時使用)
建立認証用的網址:
建立一個 Action, 用來取得認証用的網址:
        /// <summary>

        /// 取得授權的項目

        /// </summary>

        static string[] Scopes = { GmailService.Scope.GmailSend };


        // 和登入 google 的帳號無關

        // 任意值,若未來有使用者認証,可使用使用者編號或登入帳號。

        string Username = "ABC";


        /// <summary>

        /// 存放 client_secret 和 credential 的地方

        /// </summary>

        string SecretPath = @"D:\project\GmailTest\Data\Secrets";


        /// <summary>

        /// 認証完成後回傳的網址, 必需和 OAuth 2.0 Client Id 中填寫的 "已授權的重新導向 URI" 相同。

        /// </summary>

        string RedirectUri = $"https://localhost:44340/Home/AuthReturn";


        /// <summary>

        /// 取得認証用的網址

        /// </summary>

        /// <returns></returns>

        public async Task<string> GetAuthUrl()

        {

            using (var stream = new FileStream(Path.Combine(SecretPath, "client_secret.json"), FileMode.Open, FileAccess.Read))

            {

                FileDataStore dataStore = null;

                var credentialRoot = Path.Combine(SecretPath, "Credentials");

                if (!Directory.Exists(credentialRoot))

                {

                    Directory.CreateDirectory(credentialRoot);

                }


                //存放 credential 的地方,每個 username 會建立一個目錄。

                string filePath = Path.Combine(credentialRoot, Username);

                dataStore = new FileDataStore(filePath);


                IAuthorizationCodeFlow flow = new GoogleAuthorizationCodeFlow(new GoogleAuthorizationCodeFlow.Initializer

                {

                    ClientSecrets = GoogleClientSecrets.Load(stream).Secrets,

                    Scopes = Scopes,

                    DataStore = dataStore

                });


                var authResult = await new AuthorizationCodeWebApp(flow, RedirectUri, Username)

                .AuthorizeAsync(Username, CancellationToken.None);


                return authResult.RedirectUri;

            }

        }
執行結果:
用 chrome 開啟產生的網址:
選取任一帳號,如果出現以下錯誤,請回到 "OAuth 同意畫面" 去新增測試使用者
因為應用程式尚未發布,所以會看到警告,勇敢的繼續下去
這裡會要求授權使用你的名義發送信件。(這是在程式中取得授權的項目 Scopes 中所指定的)
再繼續之後,會被重導至我們在 redirectUri 指定的網址。因為我們尚未完成,所以會看到錯誤,順便也可以看一下,會帶回哪一些參數。有 state, code, scope,共三個。
順便看一下,google 的套件會在 Credentials 的目錄下幫使用者建立一個目錄,在完成驗証前,會先放一個 System.String-oauth_XXX 的檔案,裡面的值和回傳的 state 是一樣的,這個應該是用來驗証回傳資料的。
接下來我們要新增 Action "AuthReturn" 如下:
        public async Task<string> AuthReturn(AuthorizationCodeResponseUrl authorizationCode)

        {

            string[] scopes = new[] { GmailService.Scope.GmailSend };


            using (var stream = new FileStream(Path.Combine(SecretPath, "client_secret.json"), FileMode.Open, FileAccess.Read))

            {

                //確認 credential 的目錄已建立.

                var credentialRoot = Path.Combine(SecretPath, "Credentials");

                if (!Directory.Exists(credentialRoot))

                {

                    Directory.CreateDirectory(credentialRoot);

                }


                //暫存憑証用目錄

                string tempPath = Path.Combine(credentialRoot, authorizationCode.State);


                IAuthorizationCodeFlow flow = new GoogleAuthorizationCodeFlow(

                new GoogleAuthorizationCodeFlow.Initializer

                {

                    ClientSecrets = GoogleClientSecrets.Load(stream).Secrets,

                    Scopes = scopes,

                    DataStore = new FileDataStore(tempPath)

                });


                //這個動作應該是要把 code 換成 token

                await flow.ExchangeCodeForTokenAsync(Username, authorizationCode.Code, RedirectUri, CancellationToken.None).ConfigureAwait(false);


                if (!string.IsNullOrWhiteSpace(authorizationCode.State))

                {

                    string newPath = Path.Combine(credentialRoot, Username);

                    if (tempPath.ToLower() != newPath.ToLower())

                    {

                        if (Directory.Exists(newPath))

                            Directory.Delete(newPath, true);


                        Directory.Move(tempPath, newPath);

                    }

                }


                return "OK";

            }

        }
再跑一次上面的流程,最後回到 AuthReturn
在 D:\project\GmailTest\Data\Secrets\Credentials\ABC 裡面會產生一個檔案: 這個就是我們的 token 了。
看一下裡面的內容, 有 access_token, refresh_token, scope 等等, 用途應該很好猜了.. 不知道各項目的目途也沒有關係。只要有這個 token 就可以了。
refresh_token 的效期請參考以下文件:
https://developers.google.com/identity/protocols/oauth2 。也可以參考下圖, 若是要用 gmail api 來發送通知信(例如連絡我們),紅色的地方是比較令人困擾的,例如 6 個月以上,沒有人留言,原來留下的 refresh_token 就失效了。使用者必需重新建立一個 refresh_token 。
最後來使用 gmail api 發送通知信, 直接看程式碼如下: 在這個過程中遇到最大的問題除了憑証問題之外,另一個問題是編碼。直到最後找到可以用 MimeKit 把 System.Net.Mail.MailMessage 編碼成 Gmail API 的格式才解決。程式碼如下:
        public async Task<bool> SendTestMail()

        {

            var service = await GetGmailService();


            GmailMessage message = new GmailMessage();

            message.Subject = "標題";

            message.Body = $"<h1>內容</h1>";

            message.FromAddress = "bikehsu@gmail.com";

            message.IsHtml = true;

            message.ToRecipients = "bikehsu@gmail.com";

            message.Attachments = new List<Attachment>();


            string filePath = @"C:\Users\bike\Pictures\Vegetable_pumpkin.jpg";    //要附加的檔案

            Attachment attachment1 = new Attachment(filePath);

            message.Attachments.Add(attachment1);


            SendEmail(message, service);

            Console.WriteLine("OK");


            return true;

        }


        async Task<GmailService> GetGmailService()

        {

            UserCredential credential = null;


            var credentialRoot = Path.Combine(SecretPath, "Credentials");

            if (!Directory.Exists(credentialRoot))

            {

                Directory.CreateDirectory(credentialRoot);

            }


            string filePath = Path.Combine(credentialRoot, Username);


            using (var stream = new FileStream(Path.Combine(SecretPath, "client_secret.json"), FileMode.Open, FileAccess.Read))

            {

                credential = await GoogleWebAuthorizationBroker.AuthorizeAsync(

                GoogleClientSecrets.Load(stream).Secrets,

                Scopes,

                Username,

                CancellationToken.None,

                new FileDataStore(filePath));

            }


            var service = new GmailService(new BaseClientService.Initializer()

            {

                HttpClientInitializer = credential,

                ApplicationName = "Send Mail",

            });


            return service;

        }


        public class GmailMessage

        {

            public string FromAddress { get; set; }

            public string ToRecipients { get; set; }


            public string Subject { get; set; }

            public string Body { get; set; }

            public bool IsHtml { get; set; }


            public List<System.Net.Mail.Attachment> Attachments { get; set; }

        }


        public static void SendEmail(GmailMessage email, GmailService service)

        {

            var mailMessage = new System.Net.Mail.MailMessage();

            mailMessage.From = new System.Net.Mail.MailAddress(email.FromAddress);

            mailMessage.To.Add(email.ToRecipients);

            mailMessage.ReplyToList.Add(email.FromAddress);

            mailMessage.Subject = email.Subject;

            mailMessage.Body = email.Body;

            mailMessage.IsBodyHtml = email.IsHtml;


            if (email.Attachments != null)

            {

                foreach (System.Net.Mail.Attachment attachment in email.Attachments)

                {

                    mailMessage.Attachments.Add(attachment);

                }

            }


            var mimeMessage = MimeKit.MimeMessage.CreateFromMailMessage(mailMessage);


            var gmailMessage = new Google.Apis.Gmail.v1.Data.Message

            {

                Raw = Encode(mimeMessage)

            };


            Google.Apis.Gmail.v1.UsersResource.MessagesResource.SendRequest request = service.Users.Messages.Send(gmailMessage, "me");


            request.Execute();

        }


        public static string Encode(MimeMessage mimeMessage)

        {

            using (MemoryStream ms = new MemoryStream())

            {

                mimeMessage.WriteTo(ms);

                return Convert.ToBase64String(ms.GetBuffer())

                    .TrimEnd('=')

                    .Replace('+', '-')

                    .Replace('/', '_');

            }

        }
收到的信件:
結論:
使用 Gmail API 最大的原因是要增加安全性,和舊的 smtp 不同的地方是,使用 gmail api 之後,客戶不需要提供 gmail 的帳號和密碼就可以讓系統使用 gmail 發送信件,不過由於 refresh_token 的效期問題,可能會造成無法發送通知信而沒有任何人發現的情況,整個實用性會變的很低。
另一個還沒有測試的部份是應用程的啟用。這個審核不知道會不很麻煩,不過可以而知的時,整個流程會花更多的時間。
取代的做法: 可能要改用 Amazon 的 SES 來寄信,而且為了避免每個小網站都要跑 SES 的建立流程,準備來寫一個 API 給各網站使用,可以發送簡單的通知信。
以上的程式碼可以在這裡下載: https://github.com/bikehsu/GmailTest
Bike, 2022/4/10 下午 09:31:15
HttpWebRequest vs HttpClient httpClient
Post File
Token
Cookie
檔案不落地
以下的程式碼不能縮寫:
var oldFilename = content.Headers.ContentDisposition.FileName.Trim('\"');
var contentStream = await content.ReadAsStreamAsync();
return await PostFile(url, inputName, contentStream, oldFilename,
authorizationToken, IsAddIpHeaders);
}
Post File
Token
Cookie
檔案不落地
以下的程式碼不能縮寫:
var oldFilename = content.Headers.ContentDisposition.FileName.Trim('\"');
var contentStream = await content.ReadAsStreamAsync();
return await PostFile(url, inputName, contentStream, oldFilename,
authorizationToken, IsAddIpHeaders);
}
Bike, 2021/12/31 下午 02:50:10
加構獨立的 API Server 時, 要使用 Cookie 認証必需有以下條件:
1. Web Server 和 API Server 有相同的父網域.
2. Cookie 的網域指定到相同的父網域.
3. 在 API 的 Application 中允許 CORS Request, 需要修改 Startup.cs
3.1 在 ConfigureServices 中要加入 AddCors, 而且要記得 AllowCredentials()
3.2 在 Configure 中, 要加入 app.UseCors("Cors(PolicyName"), 記得要在 UseAuthorization() 之前.
4. 在 Client 端要加上 withCredentials: true
1. Web Server 和 API Server 有相同的父網域.
2. Cookie 的網域指定到相同的父網域.
3. 在 API 的 Application 中允許 CORS Request, 需要修改 Startup.cs
3.1 在 ConfigureServices 中要加入 AddCors, 而且要記得 AllowCredentials()
        public void ConfigureServices(IServiceCollection services)

        {

            services.AddCors(options =>

            {

                options.AddPolicy(name: "Cors(PolicyName",

                                 builder =>

                                 {

                                     builder.WithOrigins("https://web1.yourdomain.com",

                                                         "https://web2.yourdomain.com")

                                     .AllowCredentials();

                                 });

            });


            services.AddControllers()

                .AddNewtonsoftJson(opt =>

                 opt.SerializerSettings.ContractResolver = new CamelCasePropertyNamesContractResolver());
3.2 在 Configure 中, 要加入 app.UseCors("Cors(PolicyName"), 記得要在 UseAuthorization() 之前.
        public void Configure(IApplicationBuilder app, IWebHostEnvironment env)

        {

            app.UseExceptionMiddleware();


            app.UseHttpsRedirection();


            app.UseHttpsRedirection();


            app.UseRouting();


            app.UseCors(MyAllowSpecificOrigins);


            app.UseAuthorization();
4. 在 Client 端要加上 withCredentials: true
                            $.ajax({

                                url: apiRoot + "apiurl",

                                type: 'GET',

                                dataType: 'json', // 預期從server接收的資料型態

                                success: function (res) {

                                    console.log("success: ");

                                    console.log(res);

                                },

                                xhrFields: {

                                    withCredentials: true

                                },

                                error: function (XMLHttpRequest, textStatus, errorThrown) {

                                    alert("發生錯誤");

                                }

});Bike, 2021/10/24 下午 05:17:54