頁數 1 / 2
下一頁
搜尋 git 結果:
近日處理我們公司某個使用 my sql 的專案,已經被雷的幾次,紀錄一下
1. 使用 EF Scaffolding 指令去更新 Model ,有些欄位原本是明確型別 變成 可null型別
也就是本來是 datetime 變成 datetime?, int 變成 int?
看起來是一些 view 的欄位會有這些狀況,這時就要去 git revert ,避免build專案又一堆錯誤
2. 使用 IQueryable 語法處理時間要小心,不要在裡面計算時間。
要把時間計算先算出來,再帶入式子
1. 使用 EF Scaffolding 指令去更新 Model ,有些欄位原本是明確型別 變成 可null型別
也就是本來是 datetime 變成 datetime?, int 變成 int?
看起來是一些 view 的欄位會有這些狀況,這時就要去 git revert ,避免build專案又一堆錯誤
2. 使用 IQueryable 語法處理時間要小心,不要在裡面計算時間。
DateTime shouldBeGiveCoinDateTime = DateTime.Now.AddDays(-14);

return dbContext.ViewOrderForCoinCronJob.AsNoTracking().Where(x =>

    x.CompletedAt <= shouldBeGiveCoinDateTime

    && x.CreatedAt >= DateTime.Now.AddYears(-1) // -> 這裡轉換mysql指令會出錯

    && x.DeletedAt == null

    && x.CoinAmount > 0

    && x.Status == (byte)ORDER_STATUS.COMPLETED

    && dbContext.PackingMain.Any(y => y.OrderId == x.Id)

    && x.IsGiveCoin != 0

    && !dbContext.CoinLog.Any(y =>

        y.OrderId == x.Id

        && y.StrKey.Contains(COIN_LOG.STRING_KEY_PREFIX.ORDER_ACCUMULATION)

    )

).ToList();
要把時間計算先算出來,再帶入式子
DateTime shouldBeGiveCoinDateTime = DateTime.Now.AddDays(-14);

DateTime createDateStartAt = DateTime.Now.AddYears(-1); // -> 先算出日期

return dbContext.ViewOrderForCoinCronJob.AsNoTracking().Where(x =>

    x.CompletedAt <= shouldBeGiveCoinDateTime

    && x.CreatedAt >= createDateStartAt // -> 帶入算好的日期

    && x.DeletedAt == null

    && x.CoinAmount > 0

    && x.Status == (byte)ORDER_STATUS.COMPLETED

    && dbContext.PackingMain.Any(y => y.OrderId == x.Id)

    && x.IsGiveCoin != 0

    && !dbContext.CoinLog.Any(y =>

        y.OrderId == x.Id

        && y.StrKey.Contains(COIN_LOG.STRING_KEY_PREFIX.ORDER_ACCUMULATION)

    )

).ToList();
darren, 2025/3/10 下午 05:43:38
程式碼上色
https://highlightjs.org/
Vue
https://github.com/highlightjs/vue-plugin
中文
https://fenxianglu.cn/highlight.html?theme=atom-one-light
https://highlightjs.org/
Vue
https://github.com/highlightjs/vue-plugin
中文
https://fenxianglu.cn/highlight.html?theme=atom-one-light
hannah, 2023/9/18 下午 03:46:03
Entity Framework 提供了 ExecuteSqlRawAsync 和 FromSqlRaw 之後,可以和 Dapper 非常類似的用法。
我們在用 Dapper 時。最常用的就是 sql command 加上一個物件做為參數,就可以執行 CRUD 的動作。
其實用 Entity Framework 的 ExecuteSqlRawAsync 和 FromSqlRaw 也可以逹到幾乎一樣的效果。
ExecuteSqlRawAsync 和 FromSqlRaw 接受的參數是 object array (其實是 Microsoft.Data.SqlClient.SqlParameter 的 array)
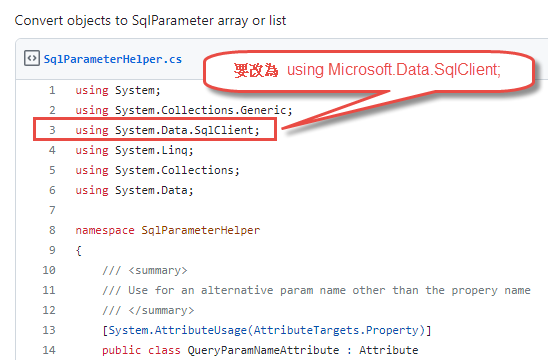
所以我們先做一個 Object to Microsoft.Data.SqlClient.SqlParameter Array 的擴充, 可參考: https://gist.github.com/aliozgur/75182b2e9b0a58b83443
不過很奇怪的是,原作者提供的擴充轉出來的會是 System.Data.SqlClient.SqlParameter Array 無法直接使用於 ExecuteSqlRawAsync 和 FromSqlRaw,所以要稍微改一下,把 using System.Data.SqlClient; 改為 using Microsoft.Data.SqlClient; 即可:
另外,我們再自行 對 DbContext 做一個擴充如下:
最後的結果可以做到以下的效果: (res3 和 res4 是配合 FormattableString 的範例 )
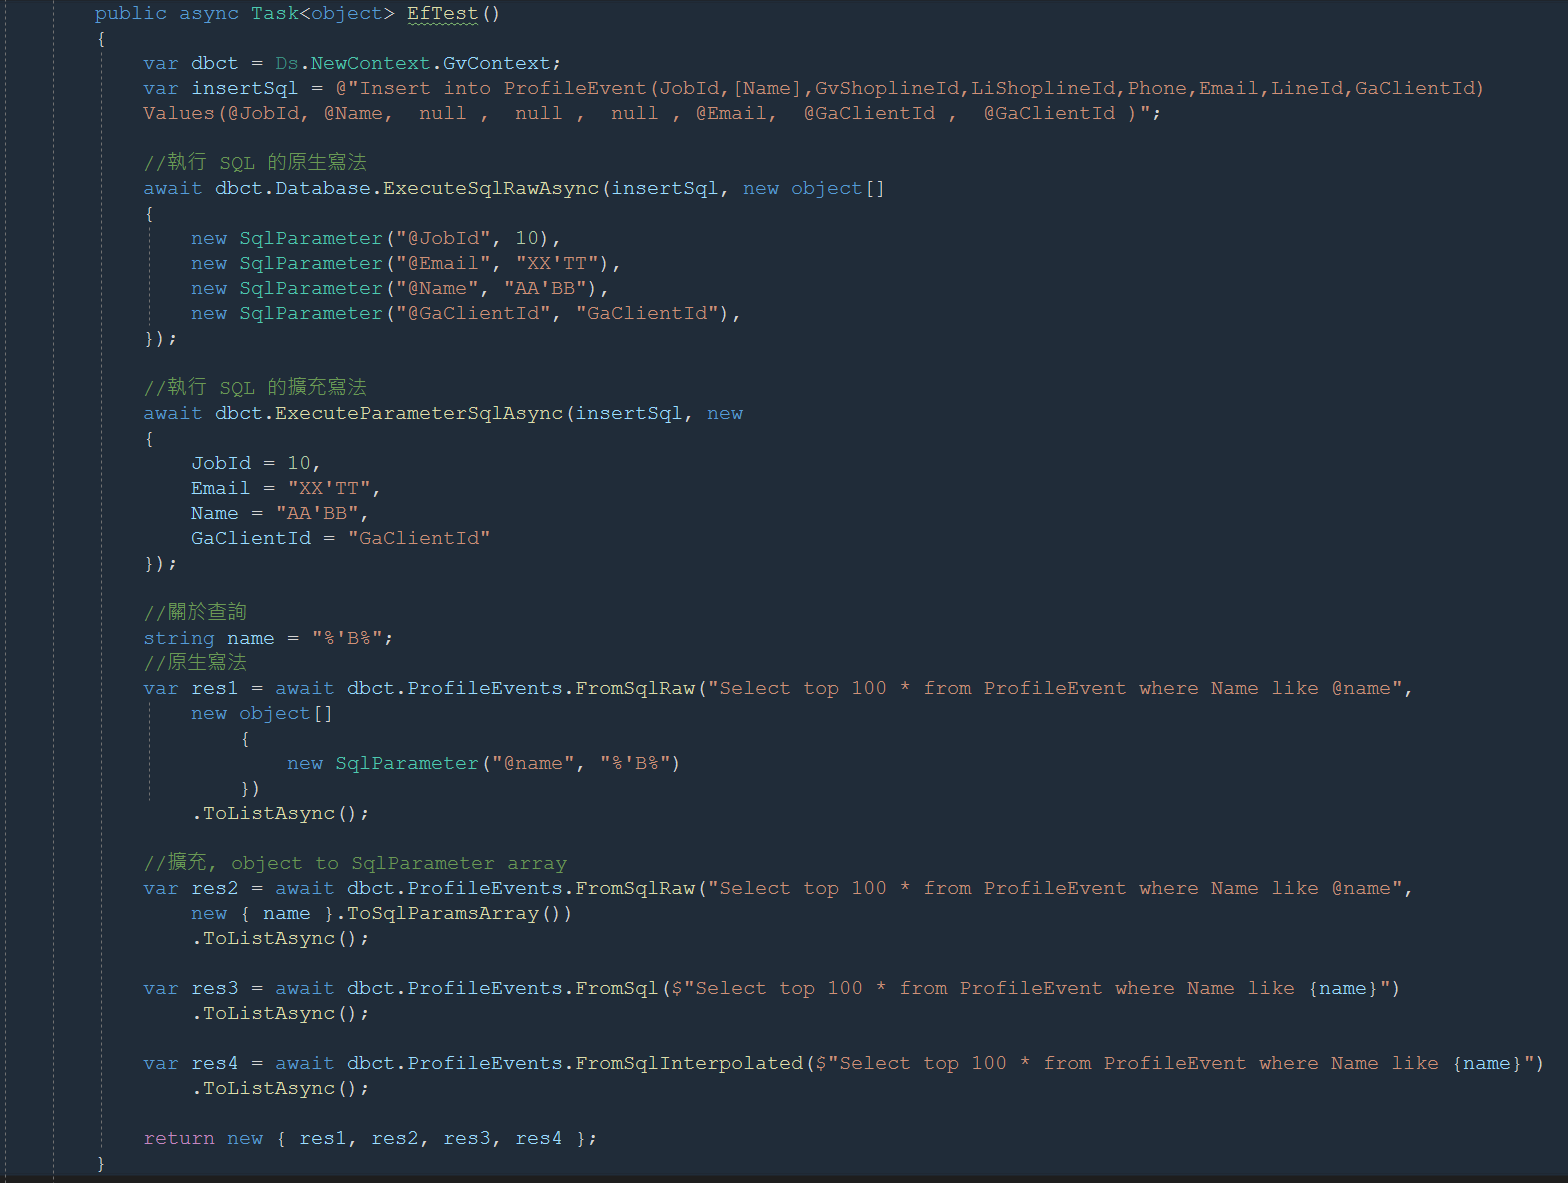
範例程式碼:
我們在用 Dapper 時。最常用的就是 sql command 加上一個物件做為參數,就可以執行 CRUD 的動作。
其實用 Entity Framework 的 ExecuteSqlRawAsync 和 FromSqlRaw 也可以逹到幾乎一樣的效果。
ExecuteSqlRawAsync 和 FromSqlRaw 接受的參數是 object array (其實是 Microsoft.Data.SqlClient.SqlParameter 的 array)
所以我們先做一個 Object to Microsoft.Data.SqlClient.SqlParameter Array 的擴充, 可參考: https://gist.github.com/aliozgur/75182b2e9b0a58b83443
不過很奇怪的是,原作者提供的擴充轉出來的會是 System.Data.SqlClient.SqlParameter Array 無法直接使用於 ExecuteSqlRawAsync 和 FromSqlRaw,所以要稍微改一下,把 using System.Data.SqlClient; 改為 using Microsoft.Data.SqlClient; 即可:

另外,我們再自行 對 DbContext 做一個擴充如下:
        /// <summary>

        /// 會把物件 Parameter 的各 Property 帶入 SQL 中.

        /// </summary>

        /// <param name="dbct"></param>

        /// <param name="sql"></param>

        /// <param name="parameters"></param>

        /// <returns></returns>

        public static async Task<int> ExecuteParameterSqlAsync(this DbContext dbct, string sql, object parameters)

        {

            return await dbct.Database.ExecuteSqlRawAsync(sql, parameters.ToSqlParamsArray());

        }
最後的結果可以做到以下的效果: (res3 和 res4 是配合 FormattableString 的範例 )

範例程式碼:
        public async Task<object> EfTest()

        {

            var dbct = Ds.NewContext.GvContext;

            var insertSql = @"Insert into ProfileEvent(JobId,[Name],GvShoplineId,LiShoplineId,Phone,Email,LineId,GaClientId)

            Values(@JobId, @Name, null , null , null , @Email, @GaClientId , @GaClientId )";


            //執行 SQL 的原生寫法

            await dbct.Database.ExecuteSqlRawAsync(insertSql, new object[]

            {

                new SqlParameter("@JobId", 10),

                new SqlParameter("@Email", "XX'TT"),

                new SqlParameter("@Name", "AA'BB"),

                new SqlParameter("@GaClientId", "GaClientId"),

            });


            //執行 SQL 的擴充寫法

            await dbct.ExecuteParameterSqlAsync(insertSql, new

            {

                JobId = 10,

                Email = "XX'TT",

                Name = "AA'BB",

                GaClientId = "GaClientId"

            });


            //關於查詢

            string name = "%'B%";

            //原生寫法

            var res1 = await dbct.ProfileEvents.FromSqlRaw("Select top 100 * from ProfileEvent where Name like @name",

                new object[]

                    {

                        new SqlParameter("@name", "%'B%")

                    })

                .ToListAsync();


            //擴充, object to SqlParameter array

            var res2 = await dbct.ProfileEvents.FromSqlRaw("Select top 100 * from ProfileEvent where Name like @name",

                new { name }.ToSqlParamsArray())

                .ToListAsync();


            var res3 = await dbct.ProfileEvents.FromSql($"Select top 100 * from ProfileEvent where Name like {name}")

                .ToListAsync();


            var res4 = await dbct.ProfileEvents.FromSqlInterpolated($"Select top 100 * from ProfileEvent where Name like {name}")

                .ToListAsync();


            return new { res1, res2, res3, res4 };

        }
Bike, 2023/5/6 下午 05:37:19
從github抓取應用程式
https://github.com/g13579112000/ShopeeApiV2
https://github.com/g13579112000/ShopeeApiV2
梨子, 2022/7/21 下午 09:40:45
若網站是使用 SVN update 方式更新網站,為了防止被外部讀取到 /.svn/ 目錄內容
要在 web.config 片段加上以下內容
git 也是一樣的方式
可以參考此網址
https://www.petefreitag.com/item/823.cfm
要在 web.config 片段加上以下內容
<configuration>

<system.webServer>

     <security>

         <requestFiltering>

            <hiddenSegments>

             <add segment=".svn" />

            </hiddenSegments>

         </requestFiltering>

     </security>

</system.webServer>

</configuration>
git 也是一樣的方式
可以參考此網址
https://www.petefreitag.com/item/823.cfm
darren, 2022/7/20 下午 04:58:58
*分解元組(Deconstructing tuples)的支援必須要至少C# 7.0以上*
以前一個funtion如果需要回傳複數個參數你會怎麼做呢?
1.可能會定義一個物件,在回傳的時候宣告並將值塞進去return。(為了一個function而去定義,好醜...)
2.又或者是將回傳參數型別直接改成dynamic,回傳時直接使用匿名物件。(performance炸裂!!!)
如果你使用了上面兩種方式...請一定!一定!!一定!!!要把這篇文章看完。
先來說說在C#7.0以前的處理方法,在呼叫function之前先將欲接收的參數宣告好並傳入。

但是這樣做有幾個缺點,
1. 當傳入的參數與傳出的參數一多起來,function定義時的參數會又臭又長。
2. 使用這個function前每次都需要宣告變數,不累嗎?
3. 不管你要不要使用這個參數,你都一定要傳入,因為ref與out不能有預設值。
接下來...讓我與各位介紹 " 元 組 元 素 "!!! (Tuple)
早上好台灣,現在我有Tuple。我很喜歡Tuple,但是速度與激情9比...咳咳...沒事。
先來個簡單的範例
定義一個funciton JohnCena
然後我們就可以很漂亮的一次性取得JohnCena的姓名、出生日期、國籍、年齡等等資料!

假如你的參數需要在外面先行宣告也沒問題!

而從C#10開始,甚至可以混合使用也沒關係!

這樣我們就輕鬆解決了以前的兩個缺點了,而要解決最後一個缺點更是簡單,
只需要將你想要丟棄(discard)或是用不到的那個參數使用UnderLine( _ )就可以囉!

元組元素的基礎講完了再來說說解構元素的部分
建構式想必大家都已經很熟悉了

但是'分解式'你有聽過嗎?
顧名思義就是可以定義物件被指派出去的參數!
驚不驚喜! 意不意外?
使用的方法就是在class底下新增一個Deconstruct function

如此一來我們就可以來試試看將John Cena解ㄊ一.... 分解!

建構式可以多載,分解式當然也可以!

以上就是這次的內容,有沒有覺得Coding時的可玩性又更好了呢?
不過要提醒一點,目前解構式並無法使用查看定義來移置相對應的位置,
對於可讀性會有不小的影響,但如果你想要把某個東西藏起來不讓你同事找到... (請不要這樣做!)
這次的範例也歡迎到我的GitHub參考囉!
06/09/2022 由Bike 補充

可以將function的回傳參數先行命名!!
直接當成物件使用,對開發效率與可讀性有著明顯的提升,相信會是未來的趨勢。
另外要道歉並修正之前將Deconstruct翻譯成解構式的錯誤
Destruct (解構式)指的是class生命周期結束前執行的function
使用方式是class名稱為dunction名稱並在前面加上波浪符號 '~'
Deconstruct的翻譯應該為分解式
以前一個funtion如果需要回傳複數個參數你會怎麼做呢?
1.可能會定義一個物件,在回傳的時候宣告並將值塞進去return。(為了一個function而去定義,好醜...)
2.又或者是將回傳參數型別直接改成dynamic,回傳時直接使用匿名物件。(performance炸裂!!!)
如果你使用了上面兩種方式...請一定!一定!!一定!!!要把這篇文章看完。
先來說說在C#7.0以前的處理方法,在呼叫function之前先將欲接收的參數宣告好並傳入。

但是這樣做有幾個缺點,
1. 當傳入的參數與傳出的參數一多起來,function定義時的參數會又臭又長。
2. 使用這個function前每次都需要宣告變數,不累嗎?
3. 不管你要不要使用這個參數,你都一定要傳入,因為ref與out不能有預設值。
接下來...讓我與各位介紹 " 元 組 元 素 "!!! (Tuple)
早上好台灣,現在我有Tuple。我很喜歡Tuple,但是速度與激情9比...咳咳...沒事。
先來個簡單的範例
定義一個funciton JohnCena
然後我們就可以很漂亮的一次性取得JohnCena的姓名、出生日期、國籍、年齡等等資料!

假如你的參數需要在外面先行宣告也沒問題!

而從C#10開始,甚至可以混合使用也沒關係!

這樣我們就輕鬆解決了以前的兩個缺點了,而要解決最後一個缺點更是簡單,
只需要將你想要丟棄(discard)或是用不到的那個參數使用UnderLine( _ )就可以囉!

元組元素的基礎講完了再來說說解構元素的部分
建構式想必大家都已經很熟悉了

但是'分解式'你有聽過嗎?
顧名思義就是可以定義物件被指派出去的參數!
驚不驚喜! 意不意外?
使用的方法就是在class底下新增一個Deconstruct function

如此一來我們就可以來試試看將John Cena解ㄊ一.... 分解!

建構式可以多載,分解式當然也可以!

以上就是這次的內容,有沒有覺得Coding時的可玩性又更好了呢?
不過要提醒一點,目前解構式並無法使用查看定義來移置相對應的位置,
對於可讀性會有不小的影響,但如果你想要把某個東西藏起來不讓你同事找到... (請不要這樣做!)
這次的範例也歡迎到我的GitHub參考囉!
06/09/2022 由Bike 補充

可以將function的回傳參數先行命名!!
直接當成物件使用,對開發效率與可讀性有著明顯的提升,相信會是未來的趨勢。
另外要道歉並修正之前將Deconstruct翻譯成解構式的錯誤
Destruct (解構式)指的是class生命周期結束前執行的function
使用方式是class名稱為dunction名稱並在前面加上波浪符號 '~'
Deconstruct的翻譯應該為分解式
梨子, 2022/5/26 下午 07:58:00
這篇文章值得看一下
https://yu-jack.github.io/2017/10/20/secure-header/
https://yu-jack.github.io/2017/10/20/secure-header/
Bike, 2022/5/5 下午 10:46:32
上一集當中我們完成了Lucene基本操作中的Create與Read,這一集會將CRUD中的Update與Delete的操作方法告訴你,並且本集會著重於講解關於"Norms"與權重(Boost)在Lucene中的運作概念。
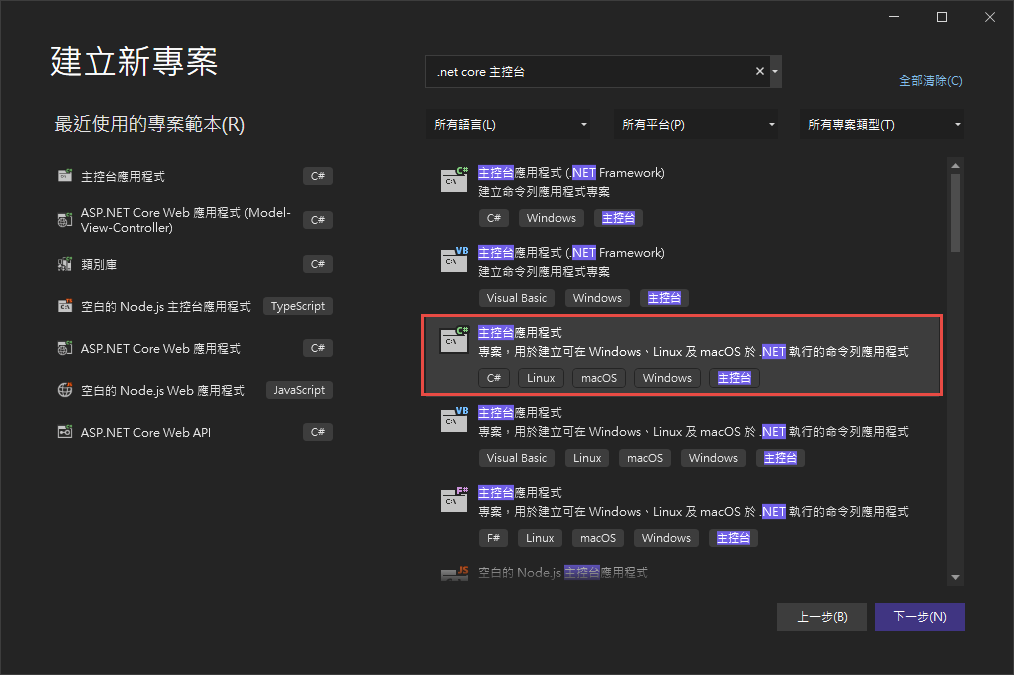
首先我們建立一個.Net 6的主控台應用程式
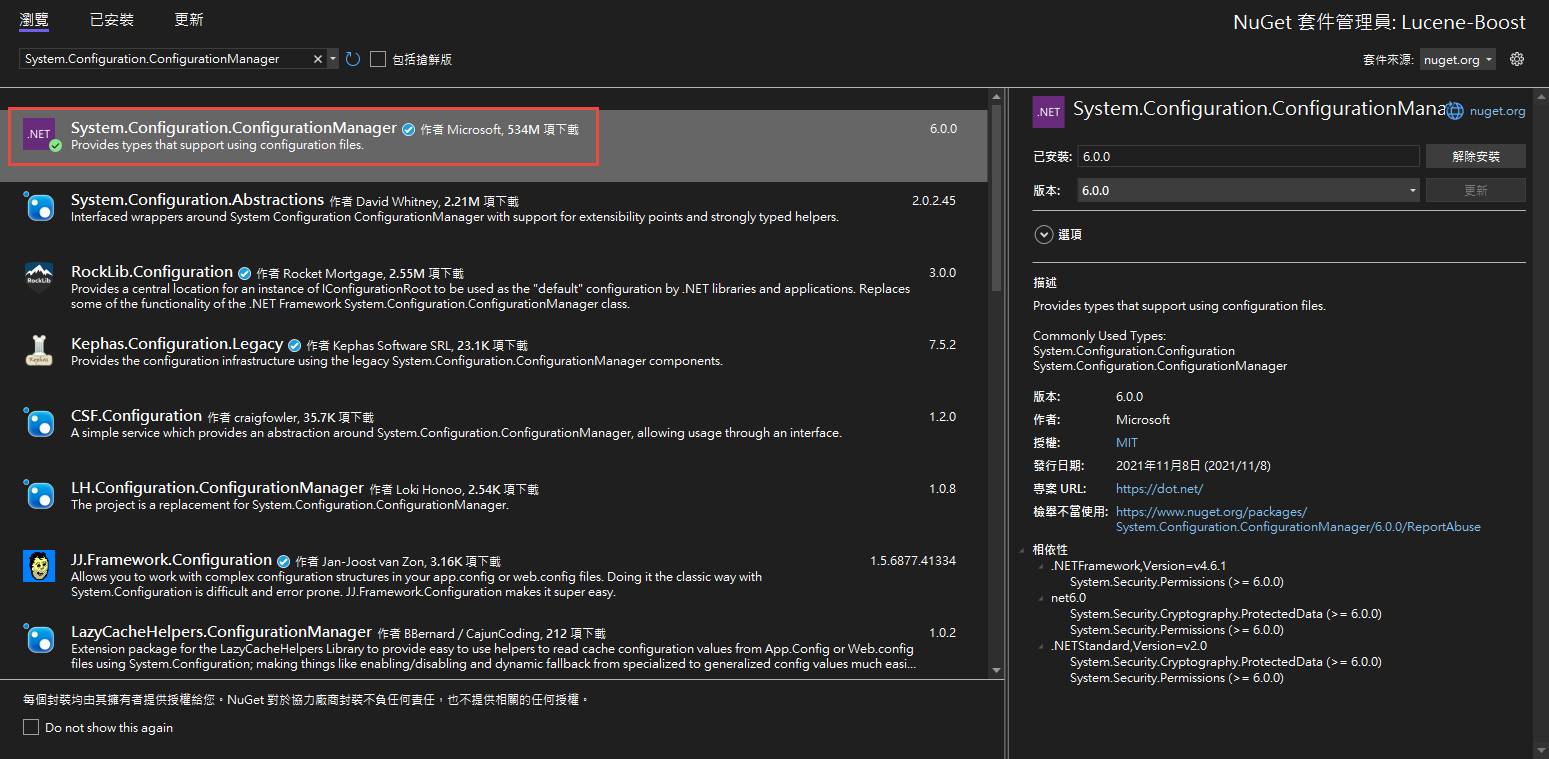
建立好後於右側專案右鍵選擇"管理Nuget套件",並選擇"瀏覽">於搜索列中搜尋"Lucene">安裝3.0.3最新穩定版 與 "System.Configuration.ConfigurationManager"
安裝好後就可以於專案內使用Lucene套件囉!
再來依照上一篇的教學建立一套簡單的Lucene查詢
好囉! 接下來我們要如何更新索引呢?
更新其實就是將存在的索引刪除並重新建立Document,不存在的則直接新增。
首先準備一組資料準備更新
*欲更新的Document必須與創建所引時使用的Document欄位相同*
來測試看看

可以看見 Name = 橘子 的索引已經改為我們新準備的資料囉。
再來是刪除!
與更新非常相似,只需要使用deleteDocument()就可以了。
再來看看輸出結果
可以發現 Score :0.7554128, Id :2, Name :橘子, Description :醫生給娜美最珍貴的寶藏。這筆索引已經被移除囉!

可以發現筆者於更新或刪除時都是輸入單一字來做異動,除了表達可以對索引做複合更動外,
是因為更新與刪除索引同樣會使用到分詞器(analyzer),
*所輸入的索引值非ID等數值時必須要配合分詞器的分詞能力*才能取得所想異動的索引喔!
Boost是什麼呢?
Boost 分為 :
1. Index Time Boost : 在建立索引時就計算好的值。例如上一篇中提到的(NORMS)
2. Query Time Boost : 查詢時賦與搜尋條件不同的值以影響結果。
我們先來測試Index Time Boost的部分
並記得重新CreateIndex才能刷新欄位的權重值喔。
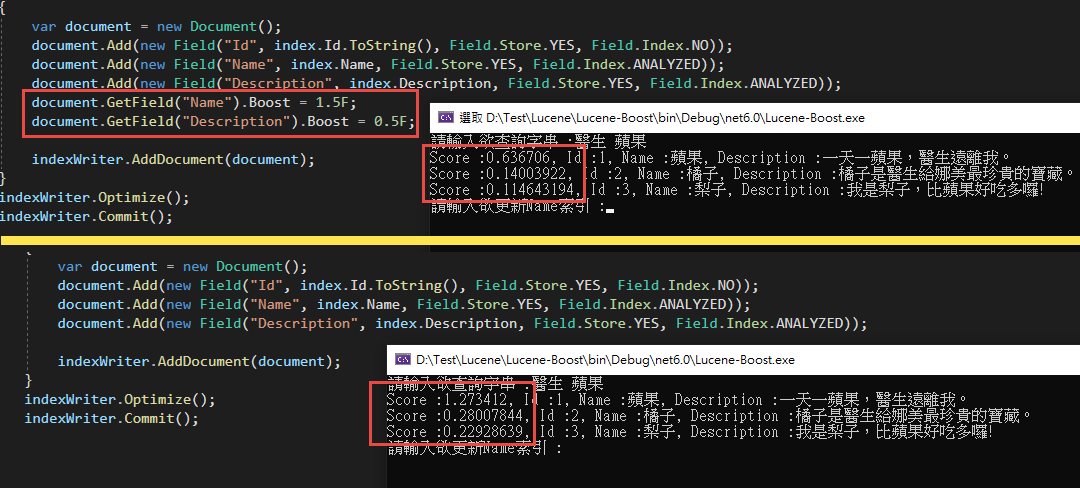
很明顯的搜尋出來的Score分數變動了! 但是有沒有發現明明Name欄位的Boost改成了1.5,蘋果的數值卻仍然只有一半呢?
這是因為我們的Search中所參照的欄位為Description,所以在計算Score的時候其實是完全沒有參與的喔!
另外要記得,使用Index Time Boost的時候,欲給予銓重分配的欄位Field.Index不能使用NO_NORMS,不然這個欄位並不會紀錄權重的資料。
再來我們試試看Query Time Boost
這次我們搜尋兩個欄位"Name"與"Description",並使用 BooleanQuery來將其組合。
BooleanQuery中的 Occur有三種參數 : "MUST","MUST_NOT","SHOULD",功能與字面上的意思一樣為"必須要有","必須沒有"與"有無都包含"。

查詢出來的分數就不一樣囉!
以上就是這一次的分享,Lucene是一款容易入門但是要實際上戰場卻又十分複雜的功能,想要達成真正高效能的全文檢索,在前期的文件規畫配置與資料的權重配比都是一個巨大的挑戰。未來會繼續分享關於Lucene的其他有趣功能,還請繼續期待呦!
另外也可以到GitHub下載我的範例來參考呦!
GitHub: https://github.com/g13579112000/Lucene
參考文件:
1. 黑暗大大的全文檢索筆記 : https://blog.darkthread.net/blog/lucene-net-notes-1/
2. Makble : http://makble.com/lucene-field-boost-example
3. CSDN Jack2013tong 文章 : https://blog.csdn.net/huwei2003/article/details/53408388
首先我們建立一個.Net 6的主控台應用程式

建立好後於右側專案右鍵選擇"管理Nuget套件",並選擇"瀏覽">於搜索列中搜尋"Lucene">安裝3.0.3最新穩定版 與 "System.Configuration.ConfigurationManager"

安裝好後就可以於專案內使用Lucene套件囉!
再來依照上一篇的教學建立一套簡單的Lucene查詢
using Lucene.Net.Analysis.Standard;

using Lucene.Net.Documents;

using Lucene.Net.Index;

using Lucene.Net.QueryParsers;

using Lucene.Net.Search;

using Lucene.Net.Store;


var _dir = new DirectoryInfo("LuceneDocument");

if (!File.Exists(_dir.FullName))

{

    System.IO.Directory.CreateDirectory(_dir.FullName);

}

var analyzer = new StandardAnalyzer(Lucene.Net.Util.Version.LUCENE_CURRENT);

CreateIndex(GetProductsInformation(), _dir, analyzer);


while (true)

{

    Console.Write("請輸入欲查詢字串 :");

    var searchValue = Console.ReadLine();

    Search(searchValue, _dir, analyzer);

}


void CreateIndex(List<Product> information, DirectoryInfo dir, StandardAnalyzer analyzer)

{

    using (var directory = FSDirectory.Open(dir))

    {

        using (var indexWriter = new IndexWriter(directory, analyzer, true, IndexWriter.MaxFieldLength.LIMITED))

        {

            foreach (var index in information)

            {

                var document = new Document();

                document.Add(new Field("Id", index.Id.ToString(), Field.Store.YES, Field.Index.NO));

                document.Add(new Field("Name", index.Name, Field.Store.YES, Field.Index.ANALYZED));

                document.Add(new Field("Description", index.Description, Field.Store.YES, Field.Index.ANALYZED));

                indexWriter.AddDocument(document);

            }

            indexWriter.Optimize();

            indexWriter.Commit();

        }

    }

}

void Search(string searchValue, DirectoryInfo dir, StandardAnalyzer analyzer)

{

    using (var directory = FSDirectory.Open(_dir))

    {

        var parser = new QueryParser(Lucene.Net.Util.Version.LUCENE_CURRENT, "Description", analyzer).Parse(searchValue);

        using (var indexSearcher = new IndexSearcher(directory))

        {

            var queryLimit = 20;

            var hits = indexSearcher.Search(parser, queryLimit);

            if (!hits.ScoreDocs.Any())

            {

                Console.WriteLine("查無相關結果。");

                return;

            }

            Document doc;

            foreach (var hit in hits.ScoreDocs)

            {

                doc = indexSearcher.Doc(hit.Doc);

                Console.WriteLine("Score :" + hit.Score + ", Id :" + doc.Get("Id") + ", Name :" + doc.Get("Name") + ", Description :" + doc.Get("Description"));

            }

        }

    }

}


List<Product> GetProductsInformation()

{

    return new List<Product> {

            new Product{ Id = 1, Name = "蘋果", Description = "一天一蘋果,醫生遠離我。"},

            new Product{ Id = 2, Name = "橘子", Description = "醫生給娜美最珍貴的寶藏。"},

            new Product{ Id = 3, Name = "梨子", Description = "我是梨子,比蘋果好吃多囉!"},

            new Product{ Id = 4, Name = "葡萄", Description = "吃葡萄不吐葡萄皮,不吃葡萄倒吐葡萄皮"},

            new Product{ Id = 5, Name = "榴槤", Description = "水果界的珍寶!好吃一直吃。"}

        };

}

class Product

{

    public long Id { get; set; }

    public string Name { get; set; } = null!;

    public string Description { get; set; } = null!;

}
好囉! 接下來我們要如何更新索引呢?
更新其實就是將存在的索引刪除並重新建立Document,不存在的則直接新增。
首先準備一組資料準備更新
List<Product> GetUpdateProductsInformation()

{

    return new List<Product>

    {

        new Product{ Id = 6, Name = "香蕉", Description = "運動完後吃根香蕉補充養分。"},

        new Product{ Id = 2, Name = "橘子", Description = "橘子跟柳丁你分得出來嗎?"}

    };

}
*欲更新的Document必須與創建所引時使用的Document欄位相同*
void Update(string key, List<Product> information, DirectoryInfo dir, StandardAnalyzer analyzer)

{

    using( var directory = FSDirectory.Open(dir))

    {

        using(var indexWriter = new IndexWriter(directory, analyzer, false, IndexWriter.MaxFieldLength.LIMITED))

        {

            foreach (var index in information)

            {

                var document = new Document();

                document.Add(new Field("Id", index.Id.ToString(), Field.Store.YES, Field.Index.NO));

                document.Add(new Field("Name", index.Name, Field.Store.YES, Field.Index.ANALYZED));

                document.Add(new Field("Description", index.Description, Field.Store.YES, Field.Index.ANALYZED));

                indexWriter.UpdateDocument(new Term("Name", key) ,document);

            }

        }

    }

}
來測試看看

可以看見 Name = 橘子 的索引已經改為我們新準備的資料囉。
再來是刪除!
與更新非常相似,只需要使用deleteDocument()就可以了。
void Delete(string key, DirectoryInfo dir, StandardAnalyzer analyzer)

{

    using (var directory = FSDirectory.Open(dir))

    {

        using (var indexWriter = new IndexWriter(directory, analyzer, false, IndexWriter.MaxFieldLength.LIMITED))

        {

            indexWriter.DeleteDocuments(new Term("Name", key));

            indexWriter.Optimize();

            indexWriter.Commit();

        }

    }

}
再來看看輸出結果
可以發現 Score :0.7554128, Id :2, Name :橘子, Description :醫生給娜美最珍貴的寶藏。這筆索引已經被移除囉!

可以發現筆者於更新或刪除時都是輸入單一字來做異動,除了表達可以對索引做複合更動外,
是因為更新與刪除索引同樣會使用到分詞器(analyzer),
*所輸入的索引值非ID等數值時必須要配合分詞器的分詞能力*才能取得所想異動的索引喔!
Boost是什麼呢?
Boost 分為 :
1. Index Time Boost : 在建立索引時就計算好的值。例如上一篇中提到的(NORMS)
2. Query Time Boost : 查詢時賦與搜尋條件不同的值以影響結果。
我們先來測試Index Time Boost的部分
void CreateIndexWithBoost(List<Product> information, DirectoryInfo dir, StandardAnalyzer analyzer)

{

    using (var directory = FSDirectory.Open(dir))

    {

        using (var indexWriter = new IndexWriter(directory, analyzer, true, IndexWriter.MaxFieldLength.LIMITED))

        {

            foreach (var index in information)

            {

                var document = new Document();

                document.Add(new Field("Id", index.Id.ToString(), Field.Store.YES, Field.Index.NO));

                document.Add(new Field("Name", index.Name, Field.Store.YES, Field.Index.ANALYZED));

                document.Add(new Field("Description", index.Description, Field.Store.YES, Field.Index.ANALYZED));

                document.GetField("Name").Boost = 1.5F;

                document.GetField("Description").Boost = 0.5F;


                indexWriter.AddDocument(document);

            }

            indexWriter.Optimize();

            indexWriter.Commit();

        }

    }

}
並記得重新CreateIndex才能刷新欄位的權重值喔。

很明顯的搜尋出來的Score分數變動了! 但是有沒有發現明明Name欄位的Boost改成了1.5,蘋果的數值卻仍然只有一半呢?
這是因為我們的Search中所參照的欄位為Description,所以在計算Score的時候其實是完全沒有參與的喔!
另外要記得,使用Index Time Boost的時候,欲給予銓重分配的欄位Field.Index不能使用NO_NORMS,不然這個欄位並不會紀錄權重的資料。
再來我們試試看Query Time Boost
void SearchWithBoost(string searchValue, DirectoryInfo dir, StandardAnalyzer analyzer)

{

    using (var directory = FSDirectory.Open(_dir))

    {

        using (var indexSearcher = new IndexSearcher(directory))

        {

            var query = new QueryParser(Lucene.Net.Util.Version.LUCENE_CURRENT, "Name", analyzer).Parse(searchValue);

            var query2 = new QueryParser(Lucene.Net.Util.Version.LUCENE_CURRENT, "Description", analyzer).Parse(searchValue);


            query.Boost = 2.0F;

            query2.Boost = 0.5F;


            BooleanQuery booleanQuery = new BooleanQuery();

            booleanQuery.Add(query, Occur.SHOULD);

            booleanQuery.Add(query2, Occur.SHOULD);


            var hits = indexSearcher.Search(booleanQuery, 20);

            if (!hits.ScoreDocs.Any())

            {

                Console.WriteLine("查無相關結果。");

                return;

            }

            Document doc;

            foreach (var hit in hits.ScoreDocs)

            {

                doc = indexSearcher.Doc(hit.Doc);

                Console.WriteLine("Score :" + hit.Score + ", Id :" + doc.Get("Id") + ", Name :" + doc.Get("Name") + ", Description :" + doc.Get("Description"));

            }

        }

    }

}
這次我們搜尋兩個欄位"Name"與"Description",並使用 BooleanQuery來將其組合。
BooleanQuery中的 Occur有三種參數 : "MUST","MUST_NOT","SHOULD",功能與字面上的意思一樣為"必須要有","必須沒有"與"有無都包含"。

查詢出來的分數就不一樣囉!
以上就是這一次的分享,Lucene是一款容易入門但是要實際上戰場卻又十分複雜的功能,想要達成真正高效能的全文檢索,在前期的文件規畫配置與資料的權重配比都是一個巨大的挑戰。未來會繼續分享關於Lucene的其他有趣功能,還請繼續期待呦!
另外也可以到GitHub下載我的範例來參考呦!
GitHub: https://github.com/g13579112000/Lucene
參考文件:
1. 黑暗大大的全文檢索筆記 : https://blog.darkthread.net/blog/lucene-net-notes-1/
2. Makble : http://makble.com/lucene-field-boost-example
3. CSDN Jack2013tong 文章 : https://blog.csdn.net/huwei2003/article/details/53408388
梨子, 2022/4/20 下午 09:34:03
這裡是我測試 Gmail API 和 Google API 憑証的一些記錄。
如果你的目的是要使用 Gmail Api 取代舊的 Gmail SMTP 來發送通知信,建議你先跳到最下方看一下結論。
如果你是想要看一下 Gmail API 和 Google API 憑証的使用方法,可以看一下這篇文章。
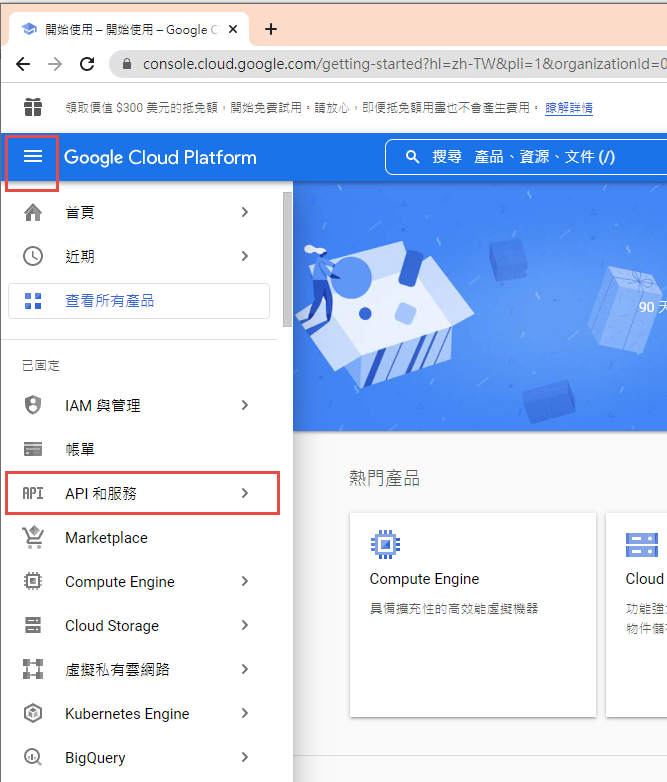
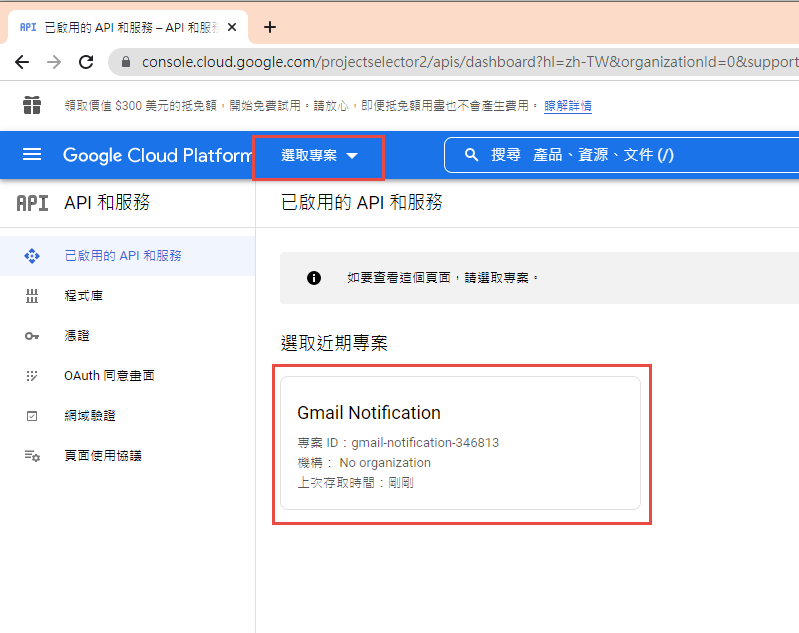
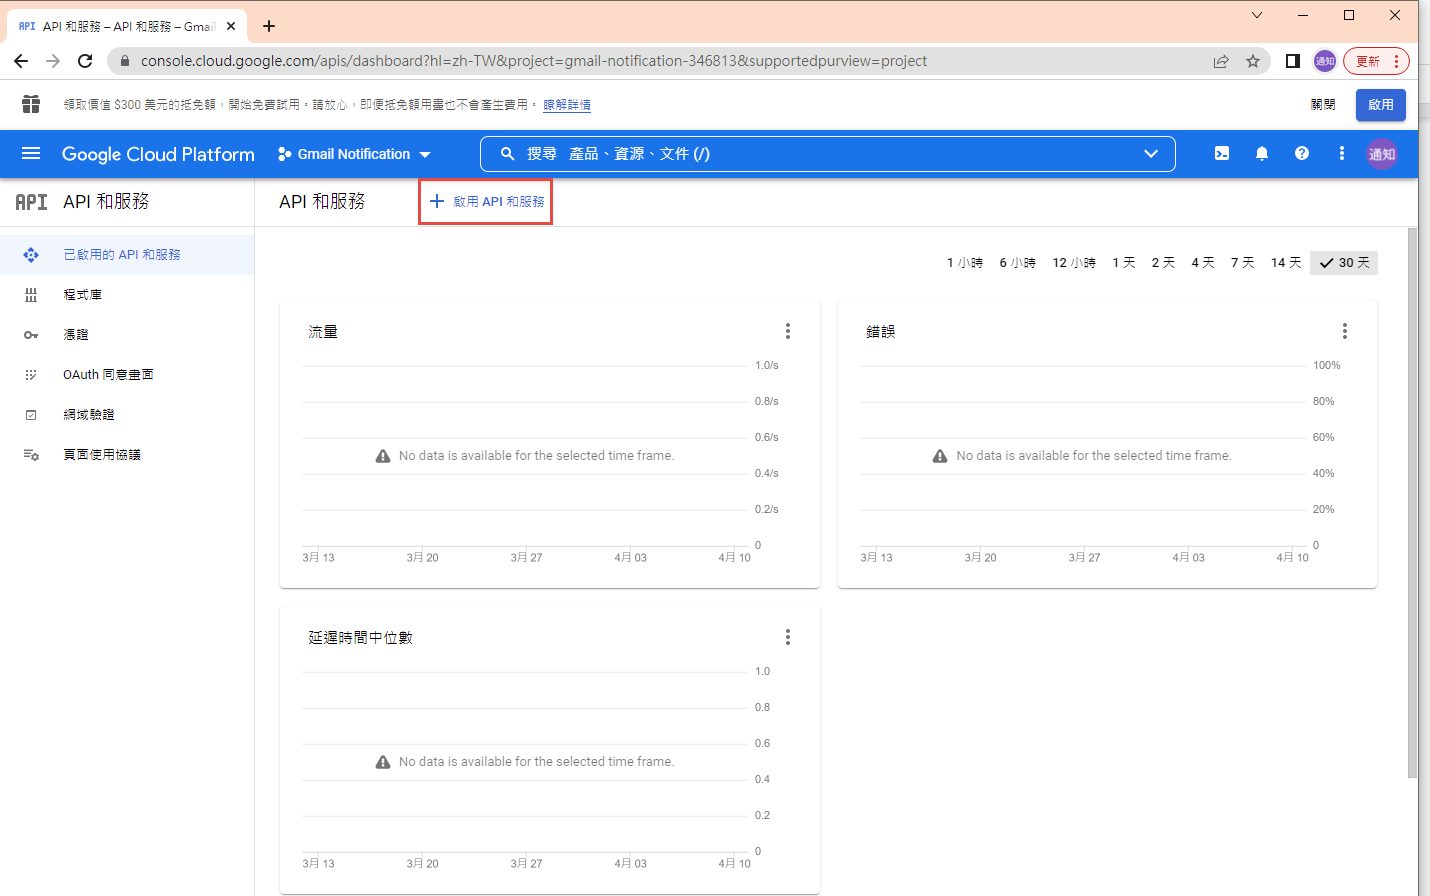
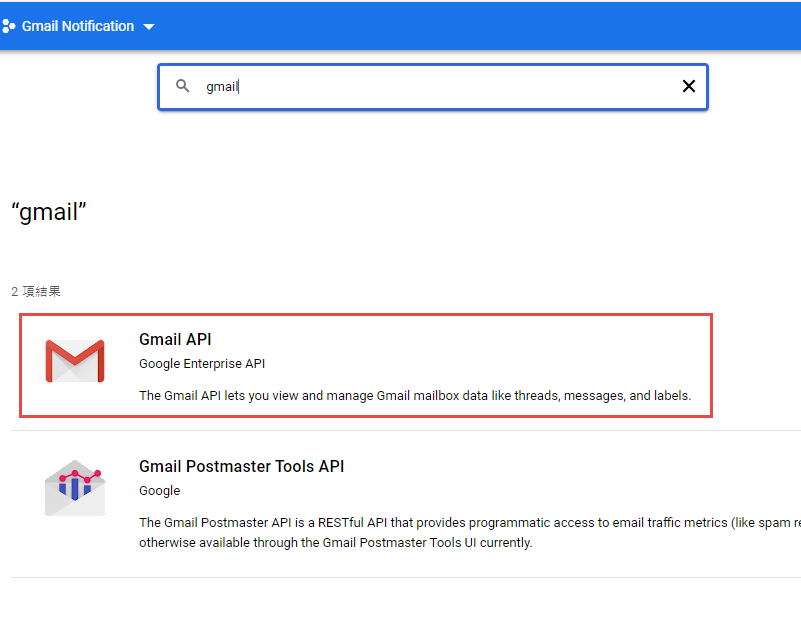
1. 在 google cloud platform 建立新的專案.
https://console.cloud.google.com/
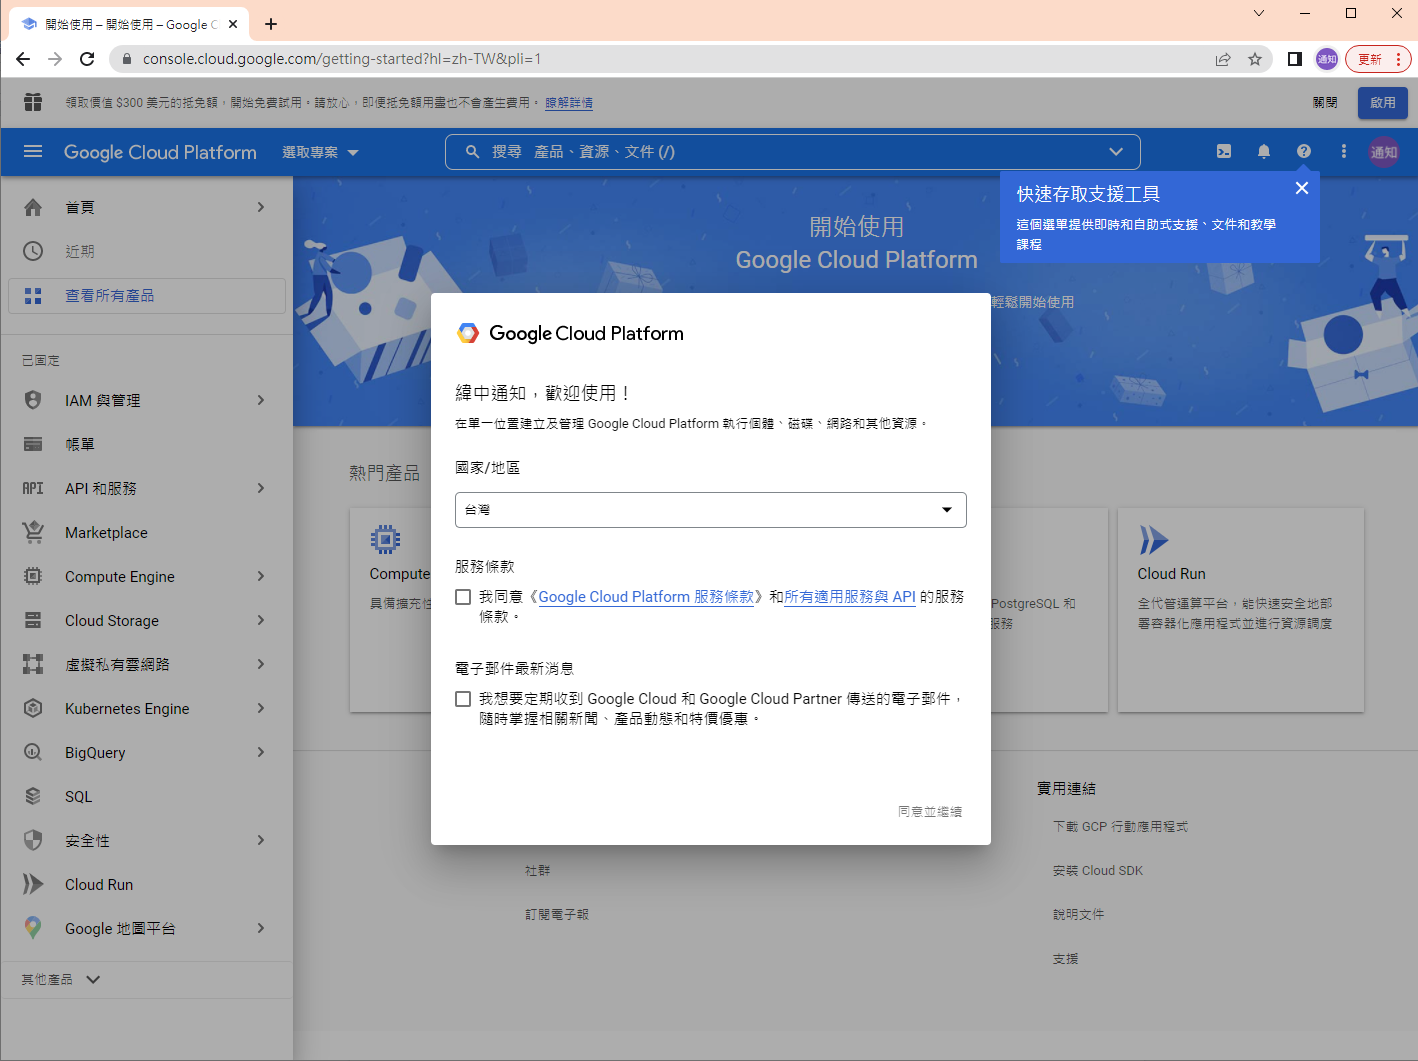
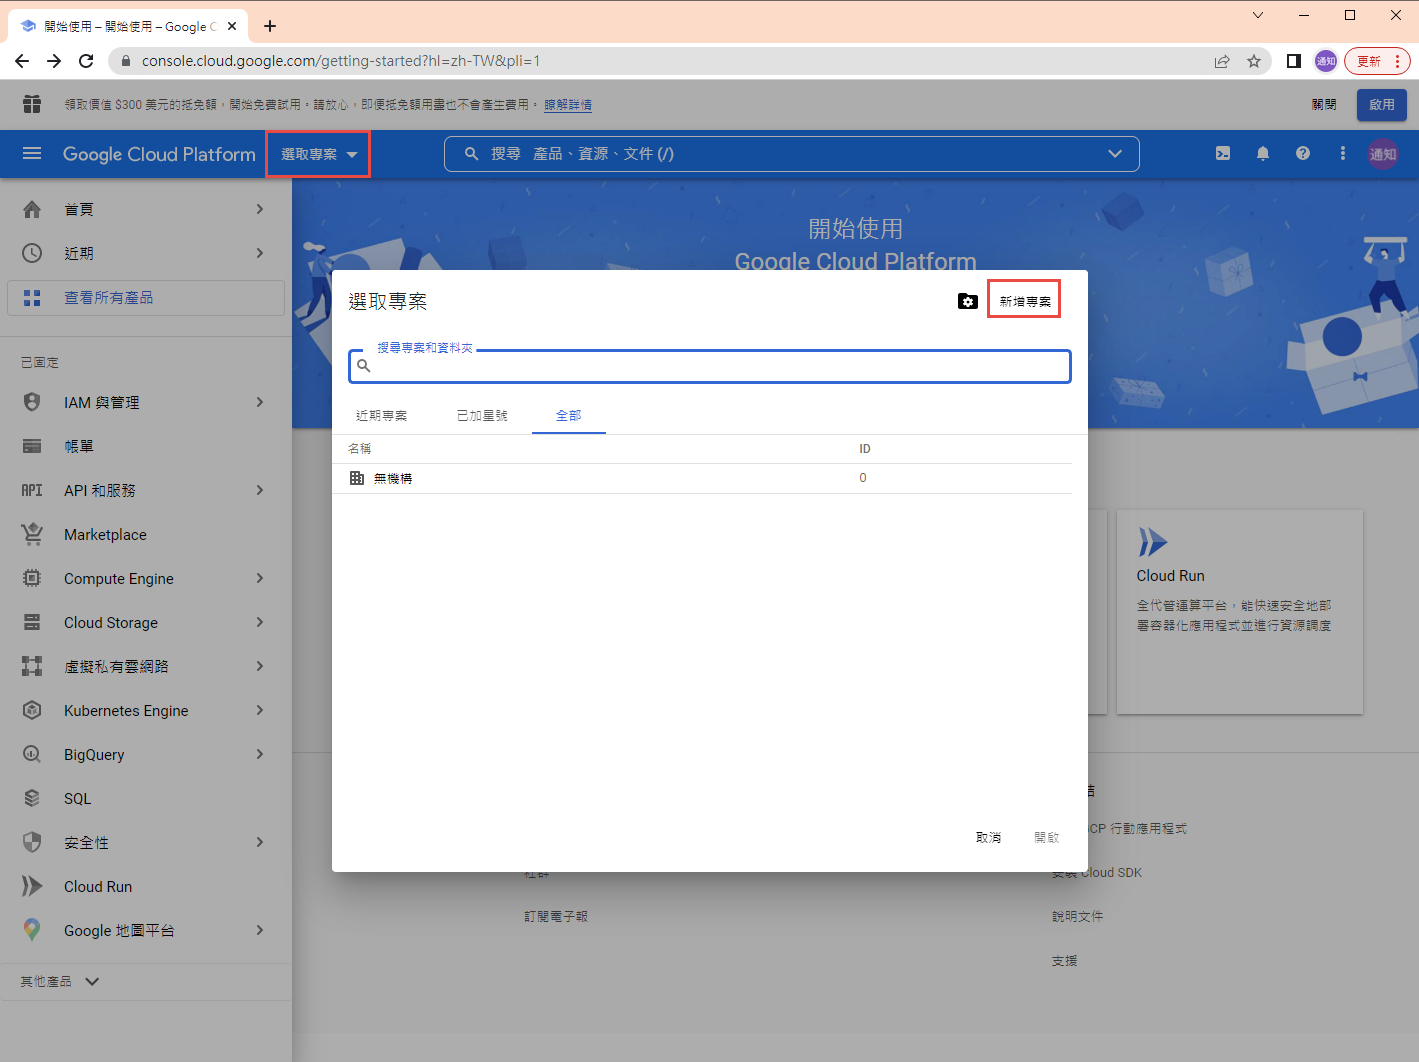
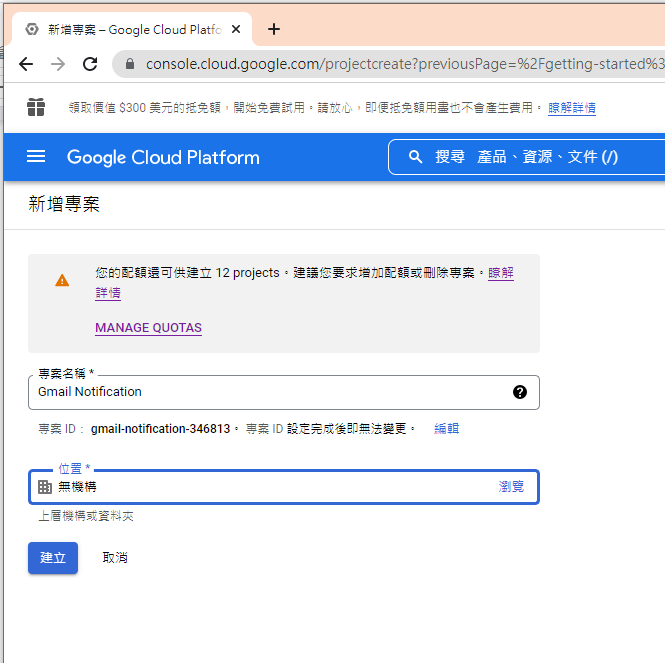
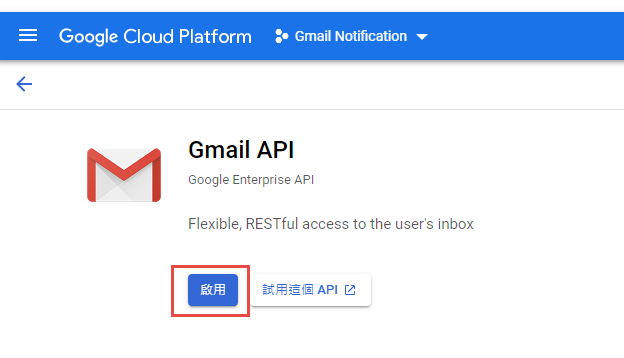
啟用 Gmail API

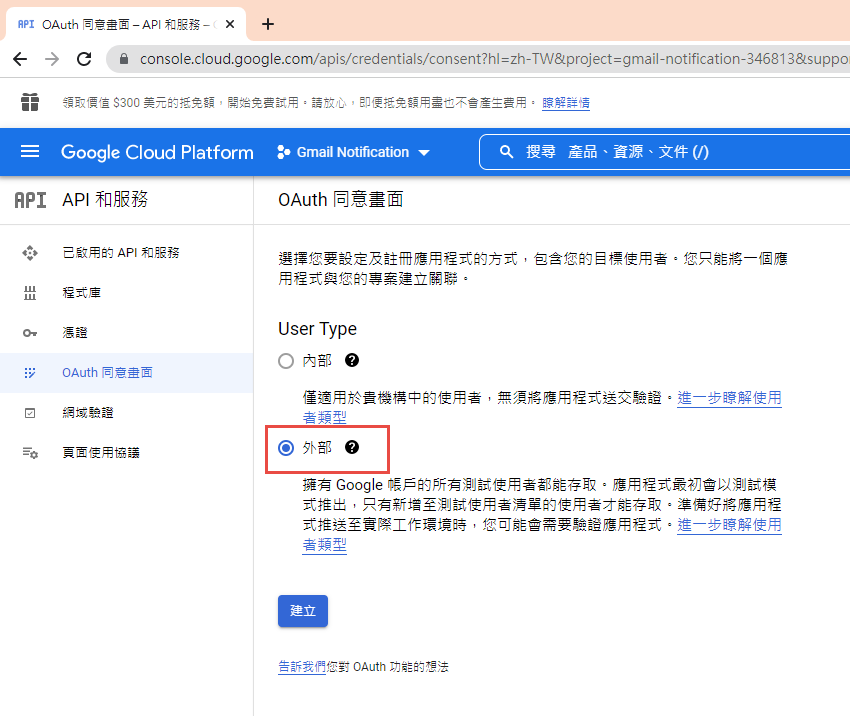
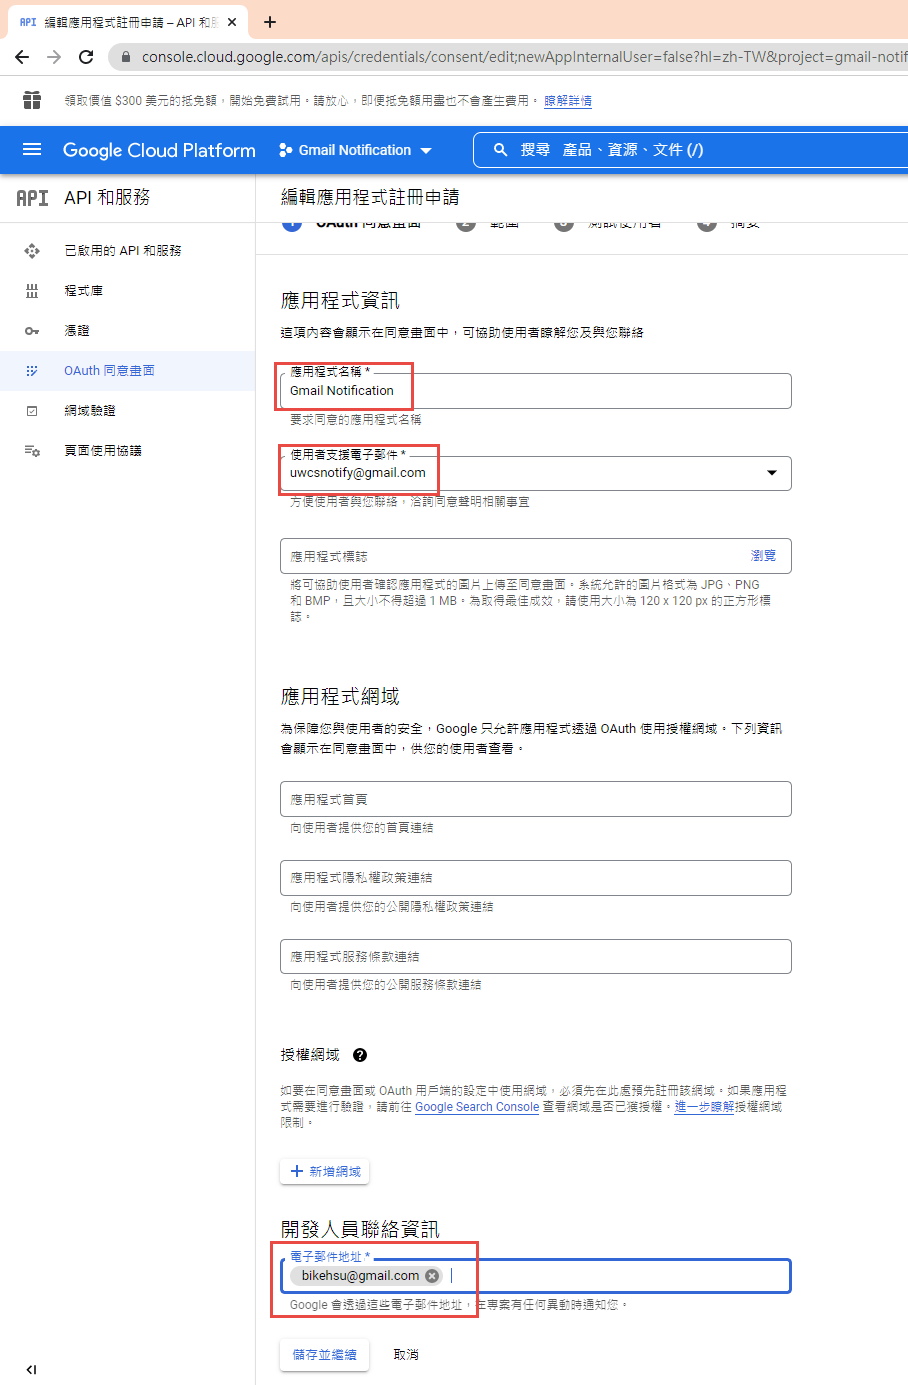
因為我們要透過 OAuth 取得使用者授權,所以要設定使用 OAuth 的同意畫面。
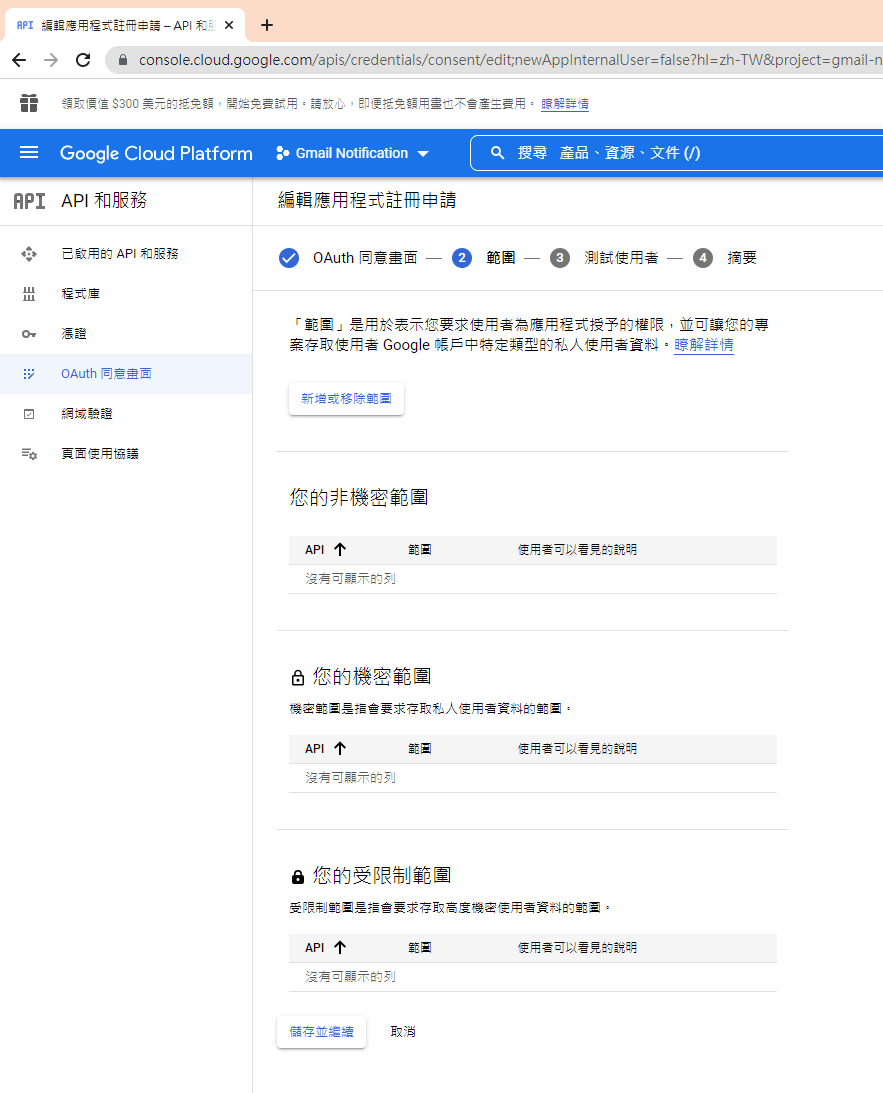
指定授權的範圍
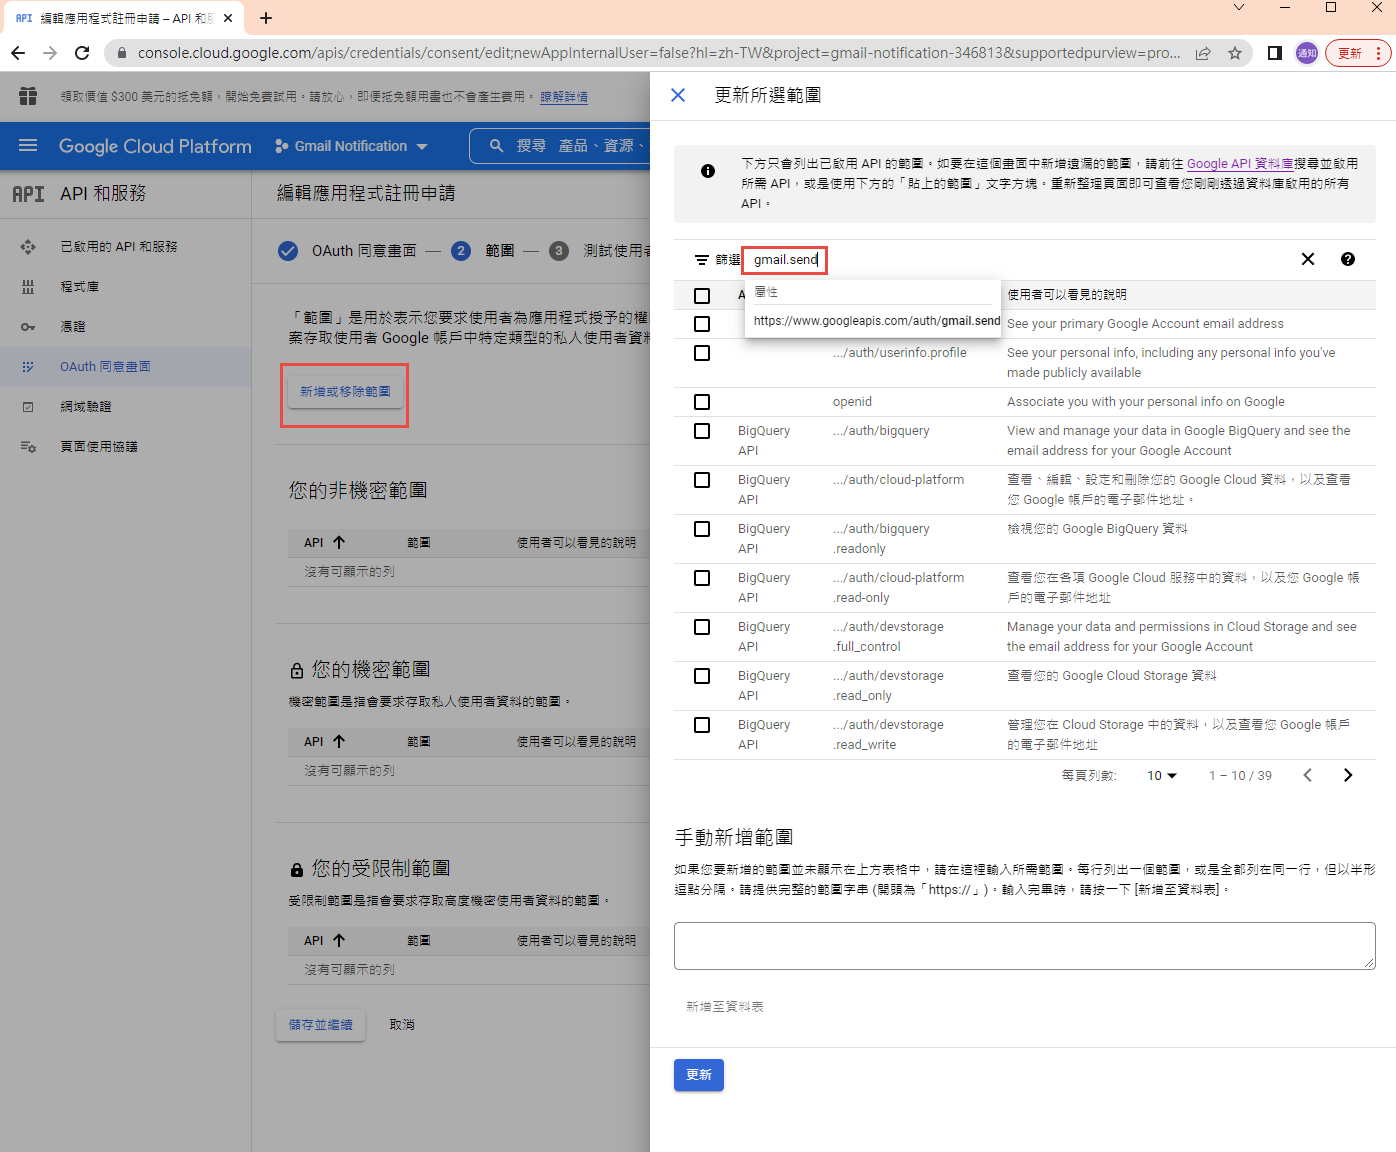
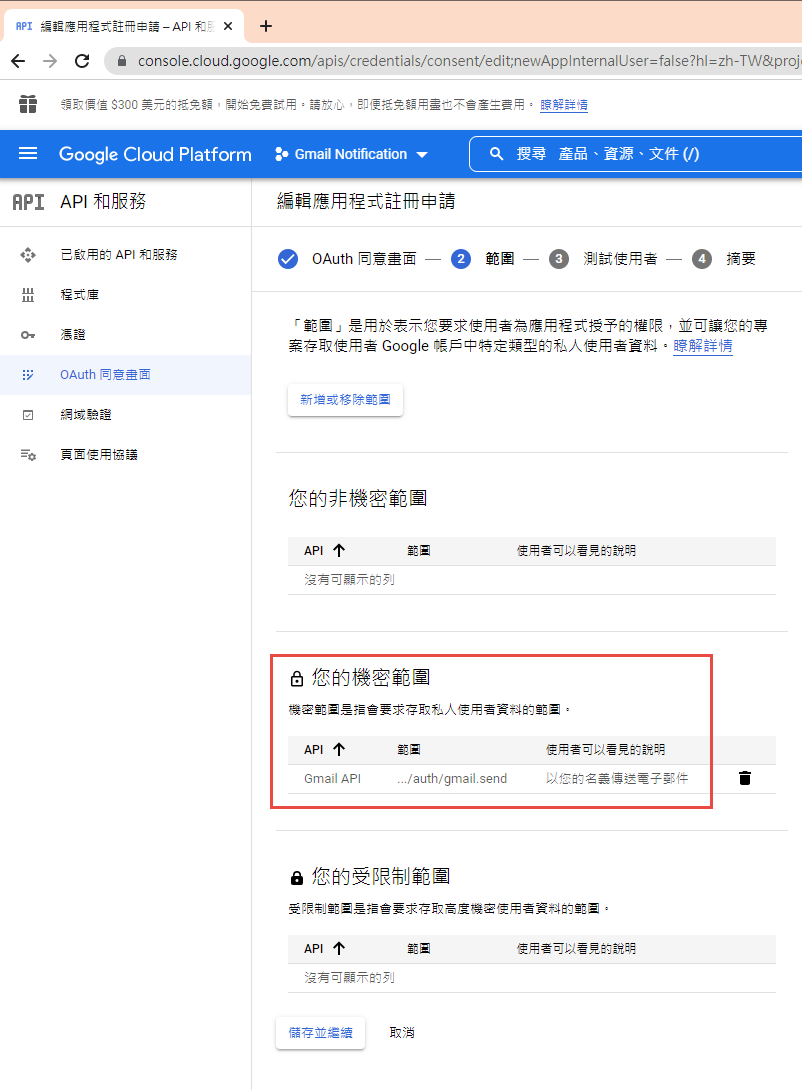
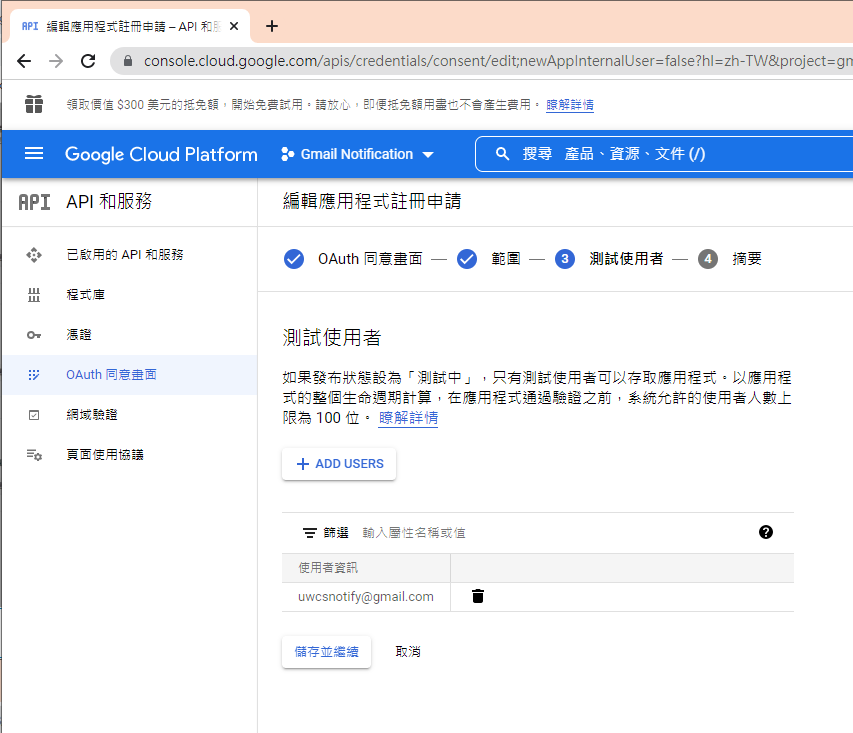
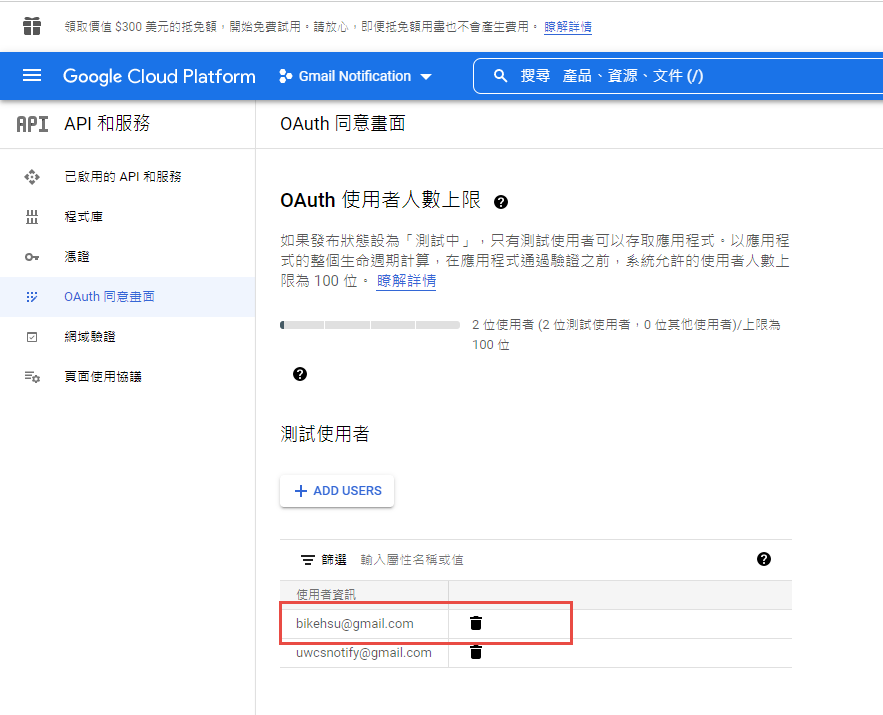
因為剛建立的專案,不會被公開,所以要指定測試使用者
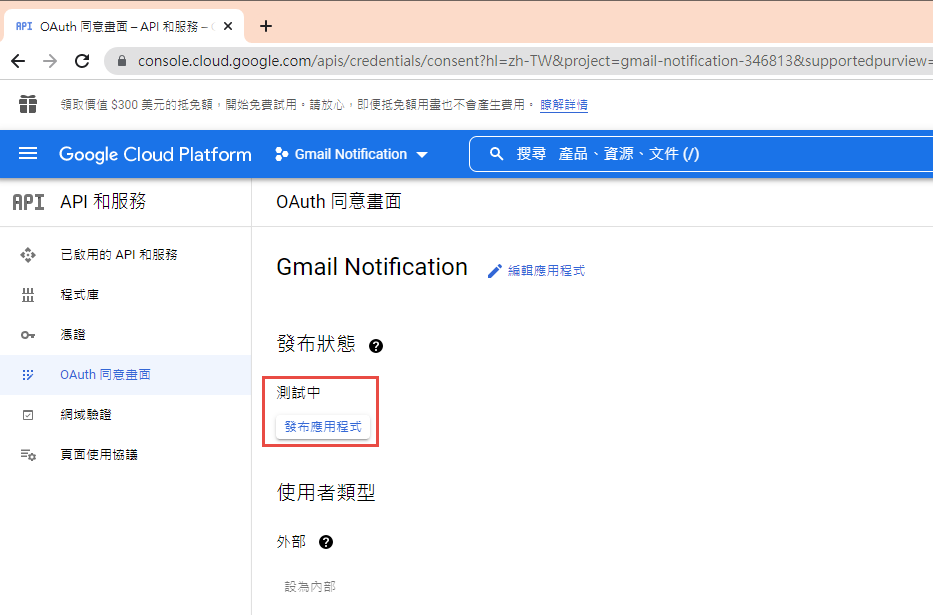
如果要給任意使用者,必需經過發布的流程,但準備工作有點麻煩,所以這次就不發布了。
建立 OAuth 2.0 用戶端 ID 憑証
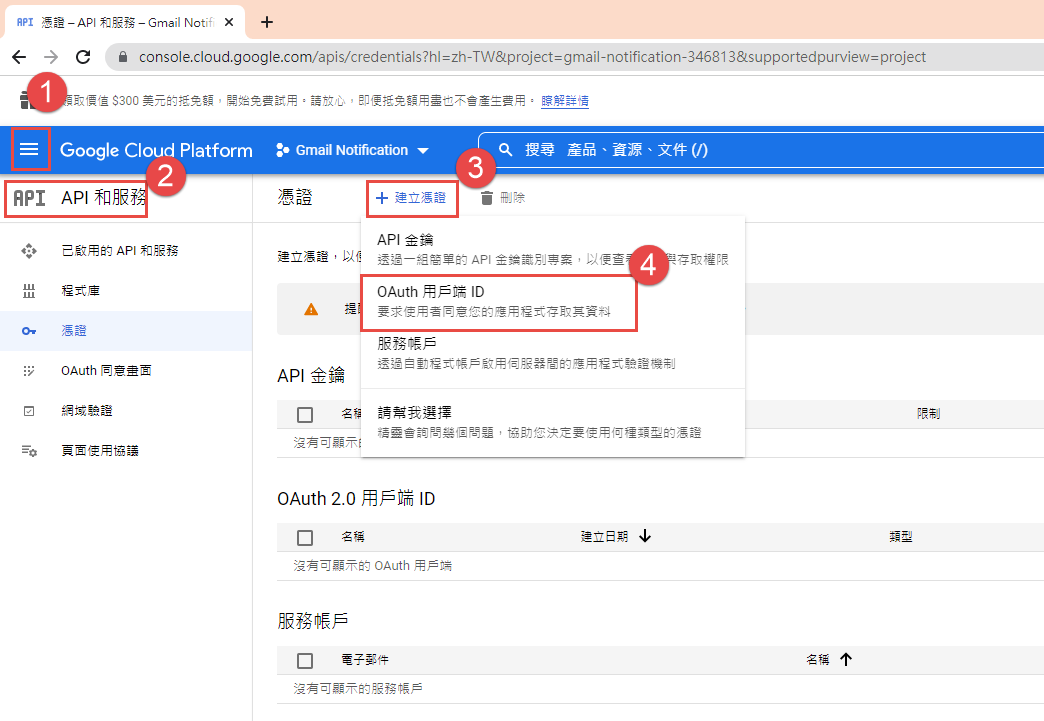
這裡除了名稱外,還有一個設定重導 Uri 的項目。現在不填寫,但稍後要回來補這個資料。
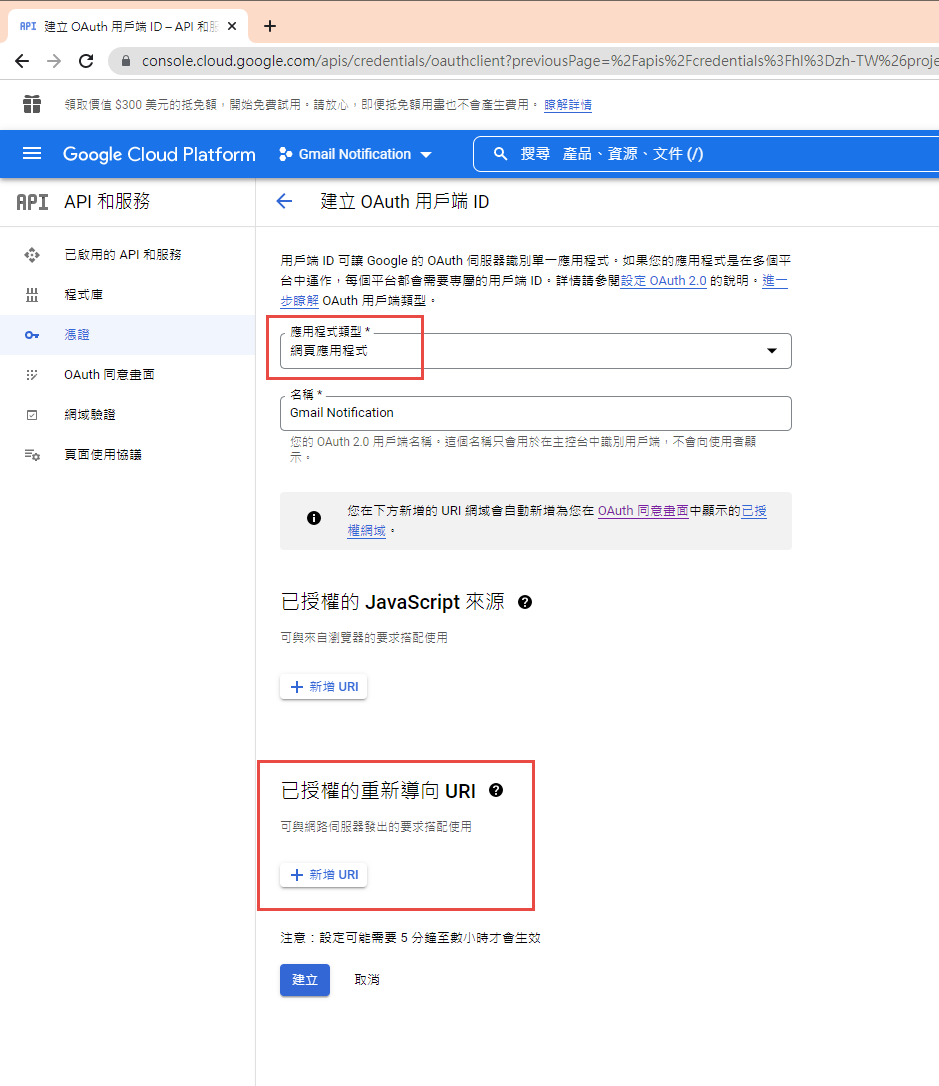
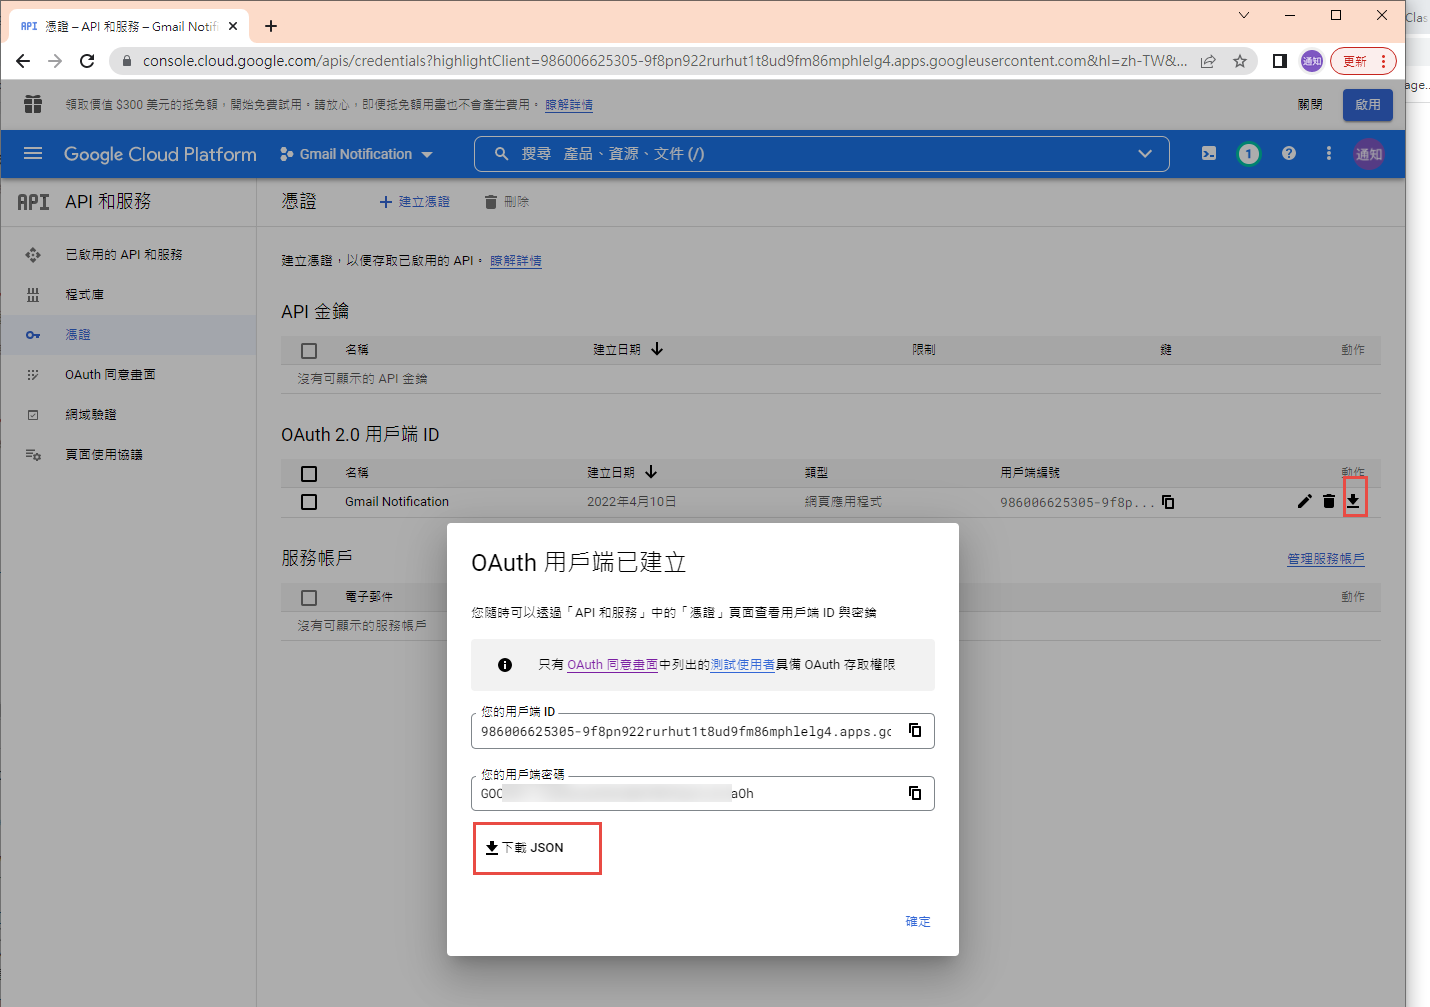
下載 json 之後,命名為 client_secret.json 保留後續使用。
再來就要建立專案了. 用 VS2022 建立一個新專案
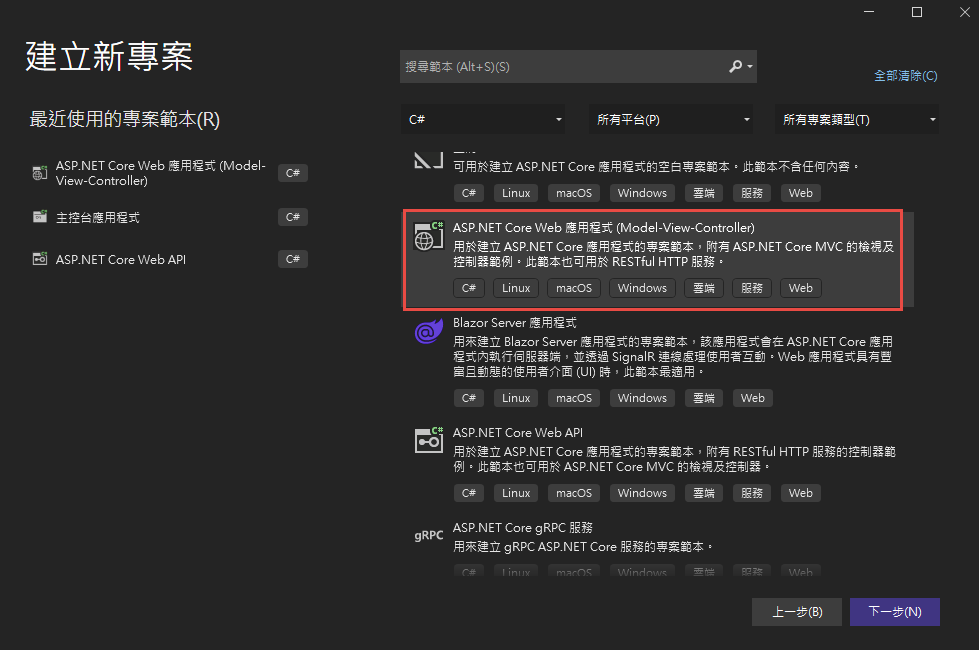
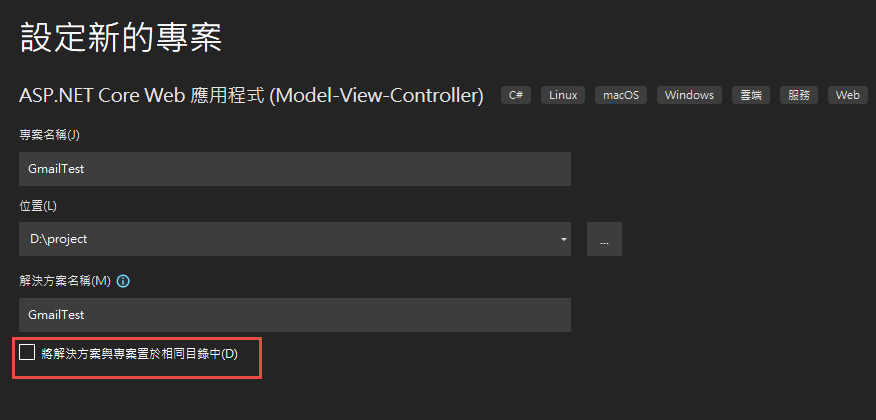
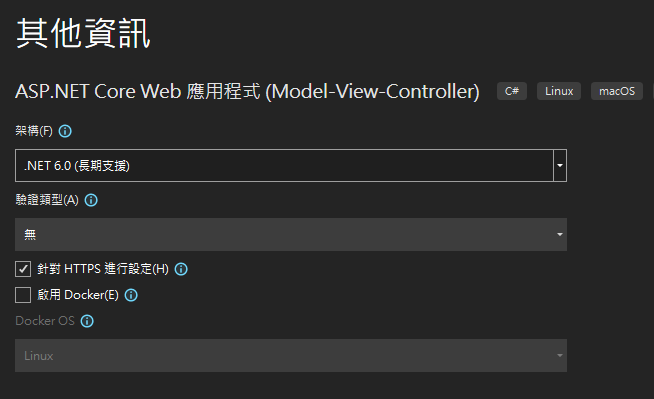
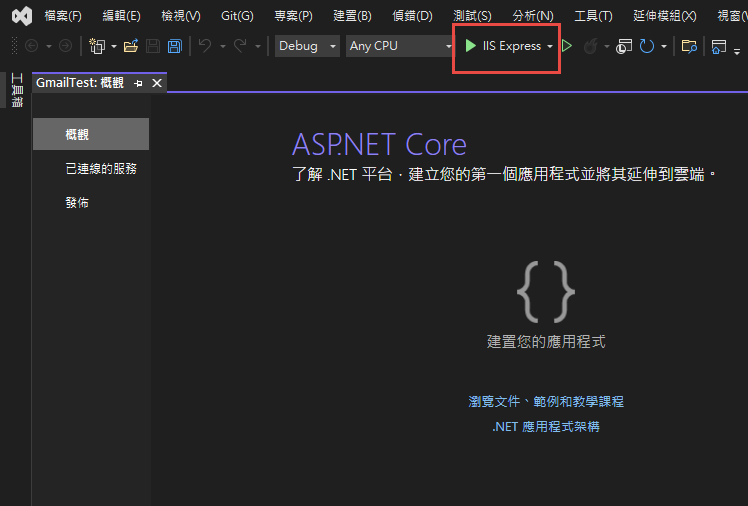
記錄網址, 本測試專案是 https://localhost:44340/ ,請依實際網址為準。
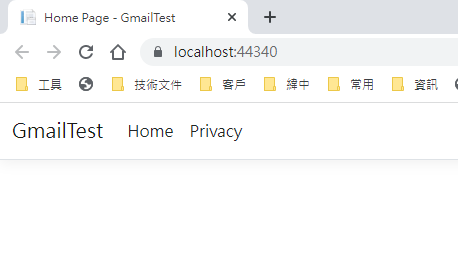
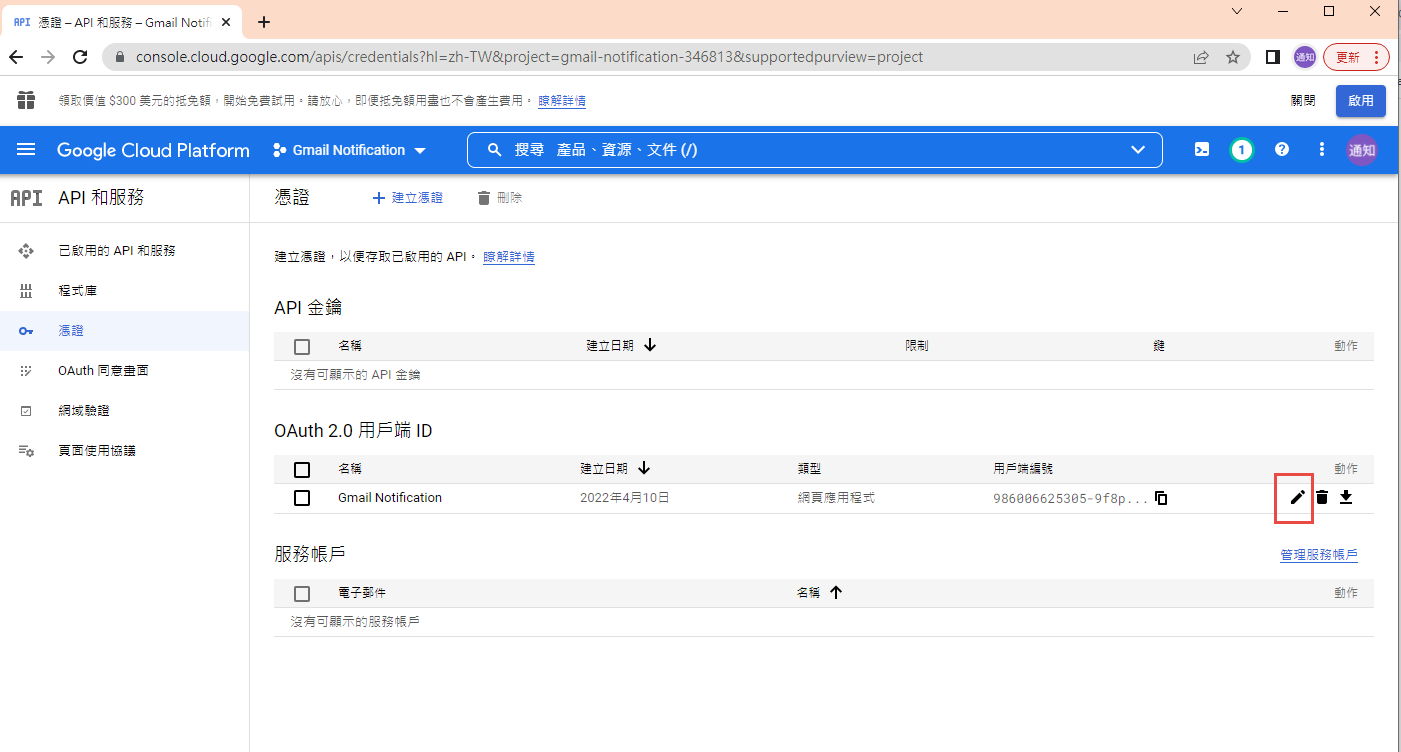
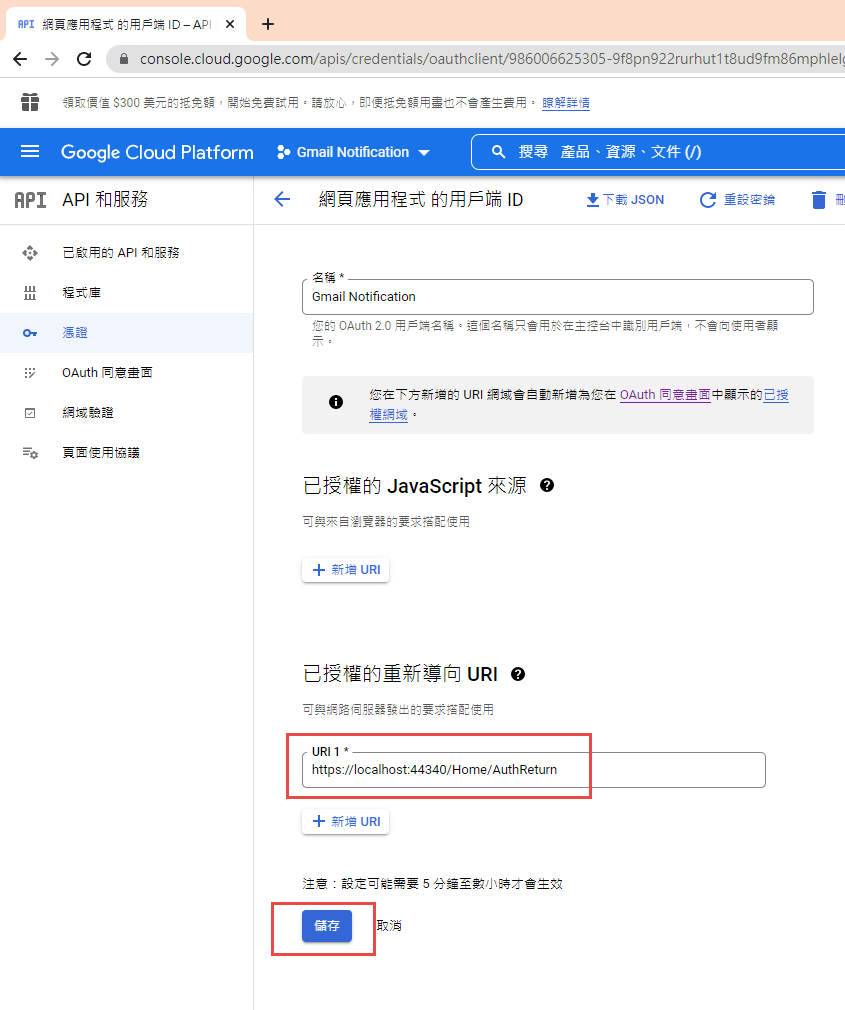
回到 OAuth 2.0 用戶端 ID 的設定頁. 在已授權的重新導向 URI 中填入 https://localhost:44340/Home/AuthReturn (填入的網址依實際專案的狀況,可能會有變化)
在 VS2022 中,使用 Nuget 安裝套件: (有漏的再麻煩和我說)
Google.Apis.Gmail.v1
Google.Apis.Auth
MimeKit (發送 gmail 時使用)
建立認証用的網址:
建立一個 Action, 用來取得認証用的網址:
執行結果:

用 chrome 開啟產生的網址:
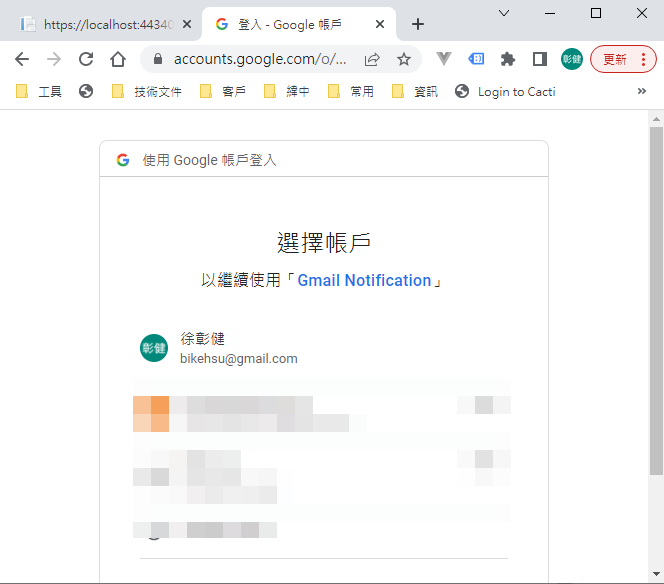
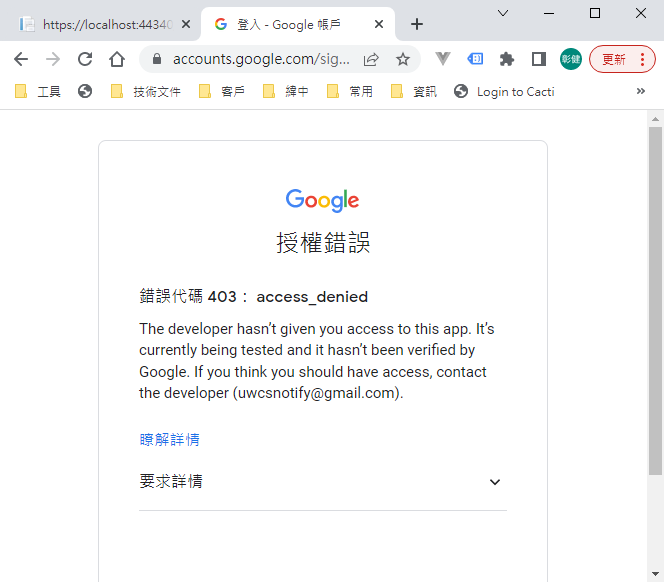
選取任一帳號,如果出現以下錯誤,請回到 "OAuth 同意畫面" 去新增測試使用者
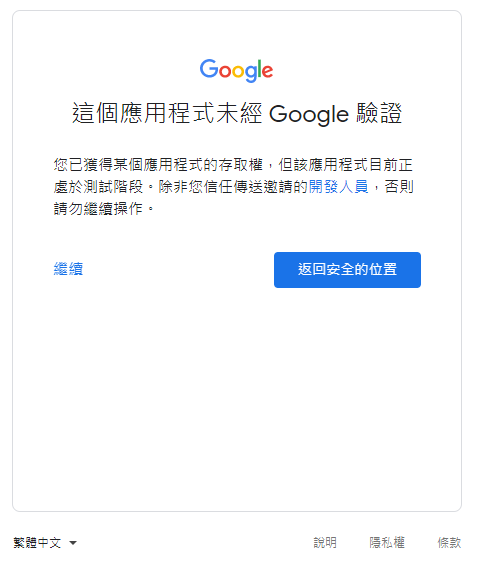
因為應用程式尚未發布,所以會看到警告,勇敢的繼續下去
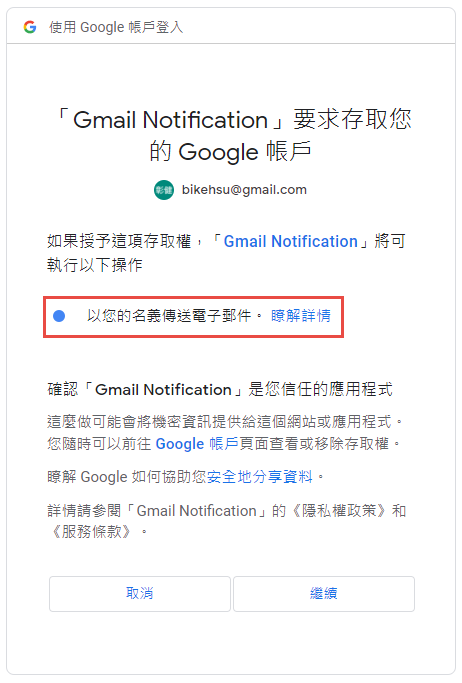
這裡會要求授權使用你的名義發送信件。(這是在程式中取得授權的項目 Scopes 中所指定的)
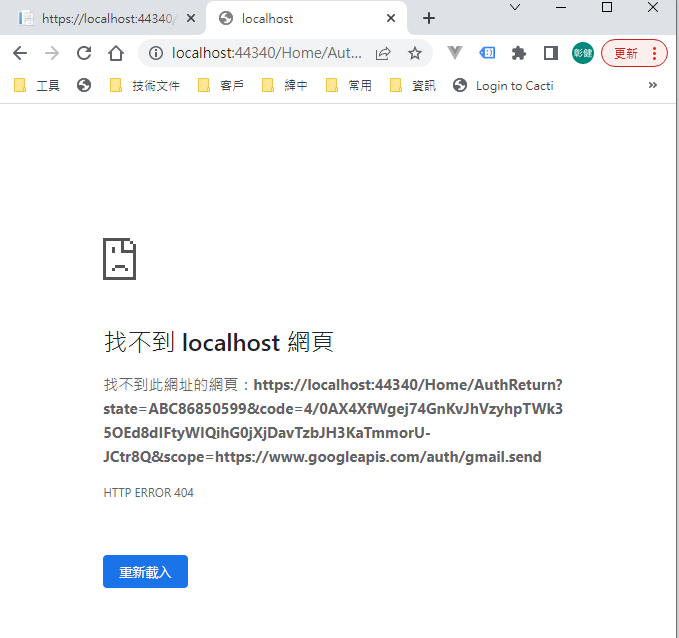
再繼續之後,會被重導至我們在 redirectUri 指定的網址。因為我們尚未完成,所以會看到錯誤,順便也可以看一下,會帶回哪一些參數。有 state, code, scope,共三個。
順便看一下,google 的套件會在 Credentials 的目錄下幫使用者建立一個目錄,在完成驗証前,會先放一個 System.String-oauth_XXX 的檔案,裡面的值和回傳的 state 是一樣的,這個應該是用來驗証回傳資料的。
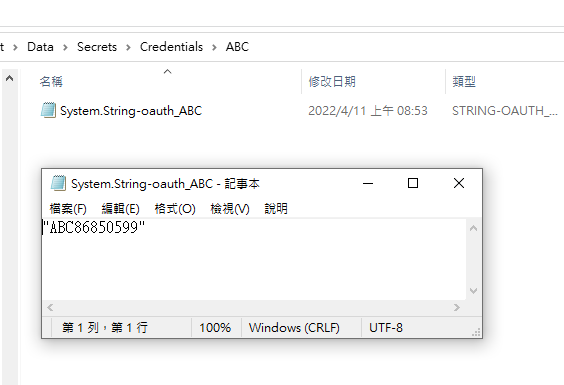
接下來我們要新增 Action "AuthReturn" 如下:
再跑一次上面的流程,最後回到 AuthReturn

在 D:\project\GmailTest\Data\Secrets\Credentials\ABC 裡面會產生一個檔案: 這個就是我們的 token 了。
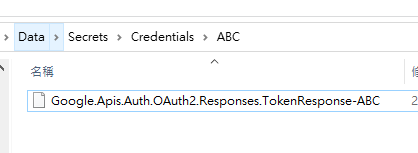
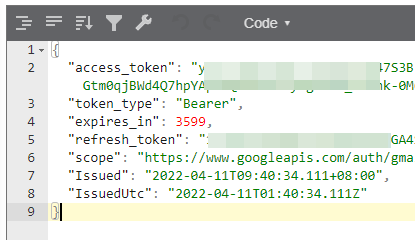
看一下裡面的內容, 有 access_token, refresh_token, scope 等等, 用途應該很好猜了.. 不知道各項目的目途也沒有關係。只要有這個 token 就可以了。
refresh_token 的效期請參考以下文件:
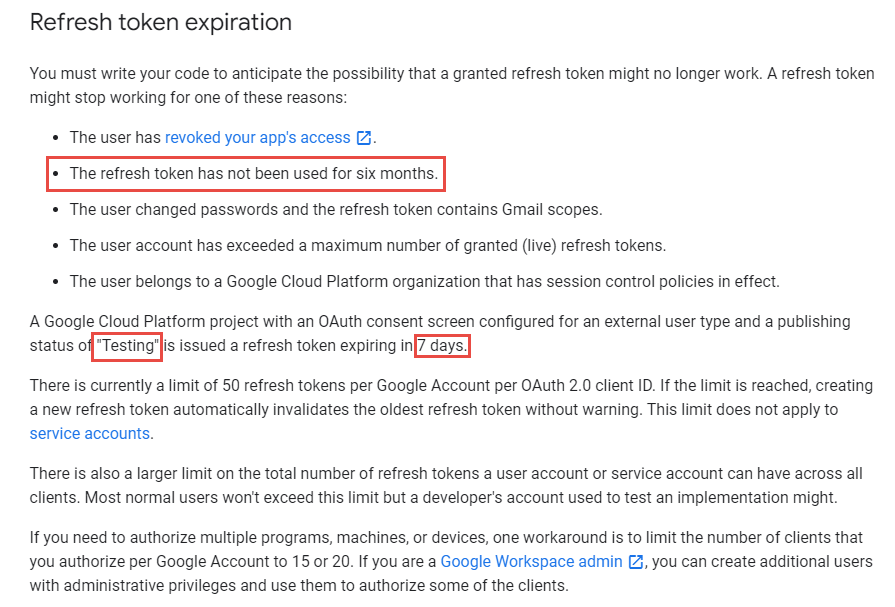
https://developers.google.com/identity/protocols/oauth2 。也可以參考下圖, 若是要用 gmail api 來發送通知信(例如連絡我們),紅色的地方是比較令人困擾的,例如 6 個月以上,沒有人留言,原來留下的 refresh_token 就失效了。使用者必需重新建立一個 refresh_token 。
最後來使用 gmail api 發送通知信, 直接看程式碼如下: 在這個過程中遇到最大的問題除了憑証問題之外,另一個問題是編碼。直到最後找到可以用 MimeKit 把 System.Net.Mail.MailMessage 編碼成 Gmail API 的格式才解決。程式碼如下:
收到的信件:
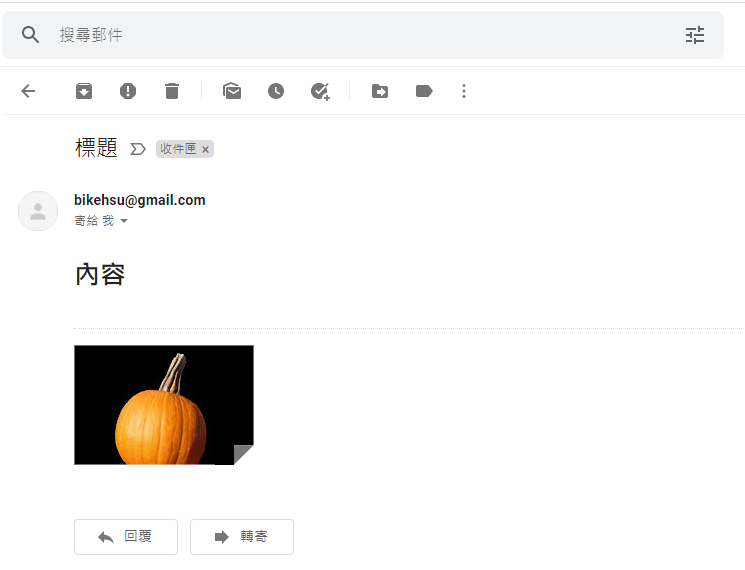
結論:
使用 Gmail API 最大的原因是要增加安全性,和舊的 smtp 不同的地方是,使用 gmail api 之後,客戶不需要提供 gmail 的帳號和密碼就可以讓系統使用 gmail 發送信件,不過由於 refresh_token 的效期問題,可能會造成無法發送通知信而沒有任何人發現的情況,整個實用性會變的很低。
另一個還沒有測試的部份是應用程的啟用。這個審核不知道會不很麻煩,不過可以而知的時,整個流程會花更多的時間。
取代的做法: 可能要改用 Amazon 的 SES 來寄信,而且為了避免每個小網站都要跑 SES 的建立流程,準備來寫一個 API 給各網站使用,可以發送簡單的通知信。
以上的程式碼可以在這裡下載: https://github.com/bikehsu/GmailTest
如果你的目的是要使用 Gmail Api 取代舊的 Gmail SMTP 來發送通知信,建議你先跳到最下方看一下結論。
如果你是想要看一下 Gmail API 和 Google API 憑証的使用方法,可以看一下這篇文章。
1. 在 google cloud platform 建立新的專案.
https://console.cloud.google.com/


啟用 Gmail API


因為我們要透過 OAuth 取得使用者授權,所以要設定使用 OAuth 的同意畫面。

指定授權的範圍


因為剛建立的專案,不會被公開,所以要指定測試使用者

如果要給任意使用者,必需經過發布的流程,但準備工作有點麻煩,所以這次就不發布了。

建立 OAuth 2.0 用戶端 ID 憑証

這裡除了名稱外,還有一個設定重導 Uri 的項目。現在不填寫,但稍後要回來補這個資料。


下載 json 之後,命名為 client_secret.json 保留後續使用。
再來就要建立專案了. 用 VS2022 建立一個新專案


記錄網址, 本測試專案是 https://localhost:44340/ ,請依實際網址為準。

回到 OAuth 2.0 用戶端 ID 的設定頁. 在已授權的重新導向 URI 中填入 https://localhost:44340/Home/AuthReturn (填入的網址依實際專案的狀況,可能會有變化)


在 VS2022 中,使用 Nuget 安裝套件: (有漏的再麻煩和我說)
Google.Apis.Gmail.v1
Google.Apis.Auth
MimeKit (發送 gmail 時使用)
建立認証用的網址:
建立一個 Action, 用來取得認証用的網址:
        /// <summary>

        /// 取得授權的項目

        /// </summary>

        static string[] Scopes = { GmailService.Scope.GmailSend };


        // 和登入 google 的帳號無關

        // 任意值,若未來有使用者認証,可使用使用者編號或登入帳號。

        string Username = "ABC";


        /// <summary>

        /// 存放 client_secret 和 credential 的地方

        /// </summary>

        string SecretPath = @"D:\project\GmailTest\Data\Secrets";


        /// <summary>

        /// 認証完成後回傳的網址, 必需和 OAuth 2.0 Client Id 中填寫的 "已授權的重新導向 URI" 相同。

        /// </summary>

        string RedirectUri = $"https://localhost:44340/Home/AuthReturn";


        /// <summary>

        /// 取得認証用的網址

        /// </summary>

        /// <returns></returns>

        public async Task<string> GetAuthUrl()

        {

            using (var stream = new FileStream(Path.Combine(SecretPath, "client_secret.json"), FileMode.Open, FileAccess.Read))

            {

                FileDataStore dataStore = null;

                var credentialRoot = Path.Combine(SecretPath, "Credentials");

                if (!Directory.Exists(credentialRoot))

                {

                    Directory.CreateDirectory(credentialRoot);

                }


                //存放 credential 的地方,每個 username 會建立一個目錄。

                string filePath = Path.Combine(credentialRoot, Username);

                dataStore = new FileDataStore(filePath);


                IAuthorizationCodeFlow flow = new GoogleAuthorizationCodeFlow(new GoogleAuthorizationCodeFlow.Initializer

                {

                    ClientSecrets = GoogleClientSecrets.Load(stream).Secrets,

                    Scopes = Scopes,

                    DataStore = dataStore

                });


                var authResult = await new AuthorizationCodeWebApp(flow, RedirectUri, Username)

                .AuthorizeAsync(Username, CancellationToken.None);


                return authResult.RedirectUri;

            }

        }
執行結果:

用 chrome 開啟產生的網址:

選取任一帳號,如果出現以下錯誤,請回到 "OAuth 同意畫面" 去新增測試使用者


因為應用程式尚未發布,所以會看到警告,勇敢的繼續下去

這裡會要求授權使用你的名義發送信件。(這是在程式中取得授權的項目 Scopes 中所指定的)

再繼續之後,會被重導至我們在 redirectUri 指定的網址。因為我們尚未完成,所以會看到錯誤,順便也可以看一下,會帶回哪一些參數。有 state, code, scope,共三個。

順便看一下,google 的套件會在 Credentials 的目錄下幫使用者建立一個目錄,在完成驗証前,會先放一個 System.String-oauth_XXX 的檔案,裡面的值和回傳的 state 是一樣的,這個應該是用來驗証回傳資料的。

接下來我們要新增 Action "AuthReturn" 如下:
        public async Task<string> AuthReturn(AuthorizationCodeResponseUrl authorizationCode)

        {

            string[] scopes = new[] { GmailService.Scope.GmailSend };


            using (var stream = new FileStream(Path.Combine(SecretPath, "client_secret.json"), FileMode.Open, FileAccess.Read))

            {

                //確認 credential 的目錄已建立.

                var credentialRoot = Path.Combine(SecretPath, "Credentials");

                if (!Directory.Exists(credentialRoot))

                {

                    Directory.CreateDirectory(credentialRoot);

                }


                //暫存憑証用目錄

                string tempPath = Path.Combine(credentialRoot, authorizationCode.State);


                IAuthorizationCodeFlow flow = new GoogleAuthorizationCodeFlow(

                new GoogleAuthorizationCodeFlow.Initializer

                {

                    ClientSecrets = GoogleClientSecrets.Load(stream).Secrets,

                    Scopes = scopes,

                    DataStore = new FileDataStore(tempPath)

                });


                //這個動作應該是要把 code 換成 token

                await flow.ExchangeCodeForTokenAsync(Username, authorizationCode.Code, RedirectUri, CancellationToken.None).ConfigureAwait(false);


                if (!string.IsNullOrWhiteSpace(authorizationCode.State))

                {

                    string newPath = Path.Combine(credentialRoot, Username);

                    if (tempPath.ToLower() != newPath.ToLower())

                    {

                        if (Directory.Exists(newPath))

                            Directory.Delete(newPath, true);


                        Directory.Move(tempPath, newPath);

                    }

                }


                return "OK";

            }

        }
再跑一次上面的流程,最後回到 AuthReturn

在 D:\project\GmailTest\Data\Secrets\Credentials\ABC 裡面會產生一個檔案: 這個就是我們的 token 了。

看一下裡面的內容, 有 access_token, refresh_token, scope 等等, 用途應該很好猜了.. 不知道各項目的目途也沒有關係。只要有這個 token 就可以了。

refresh_token 的效期請參考以下文件:
https://developers.google.com/identity/protocols/oauth2 。也可以參考下圖, 若是要用 gmail api 來發送通知信(例如連絡我們),紅色的地方是比較令人困擾的,例如 6 個月以上,沒有人留言,原來留下的 refresh_token 就失效了。使用者必需重新建立一個 refresh_token 。

最後來使用 gmail api 發送通知信, 直接看程式碼如下: 在這個過程中遇到最大的問題除了憑証問題之外,另一個問題是編碼。直到最後找到可以用 MimeKit 把 System.Net.Mail.MailMessage 編碼成 Gmail API 的格式才解決。程式碼如下:
        public async Task<bool> SendTestMail()

        {

            var service = await GetGmailService();


            GmailMessage message = new GmailMessage();

            message.Subject = "標題";

            message.Body = $"<h1>內容</h1>";

            message.FromAddress = "bikehsu@gmail.com";

            message.IsHtml = true;

            message.ToRecipients = "bikehsu@gmail.com";

            message.Attachments = new List<Attachment>();


            string filePath = @"C:\Users\bike\Pictures\Vegetable_pumpkin.jpg";    //要附加的檔案

            Attachment attachment1 = new Attachment(filePath);

            message.Attachments.Add(attachment1);


            SendEmail(message, service);

            Console.WriteLine("OK");


            return true;

        }


        async Task<GmailService> GetGmailService()

        {

            UserCredential credential = null;


            var credentialRoot = Path.Combine(SecretPath, "Credentials");

            if (!Directory.Exists(credentialRoot))

            {

                Directory.CreateDirectory(credentialRoot);

            }


            string filePath = Path.Combine(credentialRoot, Username);


            using (var stream = new FileStream(Path.Combine(SecretPath, "client_secret.json"), FileMode.Open, FileAccess.Read))

            {

                credential = await GoogleWebAuthorizationBroker.AuthorizeAsync(

                GoogleClientSecrets.Load(stream).Secrets,

                Scopes,

                Username,

                CancellationToken.None,

                new FileDataStore(filePath));

            }


            var service = new GmailService(new BaseClientService.Initializer()

            {

                HttpClientInitializer = credential,

                ApplicationName = "Send Mail",

            });


            return service;

        }


        public class GmailMessage

        {

            public string FromAddress { get; set; }

            public string ToRecipients { get; set; }


            public string Subject { get; set; }

            public string Body { get; set; }

            public bool IsHtml { get; set; }


            public List<System.Net.Mail.Attachment> Attachments { get; set; }

        }


        public static void SendEmail(GmailMessage email, GmailService service)

        {

            var mailMessage = new System.Net.Mail.MailMessage();

            mailMessage.From = new System.Net.Mail.MailAddress(email.FromAddress);

            mailMessage.To.Add(email.ToRecipients);

            mailMessage.ReplyToList.Add(email.FromAddress);

            mailMessage.Subject = email.Subject;

            mailMessage.Body = email.Body;

            mailMessage.IsBodyHtml = email.IsHtml;


            if (email.Attachments != null)

            {

                foreach (System.Net.Mail.Attachment attachment in email.Attachments)

                {

                    mailMessage.Attachments.Add(attachment);

                }

            }


            var mimeMessage = MimeKit.MimeMessage.CreateFromMailMessage(mailMessage);


            var gmailMessage = new Google.Apis.Gmail.v1.Data.Message

            {

                Raw = Encode(mimeMessage)

            };


            Google.Apis.Gmail.v1.UsersResource.MessagesResource.SendRequest request = service.Users.Messages.Send(gmailMessage, "me");


            request.Execute();

        }


        public static string Encode(MimeMessage mimeMessage)

        {

            using (MemoryStream ms = new MemoryStream())

            {

                mimeMessage.WriteTo(ms);

                return Convert.ToBase64String(ms.GetBuffer())

                    .TrimEnd('=')

                    .Replace('+', '-')

                    .Replace('/', '_');

            }

        }
收到的信件:

結論:
使用 Gmail API 最大的原因是要增加安全性,和舊的 smtp 不同的地方是,使用 gmail api 之後,客戶不需要提供 gmail 的帳號和密碼就可以讓系統使用 gmail 發送信件,不過由於 refresh_token 的效期問題,可能會造成無法發送通知信而沒有任何人發現的情況,整個實用性會變的很低。
另一個還沒有測試的部份是應用程的啟用。這個審核不知道會不很麻煩,不過可以而知的時,整個流程會花更多的時間。
取代的做法: 可能要改用 Amazon 的 SES 來寄信,而且為了避免每個小網站都要跑 SES 的建立流程,準備來寫一個 API 給各網站使用,可以發送簡單的通知信。
以上的程式碼可以在這裡下載: https://github.com/bikehsu/GmailTest
Bike, 2022/4/10 下午 09:31:15
環境說明:
AD Server: dc1 (192.168.101.109)
PC: pc110 (192.168.101.110)
PC: pc111 (192.168.101.111)
第一步,把 PC 加入 AD, 這個算是基本操作,網路上說明很多, 就不再截圖了。不過在這裡還是遇到了第一個問題,解決過程請參考另一份文件: https://blog.uwinfo.com.tw/Article.aspx?Id=486
第二步,在 Visual Studio 的測試環境中測試:
一開始是使用 .Net 6.0 來實作,沒想到找到的文件都是 .Net Core 3.1 的,所以先用 .Net Core 3.1 實做了一次,後來改用 .Net 6.0 實作才成功。使用 .Net 6.0 實作的過程如下:
1. 建立一個 MVC 的標準專案:
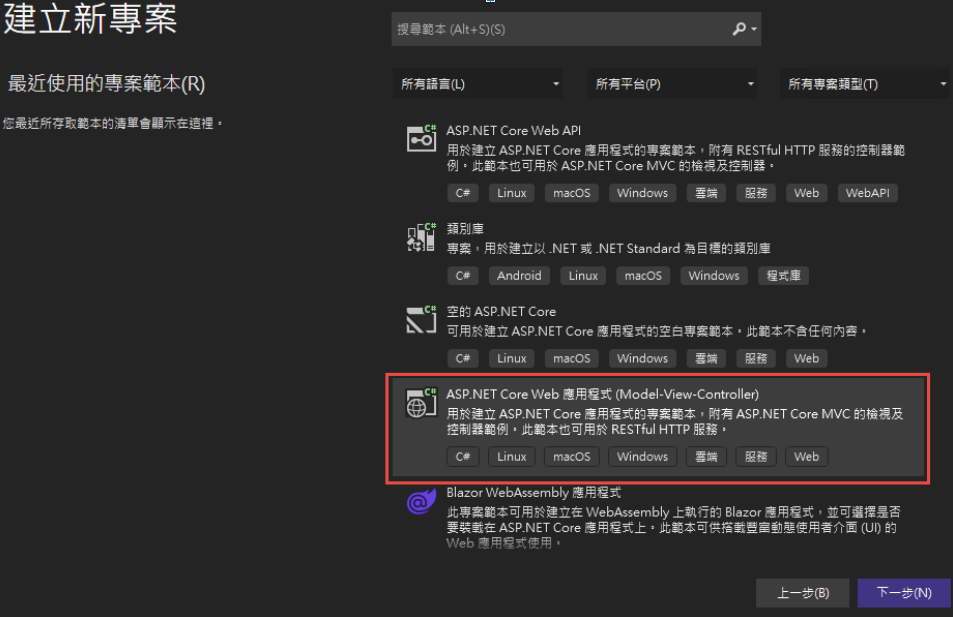
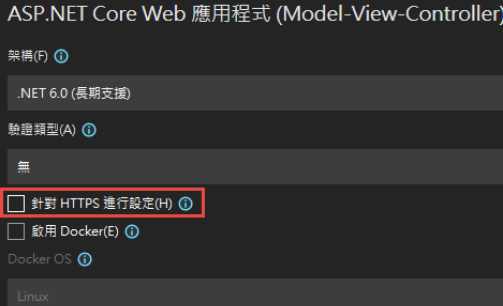
為了避免憑証問題,所以拿掉了 HTTPS 的設定
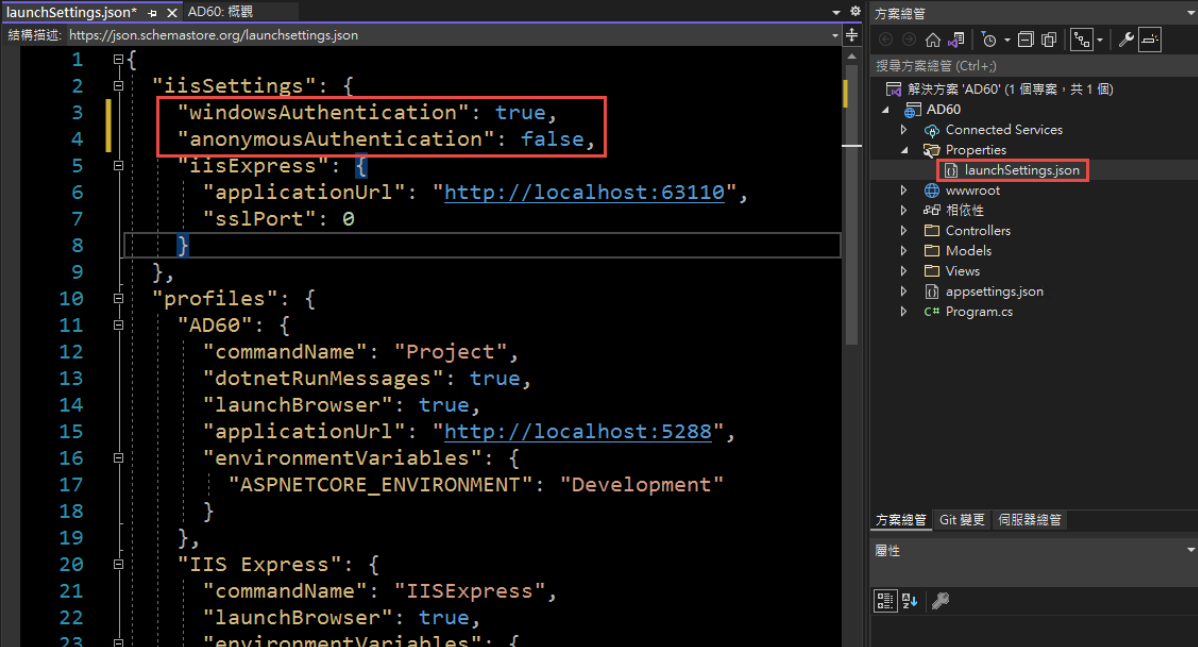
2. 改寫 launchSettings.json:
iisSettings 中的 windowsAuthentication 改為 True, anonymousAuthentication 改為 false。如下圖:
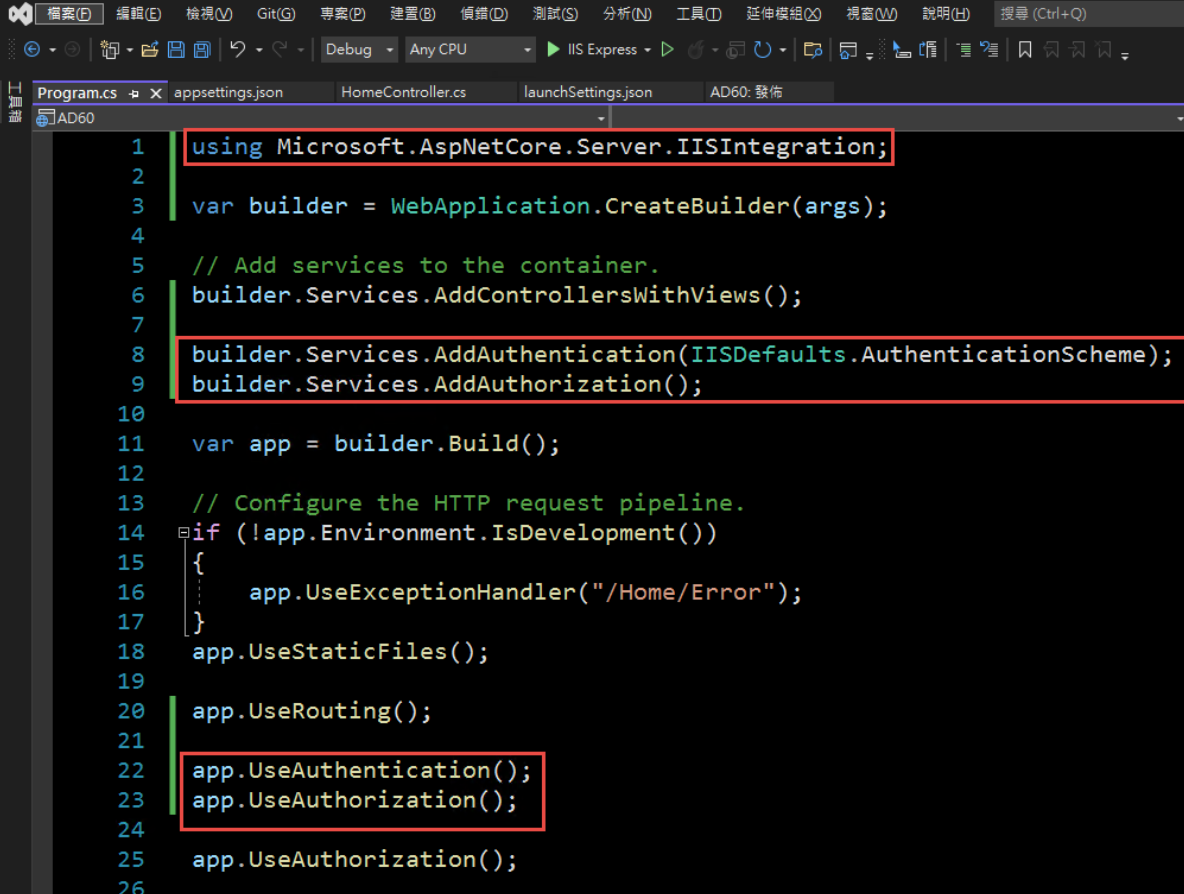
3. 修改 Program.cs, 加入以下四行指令:
builder.Services.AddAuthentication(IISDefaults.AuthenticationScheme);
builder.Services.AddAuthorization();
app.UseAuthentication();
app.UseAuthorization();
(注意: UseAuthentication 要加在 UseAuthentication 之後, VS 2022 應該會提示要新增 using Microsoft.AspNetCore.Server.IISIntegration;)
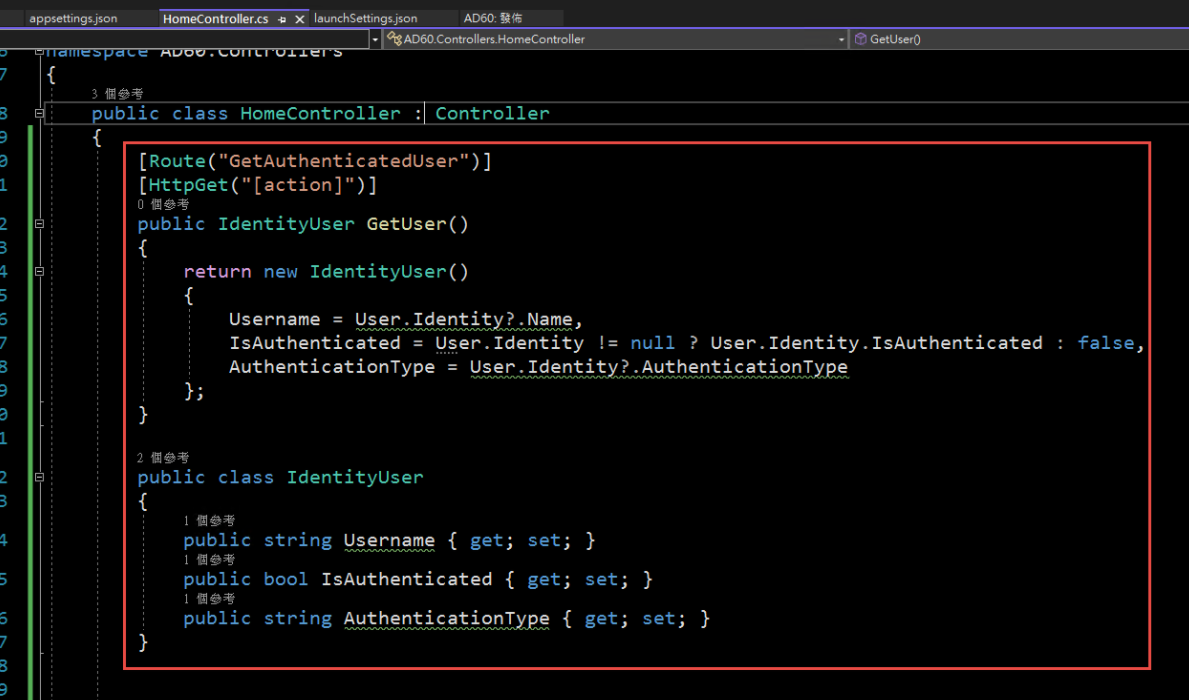
4. 在 HomeController 增加一個 Action, 以讀取驗証資料:
[Route("GetAuthenticatedUser")]
[HttpGet("[action]")]
public IdentityUser GetUser()
{
return new IdentityUser()
{
Username = User.Identity?.Name,
IsAuthenticated = User.Identity != null ? User.Identity.IsAuthenticated : false,
AuthenticationType = User.Identity?.AuthenticationType
};
}
public class IdentityUser
{
public string Username { get; set; }
public bool IsAuthenticated { get; set; }
public string AuthenticationType { get; set; }
}
5. 啟動時記得要改用 IIS Express (感覺早上花了兩三個小時在為了這個問題打轉):

6. 執行結果:

第三步,在 IIS 中安裝網站:
1. 在安裝 IIS 時,記得要勾選 windows 驗證
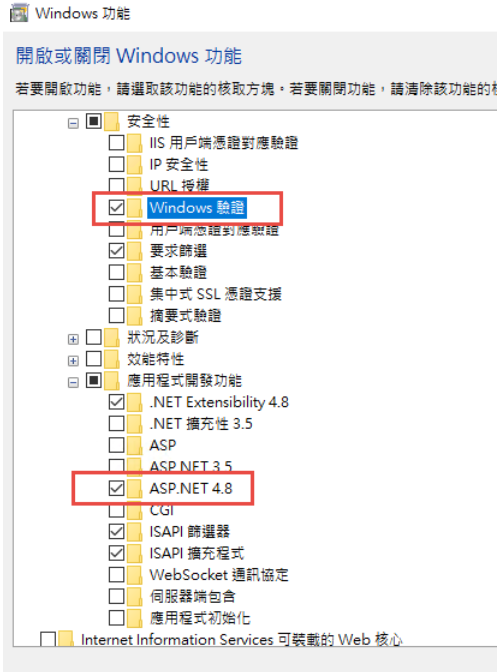
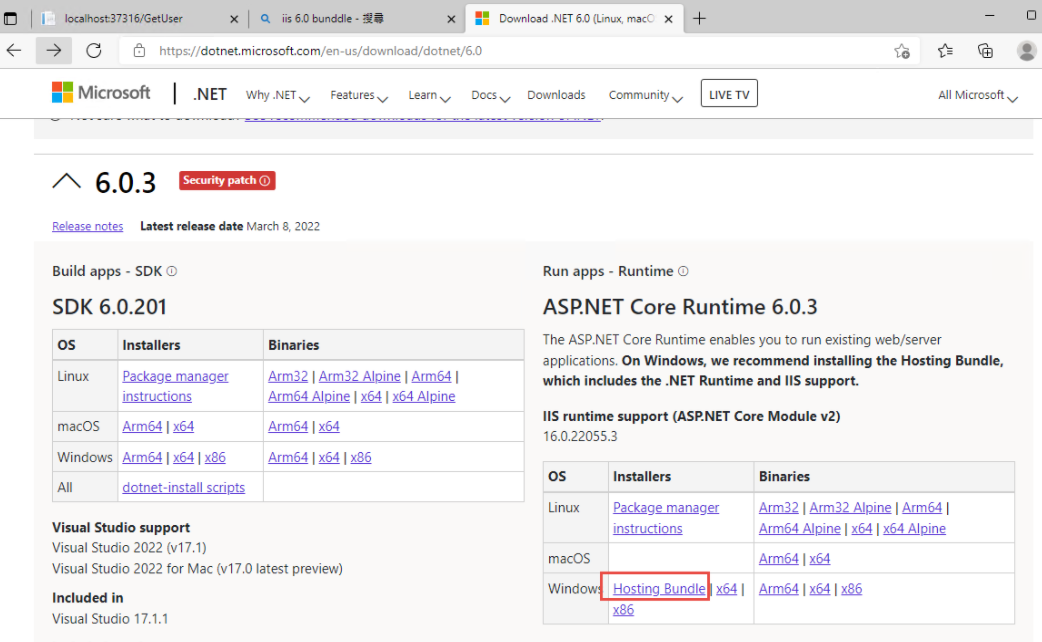
2. 安裝 .Net 6.0 的 Hosting Bundle
https://dotnet.microsoft.com/en-us/download/dotnet/6.0
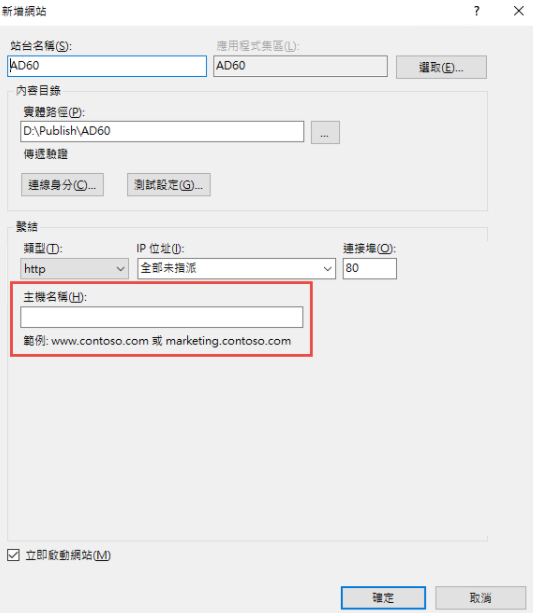
3. 新增網站:
主機名稱留空白 (AD 驗証在網域內好像不會使用指定的主機名稱,這個有待後續再做確認)
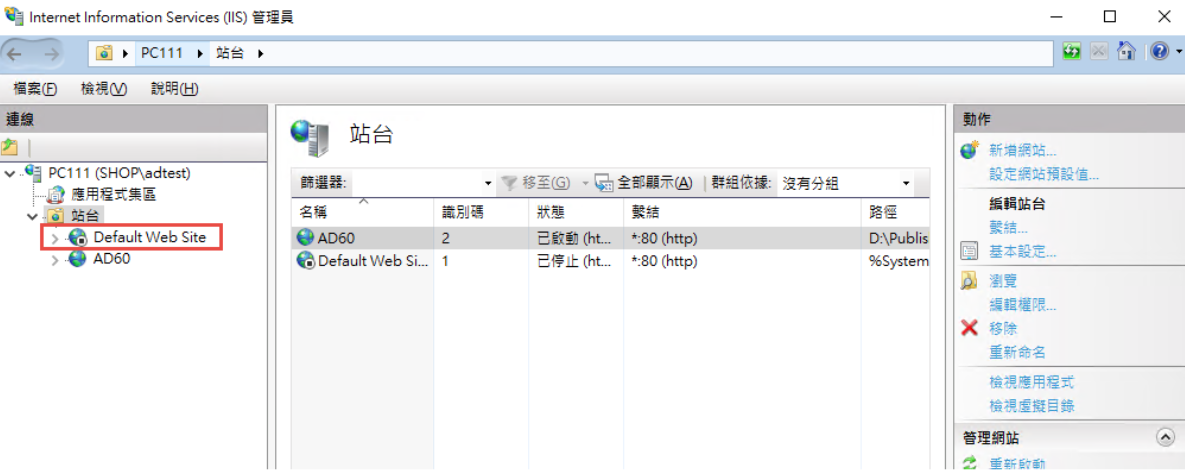
如果沒有刪除預設網站,會遇到警告,直接確認即可.

要把 Default Web Site 關閉,再啟動測試站
要啟動 windows 驗証: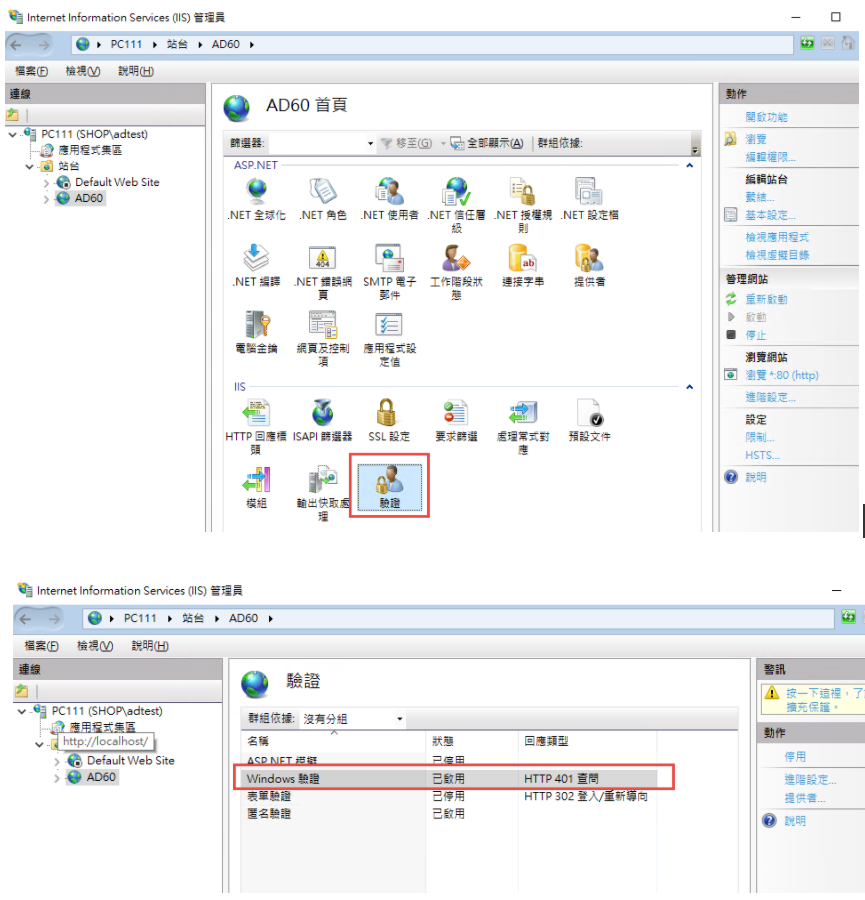
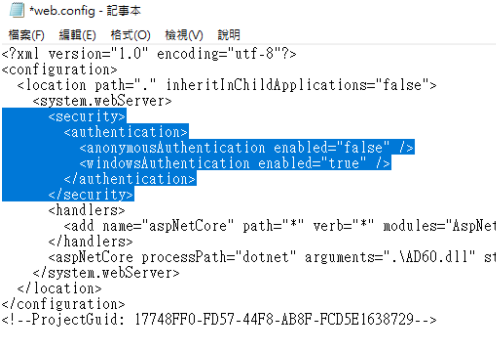
在 web.config 中增加
修改 applicationHost.config:
檔案位置: %windir%\system32\inetsrv\config\applicationHost.config
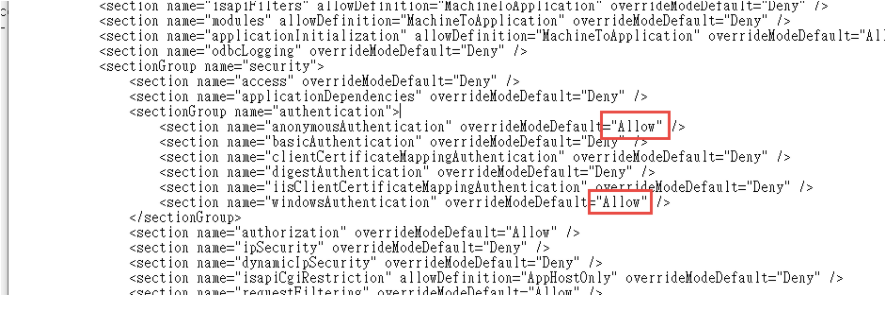
這兩地方的 Deny 改為 Allow
參考文件: https://docs.microsoft.com/zh-tw/iis/get-started/planning-for-security/how-to-use-locking-in-iis-configuration
3. 可以取得登入資訊如下:

4. 從 Domain 中另一台主機來存取,不用登入,自動取得目前登入者的資訊。

5. 從非網域主機連線: 會要求認証
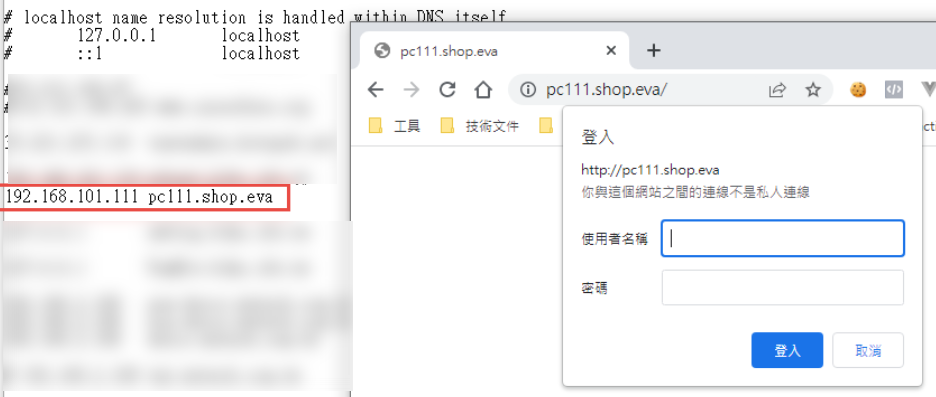
目前遇到問題: 在網域中的電腦只能用主機名稱登入,非網域的電腦,才能夠使用網址登入。
測試專案下載: https://github.com/bikehsu/AD60
AD Server: dc1 (192.168.101.109)
PC: pc110 (192.168.101.110)
PC: pc111 (192.168.101.111)
第一步,把 PC 加入 AD, 這個算是基本操作,網路上說明很多, 就不再截圖了。不過在這裡還是遇到了第一個問題,解決過程請參考另一份文件: https://blog.uwinfo.com.tw/Article.aspx?Id=486
第二步,在 Visual Studio 的測試環境中測試:
一開始是使用 .Net 6.0 來實作,沒想到找到的文件都是 .Net Core 3.1 的,所以先用 .Net Core 3.1 實做了一次,後來改用 .Net 6.0 實作才成功。使用 .Net 6.0 實作的過程如下:
1. 建立一個 MVC 的標準專案:

為了避免憑証問題,所以拿掉了 HTTPS 的設定

2. 改寫 launchSettings.json:
iisSettings 中的 windowsAuthentication 改為 True, anonymousAuthentication 改為 false。如下圖:

3. 修改 Program.cs, 加入以下四行指令:
builder.Services.AddAuthentication(IISDefaults.AuthenticationScheme);
builder.Services.AddAuthorization();
app.UseAuthentication();
app.UseAuthorization();
(注意: UseAuthentication 要加在 UseAuthentication 之後, VS 2022 應該會提示要新增 using Microsoft.AspNetCore.Server.IISIntegration;)

4. 在 HomeController 增加一個 Action, 以讀取驗証資料:
[Route("GetAuthenticatedUser")]
[HttpGet("[action]")]
public IdentityUser GetUser()
{
return new IdentityUser()
{
Username = User.Identity?.Name,
IsAuthenticated = User.Identity != null ? User.Identity.IsAuthenticated : false,
AuthenticationType = User.Identity?.AuthenticationType
};
}
public class IdentityUser
{
public string Username { get; set; }
public bool IsAuthenticated { get; set; }
public string AuthenticationType { get; set; }
}

5. 啟動時記得要改用 IIS Express (感覺早上花了兩三個小時在為了這個問題打轉):

6. 執行結果:

第三步,在 IIS 中安裝網站:
1. 在安裝 IIS 時,記得要勾選 windows 驗證

2. 安裝 .Net 6.0 的 Hosting Bundle
https://dotnet.microsoft.com/en-us/download/dotnet/6.0

3. 新增網站:
主機名稱留空白 (AD 驗証在網域內好像不會使用指定的主機名稱,這個有待後續再做確認)

如果沒有刪除預設網站,會遇到警告,直接確認即可.

要把 Default Web Site 關閉,再啟動測試站

要啟動 windows 驗証:

在 web.config 中增加
      <security>

        <authentication>

          <anonymousAuthentication enabled="false" />

          <windowsAuthentication enabled="true" />

        </authentication>

      </security>

修改 applicationHost.config:
檔案位置: %windir%\system32\inetsrv\config\applicationHost.config
這兩地方的 Deny 改為 Allow
<section name="anonymousAuthentication" overrideModeDefault="Deny" />

<section name="windowsAuthentication" overrideModeDefault="Deny" />

參考文件: https://docs.microsoft.com/zh-tw/iis/get-started/planning-for-security/how-to-use-locking-in-iis-configuration
3. 可以取得登入資訊如下:

4. 從 Domain 中另一台主機來存取,不用登入,自動取得目前登入者的資訊。

5. 從非網域主機連線: 會要求認証

目前遇到問題: 在網域中的電腦只能用主機名稱登入,非網域的電腦,才能夠使用網址登入。
測試專案下載: https://github.com/bikehsu/AD60
Bike, 2022/3/19 下午 09:10:08