頁數 1 / 2
下一頁
搜尋 entity 結果:
在 powershell 執行以下的指令
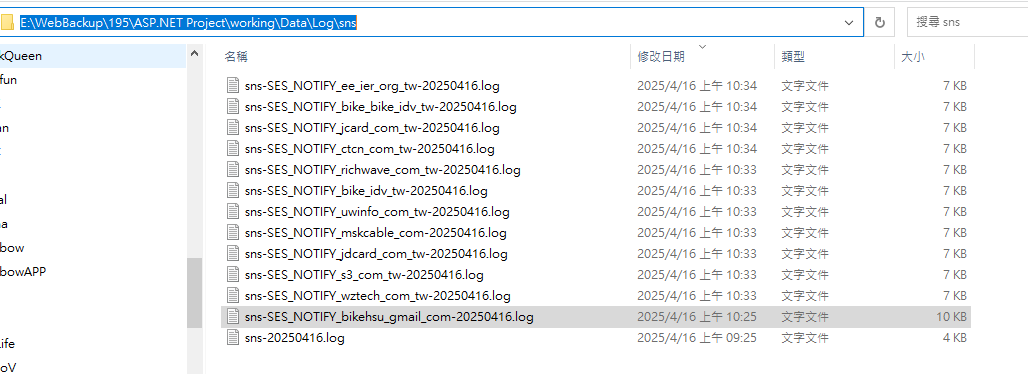
收到的 log 會放在這裡: E:\WebBackup\195\ASP.NET Project\working\Data\Log\sns
# List of SES identities

$identities = @(

    "wztech.com.tw",

    "s3.com.tw",

    "jdcard.com.tw",

    "mskcable.com",

    "uwinfo.com.tw",

    "bike.idv.tw",

    "richwave.com.tw",

    "ctcn.com.tw",

    "jcard.com.tw",

    "bike@bike.idv.tw",

    "ee@ier.org.tw"

)


foreach ($identity in $identities) {

    # Convert identity to a valid topic name by replacing '@' and '.' with '_'

    $safeIdentity = $identity -replace "@", "_" -replace "\.", "_"

    $topicName = "SES_NOTIFY_$safeIdentity"

    $endpoint = "https://working.uwinfo.com.tw/aws/api/sns/receive?topic=$topicName"


    # Validate topic name format

    if ($topicName -notmatch '^[a-zA-Z0-9_\-\$]+$') {

        Write-Host "❌ Invalid topic name: $topicName"

        continue

    }


    # 1. Create SNS topic

    $topicArn = aws sns create-topic `

        --name $topicName `

        --query 'TopicArn' `

        --output text


    Write-Host "✔ Created topic: $topicArn"


    # 2. Subscribe webhook

    aws sns subscribe `

        --topic-arn $topicArn `

        --protocol https `

        --notification-endpoint $endpoint


    Write-Host "✔ Subscribed webhook: $endpoint"


    # 3. Link SES notifications

    foreach ($type in @("Delivery", "Bounce", "Complaint")) {

        aws ses set-identity-notification-topic `

            --identity $identity `

            --notification-type $type `

            --sns-topic $topicArn

        Write-Host "✔ $type linked to $topicName"

    }


    Write-Host "✅ Setup complete for $identity\n"

}


Write-Host "🎉 All identities processed."
收到的 log 會放在這裡: E:\WebBackup\195\ASP.NET Project\working\Data\Log\sns
Bike, 2025/4/16 上午 10:40:39
在 powershell 執行以下的指令
# List of SES identities
$identities = @(
"wztech.com.tw",
"s3.com.tw",
"jdcard.com.tw",
"mskcable.com",
"uwinfo.com.tw",
"bike.idv.tw",
"richwave.com.tw",
"ctcn.com.tw",
"jcard.com.tw",
"bike@bike.idv.tw",
"ee@ier.org.tw"
)
foreach ($identity in $identities) {
# Convert identity to a valid topic name by replacing '@' and '.' with '_'
$safeIdentity = $identity -replace "@", "_" -replace "\.", "_"
$topicName = "SES_NOTIFY_$safeIdentity"
$endpoint = "https://working.uwinfo.com.tw/aws/api/sns/receive?topic=$topicName"
# Validate topic name format
if ($topicName -notmatch '^[a-zA-Z0-9_\-\$]+$') {
Write-Host "❌ Invalid topic name: $topicName"
continue
}
# 1. Create SNS topic
$topicArn = aws sns create-topic `
--name $topicName `
--query 'TopicArn' `
--output text
Write-Host "✔ Created topic: $topicArn"
# 2. Subscribe webhook
aws sns subscribe `
--topic-arn $topicArn `
--protocol https `
--notification-endpoint $endpoint
Write-Host "✔ Subscribed webhook: $endpoint"
# 3. Link SES notifications
foreach ($type in @("Delivery", "Bounce", "Complaint")) {
aws ses set-identity-notification-topic `
--identity $identity `
--notification-type $type `
--sns-topic $topicArn
Write-Host "✔ $type linked to $topicName"
}
Write-Host "✅ Setup complete for $identity\n"
}
Write-Host "🎉 All identities processed."
--
收到的 log 會放在這裡: E:\WebBackup\195\ASP.NET Project\working\Data\Log\sns
Bike, 2025/4/16 上午 10:40:31
Restful 的 API 範例,比較特別的是取得單一筆資料時,不是用一般常見的 {id} 而是用 get?id=xxx 的方式,以避免 XXS 的功擊。(不要把原網頁中的參數拼入 API 網址,要改用 Query String 的方式傳給 API)
再增加一個同步範例(只例出 action)
using Ds;

using Ds.Gv;

using iText.Kernel.Geom;

using Microsoft.AspNetCore.Mvc;

using Microsoft.EntityFrameworkCore;

using NPOI.SS.Formula.Functions;

using NPOI.SS.Util;

using Su;

using System.Linq.Expressions;


namespace CallCampaign.Api

{

    /// <summary>

    /// 行銷活動

    /// </summary>

    [Route("api/call-campaign")]

    [ApiController]

    [SetAuthorizationFilter(Sh.AuthCode.不設限)]

    public class ReserveCampaignController : Controller

    {

        /// <summary>

        /// 取得行銷活動列表

        /// </summary>

        /// <param name="reserveCampaignName"></param>

        /// <param name="currentPage"></param>

        /// <param name="pageSize"></param>

        /// <param name="orderByName"></param>

        /// <param name="sort"></param>

        /// <returns></returns>

        /// <exception cref="Exception"></exception>

        [HttpGet("")]

        public async Task<object> ListAsync([FromQuery] string reserveCampaignName = "", [FromQuery] int? currentPage = 1, [FromQuery] int? pageSize = 20, [FromQuery] string orderByName = "OrderNo", [FromQuery] string sort = "asc")

        {

            if (pageSize > 500)

            {

                pageSize = 500;

            }


            if (!(sort == "asc" || sort == "desc"))

            {

                throw new CustomException(System.Net.HttpStatusCode.BadRequest, "sort只能是asc或desc");

            }


            var temp = new V_ReserveCampaign().GetType().GetProperty(orderByName);

            if (temp == null)

            {

                throw new CustomException(System.Net.HttpStatusCode.BadRequest, "不存在欄位");

            }


            Expression<Func<V_ReserveCampaign, bool>> q = p => p.Is_Deleted == "N"

                    && (string.IsNullOrEmpty(reserveCampaignName) || (p.ReserveCampaignName != null && p.ReserveCampaignName.Contains(reserveCampaignName)))

                    ;


            if (orderByName.ToLower().Trim() != "id")

            {

                orderByName += " " + sort + ", id desc";

            }

            else

            {

                orderByName += " " + sort;

            }


            var ct = NewContext.GvContext;

            var list = await ct.GetPageListAsync(q, columns: "Id, ReserveCampaignName, OrderNo, StartAt, EndAt, ModifierName, ModifyDate, CreatorName, CreateDate", page: currentPage ?? 1, pageSize: pageSize ?? 20, orderByName);

            //var list = await ct.GetPageListAsync(q, page: currentPage ?? 1, pageSize: pageSize ?? 20, orderByName + " " + sort);

            return list;

        }


        /// <summary>

        /// 取得行銷活動

        /// </summary>

        /// <param name="Id"></param>

        /// <returns></returns>

        /// <exception cref="Exception"></exception>

        [HttpGet("get")]

        public async Task<dynamic> GetAsync([FromQuery] int Id)

        {

            var res = await Ds.NewContext.GvContext.ReserveCampaigns.Where(r => r.Id == Id)

                .FirstOrDefaultAsync();


            if (res == null)

            {

                throw new CustomException(System.Net.HttpStatusCode.BadRequest, "查無資料 " + Id.ToString());

            }

            return res;

        }


        /// <summary>

        /// 建立行銷活動

        /// </summary>

        /// <param name="dto"></param>

        /// <returns></returns>

        /// <exception cref="CustomException"></exception>

        [HttpPost("")]

        public async Task<object> CreateAsync(Dtos.CreateReserveCampaign dto)

        {

            var ct = NewContext.GvContext;

            var res = await Models.ReserveCampaignHelper.CreateReserveCampaignAsync(ct, dto);

            return res;

        }


        /// <summary>

        /// 編輯行銷活動

        /// </summary>

        /// <param name="dto"></param>

        /// <returns></returns>

        /// <exception cref="CustomException"></exception>

        [HttpPatch("")]

        public async Task<object> UpdateAsync(Dtos.UpdateReserveCampaign dto)

        {

            var ct = NewContext.GvContext;

            var res = await Models.ReserveCampaignHelper.UpdateReserveCampaignAsync(ct, dto);

            return res;

        }


        /// <summary>

        /// 刪除行銷活動

        /// </summary>

        /// <param name="id"></param>

        /// <returns></returns>

        /// <exception cref="CustomException"></exception>

        [HttpDelete("")]

        public async Task<object> DeleteAsync([FromQuery] int id)

        {

            var res = await Ds.NewContext.GvContext.MarkDeleteAsync<Ds.Gv.ReserveCampaign>(id, Sh.ModifyInfo);

            return res;

        }

    }

}
再增加一個同步範例(只例出 action)
        /// <summary>

        /// 取得列表

        /// </summary>

        /// <param name="name"></param>

        /// <param name="currentPage"></param>

        /// <param name="pageSize"></param>

        /// <param name="orderByName"></param>

        /// <param name="sort"></param>

        /// <returns></returns>

        [HttpGet("")]

        public object List([FromQuery] string name = "", [FromQuery] int? currentPage = 1, [FromQuery] int? pageSize = 20, [FromQuery] string orderByName = "OrderNo", [FromQuery] string sort = "asc")

        {

            return "";

        }


        /// <summary>

        /// 取得明細資料

        /// </summary>

        /// <param name="Id"></param>

        /// <returns></returns>

        /// <exception cref="Exception"></exception>

        [HttpGet("get")]

        public object Get([FromQuery] int id)

        {

            return "";

        }


        /// <summary>

        /// 建立

        /// </summary>

        /// <param name="dto"></param>

        /// <returns></returns>

        /// <exception cref="CustomException"></exception>

        [HttpPost("")]

        public object Create(Dtos.PhysicalCheckUpType dto)

        {

            return "";

        }


        /// <summary>

        /// 編輯

        /// </summary>

        /// <param name="dto"></param>

        /// <returns></returns>

        /// <exception cref="CustomException"></exception>

        [HttpPatch("")]

        public object Update(Dtos.PhysicalCheckUpType dto)

        {

            return "";

        }


        /// <summary>

        /// 刪除

        /// </summary>

        /// <param name="id"></param>

        /// <returns></returns>

        /// <exception cref="CustomException"></exception>

        [HttpDelete("")]

        public object Delete([FromQuery] int id)

        {

            return 1;

        }
Bike, 2023/12/13 上午 08:54:28
Entity Framework 提供了 ExecuteSqlRawAsync 和 FromSqlRaw 之後,可以和 Dapper 非常類似的用法。
我們在用 Dapper 時。最常用的就是 sql command 加上一個物件做為參數,就可以執行 CRUD 的動作。
其實用 Entity Framework 的 ExecuteSqlRawAsync 和 FromSqlRaw 也可以逹到幾乎一樣的效果。
ExecuteSqlRawAsync 和 FromSqlRaw 接受的參數是 object array (其實是 Microsoft.Data.SqlClient.SqlParameter 的 array)
所以我們先做一個 Object to Microsoft.Data.SqlClient.SqlParameter Array 的擴充, 可參考: https://gist.github.com/aliozgur/75182b2e9b0a58b83443
不過很奇怪的是,原作者提供的擴充轉出來的會是 System.Data.SqlClient.SqlParameter Array 無法直接使用於 ExecuteSqlRawAsync 和 FromSqlRaw,所以要稍微改一下,把 using System.Data.SqlClient; 改為 using Microsoft.Data.SqlClient; 即可:

另外,我們再自行 對 DbContext 做一個擴充如下:
最後的結果可以做到以下的效果: (res3 和 res4 是配合 FormattableString 的範例 )

範例程式碼:
我們在用 Dapper 時。最常用的就是 sql command 加上一個物件做為參數,就可以執行 CRUD 的動作。
其實用 Entity Framework 的 ExecuteSqlRawAsync 和 FromSqlRaw 也可以逹到幾乎一樣的效果。
ExecuteSqlRawAsync 和 FromSqlRaw 接受的參數是 object array (其實是 Microsoft.Data.SqlClient.SqlParameter 的 array)
所以我們先做一個 Object to Microsoft.Data.SqlClient.SqlParameter Array 的擴充, 可參考: https://gist.github.com/aliozgur/75182b2e9b0a58b83443
不過很奇怪的是,原作者提供的擴充轉出來的會是 System.Data.SqlClient.SqlParameter Array 無法直接使用於 ExecuteSqlRawAsync 和 FromSqlRaw,所以要稍微改一下,把 using System.Data.SqlClient; 改為 using Microsoft.Data.SqlClient; 即可:
另外,我們再自行 對 DbContext 做一個擴充如下:
        /// <summary>

        /// 會把物件 Parameter 的各 Property 帶入 SQL 中.

        /// </summary>

        /// <param name="dbct"></param>

        /// <param name="sql"></param>

        /// <param name="parameters"></param>

        /// <returns></returns>

        public static async Task<int> ExecuteParameterSqlAsync(this DbContext dbct, string sql, object parameters)

        {

            return await dbct.Database.ExecuteSqlRawAsync(sql, parameters.ToSqlParamsArray());

        }
最後的結果可以做到以下的效果: (res3 和 res4 是配合 FormattableString 的範例 )
範例程式碼:
        public async Task<object> EfTest()

        {

            var dbct = Ds.NewContext.GvContext;

            var insertSql = @"Insert into ProfileEvent(JobId,[Name],GvShoplineId,LiShoplineId,Phone,Email,LineId,GaClientId)

            Values(@JobId, @Name, null , null , null , @Email, @GaClientId , @GaClientId )";


            //執行 SQL 的原生寫法

            await dbct.Database.ExecuteSqlRawAsync(insertSql, new object[]

            {

                new SqlParameter("@JobId", 10),

                new SqlParameter("@Email", "XX'TT"),

                new SqlParameter("@Name", "AA'BB"),

                new SqlParameter("@GaClientId", "GaClientId"),

            });


            //執行 SQL 的擴充寫法

            await dbct.ExecuteParameterSqlAsync(insertSql, new

            {

                JobId = 10,

                Email = "XX'TT",

                Name = "AA'BB",

                GaClientId = "GaClientId"

            });


            //關於查詢

            string name = "%'B%";

            //原生寫法

            var res1 = await dbct.ProfileEvents.FromSqlRaw("Select top 100 * from ProfileEvent where Name like @name",

                new object[]

                    {

                        new SqlParameter("@name", "%'B%")

                    })

                .ToListAsync();


            //擴充, object to SqlParameter array

            var res2 = await dbct.ProfileEvents.FromSqlRaw("Select top 100 * from ProfileEvent where Name like @name",

                new { name }.ToSqlParamsArray())

                .ToListAsync();


            var res3 = await dbct.ProfileEvents.FromSql($"Select top 100 * from ProfileEvent where Name like {name}")

                .ToListAsync();


            var res4 = await dbct.ProfileEvents.FromSqlInterpolated($"Select top 100 * from ProfileEvent where Name like {name}")

                .ToListAsync();


            return new { res1, res2, res3, res4 };

        }
Bike, 2023/5/6 下午 05:37:19
這個指令還是會把所有的資料 Select 出來,再更新
原指令:
UPDATE Job Set En_Status = 200 Where En_Status = 100 and LastTouchAt < '2023-05-06 12:34:56'
其中 '2023-05-06 12:34:56' 是 DateTime.Now.AddMinutes(-2) 的結果(Web Server 端的時間扣 2 分鐘)
但,若是改使用 UpdateFromQueryAsync 如下:
var c = await Ds.NewContext.GvContext.Jobs.Where(j => j.En_Status == Cst.Job.Status.Running && j.LastTouchAt < DateTime.Now.AddMinutes(-2))
.UpdateFromQueryAsync(j => new Ds.Gv.Job { En_Status = Cst.Job.Status.ReStarting });
產生的 SQL 如下:
UPDATE A
SET A.[En_Status] = @zzz_BatchUpdate_0
FROM [Job] AS A
INNER JOIN ( SELECT [j].[Id], [j].[CancelledAt], [j].[CancelledBy], [j].[En_Status], [j].[EndAt], [j].[Exception], [j].[Filename], [j].[InformationJson], [j].[InitAt], [j].[Is_CheckOnly], [j].[LastTouchAt], [j].[LastTouchMessage], [j].[LoopStartAt], [j].[Name], [j].[ScheduleId], [j].[TotalTouch], [j].[TouchCount]
FROM [Job] AS [j]
WHERE [j].[En_Status] = 100 AND [j].[LastTouchAt] < DATEADD(minute, CAST(-2.0E0 AS int), GETDATE())
) AS B ON A.[Id] = B.[Id]
有兩個要注意的地方:
1. 它會先 Select 全欄位,再做更新
2. 它的時間是 DB Server 的現在時間。不是 Web Server 端的時間。
順便記錄一下。若是要執行 Update xx Ser cc = cc + 1 Where ...
EF 可寫為:
var c = await Ds.NewContext.GvContext.Jobs.Where(j => j.En_Status == Cst.Job.Status.Running && j.LastTouchAt < DateTime.Now.AddMinutes(-2))
.UpdateFromQueryAsync(j => new Ds.Gv.Job { TotalTouch = j.TotalTouch + 1 });
轉換的 SQL 為:
UPDATE A
SET A.[TotalTouch] = B.[TotalTouch] + 1
FROM [Job] AS A
INNER JOIN ( SELECT [j].[Id], [j].[CancelledAt], [j].[CancelledBy], [j].[En_Status], [j].[EndAt], [j].[Exception], [j].[Filename], [j].[InformationJson], [j].[InitAt], [j].[Is_CheckOnly], [j].[LastTouchAt], [j].[LastTouchMessage], [j].[LoopStartAt], [j].[Name], [j].[ScheduleId], [j].[TotalTouch], [j].[TouchCount]
FROM [Job] AS [j]
WHERE [j].[En_Status] = 100 AND [j].[LastTouchAt] < DATEADD(minute, CAST(-2.0E0 AS int), GETDATE())
) AS B ON A.[Id] = B.[Id]
Bike, 2023/4/29 下午 08:44:31
關於Scaffold的參數,官網雖然有文件但不是很好找,因此在此紀錄一下。
(於PM Console輸入'dotnet ef dbcontext scaffold -h'也可以查看)
-d | --data-annotations : 使用屬性定義模型
-c | --context <NAME> : 產生的DbContext名稱
--context-dir <PATH> : 產生的DbContext位置
-f | --force : 覆寫現有檔案
-o | --output-dir <PATH> : 產生的Entity Model位置
--schema <SCHEMA_NAME1>, <SCHEMA_NAME2>... : 指定Schemas產生Entity
-t | --table <TABLE_NAME1>, <TABLE_NAME2>... : 指定Table產生Entity
--use-database-names : 強制使用DB中Table與Column Name
--json : 輸出Json格式資料表於PM Console
-n | --namespace <NAMESPACE> : 指定命名空間,預設會依照專案與資料夾命名
--context-namespace <NAMESPACE> : 指定DbContext命名空間,預設會依照專案與資料夾命名
--no-onconfiguring : 不產生DbContext中的OnConfiguring
--no-pluralize : 關閉自動複數判別
-p | --project <PROJECT> : 指定專案
-s | --startup-project <PROJECT> : 指定指令執行時起始專案
--framework <FRAMEWORK> : 指定框架版本
--configuration <CONFIGURATION> : 指定配置
--no-build : 跳過專案建置
梨子, 2022/12/15 下午 12:12:11
比較方式: 對相同的資料表讀取 1000 次,來比較速度。
資料庫為 MS SQL
這裡做了 4 個 Case:
Case 1:
使用 Entity Framework,DbContext 為每次 new 一個。
Case 2:
使用 Entity Framework,使用同一個 DbContext。
Case 3:
用 DAO,轉為 Data Table 的格式 (使用 DtFromSql)。
Case 4:
使用 Dapper。
專案啟動時的記憶體使用量約為: 123 MB

測試一:
第一次讀取
Case 1, 時間: 3673.0303 ms, 記憶體: 566 MB
Case 2, 時間: 3889.9379 ms, 記憶體: 304 MB (這個時間有時會測試到 3000 ms)
Case 3, 時間: 1665.7748 ms, 記憶體: 205 MB
Case 4, 時間: 1639.7211 ms, 記憶體: 193 MB
讀取五次
Case 1, 時間: 1984.6395, 記憶體: 544MB (有發生 GC)

Case 2, 時間: 2367.9792 ms, 記憶體: 627 MB (沒有發生 GC)

Case 3, 時間: 1395.1132 ms, 記憶體: 280 MB (有發生 GC)

Case 4, 時間: 1531.3555 ms, 記憶體: 271 MB

結果: Dapper 看來完勝,速度上和直接使用 DAO 轉進 Data Table 的速度相近。但 Dapper 傳回的結果已經轉換為物件 List, 操作上會更為方便。
Entity Framework 一如預期的較慢,且花費較多的記憶體。但和想像中最大的差異是,使用同一個 DbContext 比 new 1000 個 DbContext 的速度還要慢, 花費的記憶體在 GC 之後,差異不大。
所以不一定要用 DI 注入 DbContext, 在各 function 中一直傳遞 DbContext. 在 Static 的 function 中,可以安心的 new 一個 DbContext 出來使用吧,只是要記得用 using 哦,否則可能會有 connection 沒有關閉的問題。
資料庫為 MS SQL
這裡做了 4 個 Case:
Case 1:
使用 Entity Framework,DbContext 為每次 new 一個。
Case 2:
使用 Entity Framework,使用同一個 DbContext。
Case 3:
用 DAO,轉為 Data Table 的格式 (使用 DtFromSql)。
Case 4:
使用 Dapper。
專案啟動時的記憶體使用量約為: 123 MB
測試一:
第一次讀取
Case 1, 時間: 3673.0303 ms, 記憶體: 566 MB
Case 2, 時間: 3889.9379 ms, 記憶體: 304 MB (這個時間有時會測試到 3000 ms)
Case 3, 時間: 1665.7748 ms, 記憶體: 205 MB
Case 4, 時間: 1639.7211 ms, 記憶體: 193 MB
讀取五次
Case 1, 時間: 1984.6395, 記憶體: 544MB (有發生 GC)
Case 2, 時間: 2367.9792 ms, 記憶體: 627 MB (沒有發生 GC)
Case 3, 時間: 1395.1132 ms, 記憶體: 280 MB (有發生 GC)
Case 4, 時間: 1531.3555 ms, 記憶體: 271 MB
結果: Dapper 看來完勝,速度上和直接使用 DAO 轉進 Data Table 的速度相近。但 Dapper 傳回的結果已經轉換為物件 List, 操作上會更為方便。
Entity Framework 一如預期的較慢,且花費較多的記憶體。但和想像中最大的差異是,使用同一個 DbContext 比 new 1000 個 DbContext 的速度還要慢, 花費的記憶體在 GC 之後,差異不大。
所以不一定要用 DI 注入 DbContext, 在各 function 中一直傳遞 DbContext. 在 Static 的 function 中,可以安心的 new 一個 DbContext 出來使用吧,只是要記得用 using 哦,否則可能會有 connection 沒有關閉的問題。
Bike, 2022/7/18 上午 09:46:34
今天解了一個 Bug.
在網路上找到AD 登入後, 使用 DirectoryServices 取得使用者的資訊的 Sample Code 如下:
User 反應有一些員工登入後會沒有查到使用者資訊,後來發現若是在 AD 中建立使用者時,使用者的名稱和登入帳號不一致的話,會抓不到使用者資料。
最後經過一翻努力後,終於找到要改用 "samaccountname" 來做為 Filter 的條件。
在網路上找到AD 登入後, 使用 DirectoryServices 取得使用者的資訊的 Sample Code 如下:
            var name = User.Identity.Name.Split('\\')[1]; //*@I was getting name as domain\\name @*

            DirectorySearcher ds = new DirectorySearcher();

            ds.Filter = "(&(objectClass=user)(objectcategory=person)(name=" + name + "))";

            SearchResult userProperty = ds.FindOne();
User 反應有一些員工登入後會沒有查到使用者資訊,後來發現若是在 AD 中建立使用者時,使用者的名稱和登入帳號不一致的話,會抓不到使用者資料。
最後經過一翻努力後,終於找到要改用 "samaccountname" 來做為 Filter 的條件。
            var name = User.Identity.Name.Split('\\')[1]; //*@I was getting name as domain\\name @*

            DirectorySearcher ds = new DirectorySearcher();

            ds.Filter = "(&(objectClass=user)(objectcategory=person)(samaccountname=" + name + "))";

SearchResult userProperty = ds.FindOne();Bike, 2022/4/18 下午 05:30:49
這裡是我測試 Gmail API 和 Google API 憑証的一些記錄。
如果你的目的是要使用 Gmail Api 取代舊的 Gmail SMTP 來發送通知信,建議你先跳到最下方看一下結論。
如果你是想要看一下 Gmail API 和 Google API 憑証的使用方法,可以看一下這篇文章。
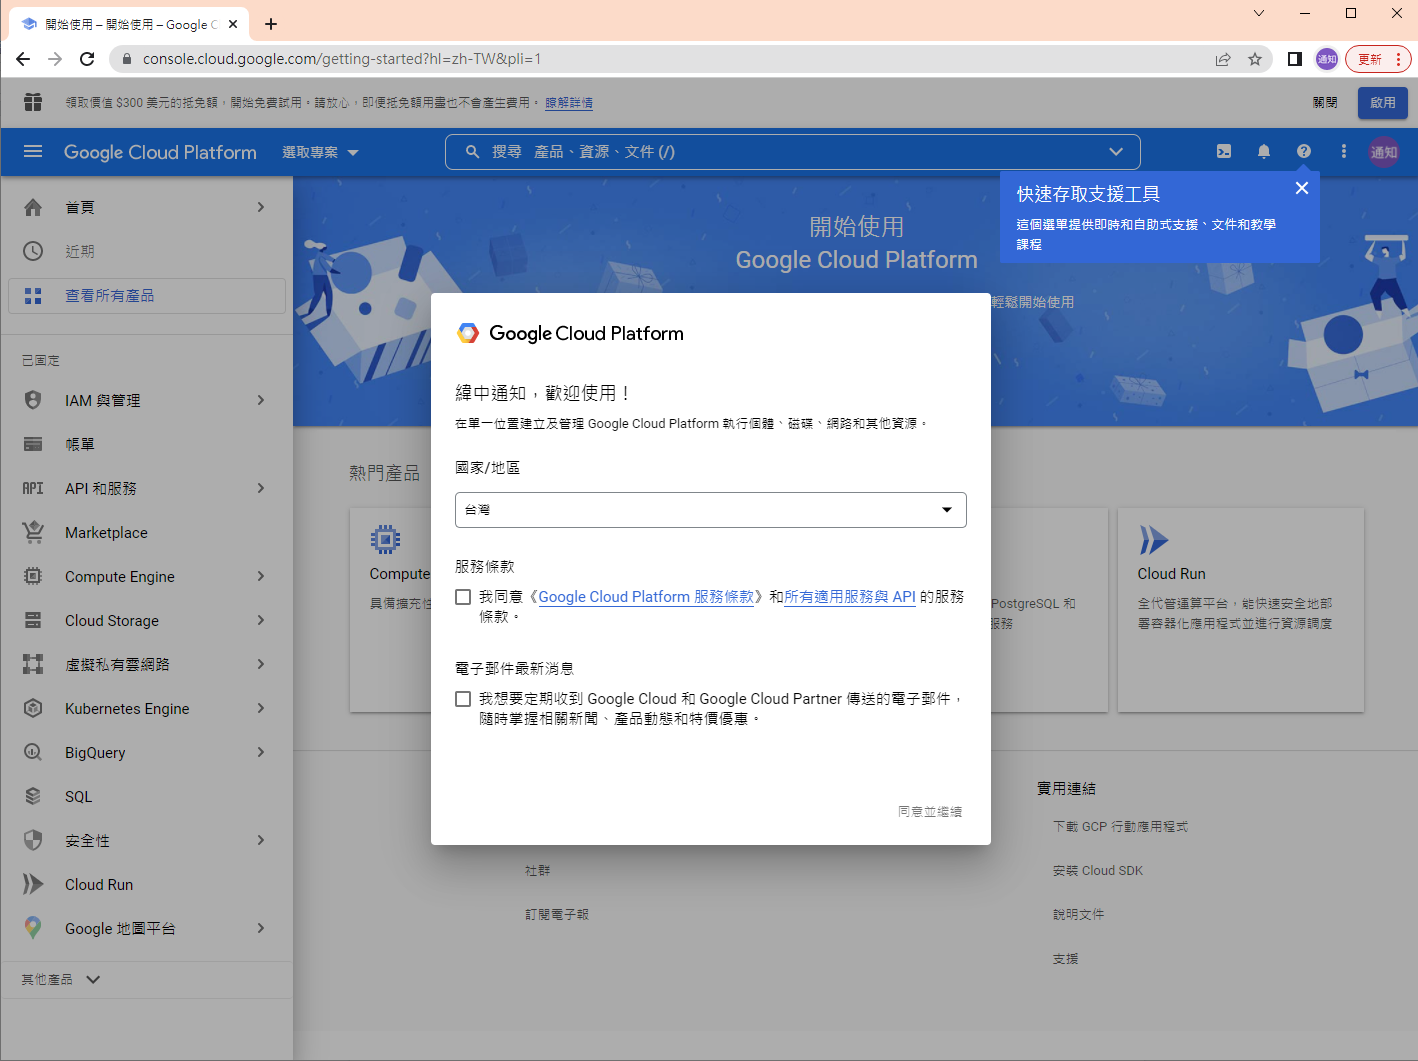
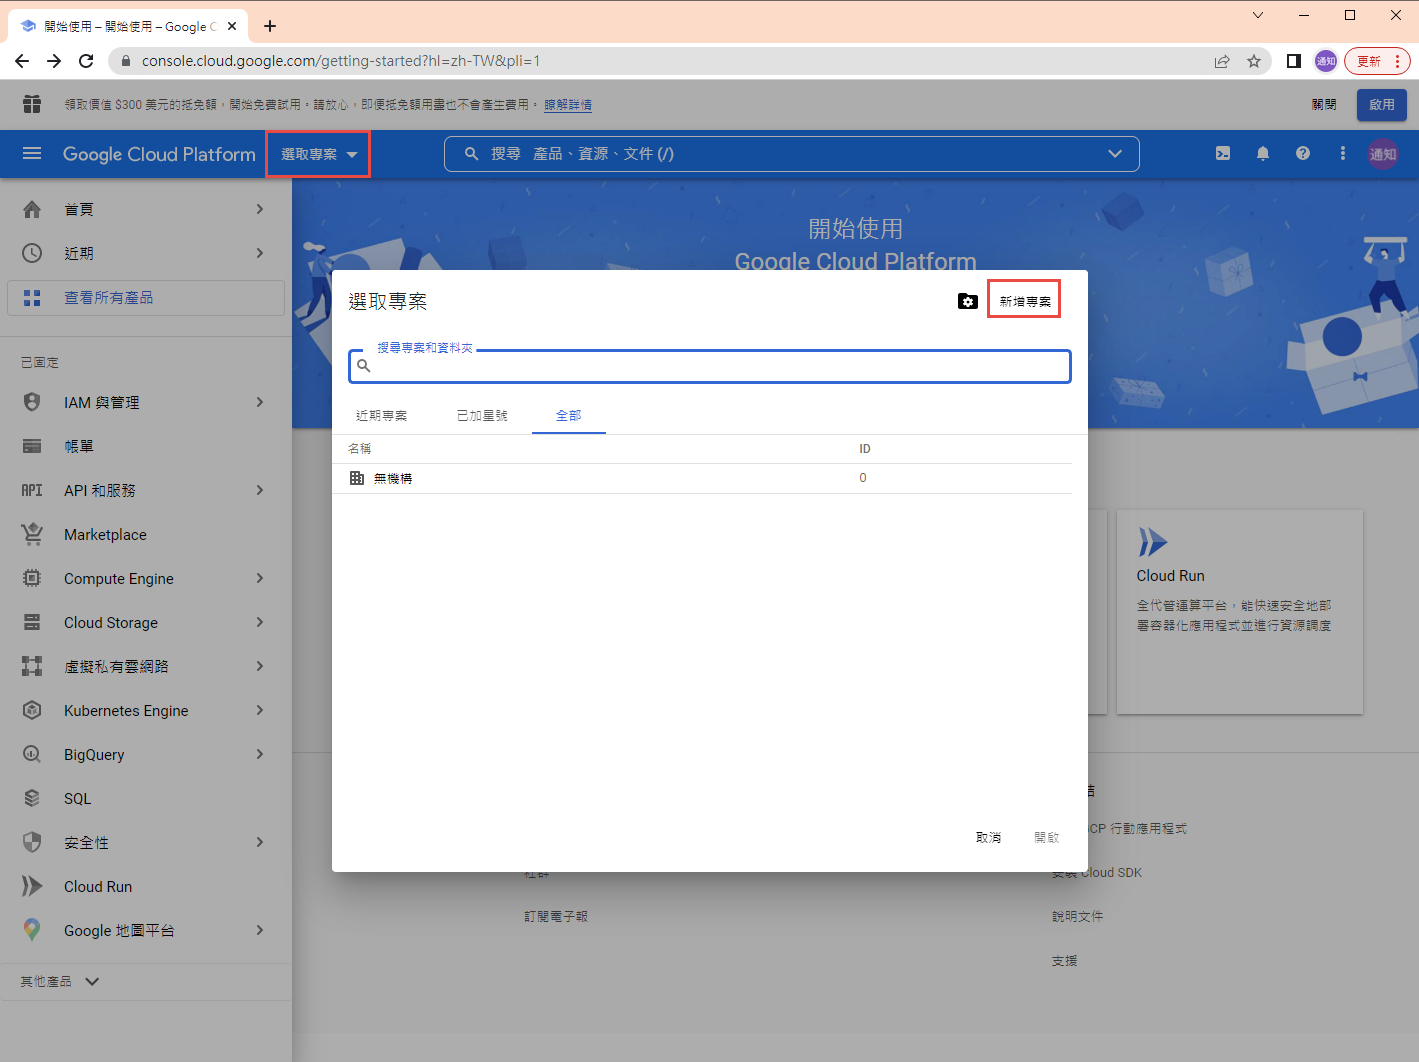
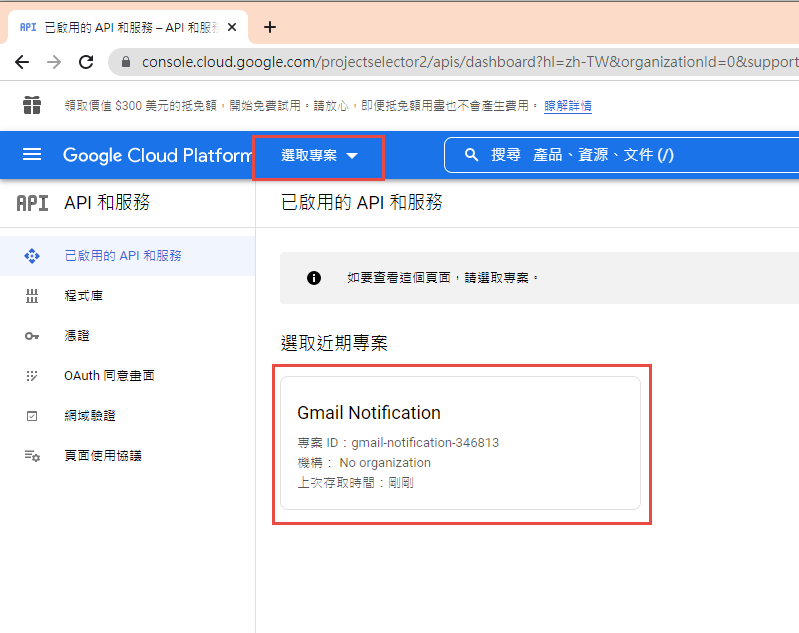
1. 在 google cloud platform 建立新的專案.
https://console.cloud.google.com/

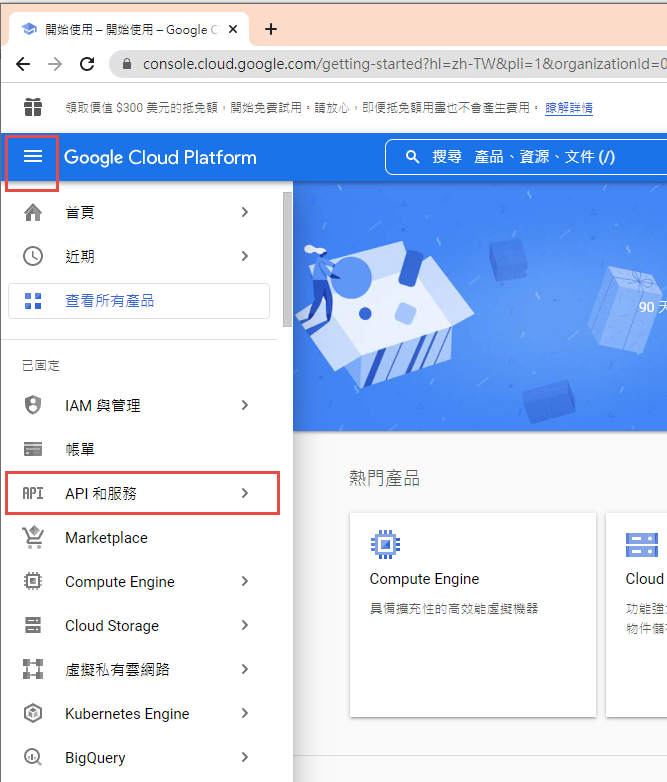
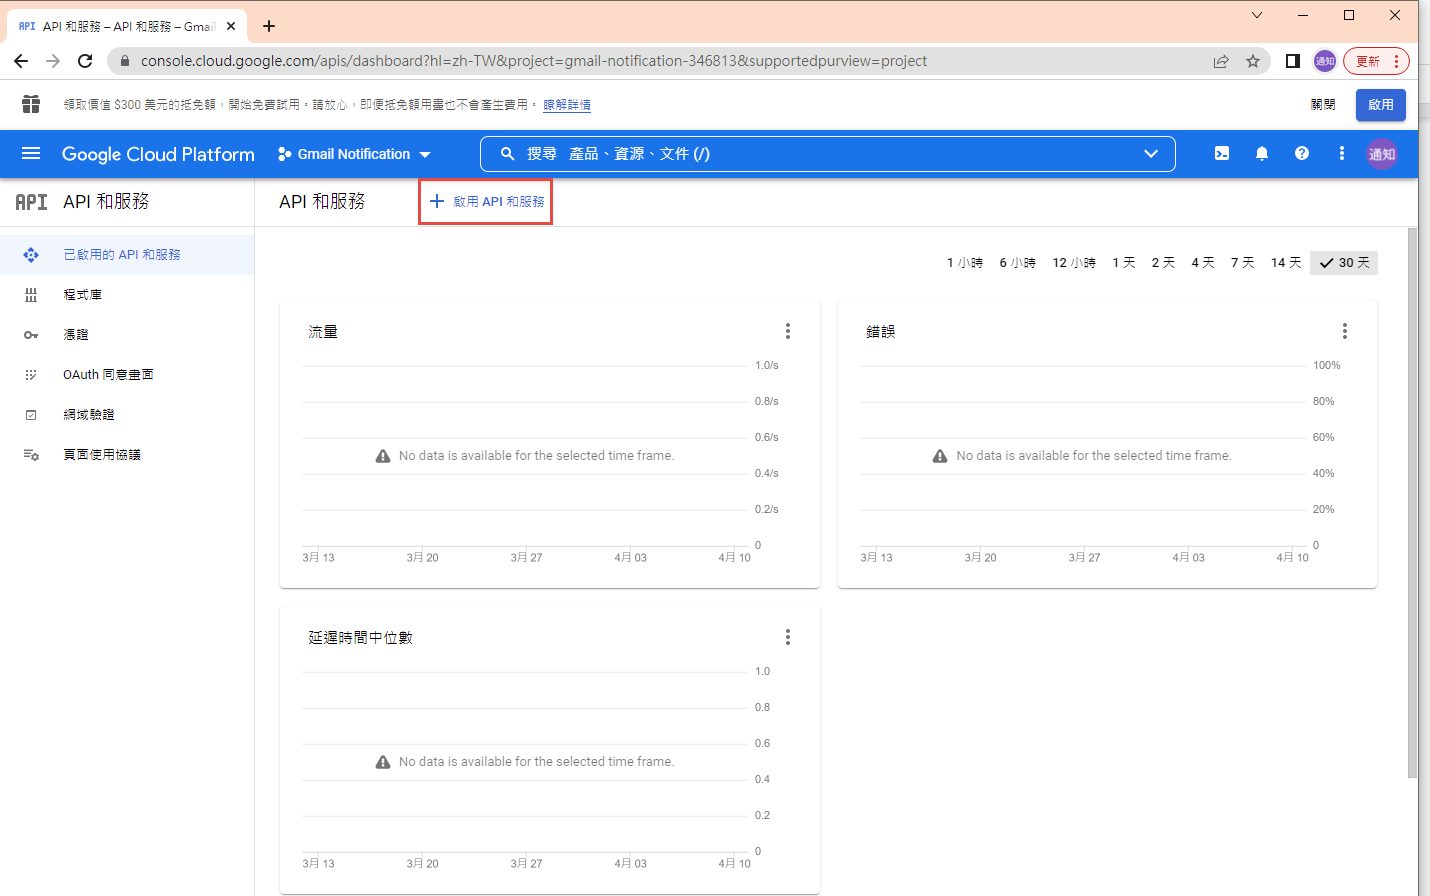
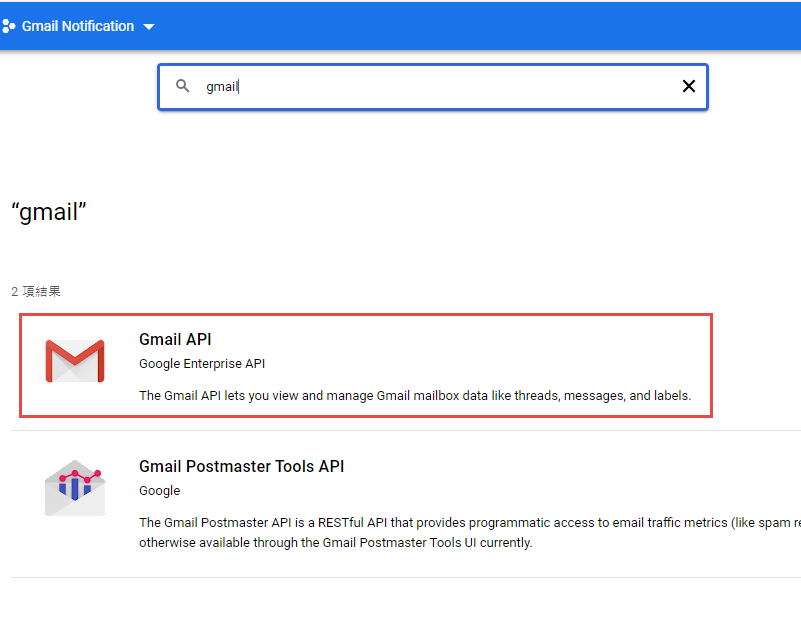
啟用 Gmail API


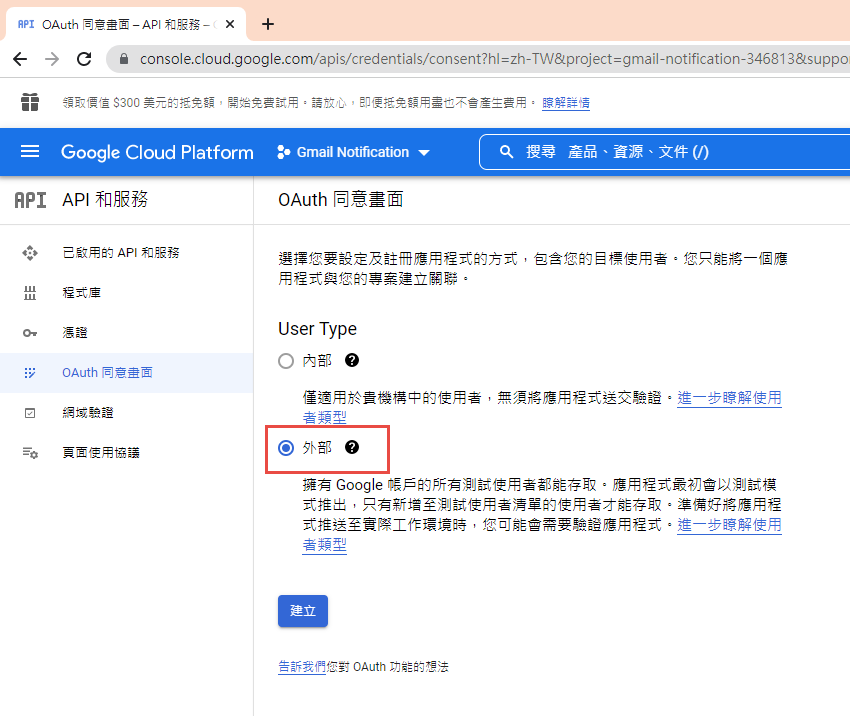
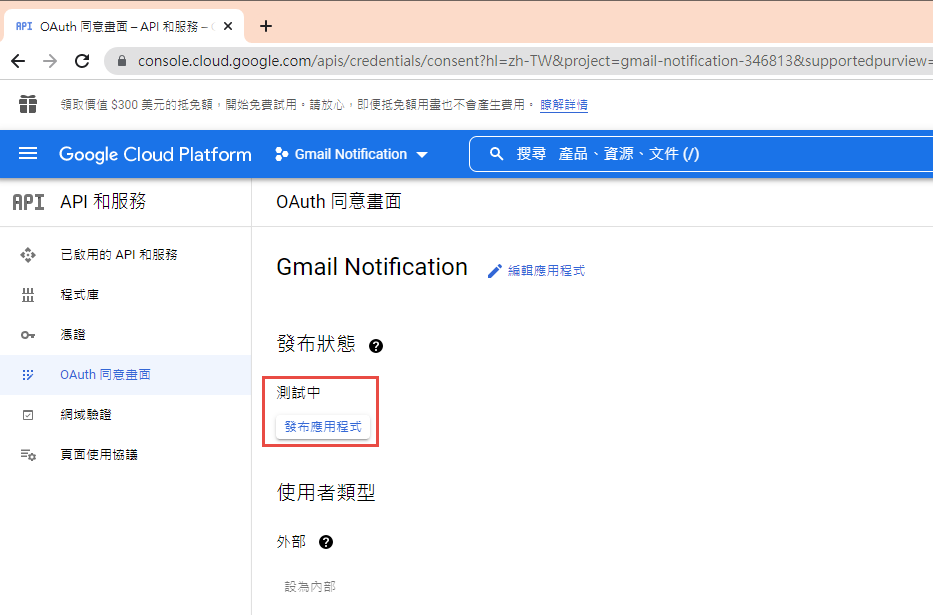
因為我們要透過 OAuth 取得使用者授權,所以要設定使用 OAuth 的同意畫面。
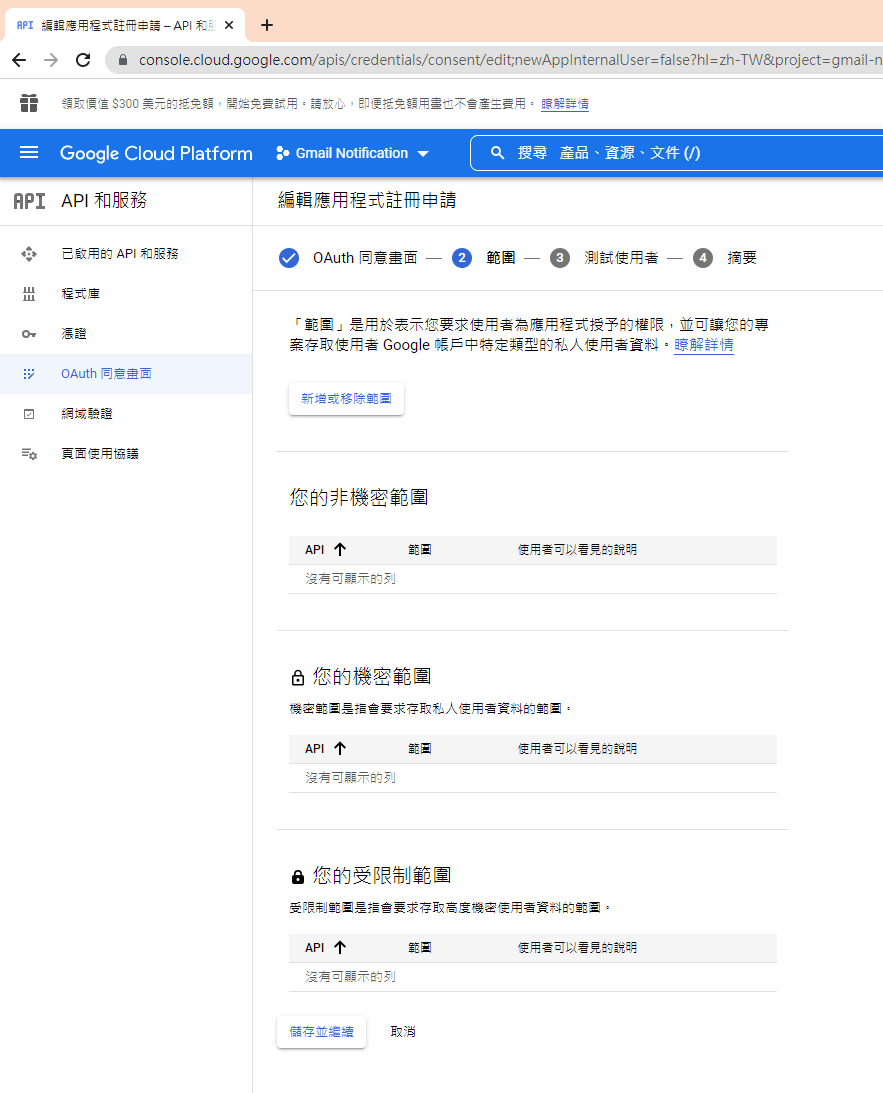
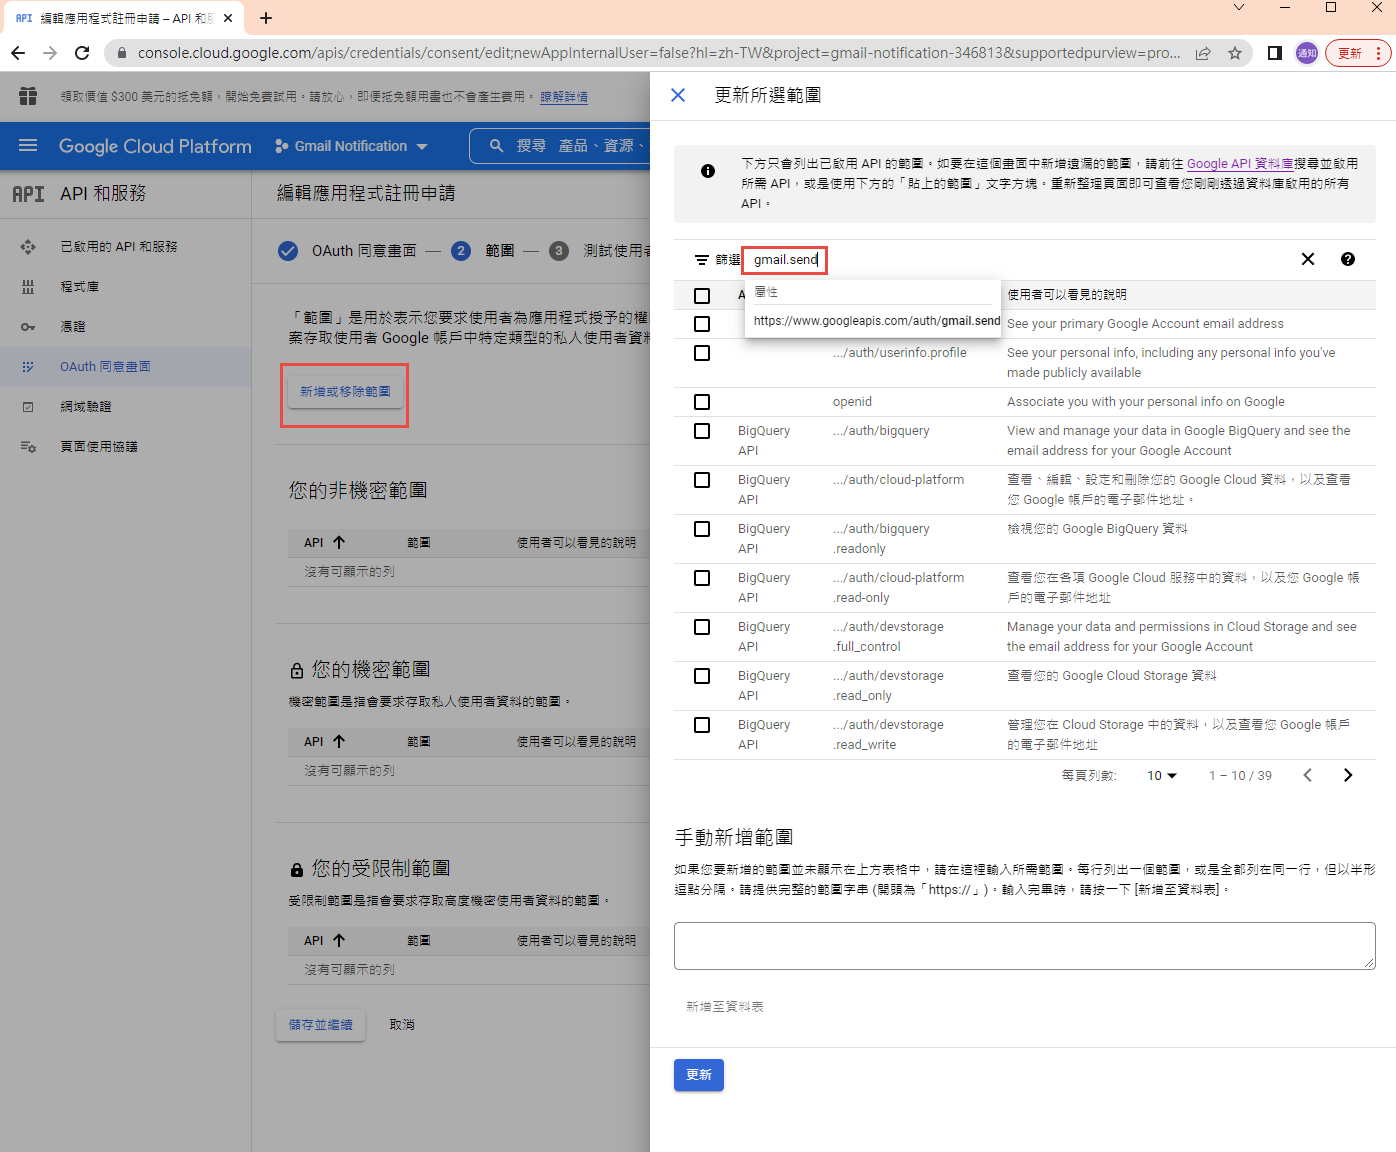
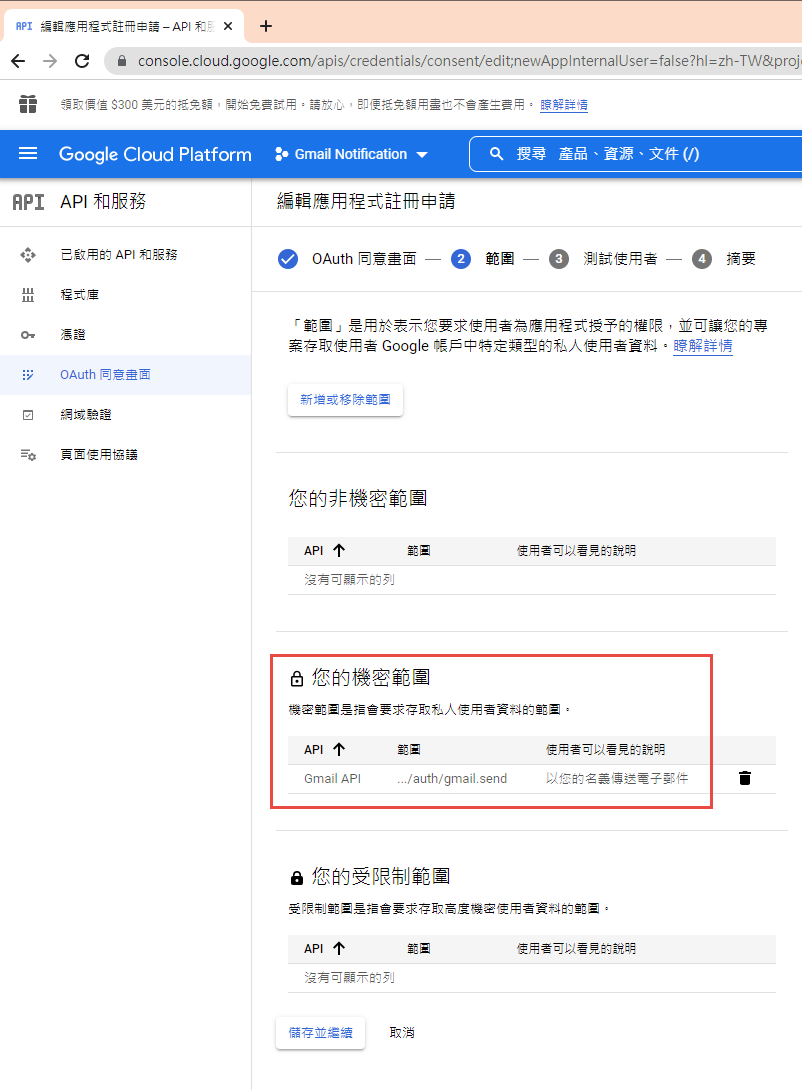
指定授權的範圍
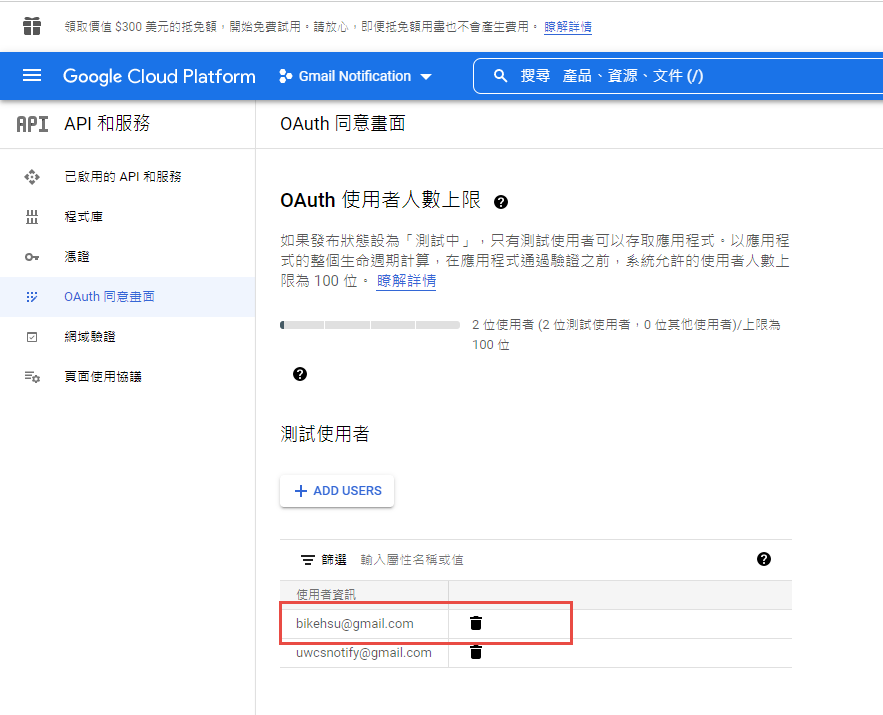
因為剛建立的專案,不會被公開,所以要指定測試使用者
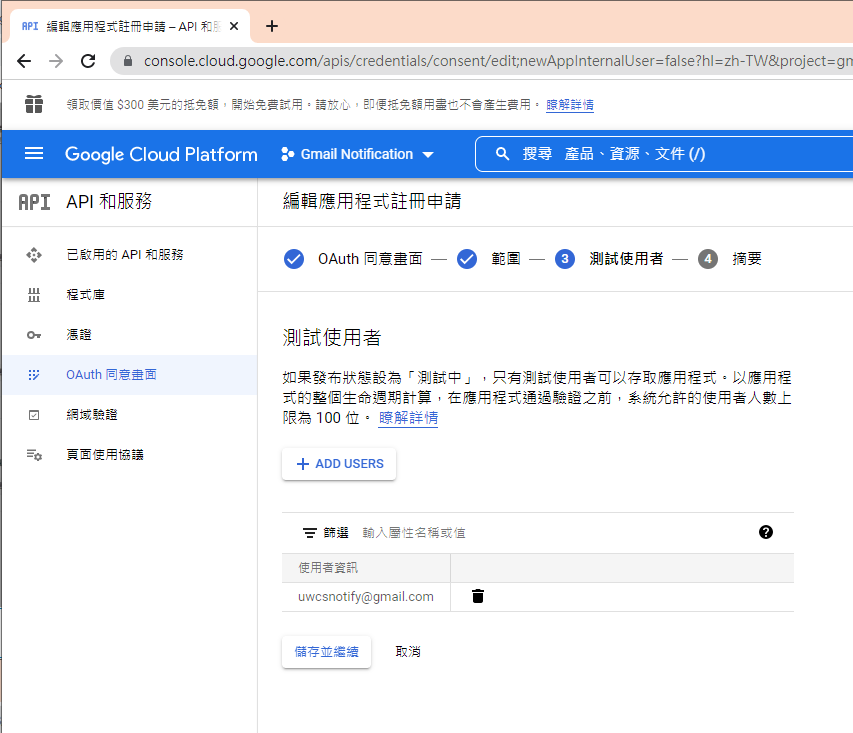
如果要給任意使用者,必需經過發布的流程,但準備工作有點麻煩,所以這次就不發布了。
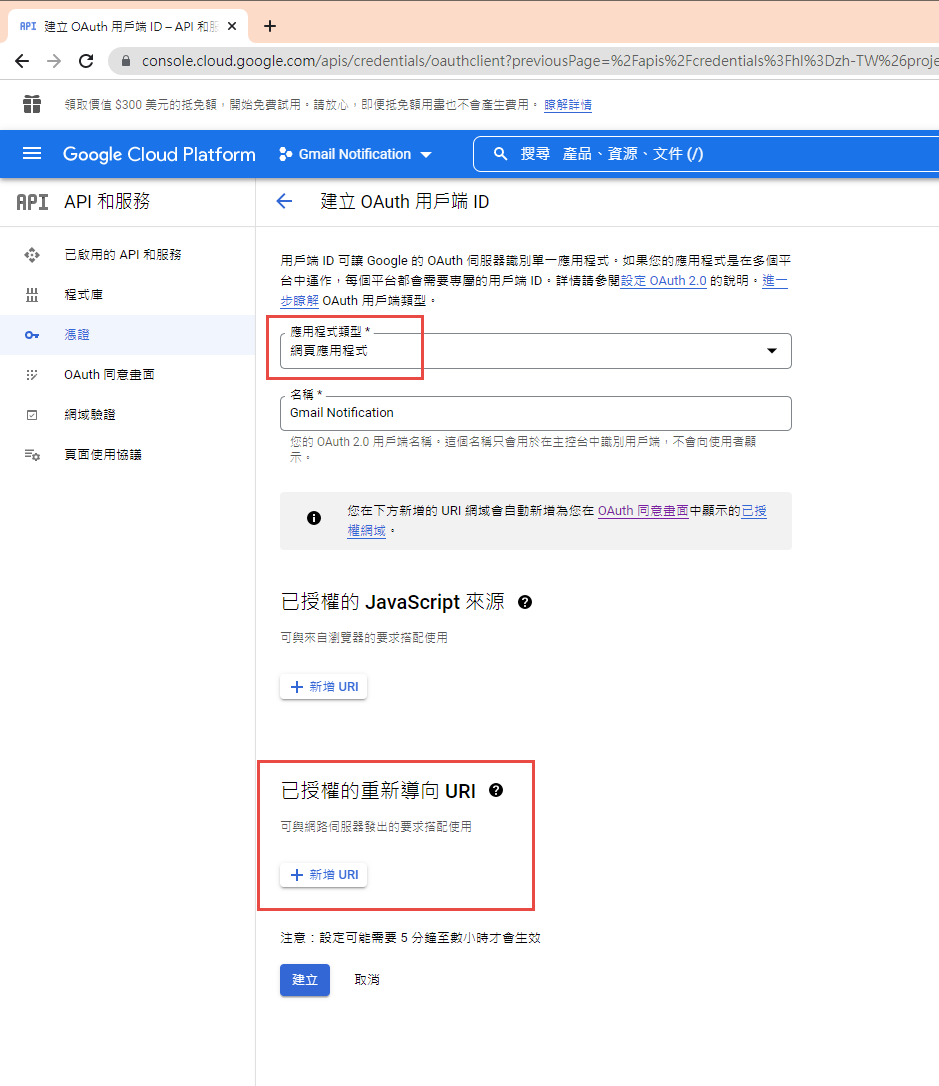
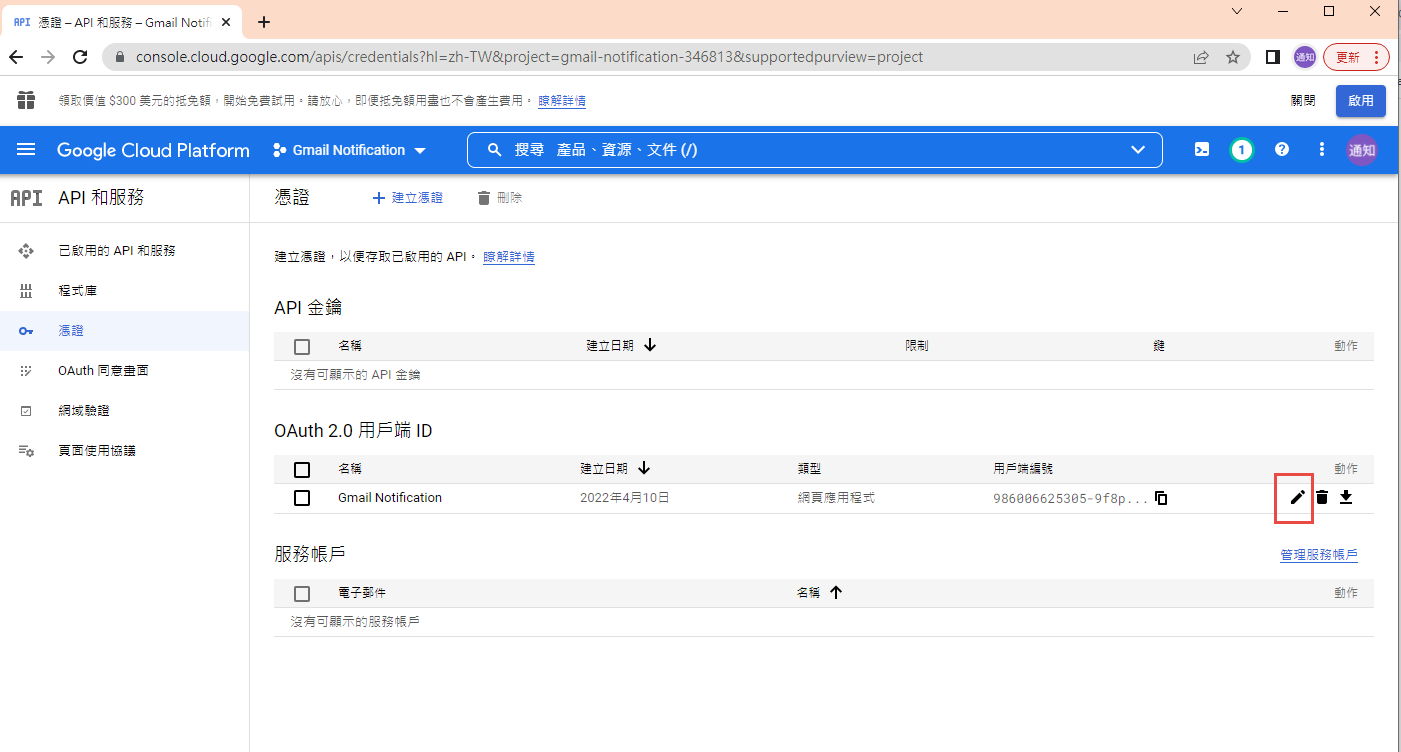
建立 OAuth 2.0 用戶端 ID 憑証

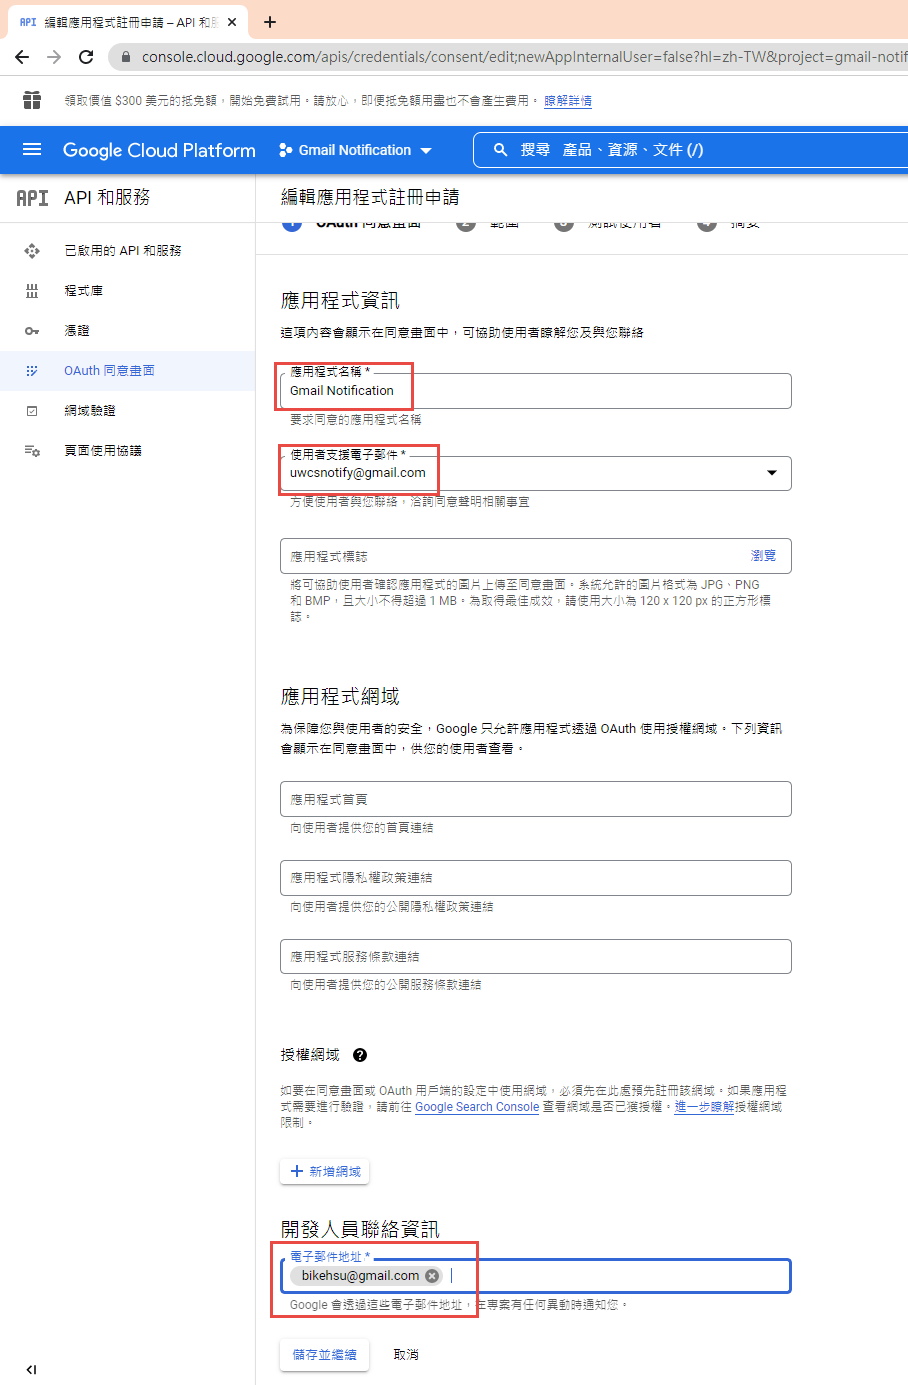
這裡除了名稱外,還有一個設定重導 Uri 的項目。現在不填寫,但稍後要回來補這個資料。
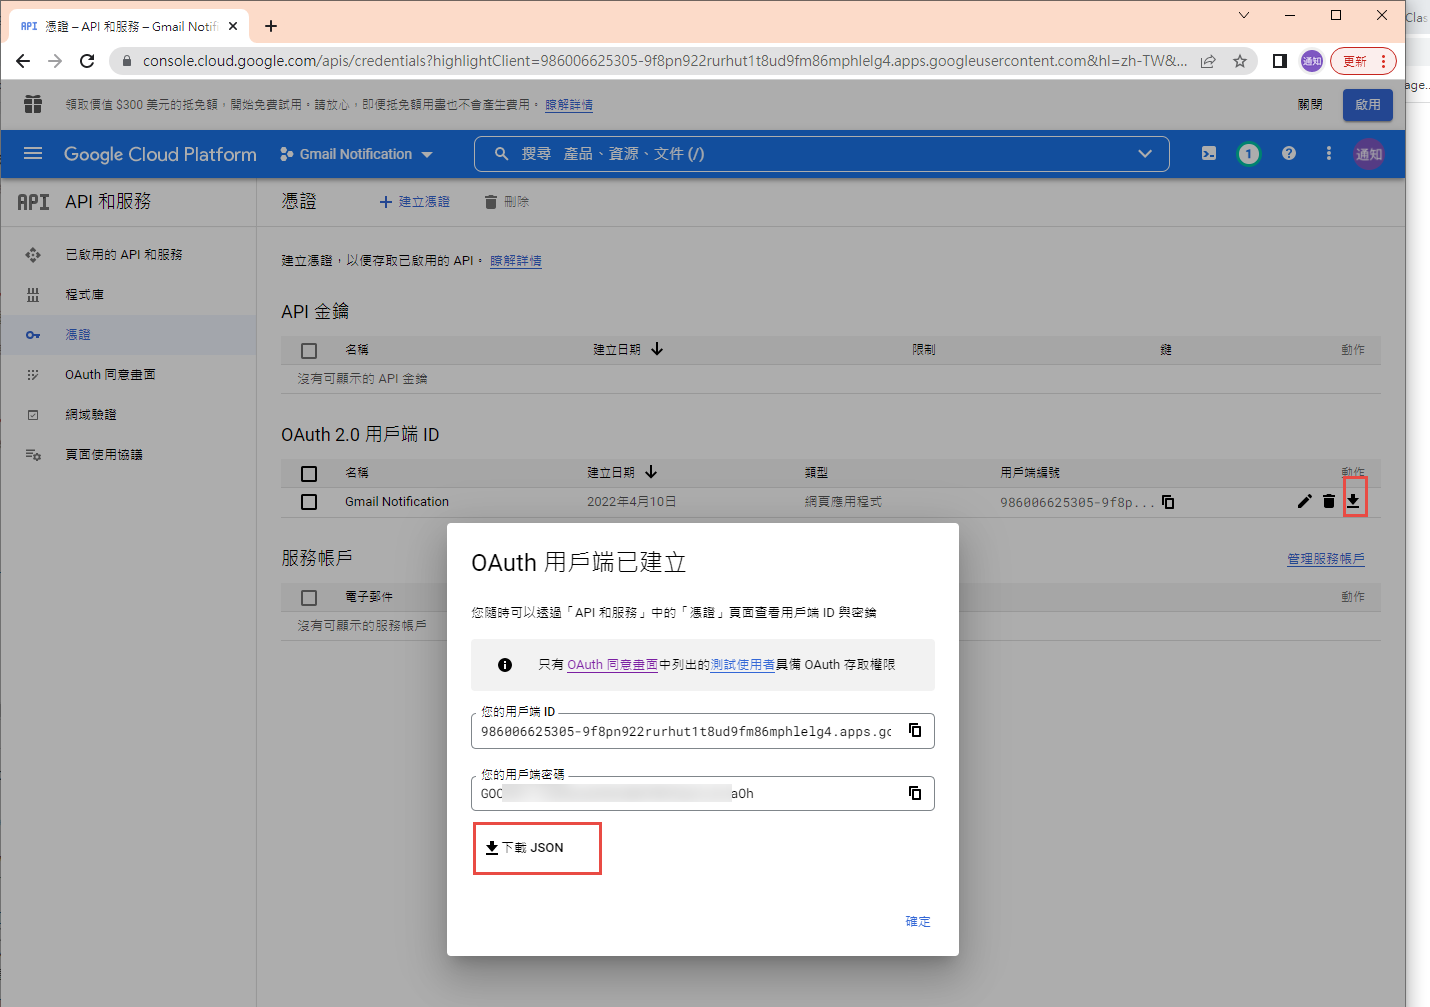
下載 json 之後,命名為 client_secret.json 保留後續使用。
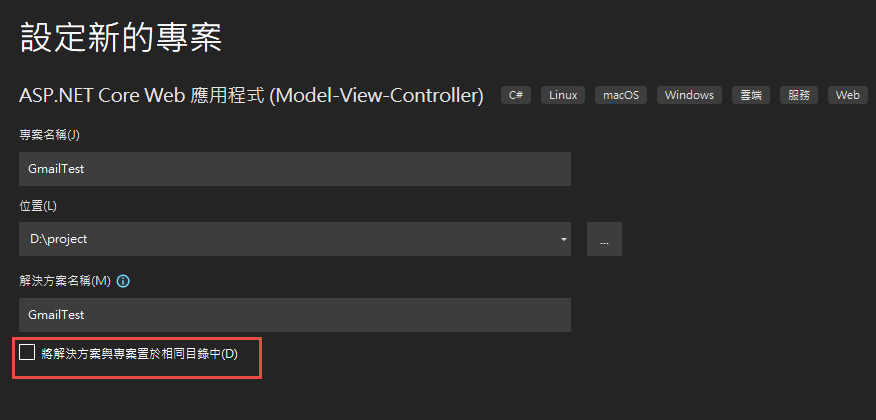
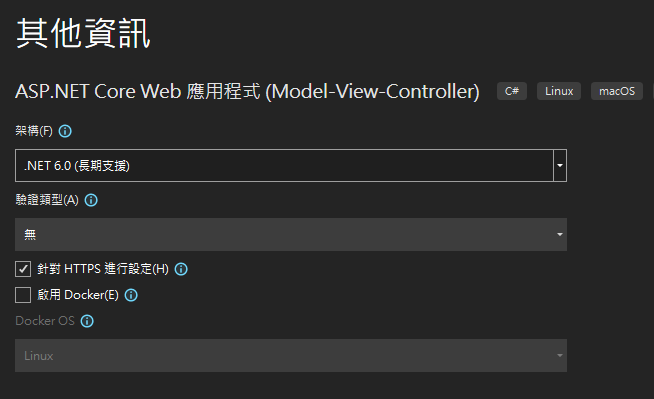
再來就要建立專案了. 用 VS2022 建立一個新專案

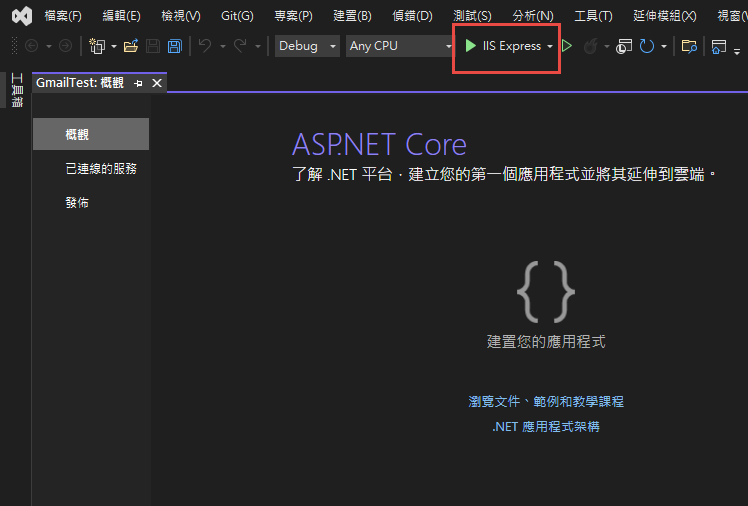
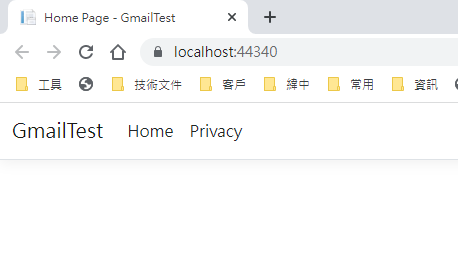
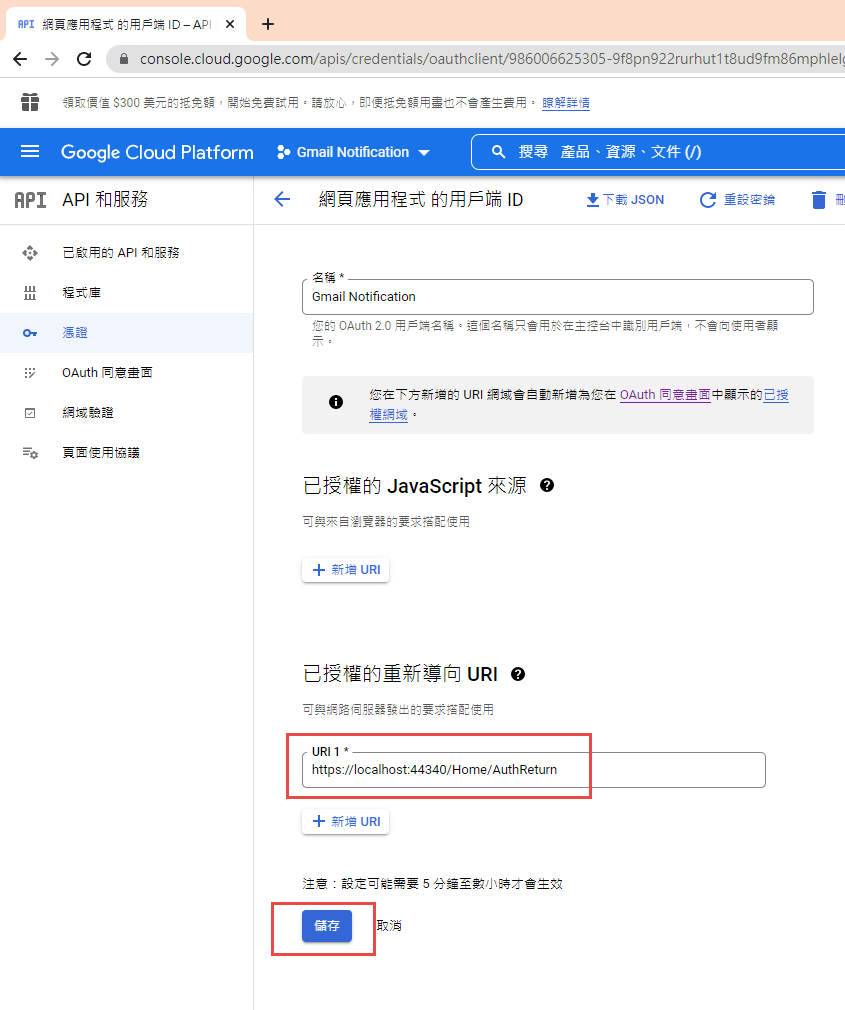
記錄網址, 本測試專案是 https://localhost:44340/ ,請依實際網址為準。
回到 OAuth 2.0 用戶端 ID 的設定頁. 在已授權的重新導向 URI 中填入 https://localhost:44340/Home/AuthReturn (填入的網址依實際專案的狀況,可能會有變化)
在 VS2022 中,使用 Nuget 安裝套件: (有漏的再麻煩和我說)
Google.Apis.Gmail.v1
Google.Apis.Auth
MimeKit (發送 gmail 時使用)
建立認証用的網址:
建立一個 Action, 用來取得認証用的網址:
執行結果:
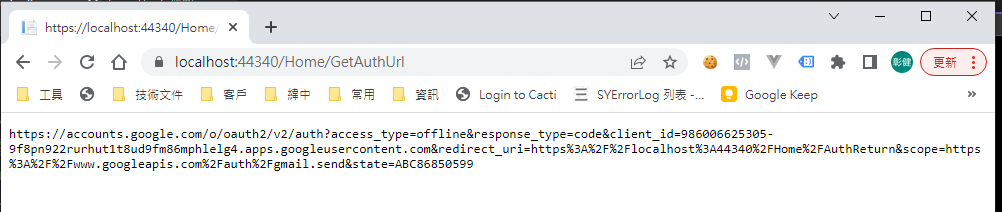
用 chrome 開啟產生的網址:
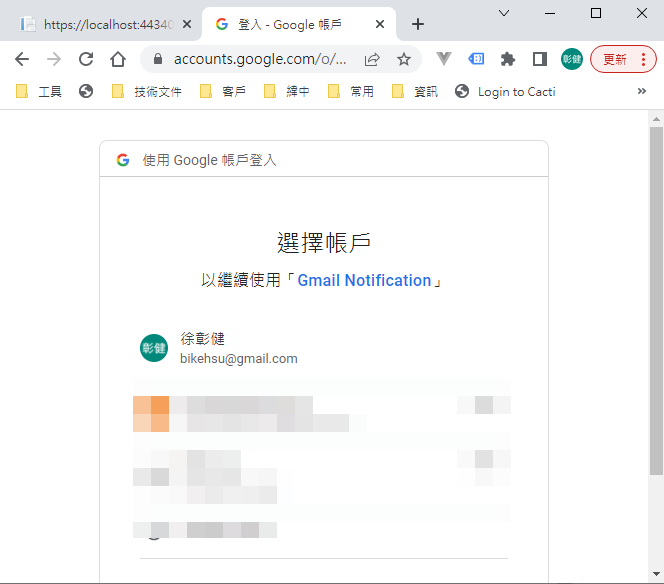
選取任一帳號,如果出現以下錯誤,請回到 "OAuth 同意畫面" 去新增測試使用者
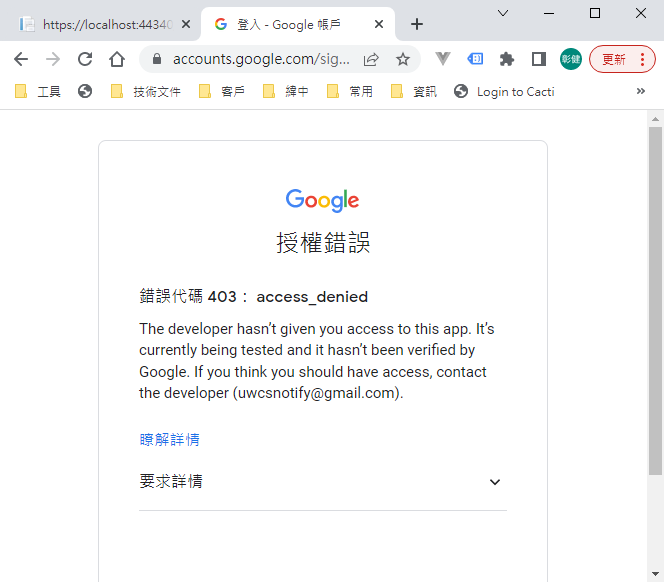
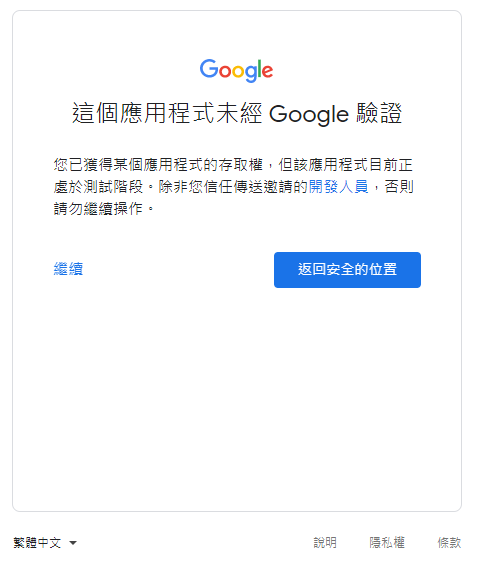
因為應用程式尚未發布,所以會看到警告,勇敢的繼續下去
這裡會要求授權使用你的名義發送信件。(這是在程式中取得授權的項目 Scopes 中所指定的)

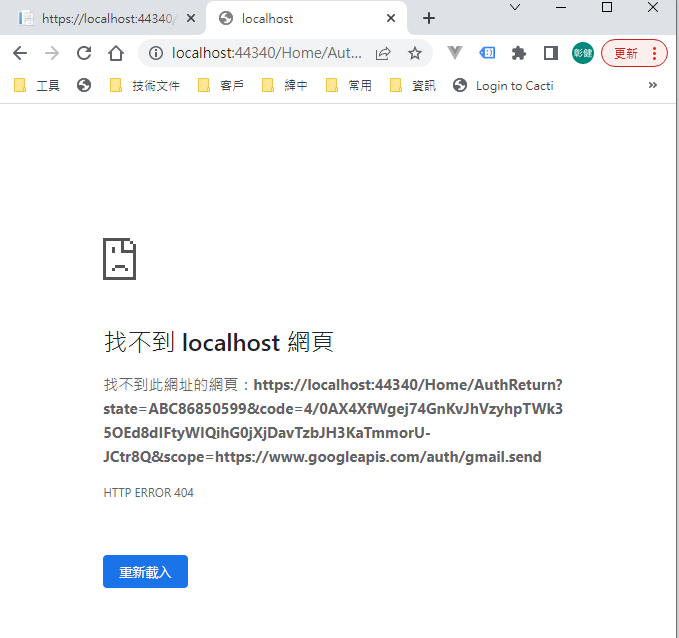
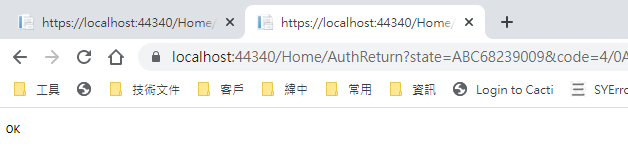
再繼續之後,會被重導至我們在 redirectUri 指定的網址。因為我們尚未完成,所以會看到錯誤,順便也可以看一下,會帶回哪一些參數。有 state, code, scope,共三個。
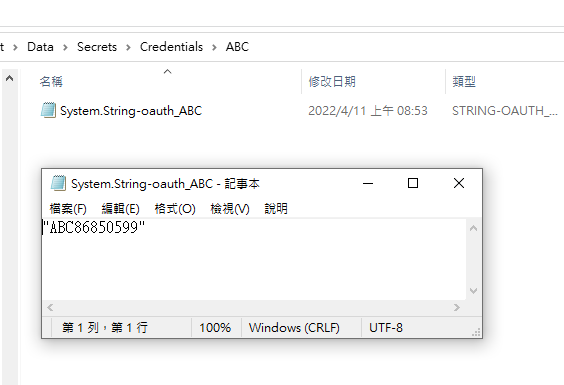
順便看一下,google 的套件會在 Credentials 的目錄下幫使用者建立一個目錄,在完成驗証前,會先放一個 System.String-oauth_XXX 的檔案,裡面的值和回傳的 state 是一樣的,這個應該是用來驗証回傳資料的。
接下來我們要新增 Action "AuthReturn" 如下:
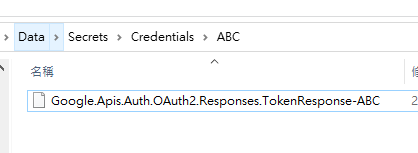
再跑一次上面的流程,最後回到 AuthReturn
在 D:\project\GmailTest\Data\Secrets\Credentials\ABC 裡面會產生一個檔案: 這個就是我們的 token 了。
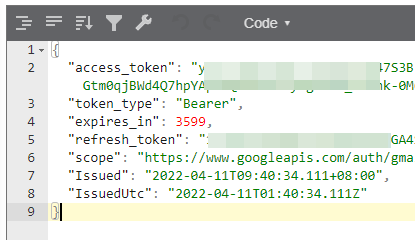
看一下裡面的內容, 有 access_token, refresh_token, scope 等等, 用途應該很好猜了.. 不知道各項目的目途也沒有關係。只要有這個 token 就可以了。
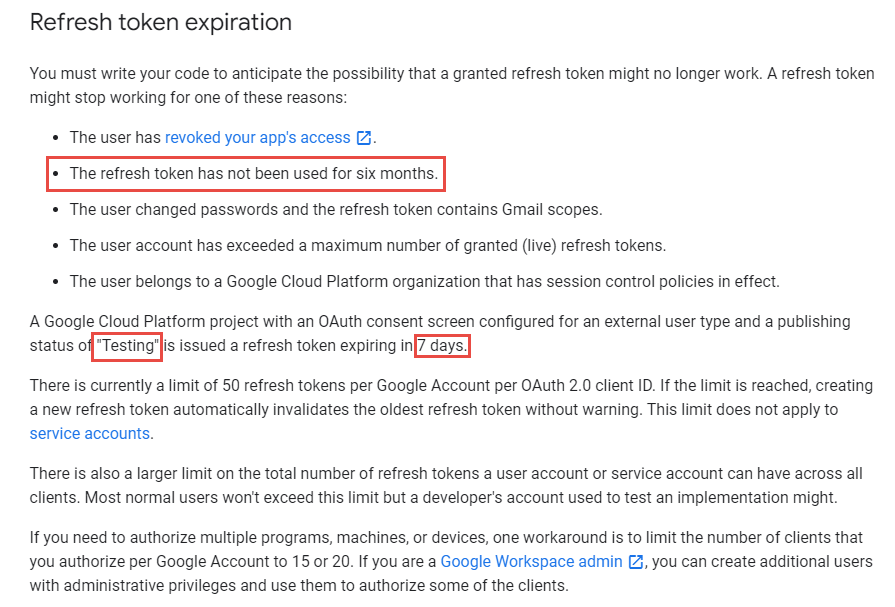
refresh_token 的效期請參考以下文件:
https://developers.google.com/identity/protocols/oauth2 。也可以參考下圖, 若是要用 gmail api 來發送通知信(例如連絡我們),紅色的地方是比較令人困擾的,例如 6 個月以上,沒有人留言,原來留下的 refresh_token 就失效了。使用者必需重新建立一個 refresh_token 。
最後來使用 gmail api 發送通知信, 直接看程式碼如下: 在這個過程中遇到最大的問題除了憑証問題之外,另一個問題是編碼。直到最後找到可以用 MimeKit 把 System.Net.Mail.MailMessage 編碼成 Gmail API 的格式才解決。程式碼如下:
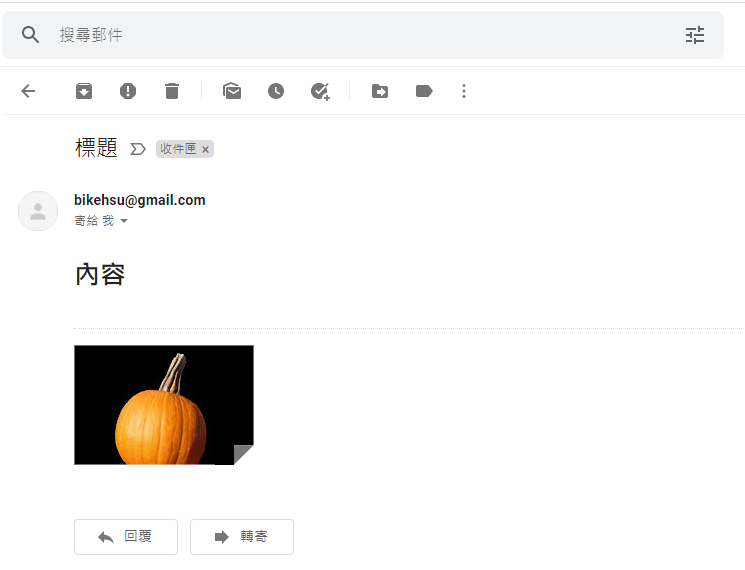
收到的信件:
結論:
使用 Gmail API 最大的原因是要增加安全性,和舊的 smtp 不同的地方是,使用 gmail api 之後,客戶不需要提供 gmail 的帳號和密碼就可以讓系統使用 gmail 發送信件,不過由於 refresh_token 的效期問題,可能會造成無法發送通知信而沒有任何人發現的情況,整個實用性會變的很低。
另一個還沒有測試的部份是應用程的啟用。這個審核不知道會不很麻煩,不過可以而知的時,整個流程會花更多的時間。
取代的做法: 可能要改用 Amazon 的 SES 來寄信,而且為了避免每個小網站都要跑 SES 的建立流程,準備來寫一個 API 給各網站使用,可以發送簡單的通知信。
以上的程式碼可以在這裡下載: https://github.com/bikehsu/GmailTest
如果你的目的是要使用 Gmail Api 取代舊的 Gmail SMTP 來發送通知信,建議你先跳到最下方看一下結論。
如果你是想要看一下 Gmail API 和 Google API 憑証的使用方法,可以看一下這篇文章。
1. 在 google cloud platform 建立新的專案.
https://console.cloud.google.com/
啟用 Gmail API
因為我們要透過 OAuth 取得使用者授權,所以要設定使用 OAuth 的同意畫面。
指定授權的範圍
因為剛建立的專案,不會被公開,所以要指定測試使用者
如果要給任意使用者,必需經過發布的流程,但準備工作有點麻煩,所以這次就不發布了。
建立 OAuth 2.0 用戶端 ID 憑証
這裡除了名稱外,還有一個設定重導 Uri 的項目。現在不填寫,但稍後要回來補這個資料。
下載 json 之後,命名為 client_secret.json 保留後續使用。
再來就要建立專案了. 用 VS2022 建立一個新專案
記錄網址, 本測試專案是 https://localhost:44340/ ,請依實際網址為準。
回到 OAuth 2.0 用戶端 ID 的設定頁. 在已授權的重新導向 URI 中填入 https://localhost:44340/Home/AuthReturn (填入的網址依實際專案的狀況,可能會有變化)
在 VS2022 中,使用 Nuget 安裝套件: (有漏的再麻煩和我說)
Google.Apis.Gmail.v1
Google.Apis.Auth
MimeKit (發送 gmail 時使用)
建立認証用的網址:
建立一個 Action, 用來取得認証用的網址:
        /// <summary>

        /// 取得授權的項目

        /// </summary>

        static string[] Scopes = { GmailService.Scope.GmailSend };


        // 和登入 google 的帳號無關

        // 任意值,若未來有使用者認証,可使用使用者編號或登入帳號。

        string Username = "ABC";


        /// <summary>

        /// 存放 client_secret 和 credential 的地方

        /// </summary>

        string SecretPath = @"D:\project\GmailTest\Data\Secrets";


        /// <summary>

        /// 認証完成後回傳的網址, 必需和 OAuth 2.0 Client Id 中填寫的 "已授權的重新導向 URI" 相同。

        /// </summary>

        string RedirectUri = $"https://localhost:44340/Home/AuthReturn";


        /// <summary>

        /// 取得認証用的網址

        /// </summary>

        /// <returns></returns>

        public async Task<string> GetAuthUrl()

        {

            using (var stream = new FileStream(Path.Combine(SecretPath, "client_secret.json"), FileMode.Open, FileAccess.Read))

            {

                FileDataStore dataStore = null;

                var credentialRoot = Path.Combine(SecretPath, "Credentials");

                if (!Directory.Exists(credentialRoot))

                {

                    Directory.CreateDirectory(credentialRoot);

                }


                //存放 credential 的地方,每個 username 會建立一個目錄。

                string filePath = Path.Combine(credentialRoot, Username);

                dataStore = new FileDataStore(filePath);


                IAuthorizationCodeFlow flow = new GoogleAuthorizationCodeFlow(new GoogleAuthorizationCodeFlow.Initializer

                {

                    ClientSecrets = GoogleClientSecrets.Load(stream).Secrets,

                    Scopes = Scopes,

                    DataStore = dataStore

                });


                var authResult = await new AuthorizationCodeWebApp(flow, RedirectUri, Username)

                .AuthorizeAsync(Username, CancellationToken.None);


                return authResult.RedirectUri;

            }

        }
執行結果:
用 chrome 開啟產生的網址:
選取任一帳號,如果出現以下錯誤,請回到 "OAuth 同意畫面" 去新增測試使用者
因為應用程式尚未發布,所以會看到警告,勇敢的繼續下去
這裡會要求授權使用你的名義發送信件。(這是在程式中取得授權的項目 Scopes 中所指定的)
再繼續之後,會被重導至我們在 redirectUri 指定的網址。因為我們尚未完成,所以會看到錯誤,順便也可以看一下,會帶回哪一些參數。有 state, code, scope,共三個。
順便看一下,google 的套件會在 Credentials 的目錄下幫使用者建立一個目錄,在完成驗証前,會先放一個 System.String-oauth_XXX 的檔案,裡面的值和回傳的 state 是一樣的,這個應該是用來驗証回傳資料的。
接下來我們要新增 Action "AuthReturn" 如下:
        public async Task<string> AuthReturn(AuthorizationCodeResponseUrl authorizationCode)

        {

            string[] scopes = new[] { GmailService.Scope.GmailSend };


            using (var stream = new FileStream(Path.Combine(SecretPath, "client_secret.json"), FileMode.Open, FileAccess.Read))

            {

                //確認 credential 的目錄已建立.

                var credentialRoot = Path.Combine(SecretPath, "Credentials");

                if (!Directory.Exists(credentialRoot))

                {

                    Directory.CreateDirectory(credentialRoot);

                }


                //暫存憑証用目錄

                string tempPath = Path.Combine(credentialRoot, authorizationCode.State);


                IAuthorizationCodeFlow flow = new GoogleAuthorizationCodeFlow(

                new GoogleAuthorizationCodeFlow.Initializer

                {

                    ClientSecrets = GoogleClientSecrets.Load(stream).Secrets,

                    Scopes = scopes,

                    DataStore = new FileDataStore(tempPath)

                });


                //這個動作應該是要把 code 換成 token

                await flow.ExchangeCodeForTokenAsync(Username, authorizationCode.Code, RedirectUri, CancellationToken.None).ConfigureAwait(false);


                if (!string.IsNullOrWhiteSpace(authorizationCode.State))

                {

                    string newPath = Path.Combine(credentialRoot, Username);

                    if (tempPath.ToLower() != newPath.ToLower())

                    {

                        if (Directory.Exists(newPath))

                            Directory.Delete(newPath, true);


                        Directory.Move(tempPath, newPath);

                    }

                }


                return "OK";

            }

        }
再跑一次上面的流程,最後回到 AuthReturn
在 D:\project\GmailTest\Data\Secrets\Credentials\ABC 裡面會產生一個檔案: 這個就是我們的 token 了。
看一下裡面的內容, 有 access_token, refresh_token, scope 等等, 用途應該很好猜了.. 不知道各項目的目途也沒有關係。只要有這個 token 就可以了。
refresh_token 的效期請參考以下文件:
https://developers.google.com/identity/protocols/oauth2 。也可以參考下圖, 若是要用 gmail api 來發送通知信(例如連絡我們),紅色的地方是比較令人困擾的,例如 6 個月以上,沒有人留言,原來留下的 refresh_token 就失效了。使用者必需重新建立一個 refresh_token 。
最後來使用 gmail api 發送通知信, 直接看程式碼如下: 在這個過程中遇到最大的問題除了憑証問題之外,另一個問題是編碼。直到最後找到可以用 MimeKit 把 System.Net.Mail.MailMessage 編碼成 Gmail API 的格式才解決。程式碼如下:
        public async Task<bool> SendTestMail()

        {

            var service = await GetGmailService();


            GmailMessage message = new GmailMessage();

            message.Subject = "標題";

            message.Body = $"<h1>內容</h1>";

            message.FromAddress = "bikehsu@gmail.com";

            message.IsHtml = true;

            message.ToRecipients = "bikehsu@gmail.com";

            message.Attachments = new List<Attachment>();


            string filePath = @"C:\Users\bike\Pictures\Vegetable_pumpkin.jpg";    //要附加的檔案

            Attachment attachment1 = new Attachment(filePath);

            message.Attachments.Add(attachment1);


            SendEmail(message, service);

            Console.WriteLine("OK");


            return true;

        }


        async Task<GmailService> GetGmailService()

        {

            UserCredential credential = null;


            var credentialRoot = Path.Combine(SecretPath, "Credentials");

            if (!Directory.Exists(credentialRoot))

            {

                Directory.CreateDirectory(credentialRoot);

            }


            string filePath = Path.Combine(credentialRoot, Username);


            using (var stream = new FileStream(Path.Combine(SecretPath, "client_secret.json"), FileMode.Open, FileAccess.Read))

            {

                credential = await GoogleWebAuthorizationBroker.AuthorizeAsync(

                GoogleClientSecrets.Load(stream).Secrets,

                Scopes,

                Username,

                CancellationToken.None,

                new FileDataStore(filePath));

            }


            var service = new GmailService(new BaseClientService.Initializer()

            {

                HttpClientInitializer = credential,

                ApplicationName = "Send Mail",

            });


            return service;

        }


        public class GmailMessage

        {

            public string FromAddress { get; set; }

            public string ToRecipients { get; set; }


            public string Subject { get; set; }

            public string Body { get; set; }

            public bool IsHtml { get; set; }


            public List<System.Net.Mail.Attachment> Attachments { get; set; }

        }


        public static void SendEmail(GmailMessage email, GmailService service)

        {

            var mailMessage = new System.Net.Mail.MailMessage();

            mailMessage.From = new System.Net.Mail.MailAddress(email.FromAddress);

            mailMessage.To.Add(email.ToRecipients);

            mailMessage.ReplyToList.Add(email.FromAddress);

            mailMessage.Subject = email.Subject;

            mailMessage.Body = email.Body;

            mailMessage.IsBodyHtml = email.IsHtml;


            if (email.Attachments != null)

            {

                foreach (System.Net.Mail.Attachment attachment in email.Attachments)

                {

                    mailMessage.Attachments.Add(attachment);

                }

            }


            var mimeMessage = MimeKit.MimeMessage.CreateFromMailMessage(mailMessage);


            var gmailMessage = new Google.Apis.Gmail.v1.Data.Message

            {

                Raw = Encode(mimeMessage)

            };


            Google.Apis.Gmail.v1.UsersResource.MessagesResource.SendRequest request = service.Users.Messages.Send(gmailMessage, "me");


            request.Execute();

        }


        public static string Encode(MimeMessage mimeMessage)

        {

            using (MemoryStream ms = new MemoryStream())

            {

                mimeMessage.WriteTo(ms);

                return Convert.ToBase64String(ms.GetBuffer())

                    .TrimEnd('=')

                    .Replace('+', '-')

                    .Replace('/', '_');

            }

        }
收到的信件:
結論:
使用 Gmail API 最大的原因是要增加安全性,和舊的 smtp 不同的地方是,使用 gmail api 之後,客戶不需要提供 gmail 的帳號和密碼就可以讓系統使用 gmail 發送信件,不過由於 refresh_token 的效期問題,可能會造成無法發送通知信而沒有任何人發現的情況,整個實用性會變的很低。
另一個還沒有測試的部份是應用程的啟用。這個審核不知道會不很麻煩,不過可以而知的時,整個流程會花更多的時間。
取代的做法: 可能要改用 Amazon 的 SES 來寄信,而且為了避免每個小網站都要跑 SES 的建立流程,準備來寫一個 API 給各網站使用,可以發送簡單的通知信。
以上的程式碼可以在這裡下載: https://github.com/bikehsu/GmailTest
Bike, 2022/4/10 下午 09:31:15
環境說明:
AD Server: dc1 (192.168.101.109)
PC: pc110 (192.168.101.110)
PC: pc111 (192.168.101.111)
第一步,把 PC 加入 AD, 這個算是基本操作,網路上說明很多, 就不再截圖了。不過在這裡還是遇到了第一個問題,解決過程請參考另一份文件: https://blog.uwinfo.com.tw/Article.aspx?Id=486
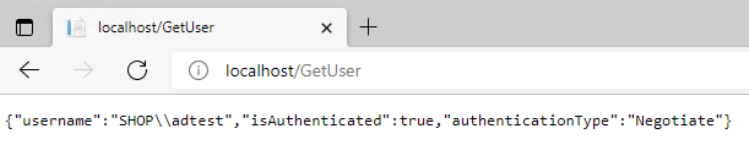
第二步,在 Visual Studio 的測試環境中測試:
一開始是使用 .Net 6.0 來實作,沒想到找到的文件都是 .Net Core 3.1 的,所以先用 .Net Core 3.1 實做了一次,後來改用 .Net 6.0 實作才成功。使用 .Net 6.0 實作的過程如下:
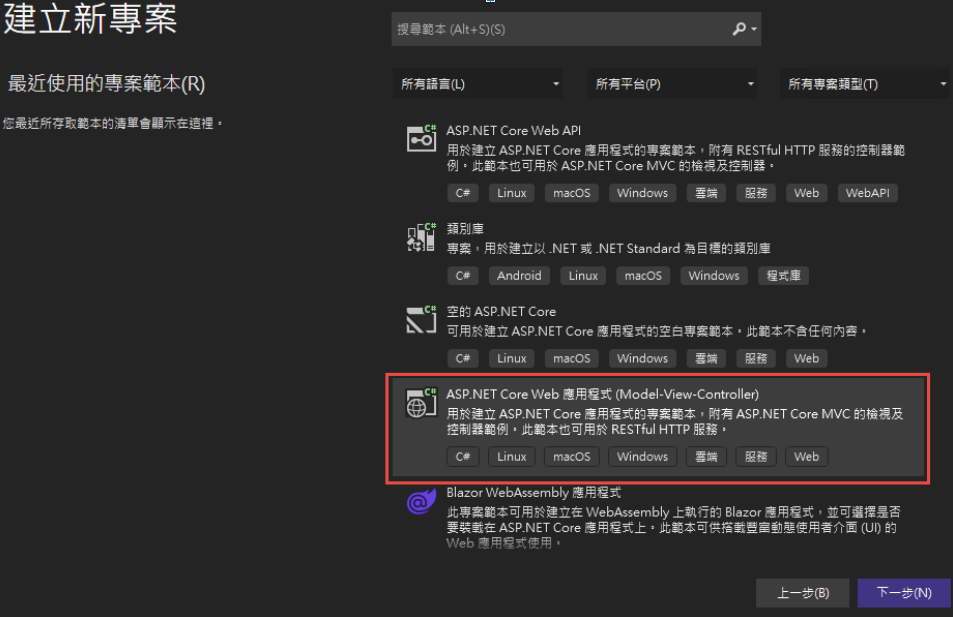
1. 建立一個 MVC 的標準專案:
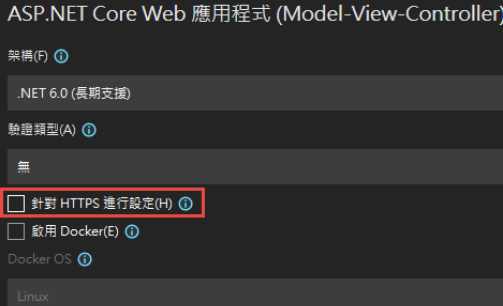
為了避免憑証問題,所以拿掉了 HTTPS 的設定
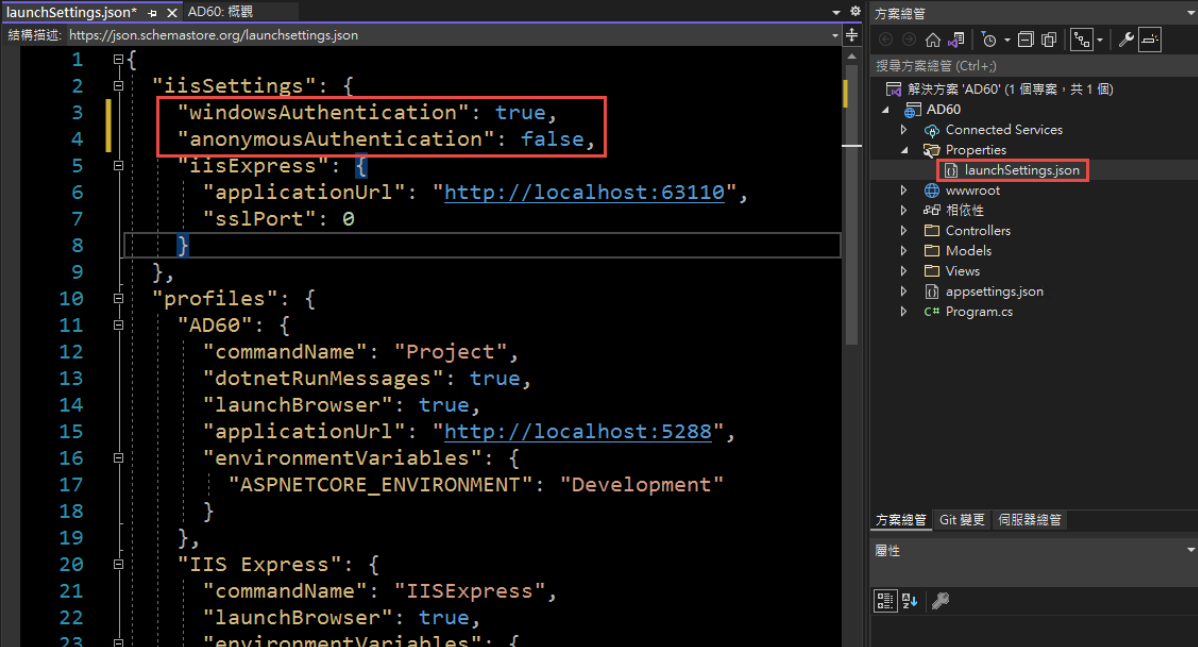
2. 改寫 launchSettings.json:
iisSettings 中的 windowsAuthentication 改為 True, anonymousAuthentication 改為 false。如下圖:
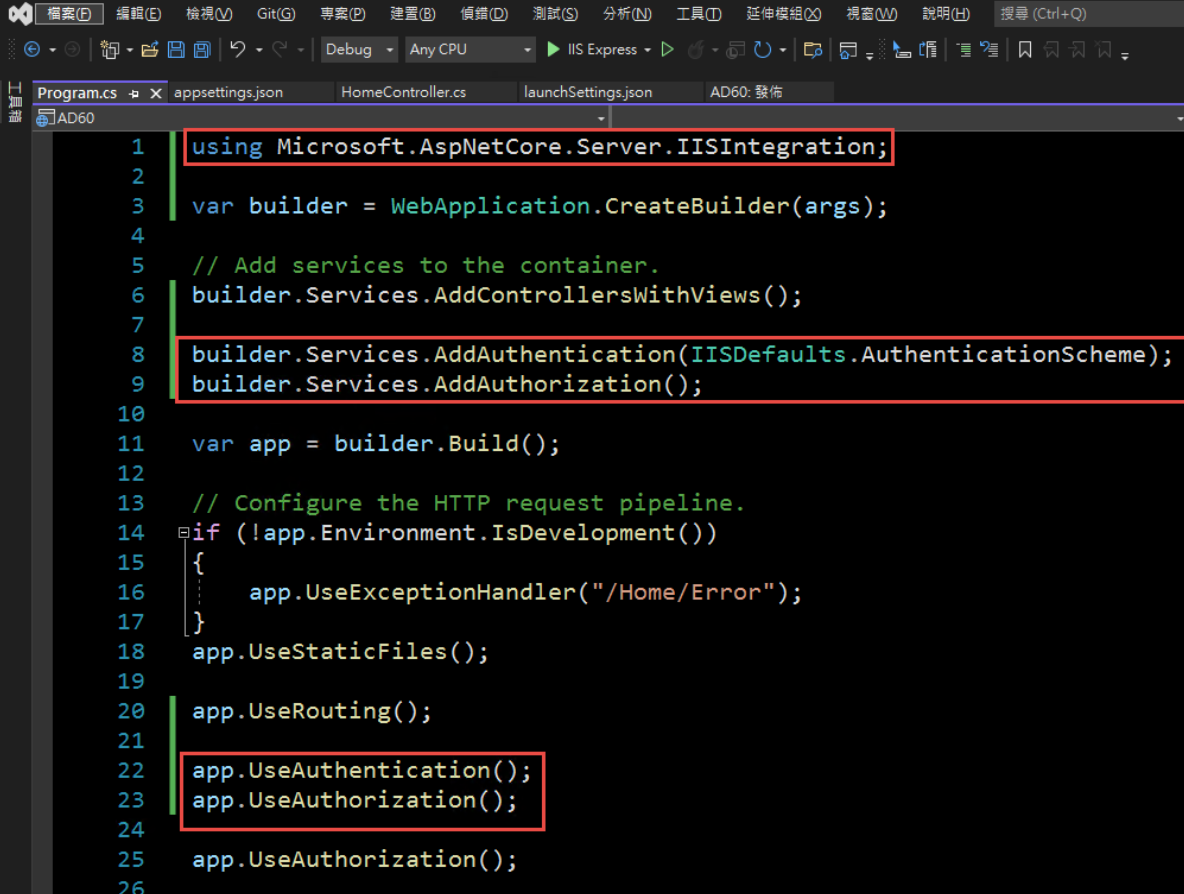
3. 修改 Program.cs, 加入以下四行指令:
builder.Services.AddAuthentication(IISDefaults.AuthenticationScheme);
builder.Services.AddAuthorization();
app.UseAuthentication();
app.UseAuthorization();
(注意: UseAuthentication 要加在 UseAuthentication 之後, VS 2022 應該會提示要新增 using Microsoft.AspNetCore.Server.IISIntegration;)
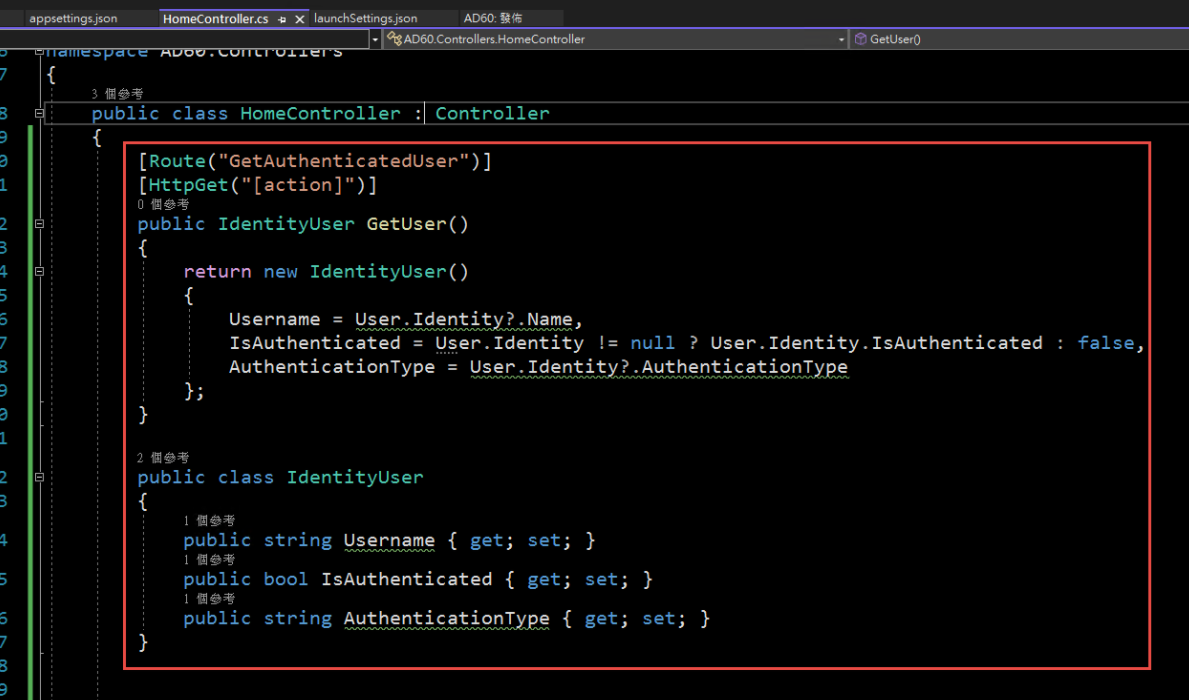
4. 在 HomeController 增加一個 Action, 以讀取驗証資料:
[Route("GetAuthenticatedUser")]
[HttpGet("[action]")]
public IdentityUser GetUser()
{
return new IdentityUser()
{
Username = User.Identity?.Name,
IsAuthenticated = User.Identity != null ? User.Identity.IsAuthenticated : false,
AuthenticationType = User.Identity?.AuthenticationType
};
}
public class IdentityUser
{
public string Username { get; set; }
public bool IsAuthenticated { get; set; }
public string AuthenticationType { get; set; }
}
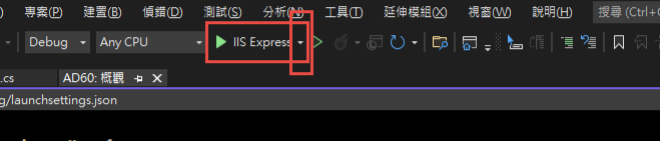
5. 啟動時記得要改用 IIS Express (感覺早上花了兩三個小時在為了這個問題打轉):
6. 執行結果:

第三步,在 IIS 中安裝網站:
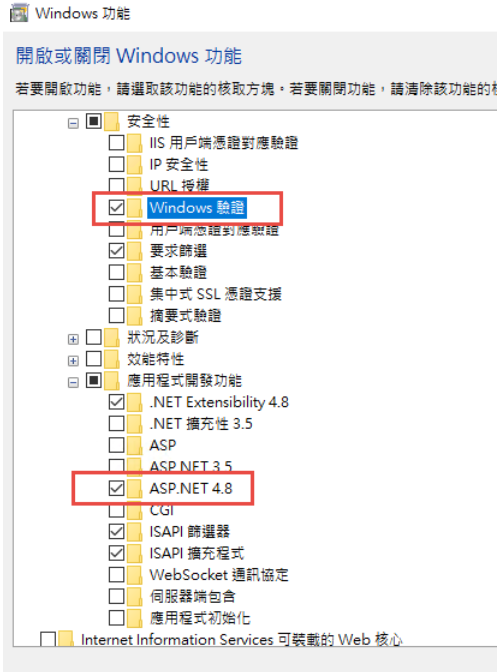
1. 在安裝 IIS 時,記得要勾選 windows 驗證
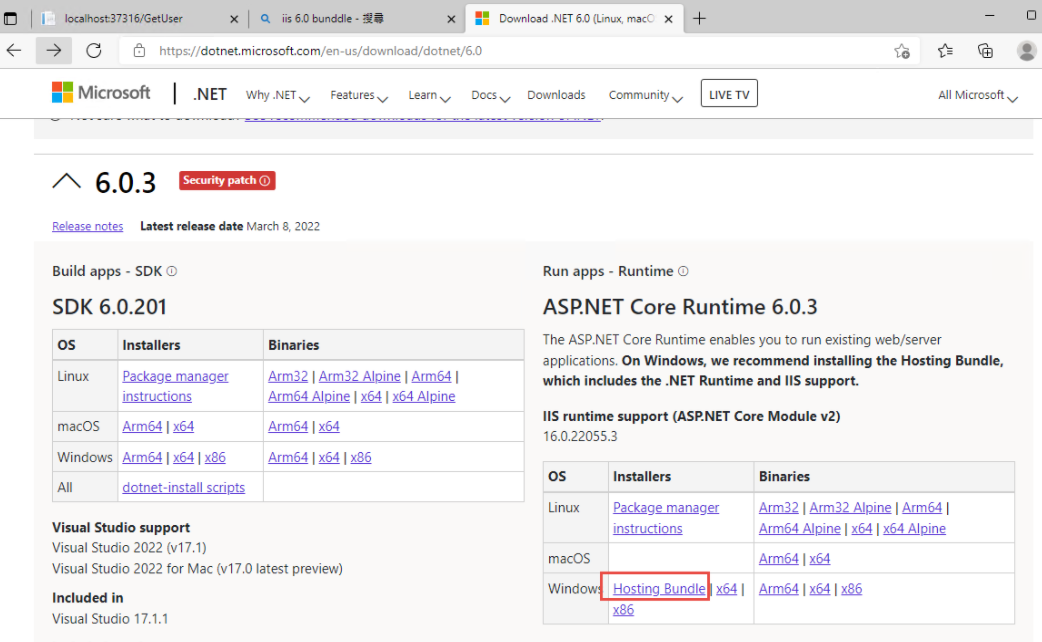
2. 安裝 .Net 6.0 的 Hosting Bundle
https://dotnet.microsoft.com/en-us/download/dotnet/6.0
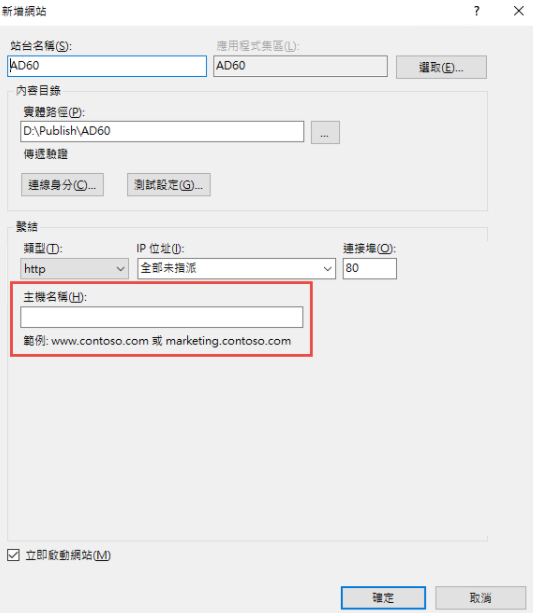
3. 新增網站:
主機名稱留空白 (AD 驗証在網域內好像不會使用指定的主機名稱,這個有待後續再做確認)
如果沒有刪除預設網站,會遇到警告,直接確認即可.
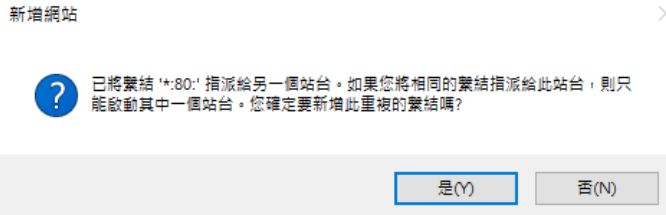
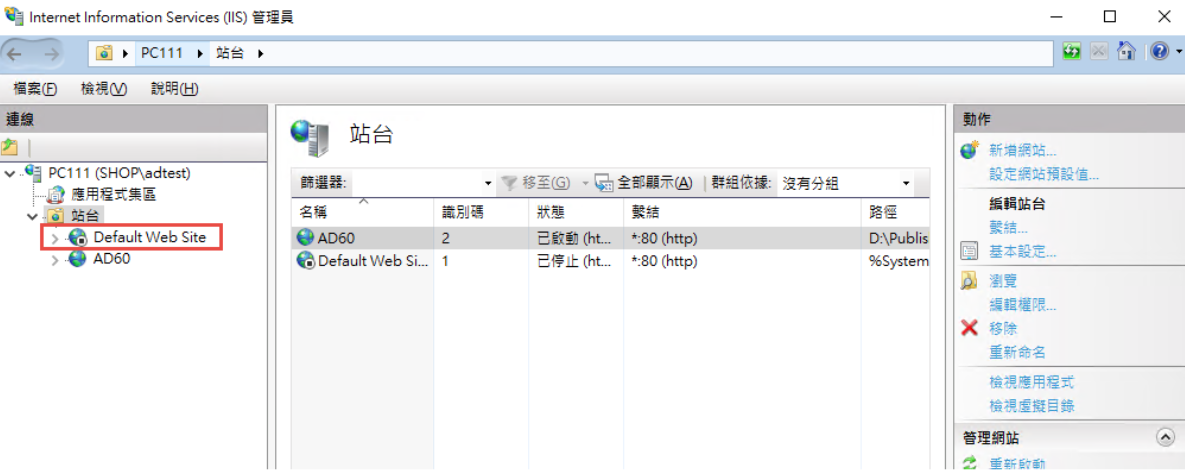
要把 Default Web Site 關閉,再啟動測試站
要啟動 windows 驗証: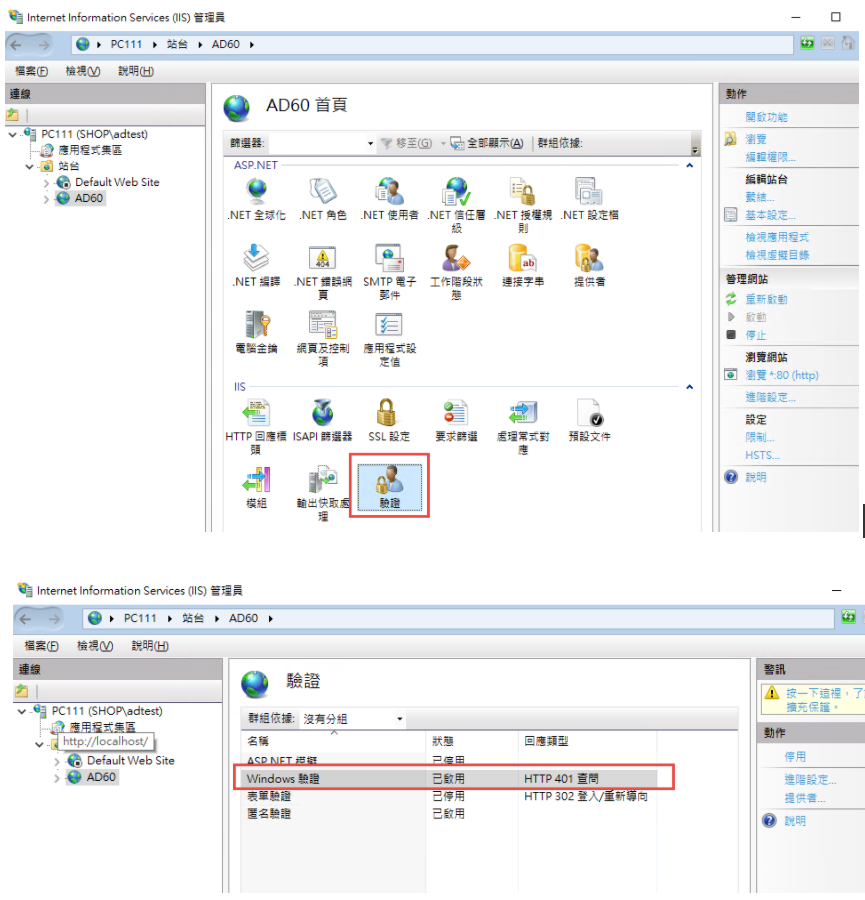
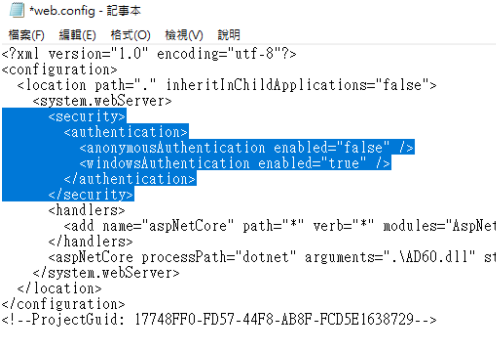
在 web.config 中增加
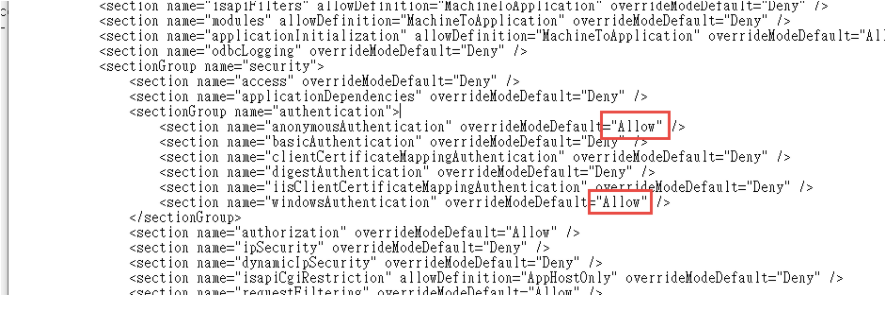
修改 applicationHost.config:
檔案位置: %windir%\system32\inetsrv\config\applicationHost.config
這兩地方的 Deny 改為 Allow
參考文件: https://docs.microsoft.com/zh-tw/iis/get-started/planning-for-security/how-to-use-locking-in-iis-configuration
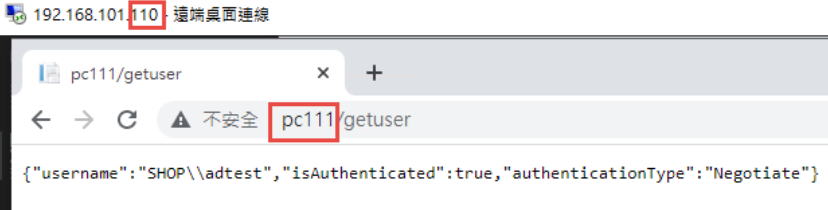
3. 可以取得登入資訊如下:
4. 從 Domain 中另一台主機來存取,不用登入,自動取得目前登入者的資訊。
5. 從非網域主機連線: 會要求認証
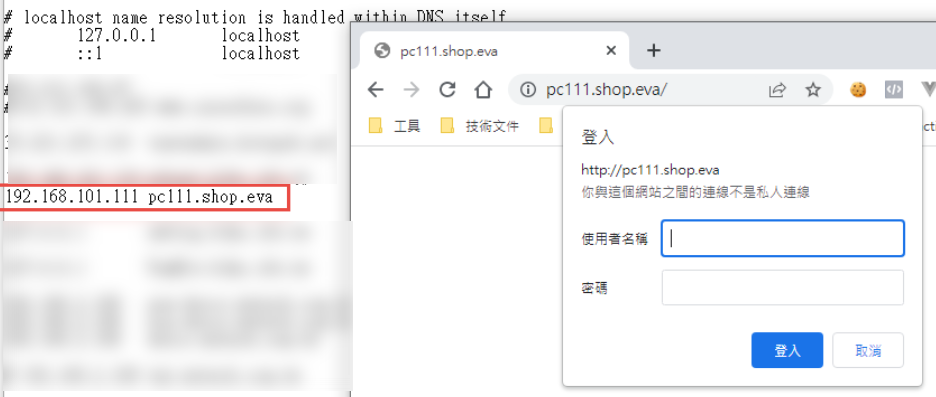
目前遇到問題: 在網域中的電腦只能用主機名稱登入,非網域的電腦,才能夠使用網址登入。
測試專案下載: https://github.com/bikehsu/AD60
AD Server: dc1 (192.168.101.109)
PC: pc110 (192.168.101.110)
PC: pc111 (192.168.101.111)
第一步,把 PC 加入 AD, 這個算是基本操作,網路上說明很多, 就不再截圖了。不過在這裡還是遇到了第一個問題,解決過程請參考另一份文件: https://blog.uwinfo.com.tw/Article.aspx?Id=486
第二步,在 Visual Studio 的測試環境中測試:
一開始是使用 .Net 6.0 來實作,沒想到找到的文件都是 .Net Core 3.1 的,所以先用 .Net Core 3.1 實做了一次,後來改用 .Net 6.0 實作才成功。使用 .Net 6.0 實作的過程如下:
1. 建立一個 MVC 的標準專案:
為了避免憑証問題,所以拿掉了 HTTPS 的設定
2. 改寫 launchSettings.json:
iisSettings 中的 windowsAuthentication 改為 True, anonymousAuthentication 改為 false。如下圖:
3. 修改 Program.cs, 加入以下四行指令:
builder.Services.AddAuthentication(IISDefaults.AuthenticationScheme);
builder.Services.AddAuthorization();
app.UseAuthentication();
app.UseAuthorization();
(注意: UseAuthentication 要加在 UseAuthentication 之後, VS 2022 應該會提示要新增 using Microsoft.AspNetCore.Server.IISIntegration;)
4. 在 HomeController 增加一個 Action, 以讀取驗証資料:
[Route("GetAuthenticatedUser")]
[HttpGet("[action]")]
public IdentityUser GetUser()
{
return new IdentityUser()
{
Username = User.Identity?.Name,
IsAuthenticated = User.Identity != null ? User.Identity.IsAuthenticated : false,
AuthenticationType = User.Identity?.AuthenticationType
};
}
public class IdentityUser
{
public string Username { get; set; }
public bool IsAuthenticated { get; set; }
public string AuthenticationType { get; set; }
}
5. 啟動時記得要改用 IIS Express (感覺早上花了兩三個小時在為了這個問題打轉):
6. 執行結果:
第三步,在 IIS 中安裝網站:
1. 在安裝 IIS 時,記得要勾選 windows 驗證
2. 安裝 .Net 6.0 的 Hosting Bundle
https://dotnet.microsoft.com/en-us/download/dotnet/6.0
3. 新增網站:
主機名稱留空白 (AD 驗証在網域內好像不會使用指定的主機名稱,這個有待後續再做確認)
如果沒有刪除預設網站,會遇到警告,直接確認即可.
要把 Default Web Site 關閉,再啟動測試站
要啟動 windows 驗証:
在 web.config 中增加
      <security>

        <authentication>

          <anonymousAuthentication enabled="false" />

          <windowsAuthentication enabled="true" />

        </authentication>

      </security>
修改 applicationHost.config:
檔案位置: %windir%\system32\inetsrv\config\applicationHost.config
這兩地方的 Deny 改為 Allow
<section name="anonymousAuthentication" overrideModeDefault="Deny" />

<section name="windowsAuthentication" overrideModeDefault="Deny" />
參考文件: https://docs.microsoft.com/zh-tw/iis/get-started/planning-for-security/how-to-use-locking-in-iis-configuration
3. 可以取得登入資訊如下:
4. 從 Domain 中另一台主機來存取,不用登入,自動取得目前登入者的資訊。
5. 從非網域主機連線: 會要求認証
目前遇到問題: 在網域中的電腦只能用主機名稱登入,非網域的電腦,才能夠使用網址登入。
測試專案下載: https://github.com/bikehsu/AD60
Bike, 2022/3/19 下午 09:10:08