頁數 1 / 2
下一頁
搜尋 download 結果:
IIS 如果要使用 reverse proxy server 服務,其實網路上已經有很多文章可以參考
這篇文章只是記錄一下安裝上要注意的事
過去安裝 IIS 套件 可以透過 Web Platform Installer 搜尋下載
但現在 IIS 的 Web Platform Installer 已經不讓人搜尋下載可安裝的套件
所以要直接去微軟網站找相關套件 可以用 IIS ARR 搜尋
https://www.iis.net/downloads/microsoft/application-request-routing
下載 requestRouter_amd64.msi 安裝這個 (3.0版 2021 年以後就沒有更新了)
安裝前,IIS也要預先安裝 URLRewrite 2 套件
安裝很簡單,msi 安裝後,IIS重啟就可以看到
IIS 的主機設定,可以看到 "Application Reuest Routing Cache" --> 點進後右邊有 Server Proxy Settings
proxy 的設定有一些地方要注意一下,避免未來採到雷
首先 當然先開啟 Enable proxy,下面針對一些要注意的屬性說明一下
1. Time-out : 預設120秒,如果你後端的站台有一些操作可能超過兩分鐘(例如處理報表),這個就調長一點
2. Reverse rewrite host in response header: 這個勾勾預設是開的,他的好意是同站台redirect(302) 到其他網頁,可以覆蓋
host 讓 client端能跑到正常的網址。但如果你是 redirect 到其他站台,建議把它關掉,不然後端網站如果下
redirect (302) 到別的站台,他會主動把 redirect網址 host 改為本站 (被雷過,所以要特別記下來)
3. Include TCP port from client IP: 這是一個 X-Forwarded-For 設定,預設是打開,這樣後端主機抓 client 來源 IP就會類似
"112.121.100.100:443" ,但後端網站在抓 client端IP通常不會管 port number,因此就會造成比對 IP 發生錯誤
所以建議還是把它關閉
4. Enable disk cache: 預設是勾勾打開,如果後端是靜態網站,例如圖片server,這個打開沒有問題,但如果後端網站是動態網站
那還是關掉
darren, 2025/1/10 上午 11:01:38
產生 FileStreamResult 物件的 function 如下: (目前置於 SU 之中,以便轉移)
輸出用的 Controller 和 Action 如下:
        static List<Brush> CaptchaBrushes = null;

        public static FileStreamResult CreateCaptcha(string captcha)

        {

            if (CaptchaBrushes == null)

            {

                CaptchaBrushes = new List<Brush>();

                CaptchaBrushes.Add(Brushes.White);

                CaptchaBrushes.Add(Brushes.Gold);

                CaptchaBrushes.Add(Brushes.LightSkyBlue);

                CaptchaBrushes.Add(Brushes.LimeGreen);

                CaptchaBrushes.Add(Brushes.AliceBlue);

                CaptchaBrushes.Add(Brushes.AntiqueWhite);

                CaptchaBrushes.Add(Brushes.BurlyWood);

                CaptchaBrushes.Add(Brushes.Silver);

            }


            int width = 90;

            int height = 45;


            //https://stackoverflow.com/questions/61365732/cannot-access-a-closed-stream-when-returning-filestreamresult-from-c-sharp-netc

            //Using statements close and unload the variable from memory set in the using statement which is why you are getting an error trying to access a closed memory stream.You don't need to use a using statement if you are just going to return the result at the end.


            //這個 memory stream 不用關閉或 dispose

            var ms = new MemoryStream();


            // 釋放所有在 GDI+ 所佔用的記憶體空間 ( 非常重要!! )

            using (Bitmap _bmp = new Bitmap(width, height))

            using (Graphics _graphics = Graphics.FromImage(_bmp))

            using (Font _font = new Font("Courier New", 24, FontStyle.Bold)) // _font 設定要出現在圖片上的文字字型、大小與樣式

            {

                // (封裝 GDI+ 繪圖介面) 所有繪圖作業都需透過 Graphics 物件進行操作

                _graphics.Clear(Color.Black);


                // 如果想啟用「反鋸齒」功能,可以將以下這行取消註解

                //_graphics.TextRenderingHint = TextRenderingHint.AntiAlias;


                // 將亂碼字串「繪製」到之前產生的 Graphics 「繪圖板」上

                var x = 10;

                for(var i = 0; i < captcha.Length; i++)

                {

                    _graphics.DrawString(captcha.Substring(i, 1), _font, CaptchaBrushes[Su.MathUtil.GetRandomInt(CaptchaBrushes.Count)], x, Su.MathUtil.GetRandomInt(15));

                    x += 10 + Su.MathUtil.GetRandomInt(10);

                }


                // 畫線


                _graphics.DrawLine(new Pen(CaptchaBrushes[Su.MathUtil.GetRandomInt(CaptchaBrushes.Count)], 1),

                    Su.MathUtil.GetRandomInt(0, Convert.ToInt32((width * 0.9 / 2))), 0, Su.MathUtil.GetRandomInt(Convert.ToInt32(width / 2), Convert.ToInt32(width * 1.9 / 2)), height);


                _graphics.DrawLine(new Pen(CaptchaBrushes[Su.MathUtil.GetRandomInt(CaptchaBrushes.Count)], 1),

                    Su.MathUtil.GetRandomInt(Convert.ToInt32(width / 2), Convert.ToInt32(width * 1.9 / 2)), 0, Su.MathUtil.GetRandomInt(0, Convert.ToInt32((width * 0.9 / 2))), height);


                _graphics.DrawLine(new Pen(CaptchaBrushes[Su.MathUtil.GetRandomInt(CaptchaBrushes.Count)], 1),

                    0,

                    Su.MathUtil.GetRandomInt(height / 2),

                    width,

                    height / 2 + Su.MathUtil.GetRandomInt(height / 2)

                    );


                _graphics.DrawLine(new Pen(CaptchaBrushes[Su.MathUtil.GetRandomInt(CaptchaBrushes.Count)], 1),

                 0,

                 height / 2 + Su.MathUtil.GetRandomInt(height / 2),

                 width,

                    Su.MathUtil.GetRandomInt(height / 2)

                 );


                _bmp.Save(ms, System.Drawing.Imaging.ImageFormat.Jpeg);

            }


            ms.Seek(0, SeekOrigin.Begin);


            // Controller 的型別為 FileResult

            return new FileStreamResult(ms, "image/jpeg")

            { FileDownloadName = $"{DateTime.Now.Ymdhmsf()}.jpg" };

        }
輸出用的 Controller 和 Action 如下:
namespace Web.Controllers

{

    public class CaptchaController : Controller

    {

        [Route("captcha")]

        public async Task<FileStreamResult> Index()

        {

            //產生 Captcha 並存入 Session 之中。目前是四位數字

            string captcha = (await Ah.ReGetAsync<object>("api/kol/create-captcha-code")).ToString();


            //產生圖檔並回傳 FileStreamResult

            return Su.Wu.CreateCaptcha(captcha);

        }

    }

}
Bike, 2022/9/25 下午 10:03:44
文章參考: https://windowsreport.com/windows-server-enable-tls/
工具下載: https://www.nartac.com/Products/IISCrypto/Download
工具下載: https://www.nartac.com/Products/IISCrypto/Download
Bike, 2022/5/5 下午 10:32:11
環境說明:
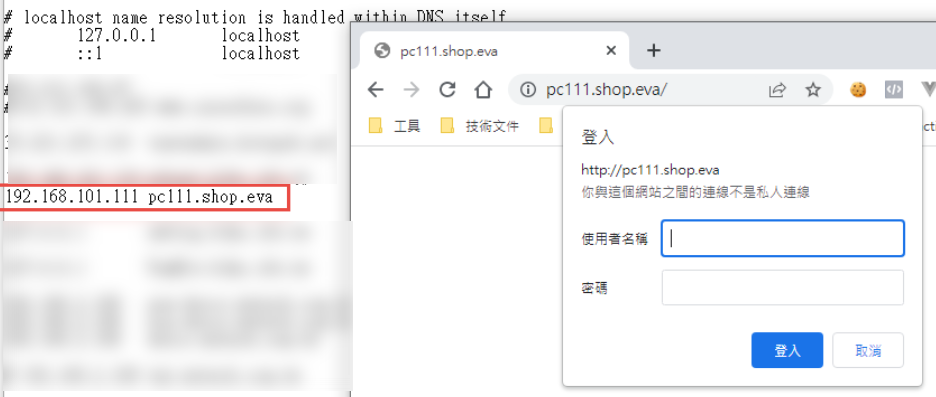
AD Server: dc1 (192.168.101.109)
PC: pc110 (192.168.101.110)
PC: pc111 (192.168.101.111)
第一步,把 PC 加入 AD, 這個算是基本操作,網路上說明很多, 就不再截圖了。不過在這裡還是遇到了第一個問題,解決過程請參考另一份文件: https://blog.uwinfo.com.tw/Article.aspx?Id=486
第二步,在 Visual Studio 的測試環境中測試:
一開始是使用 .Net 6.0 來實作,沒想到找到的文件都是 .Net Core 3.1 的,所以先用 .Net Core 3.1 實做了一次,後來改用 .Net 6.0 實作才成功。使用 .Net 6.0 實作的過程如下:
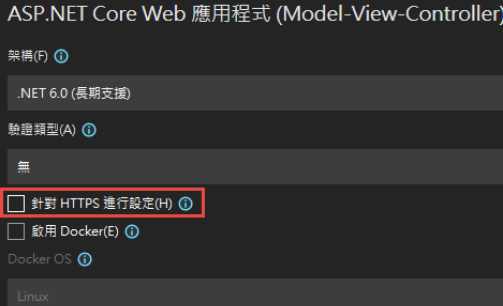
1. 建立一個 MVC 的標準專案:
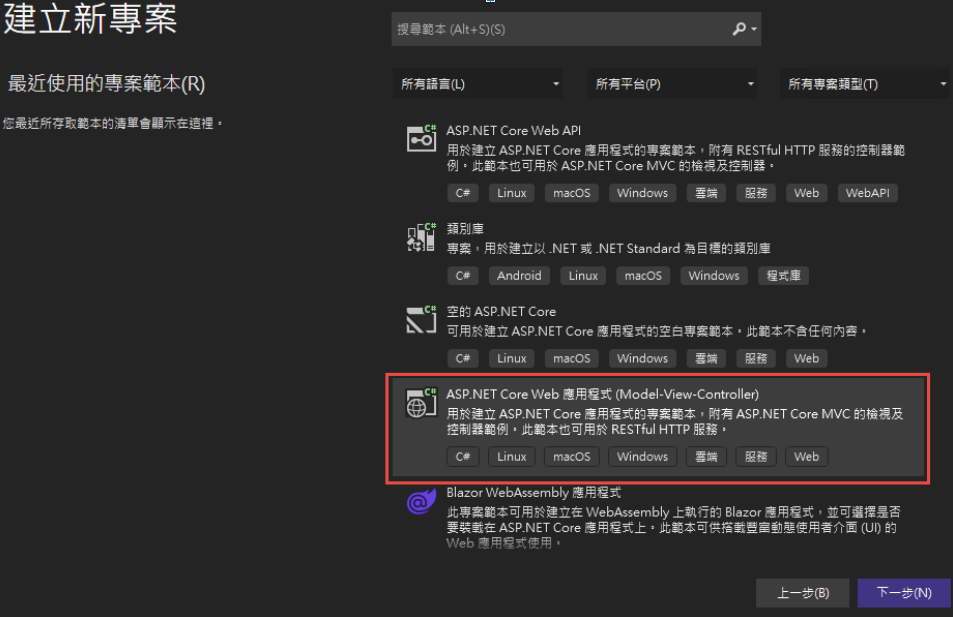
為了避免憑証問題,所以拿掉了 HTTPS 的設定
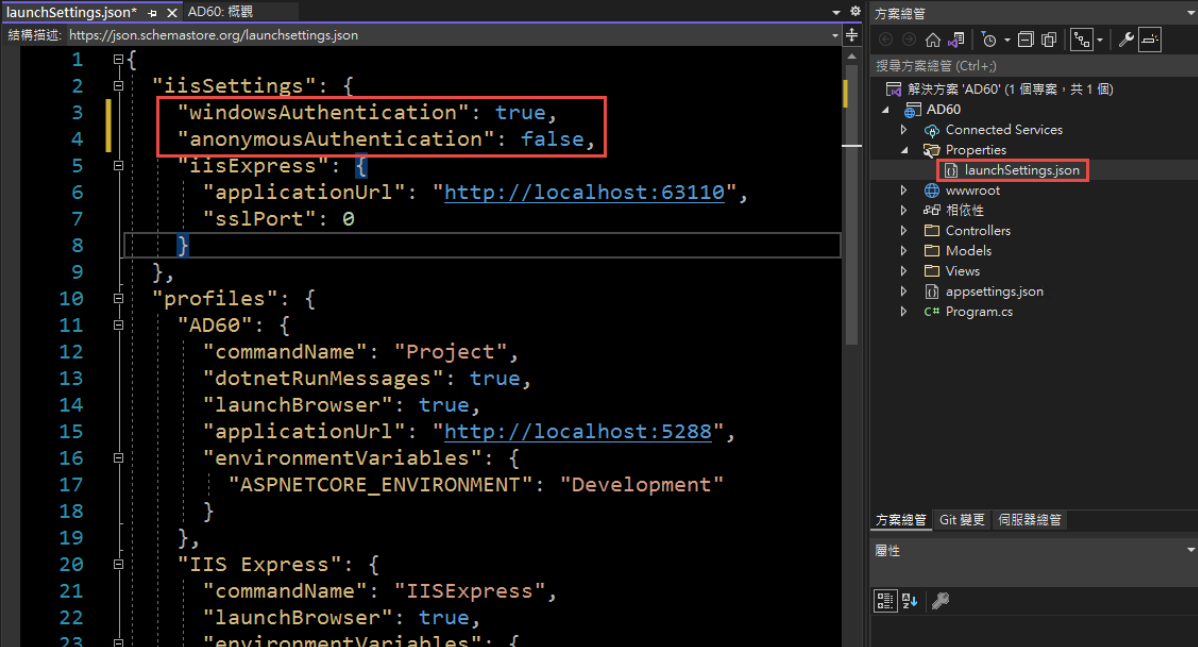
2. 改寫 launchSettings.json:
iisSettings 中的 windowsAuthentication 改為 True, anonymousAuthentication 改為 false。如下圖:
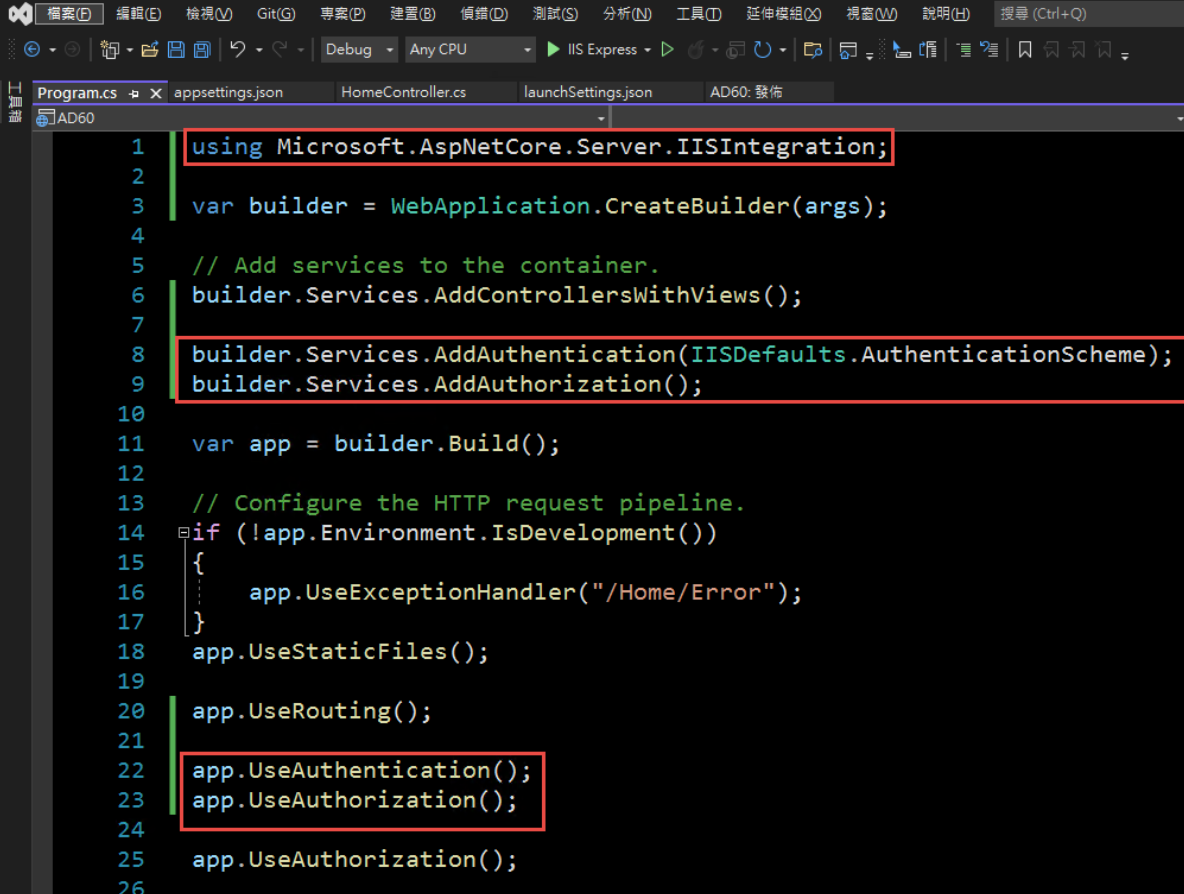
3. 修改 Program.cs, 加入以下四行指令:
builder.Services.AddAuthentication(IISDefaults.AuthenticationScheme);
builder.Services.AddAuthorization();
app.UseAuthentication();
app.UseAuthorization();
(注意: UseAuthentication 要加在 UseAuthentication 之後, VS 2022 應該會提示要新增 using Microsoft.AspNetCore.Server.IISIntegration;)
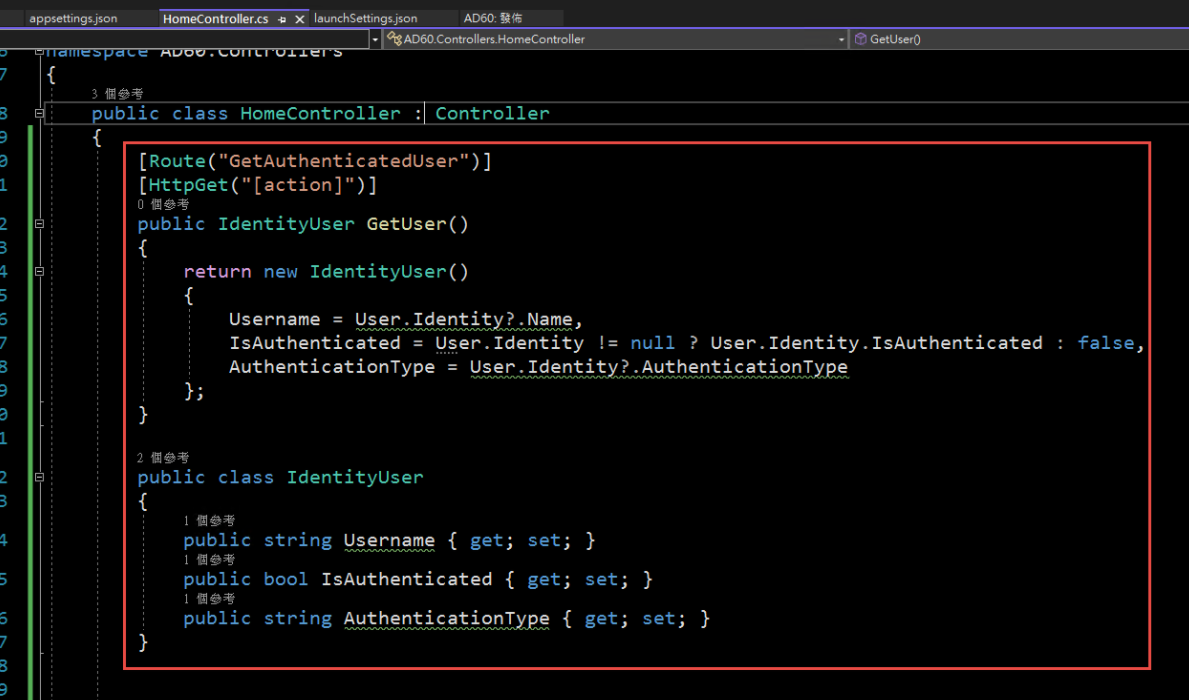
4. 在 HomeController 增加一個 Action, 以讀取驗証資料:
[Route("GetAuthenticatedUser")]
[HttpGet("[action]")]
public IdentityUser GetUser()
{
return new IdentityUser()
{
Username = User.Identity?.Name,
IsAuthenticated = User.Identity != null ? User.Identity.IsAuthenticated : false,
AuthenticationType = User.Identity?.AuthenticationType
};
}
public class IdentityUser
{
public string Username { get; set; }
public bool IsAuthenticated { get; set; }
public string AuthenticationType { get; set; }
}
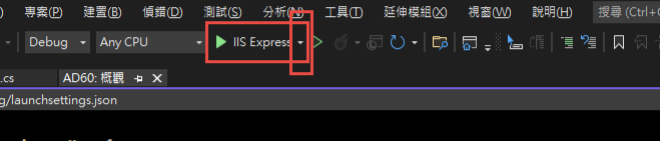
5. 啟動時記得要改用 IIS Express (感覺早上花了兩三個小時在為了這個問題打轉):
6. 執行結果:

第三步,在 IIS 中安裝網站:
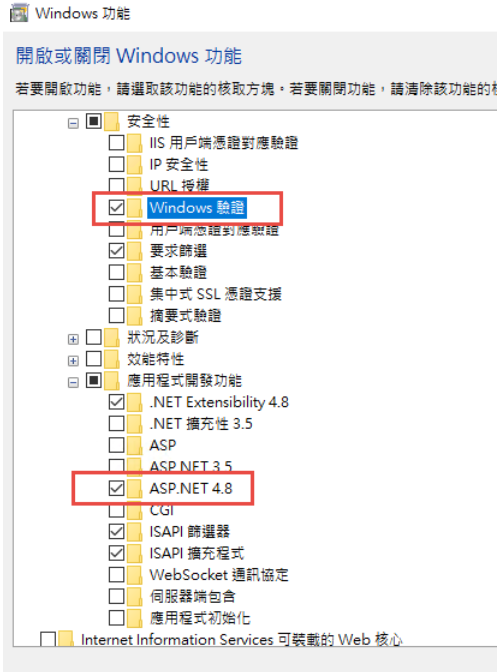
1. 在安裝 IIS 時,記得要勾選 windows 驗證
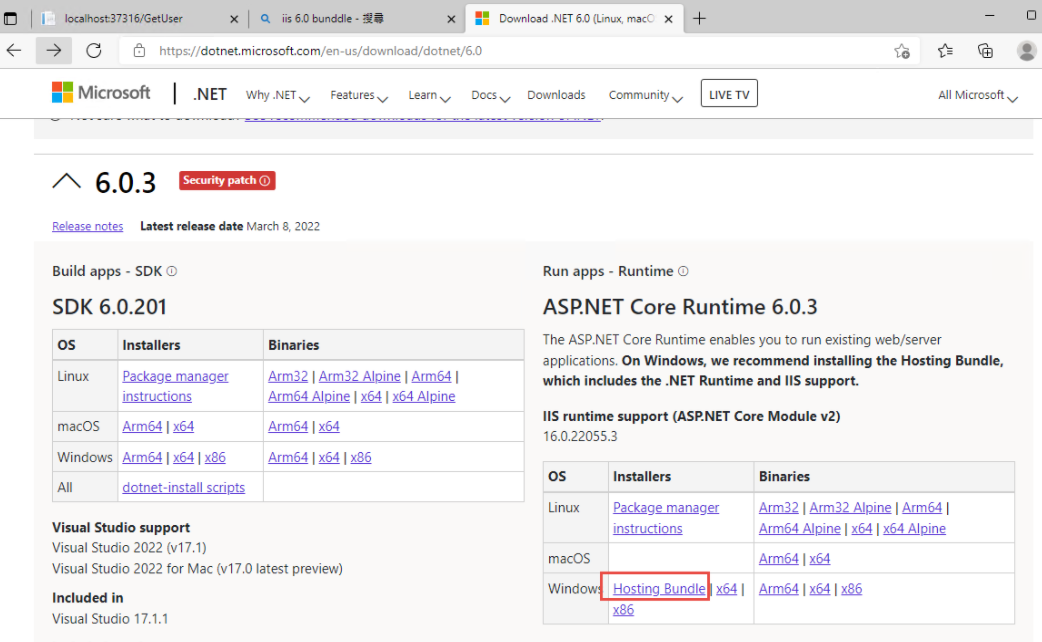
2. 安裝 .Net 6.0 的 Hosting Bundle
https://dotnet.microsoft.com/en-us/download/dotnet/6.0
3. 新增網站:
主機名稱留空白 (AD 驗証在網域內好像不會使用指定的主機名稱,這個有待後續再做確認)
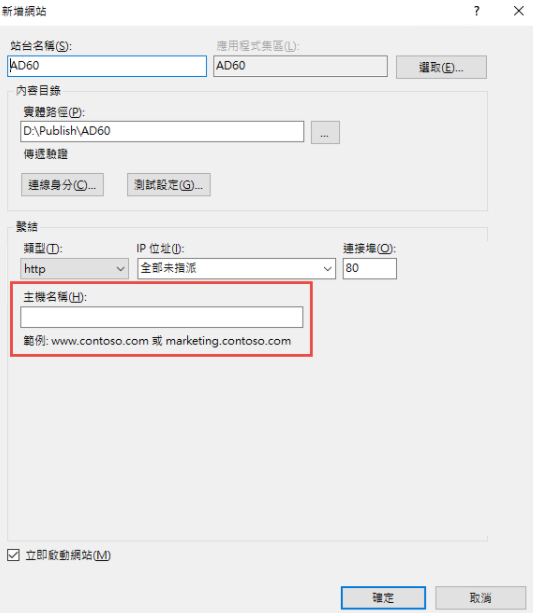
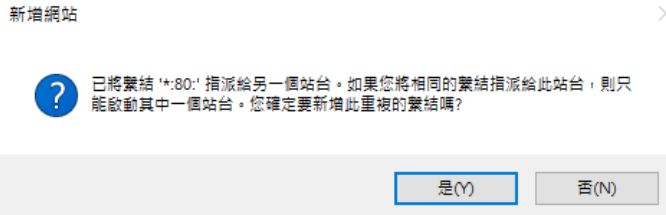
如果沒有刪除預設網站,會遇到警告,直接確認即可.
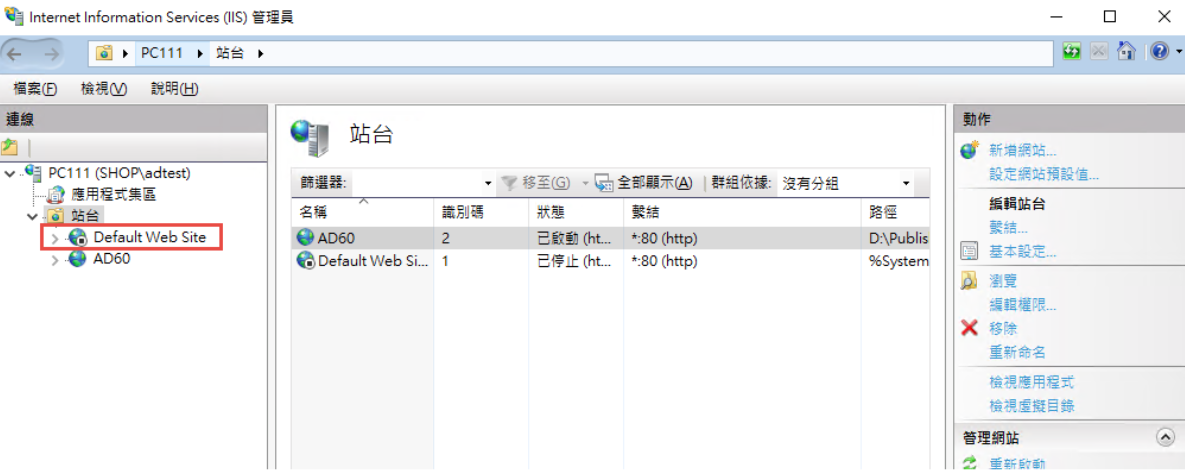
要把 Default Web Site 關閉,再啟動測試站
要啟動 windows 驗証: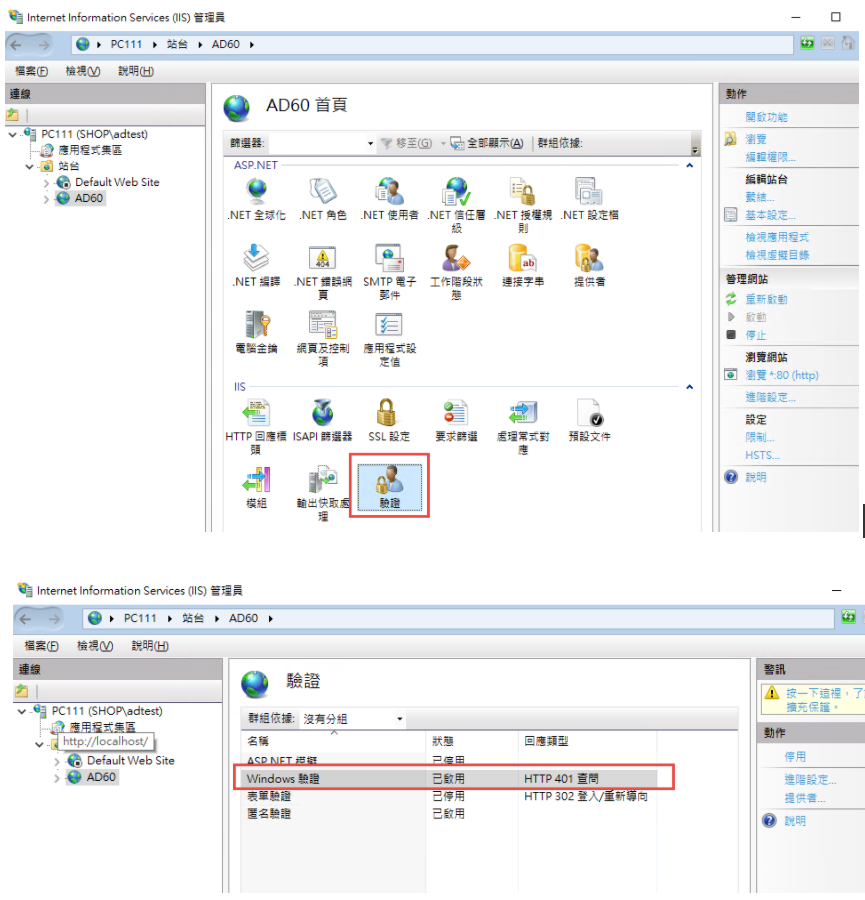
在 web.config 中增加
修改 applicationHost.config:
檔案位置: %windir%\system32\inetsrv\config\applicationHost.config
這兩地方的 Deny 改為 Allow
參考文件: https://docs.microsoft.com/zh-tw/iis/get-started/planning-for-security/how-to-use-locking-in-iis-configuration
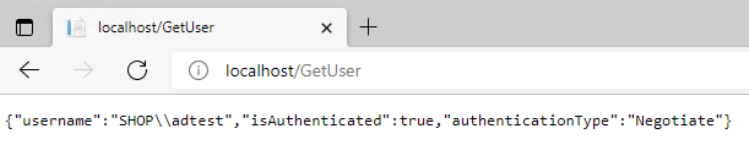
3. 可以取得登入資訊如下:
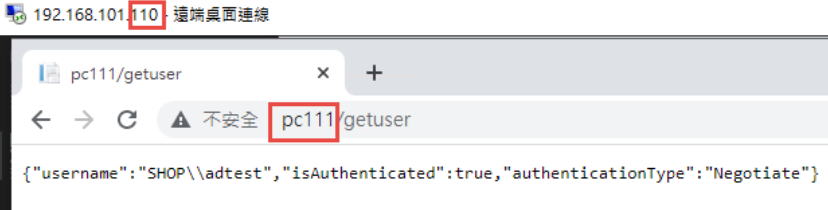
4. 從 Domain 中另一台主機來存取,不用登入,自動取得目前登入者的資訊。
5. 從非網域主機連線: 會要求認証
目前遇到問題: 在網域中的電腦只能用主機名稱登入,非網域的電腦,才能夠使用網址登入。
測試專案下載: https://github.com/bikehsu/AD60
AD Server: dc1 (192.168.101.109)
PC: pc110 (192.168.101.110)
PC: pc111 (192.168.101.111)
第一步,把 PC 加入 AD, 這個算是基本操作,網路上說明很多, 就不再截圖了。不過在這裡還是遇到了第一個問題,解決過程請參考另一份文件: https://blog.uwinfo.com.tw/Article.aspx?Id=486
第二步,在 Visual Studio 的測試環境中測試:
一開始是使用 .Net 6.0 來實作,沒想到找到的文件都是 .Net Core 3.1 的,所以先用 .Net Core 3.1 實做了一次,後來改用 .Net 6.0 實作才成功。使用 .Net 6.0 實作的過程如下:
1. 建立一個 MVC 的標準專案:
為了避免憑証問題,所以拿掉了 HTTPS 的設定
2. 改寫 launchSettings.json:
iisSettings 中的 windowsAuthentication 改為 True, anonymousAuthentication 改為 false。如下圖:
3. 修改 Program.cs, 加入以下四行指令:
builder.Services.AddAuthentication(IISDefaults.AuthenticationScheme);
builder.Services.AddAuthorization();
app.UseAuthentication();
app.UseAuthorization();
(注意: UseAuthentication 要加在 UseAuthentication 之後, VS 2022 應該會提示要新增 using Microsoft.AspNetCore.Server.IISIntegration;)
4. 在 HomeController 增加一個 Action, 以讀取驗証資料:
[Route("GetAuthenticatedUser")]
[HttpGet("[action]")]
public IdentityUser GetUser()
{
return new IdentityUser()
{
Username = User.Identity?.Name,
IsAuthenticated = User.Identity != null ? User.Identity.IsAuthenticated : false,
AuthenticationType = User.Identity?.AuthenticationType
};
}
public class IdentityUser
{
public string Username { get; set; }
public bool IsAuthenticated { get; set; }
public string AuthenticationType { get; set; }
}
5. 啟動時記得要改用 IIS Express (感覺早上花了兩三個小時在為了這個問題打轉):
6. 執行結果:
第三步,在 IIS 中安裝網站:
1. 在安裝 IIS 時,記得要勾選 windows 驗證
2. 安裝 .Net 6.0 的 Hosting Bundle
https://dotnet.microsoft.com/en-us/download/dotnet/6.0
3. 新增網站:
主機名稱留空白 (AD 驗証在網域內好像不會使用指定的主機名稱,這個有待後續再做確認)
如果沒有刪除預設網站,會遇到警告,直接確認即可.
要把 Default Web Site 關閉,再啟動測試站
要啟動 windows 驗証:
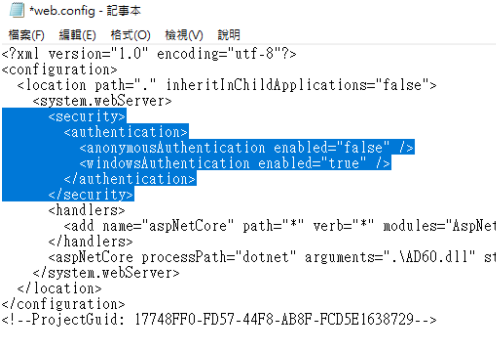
在 web.config 中增加
      <security>

        <authentication>

          <anonymousAuthentication enabled="false" />

          <windowsAuthentication enabled="true" />

        </authentication>

      </security>
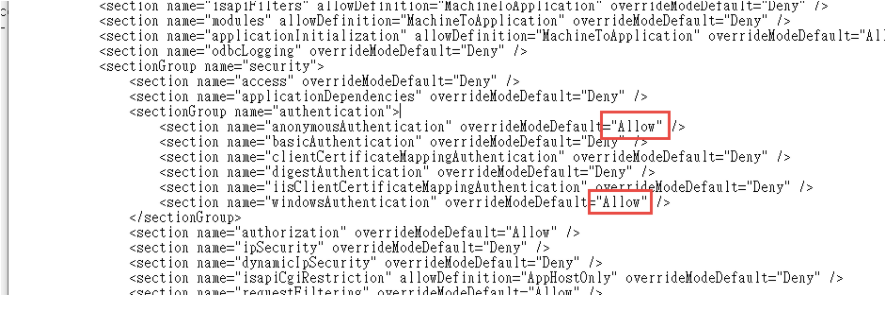
修改 applicationHost.config:
檔案位置: %windir%\system32\inetsrv\config\applicationHost.config
這兩地方的 Deny 改為 Allow
<section name="anonymousAuthentication" overrideModeDefault="Deny" />

<section name="windowsAuthentication" overrideModeDefault="Deny" />
參考文件: https://docs.microsoft.com/zh-tw/iis/get-started/planning-for-security/how-to-use-locking-in-iis-configuration
3. 可以取得登入資訊如下:
4. 從 Domain 中另一台主機來存取,不用登入,自動取得目前登入者的資訊。
5. 從非網域主機連線: 會要求認証
目前遇到問題: 在網域中的電腦只能用主機名稱登入,非網域的電腦,才能夠使用網址登入。
測試專案下載: https://github.com/bikehsu/AD60
Bike, 2022/3/19 下午 09:10:08
跑.net core 程式的時候遇到
錯誤 MSB3644 找不到 .NETFramework,Version=v5.0 的參考組件。若要解決此問題,請安裝此架構版本的開發人員套件 (SDK/目標套件) 或重定應用程式。您可以在 https://aka.ms/msbuild/developerpacks 下載 .NET Framework 開發人員套件 KOKOxMMBApi C:\Program Files (x86)\Microsoft Visual Studio\2019\Community\MSBuild\Current\Bin\Microsoft.Common.CurrentVersion.targets 1175
遇到此問題時先去
https://dotnet.microsoft.com/download/dotnet/5.0
下載64版本
但另一個原因有可能是vs2019版本過低,建議升到 16.6 版以上
https://visualstudio.microsoft.com/zh-hant/downloads/
接著~很可能遇到無法更新
請參考這篇
https://www.dotblogs.com.tw/Eyelash/2021/01/09/151544
刪除C:\Program Files (x86)\Microsoft Visual Studio\Installer\
Installer刪掉這個資料夾
回到VS 說明 > 檢查版本
就能更新了
Doug, 2021/10/5 上午 11:53:20

下載Runtime版本打開後出現, 【這部電腦已經安裝 .NET Framework 4.6.2 (含) 以上版本的更新】

後來下載Developer Pack版本安裝完畢後就可以了
https://dotnet.microsoft.com/download/dotnet-framework/net462

choco, 2021/8/23 下午 02:28:48
好像為了這個找了很多次 google, 每次都花了不少時間..
1. 新增功能角色

2. 新增管理服務

3. 安裝 Web Deploy 套件
https://www.iis.net/downloads/microsoft/web-deploy
4. 完工..
參考: https://stackoverflow.com/questions/41386690/missing-import-web-application-option-in-web-deploy-3-6
1. 新增功能角色
2. 新增管理服務
3. 安裝 Web Deploy 套件
https://www.iis.net/downloads/microsoft/web-deploy
4. 完工..
參考: https://stackoverflow.com/questions/41386690/missing-import-web-application-option-in-web-deploy-3-6
Bike, 2019/5/22 下午 07:47:55
客戶要求
1. 檔案只能放在 Firewall 內的後台用 Web server (Server A).
2. 使用者只能存取 DMZ 的 Web server (Server B).
3. Server B 只能用 HTTP 通過 Firewall 向 Server A 要資料.(i.e. Server B 不能掛戴 Server A 的目錄成為虛擬目錄)
所以在 Server B 上面建立了一支程式用 HTTP 的方式讀取 Server A 的檔案再寫出去.
例如, http://ServerB/Upload/test.pdf 會讀取 http://ServerA/Upload/test.pdf 再送到 Client 端
但不是這樣就好了, 在 RouteConfig.cs 中要加上:
routes.MapRoute(
name: "Upload",
url: "Upload/{filename}",
defaults: new { controller = "Upload", action = "Index", filename = UrlParameter.Optional }
);
此外在 Web.Config 中也要加上:
<system.webServer>
<handlers>
<add name="UrlRoutingHandler_Upload"
type="System.Web.Routing.UrlRoutingHandler,
System.Web, Version=4.0.0.0,
Culture=neutral,
PublicKeyToken=b03f5f7f11d50a3a"
path="/Upload/*"
verb="GET"/>
</handlers>
</system.webServer>
參考:
http://stackoverflow.com/questions/5596747/download-stream-file-from-url-asp-net
http://blog.darkthread.net/post-2014-12-05-mvc-routing-for-url-with-filename.aspx
1. 檔案只能放在 Firewall 內的後台用 Web server (Server A).
2. 使用者只能存取 DMZ 的 Web server (Server B).
3. Server B 只能用 HTTP 通過 Firewall 向 Server A 要資料.(i.e. Server B 不能掛戴 Server A 的目錄成為虛擬目錄)
所以在 Server B 上面建立了一支程式用 HTTP 的方式讀取 Server A 的檔案再寫出去.
例如, http://ServerB/Upload/test.pdf 會讀取 http://ServerA/Upload/test.pdf 再送到 Client 端
namespace WWW.Controllers

{

    public class UploadController : Controller

    {

        // GET: Upload

        public void Index(string Filename)

        {

            //Create a stream for the file

            Stream stream = null;


            //This controls how many bytes to read at a time and send to the client

            int bytesToRead = 10000;


            // Buffer to read bytes in chunk size specified above

            byte[] buffer = new Byte[bytesToRead];


            string url = "http://admin-dev.nanya.bike.idv.tw/newnanyaback/Upload/" + Filename;


            // The number of bytes read

            try

            {

                //Create a WebRequest to get the file

                HttpWebRequest fileReq = (HttpWebRequest)HttpWebRequest.Create(url);


                //Create a response for this request

                HttpWebResponse fileResp = (HttpWebResponse)fileReq.GetResponse();


                if (fileReq.ContentLength > 0)

                    fileResp.ContentLength = fileReq.ContentLength;


                //Get the Stream returned from the response

                stream = fileResp.GetResponseStream();


                // prepare the response to the client. resp is the client Response

                var resp = HttpContext.Response;


                if (Filename.ToLower().EndsWith(".png") ||

                    Filename.ToLower().EndsWith(".jpg") ||

                    Filename.ToLower().EndsWith(".jpeg") ||

                    Filename.ToLower().EndsWith(".gif")

                    )

                {

                    resp.ContentType = "image";

                }

                else

                {

                    //Indicate the type of data being sent

                    resp.ContentType = "application/octet-stream";


                    //Name the file

                    resp.AddHeader("Content-Disposition", "attachment; filename=\"" + HttpUtility.UrlEncode(Filename, Encoding.UTF8) + "\"");

                }


                resp.AddHeader("Content-Length", fileResp.ContentLength.ToString());


                int length;

                do

                {

                    // Verify that the client is connected.

                    if (resp.IsClientConnected)

                    {

                        // Read data into the buffer.

                        length = stream.Read(buffer, 0, bytesToRead);


                        // and write it out to the response's output stream

                        resp.OutputStream.Write(buffer, 0, length);


                        // Flush the data

                        resp.Flush();


                        //Clear the buffer

                        buffer = new Byte[bytesToRead];

                    }

                    else

                    {

                        // cancel the download if client has disconnected

                        length = -1;

                    }

                } while (length > 0); //Repeat until no data is read

            }

            finally

            {

                if (stream != null)

                {

                    //Close the input stream

                    stream.Close();

                }

            }

        }

    }

}
但不是這樣就好了, 在 RouteConfig.cs 中要加上:
routes.MapRoute(
name: "Upload",
url: "Upload/{filename}",
defaults: new { controller = "Upload", action = "Index", filename = UrlParameter.Optional }
);
此外在 Web.Config 中也要加上:
<system.webServer>
<handlers>
<add name="UrlRoutingHandler_Upload"
type="System.Web.Routing.UrlRoutingHandler,
System.Web, Version=4.0.0.0,
Culture=neutral,
PublicKeyToken=b03f5f7f11d50a3a"
path="/Upload/*"
verb="GET"/>
</handlers>
</system.webServer>
參考:
http://stackoverflow.com/questions/5596747/download-stream-file-from-url-asp-net
http://blog.darkthread.net/post-2014-12-05-mvc-routing-for-url-with-filename.aspx
Bike, 2016/12/1 下午 09:34:30
問題情形:.NET 4.0在遇到IE11時,會將Style的width拿掉
參考:http://forums.asp.net/t/1934887.aspx
解決方法:安裝更新 KB2836939 下載
參考:http://forums.asp.net/t/1934887.aspx
解決方法:安裝更新 KB2836939 下載
Reiko, 2013/12/4 下午 12:18:12
- 下載 再生龍單機板 zip 檔.
- 如果您的 USB 裝置已經存在一個 FAT 格式的分割區(至少 200 MB),請跳到步驟(3).
否則,請 在您的 USB裝置上產生一個 FAT16或 FAT32 格式的分割區(至少 200 MB) - 解壓縮 zip 並把其中所有的檔案放置您的 FAT 分割去中,並保持目錄架構. 例如:"COPYING" 檔案應該在 USB 裝置的根目錄下(如:G:\COPYING).
- 瀏覽您的 USB 裝置,在 utils\win32\ 目錄下(如:G:\utils\win32\) 並以『管理者身分執行』 makeboot.bat
警告! makeboot.bat 必須在您的 USB 裝置上執行. - 依畫面指示進行.
(PS: 上述是由下面資訊修改而來 : http://www.pendrivelinux.com/2007/01/02/all-in-one-usb-dsl. 感謝 PDLA : http://pendrivelinux.com)
Bike, 2013/11/25 下午 06:16:01