搜尋 Config 結果:
這裡是我測試 Gmail API 和 Google API 憑証的一些記錄。
如果你的目的是要使用 Gmail Api 取代舊的 Gmail SMTP 來發送通知信,建議你先跳到最下方看一下結論。
如果你是想要看一下 Gmail API 和 Google API 憑証的使用方法,可以看一下這篇文章。
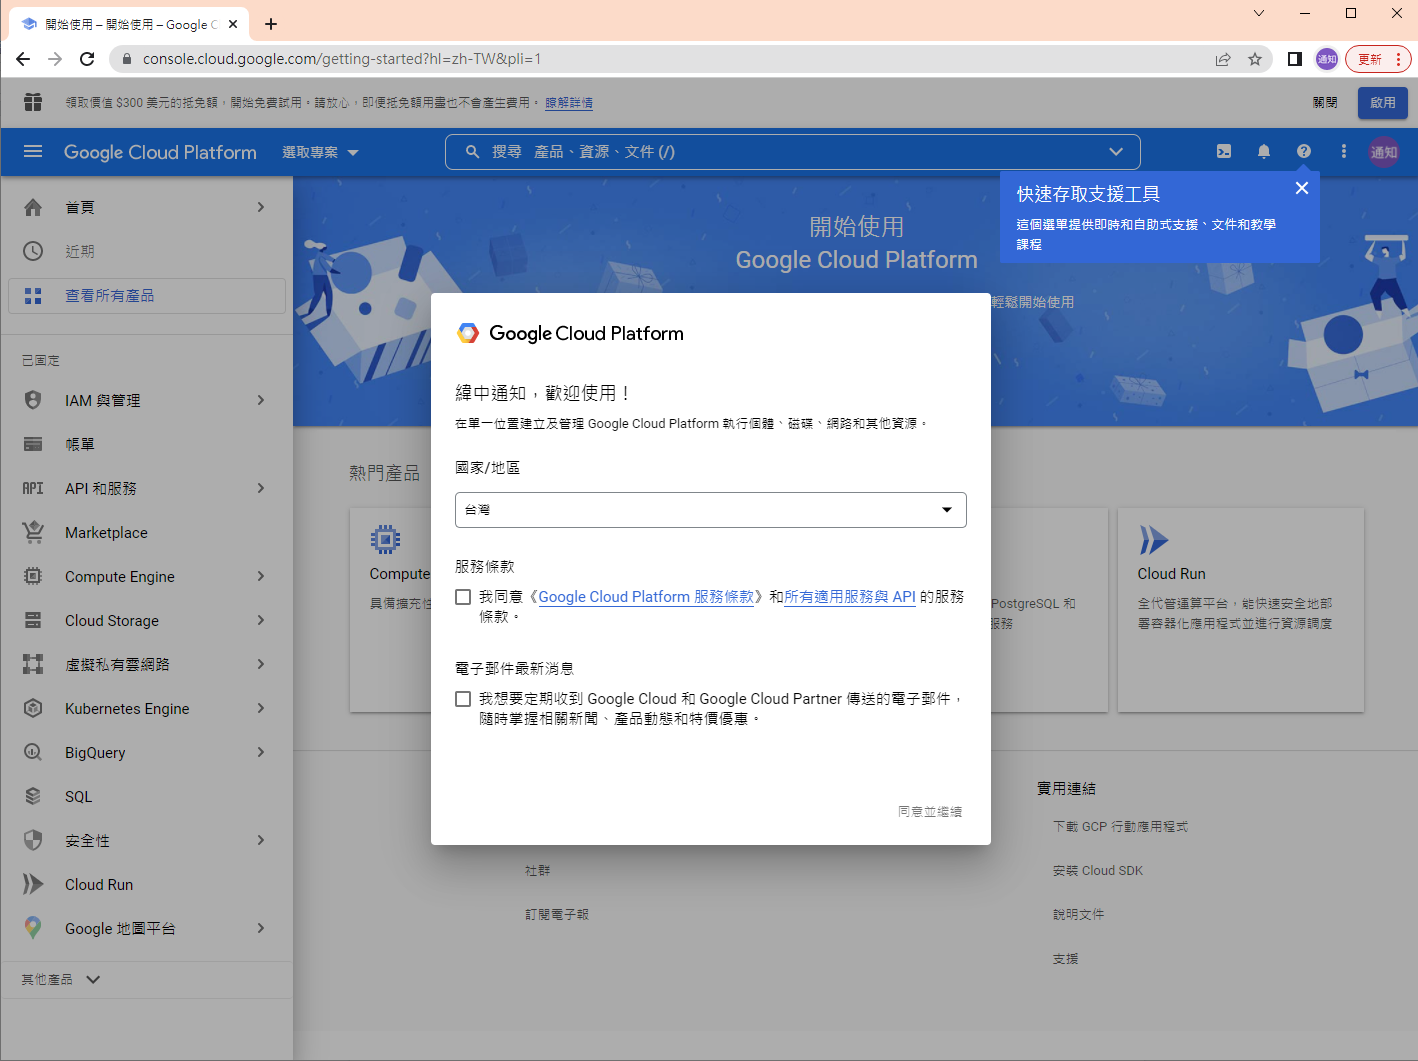
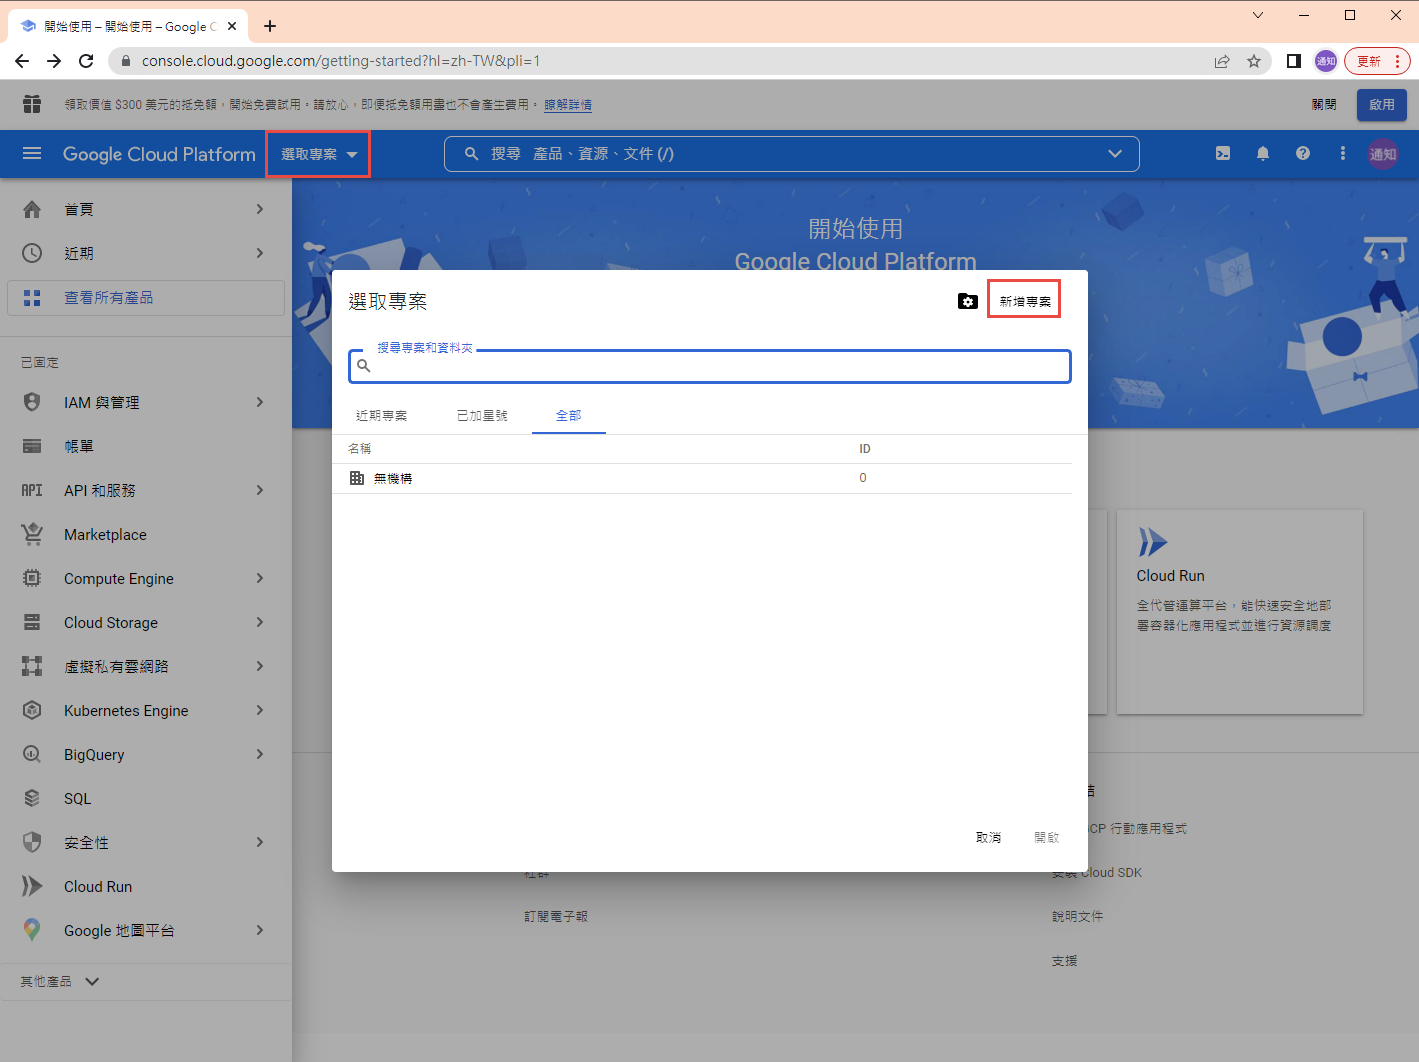
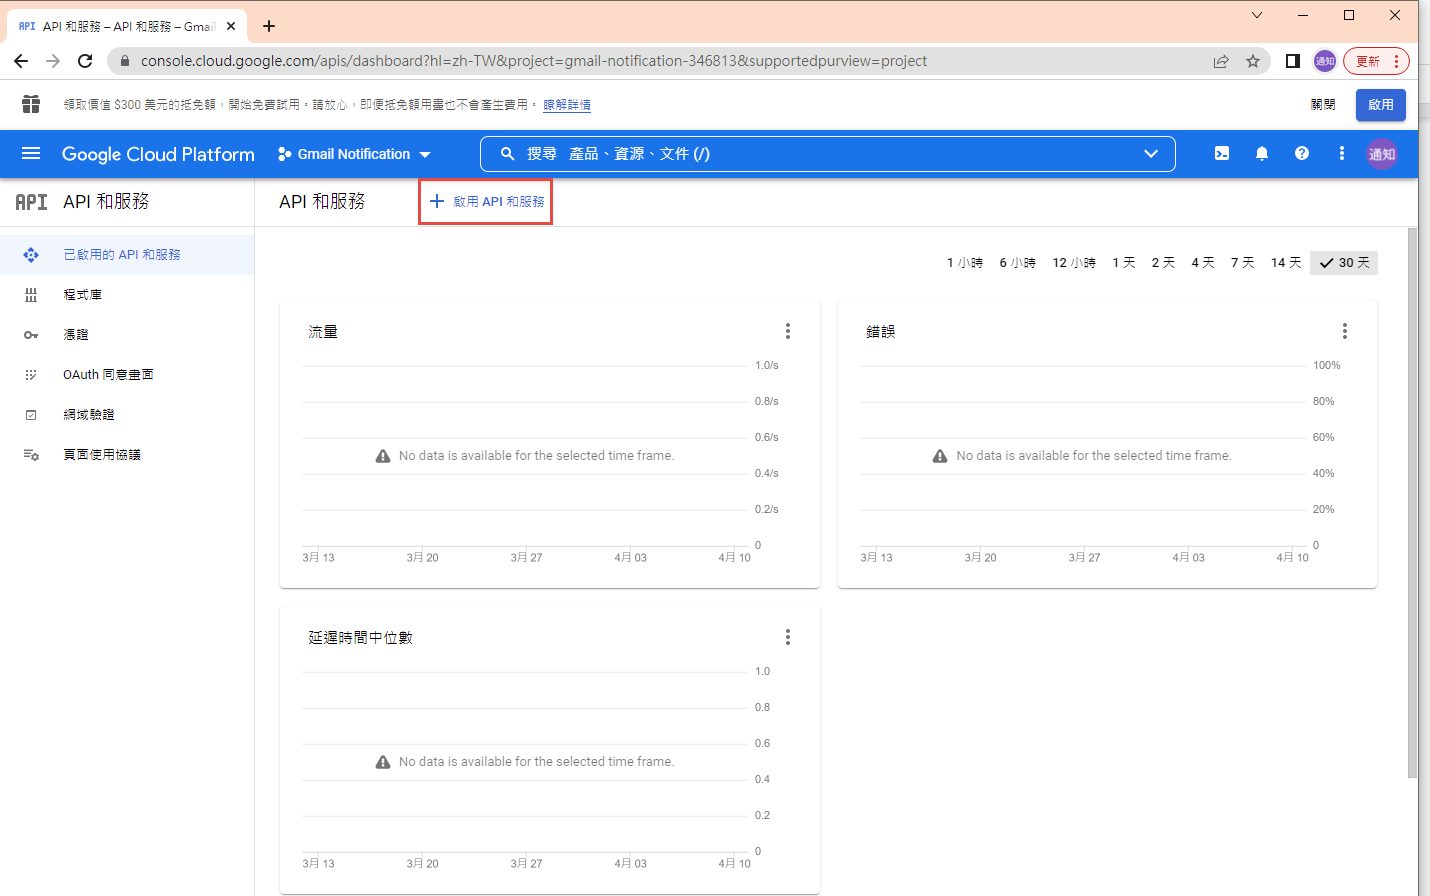
1. 在 google cloud platform 建立新的專案.
https://console.cloud.google.com/

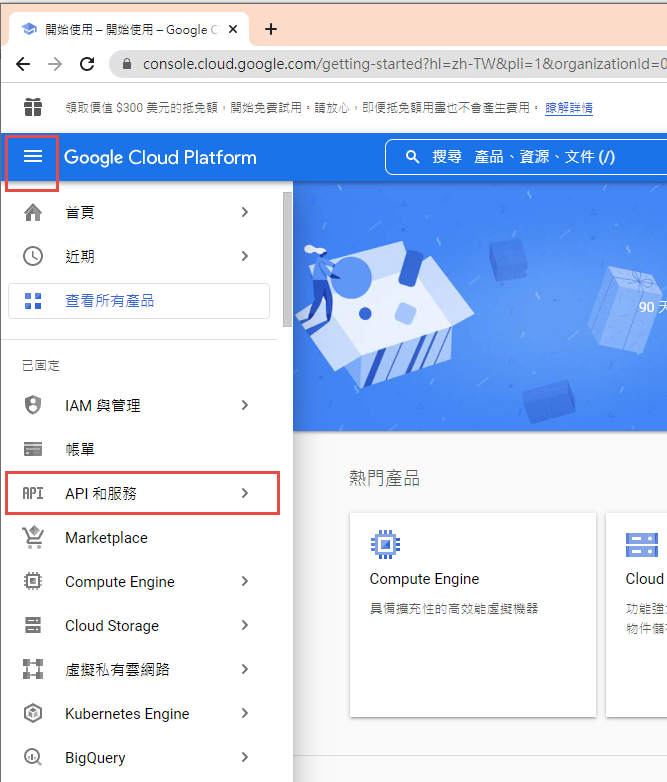
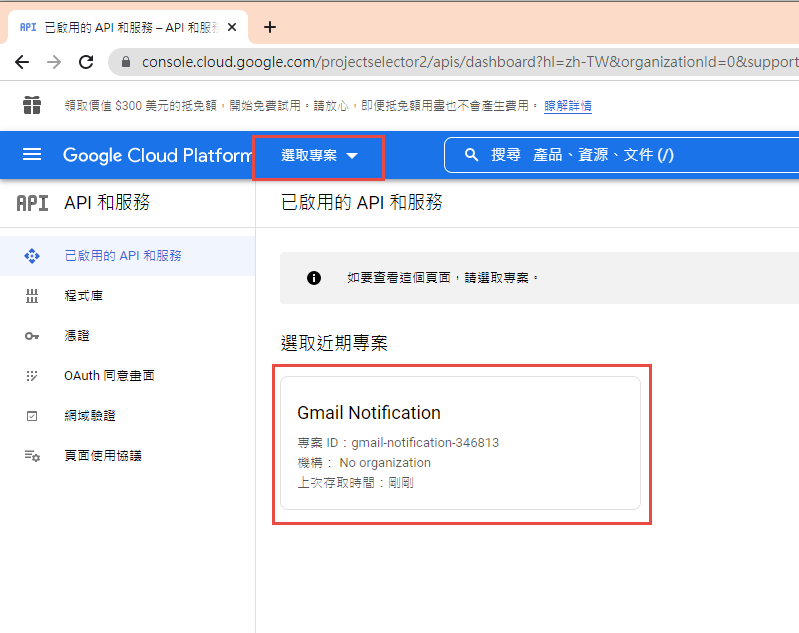
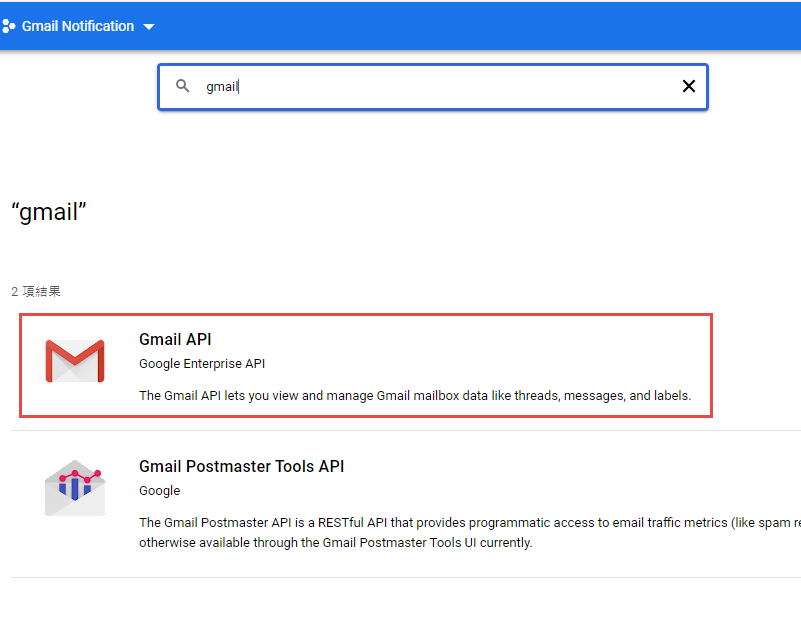
啟用 Gmail API


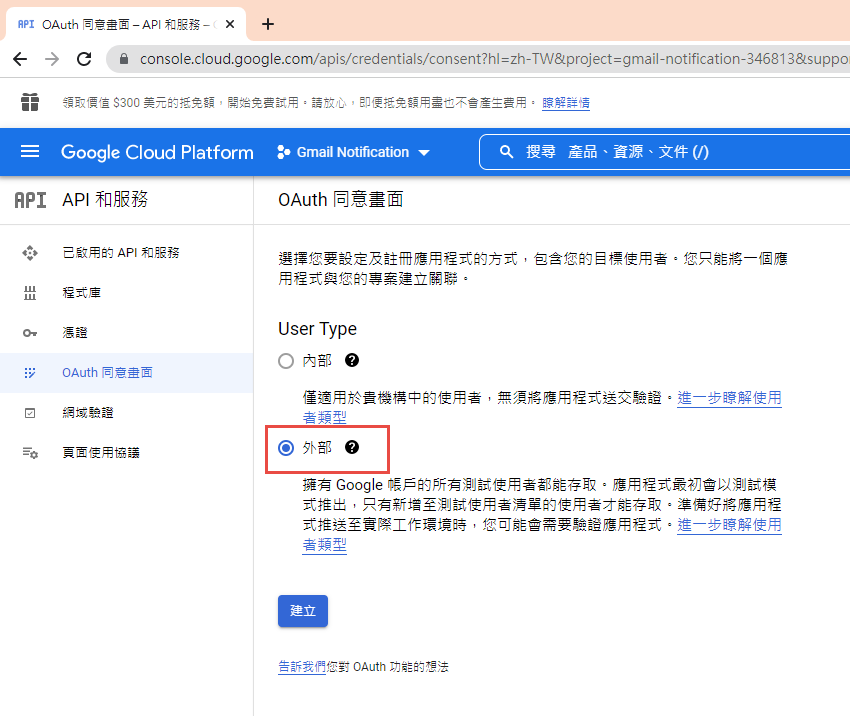
因為我們要透過 OAuth 取得使用者授權,所以要設定使用 OAuth 的同意畫面。
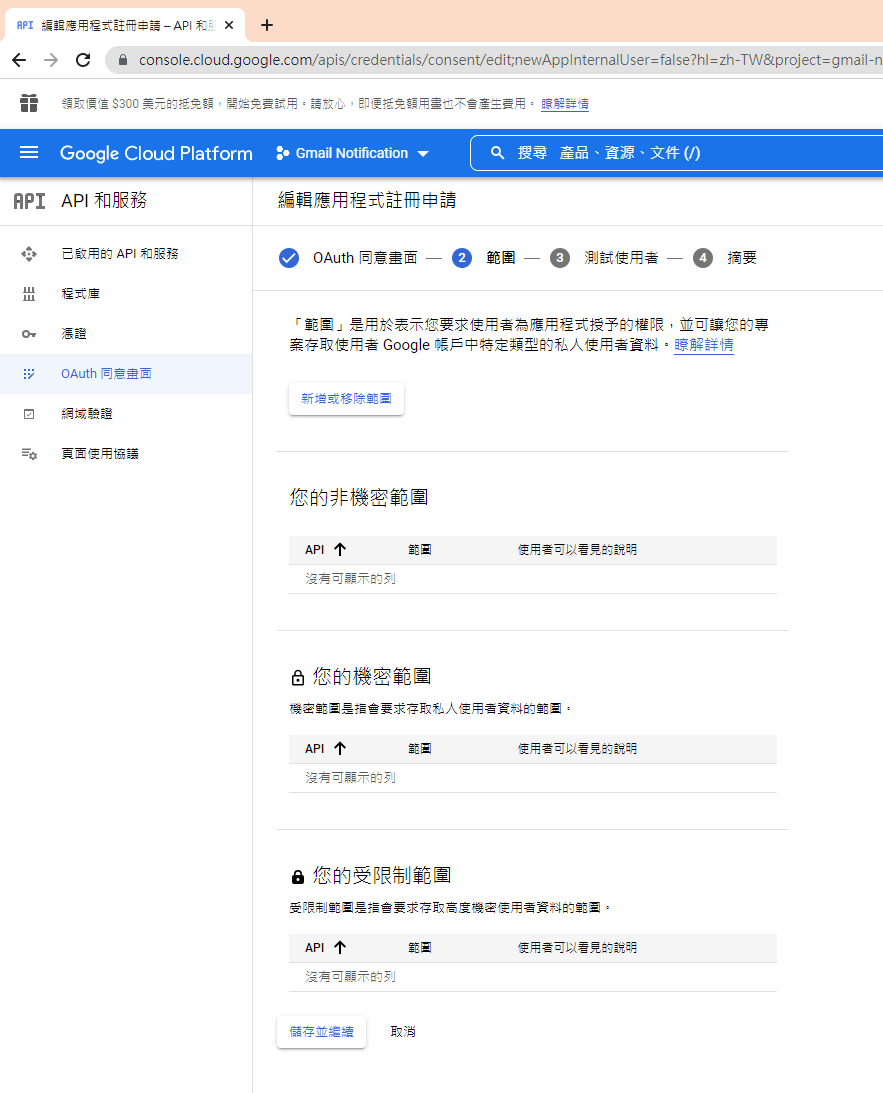
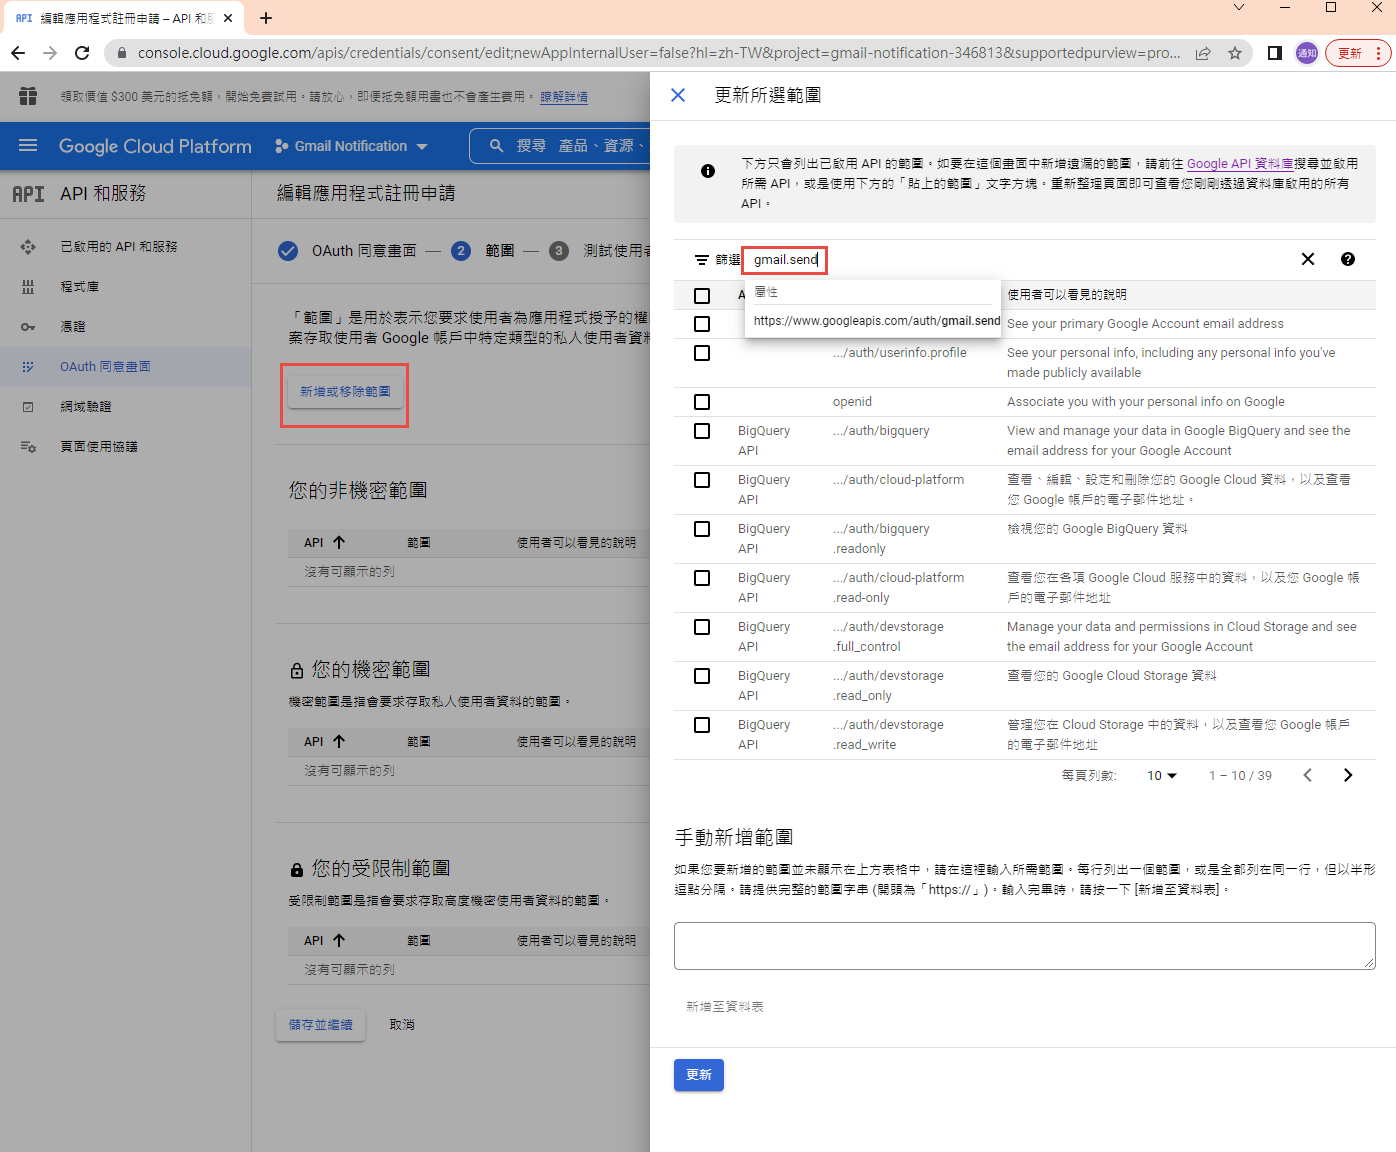
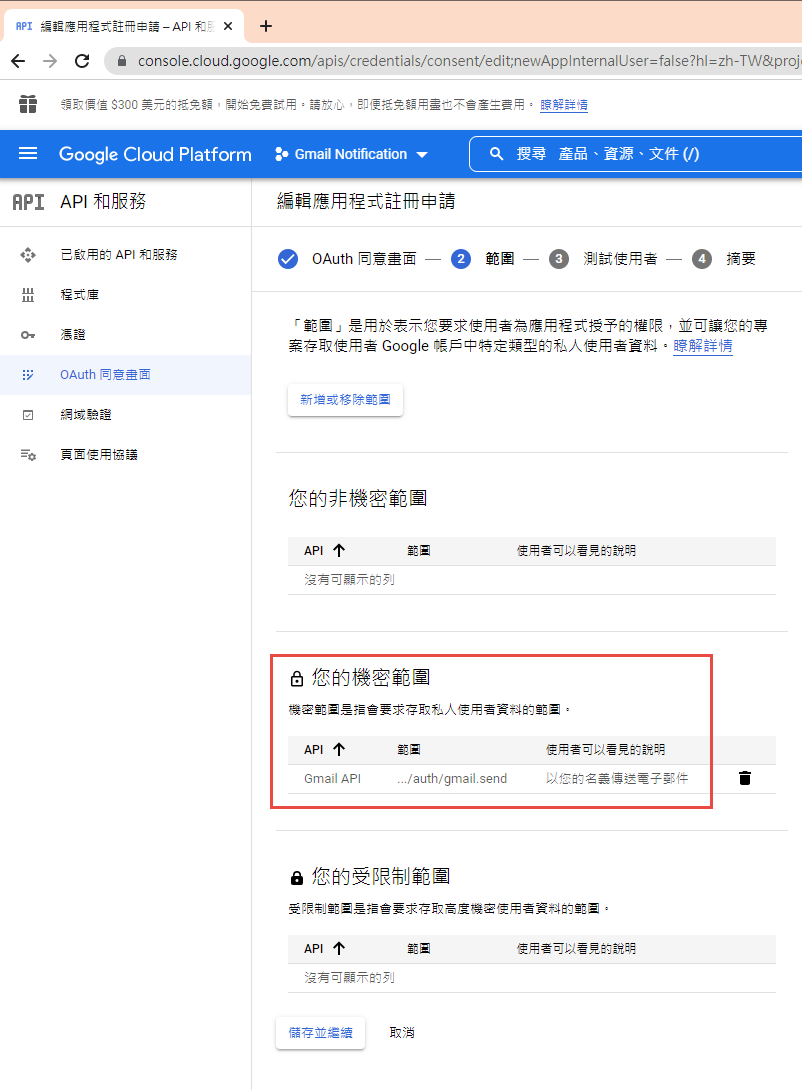
指定授權的範圍
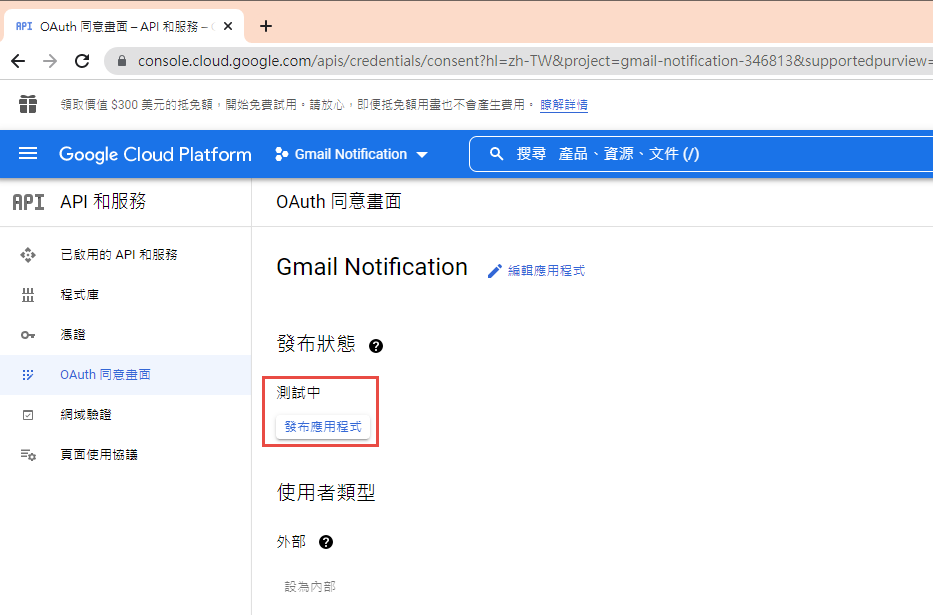
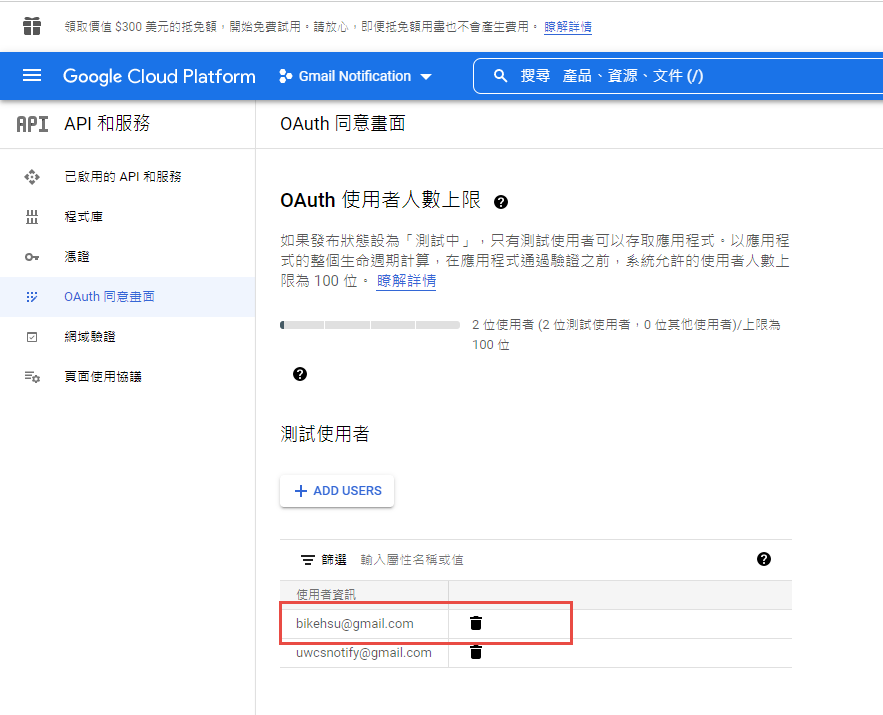
因為剛建立的專案,不會被公開,所以要指定測試使用者
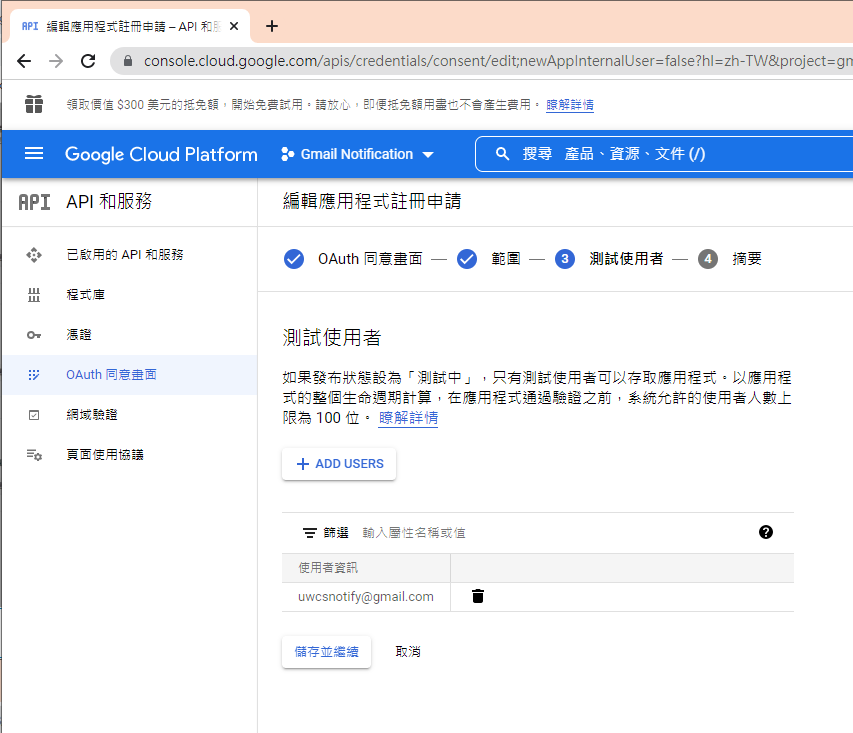
如果要給任意使用者,必需經過發布的流程,但準備工作有點麻煩,所以這次就不發布了。
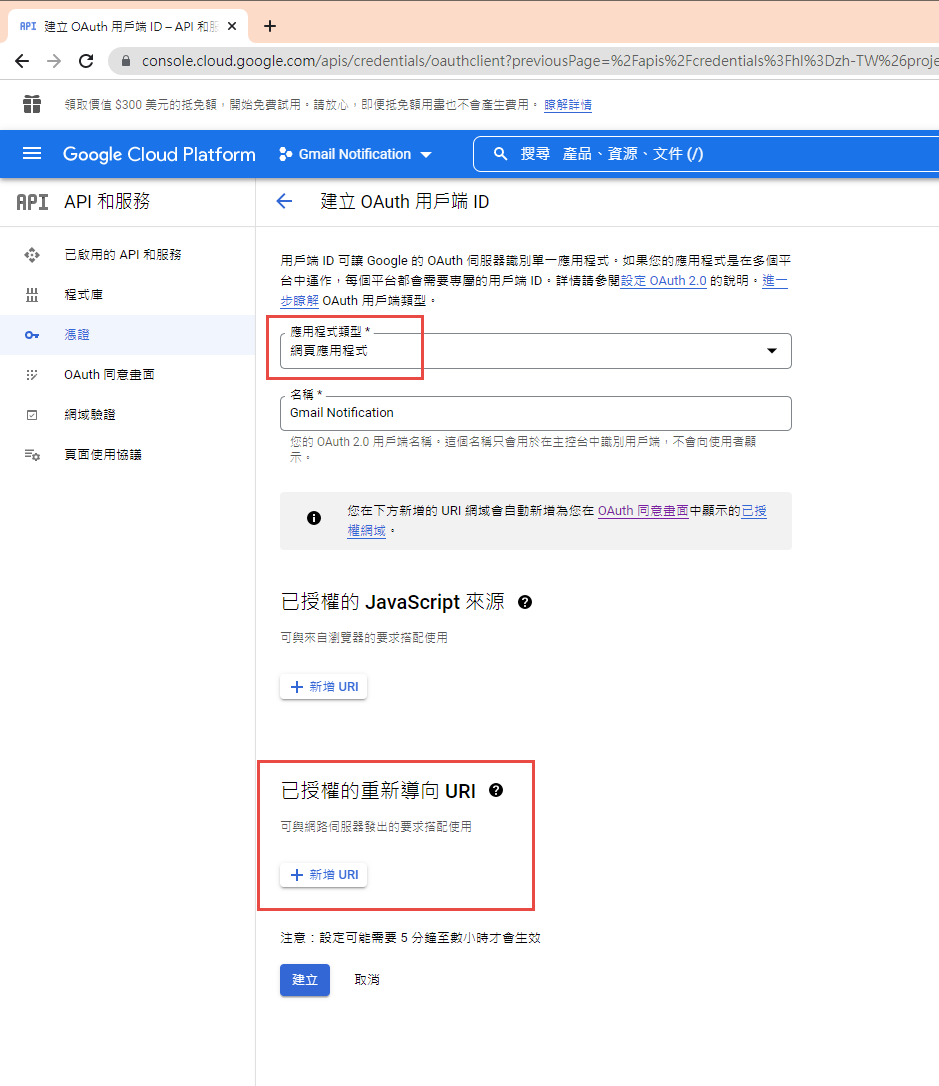
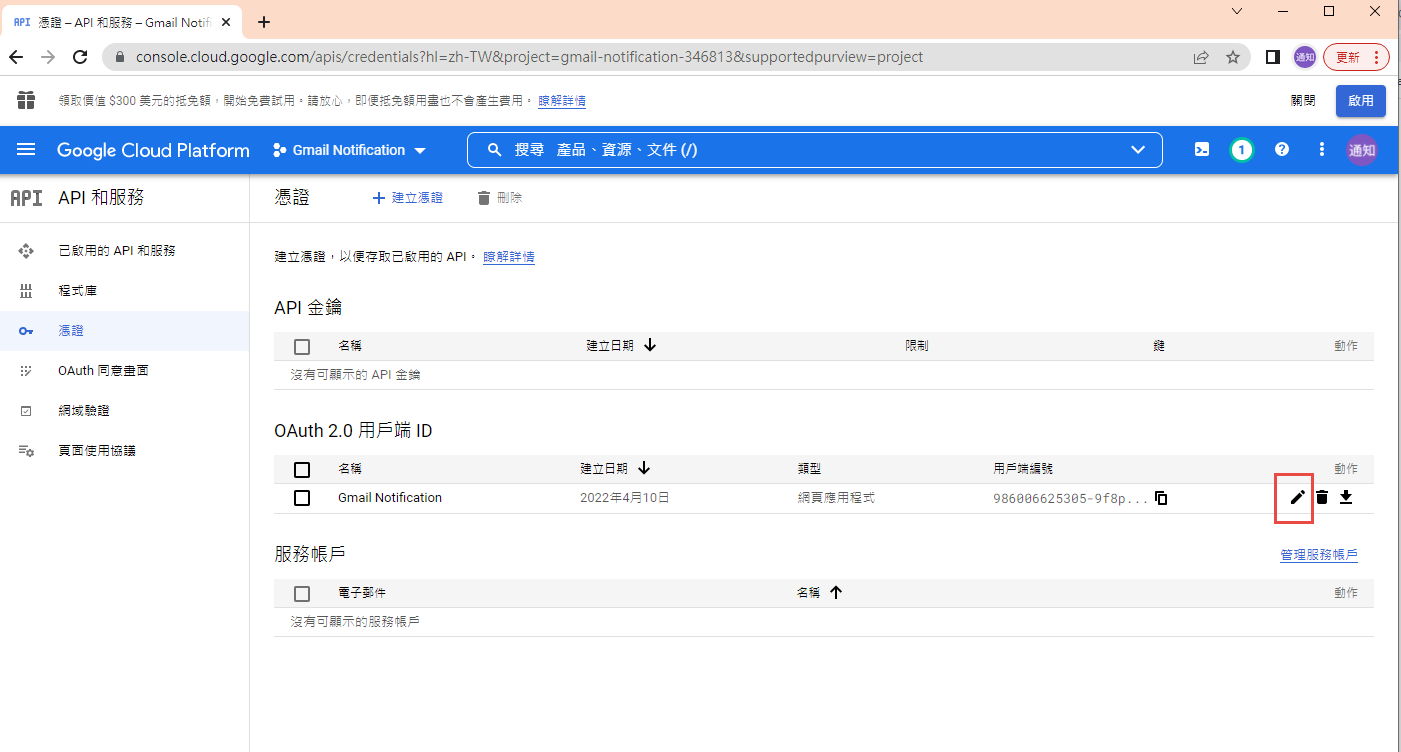
建立 OAuth 2.0 用戶端 ID 憑証

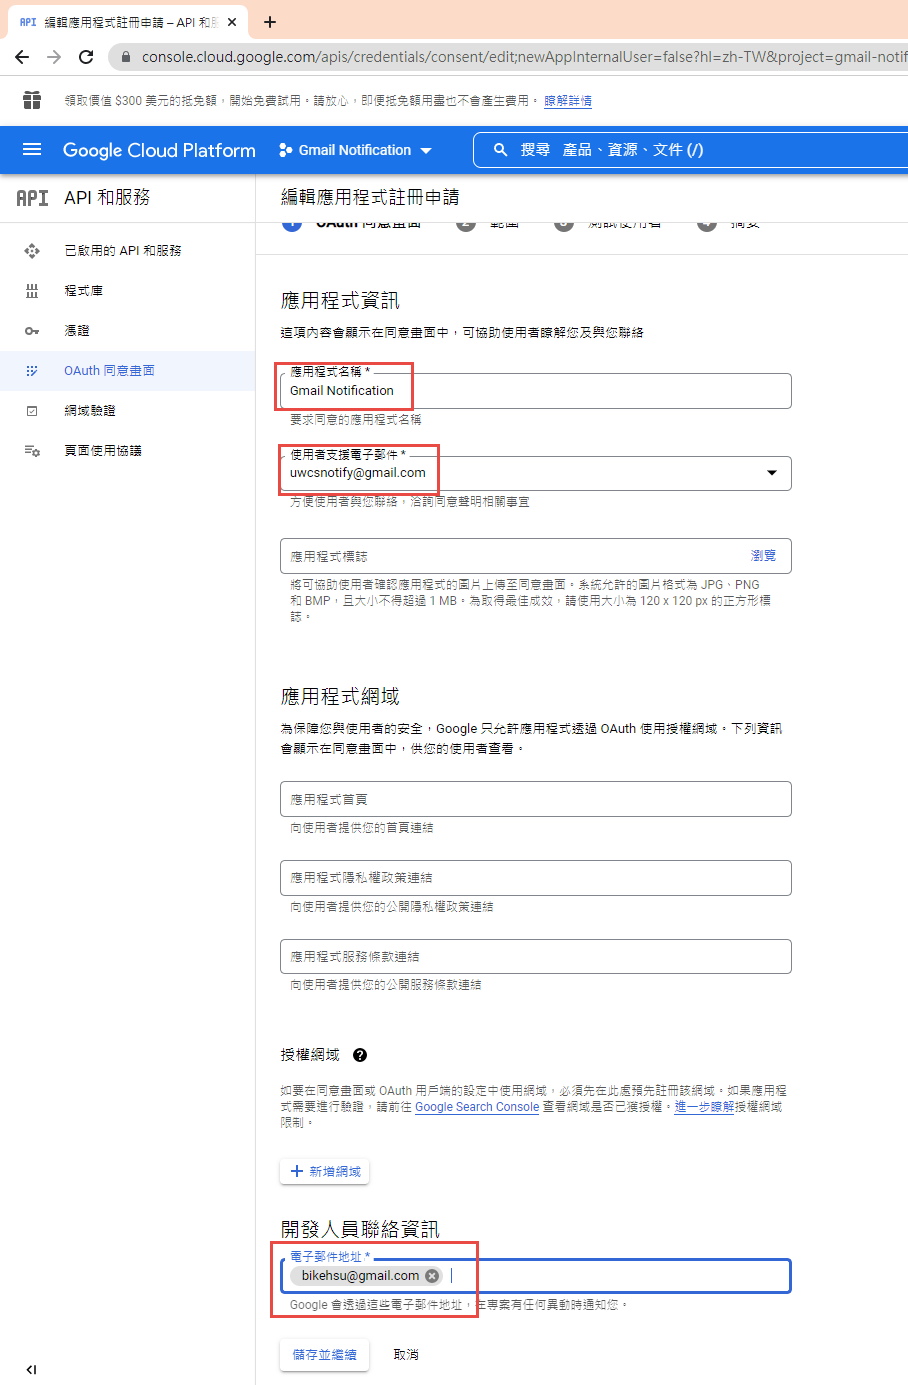
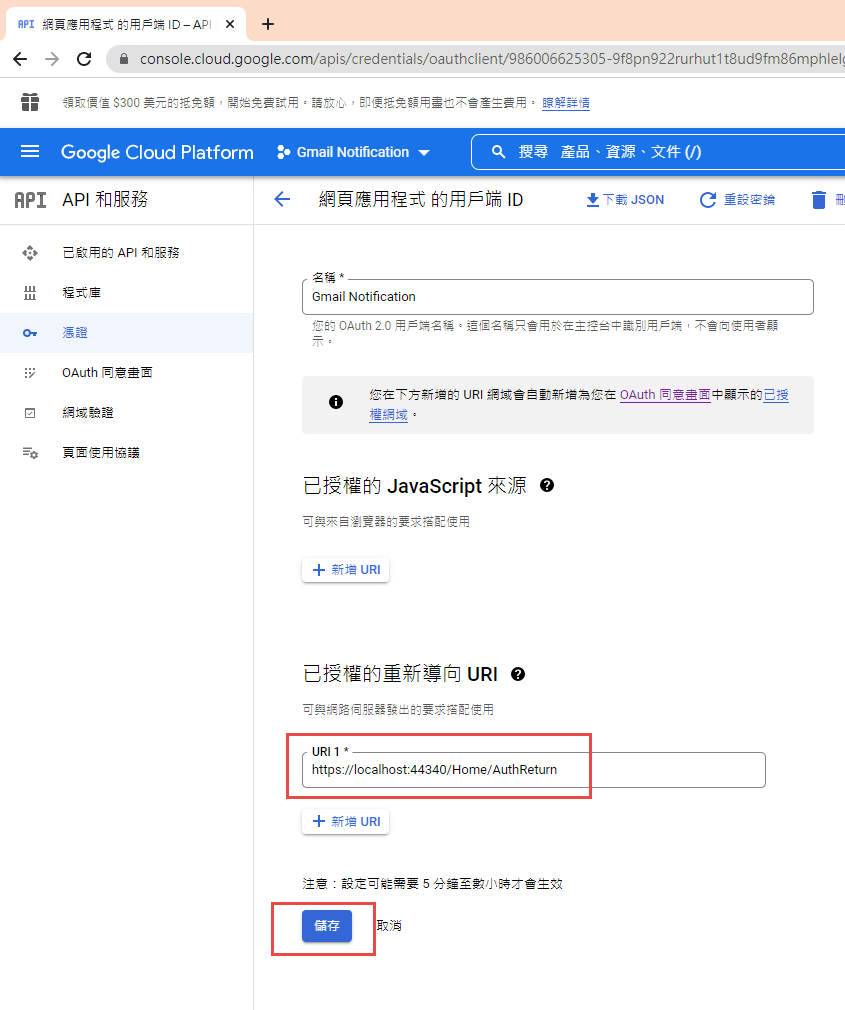
這裡除了名稱外,還有一個設定重導 Uri 的項目。現在不填寫,但稍後要回來補這個資料。
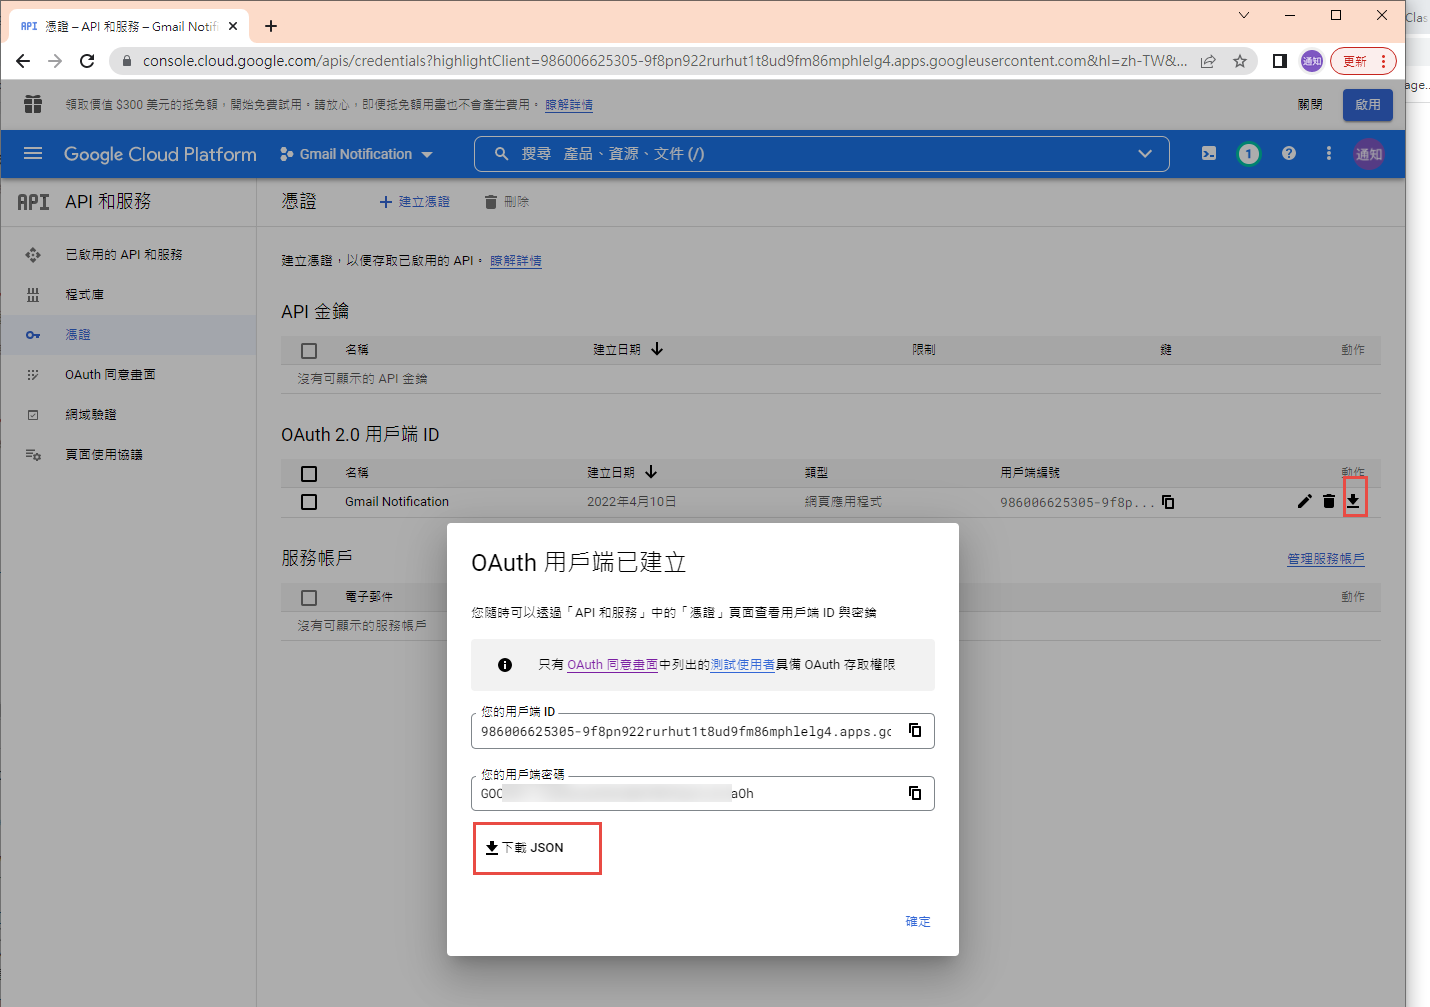
下載 json 之後,命名為 client_secret.json 保留後續使用。
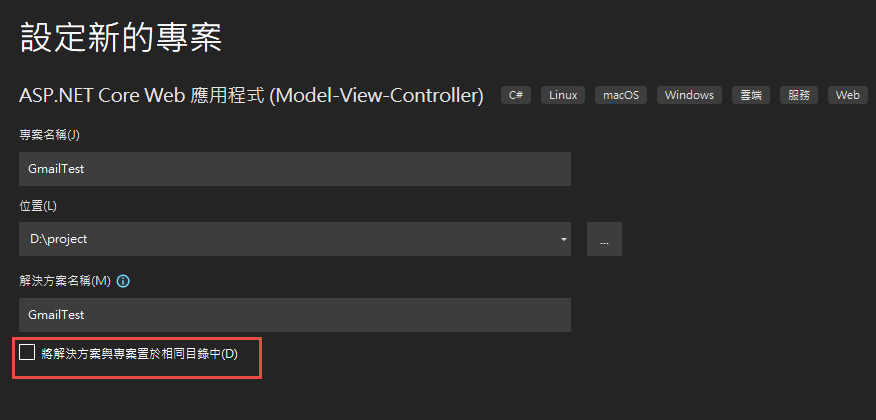
再來就要建立專案了. 用 VS2022 建立一個新專案

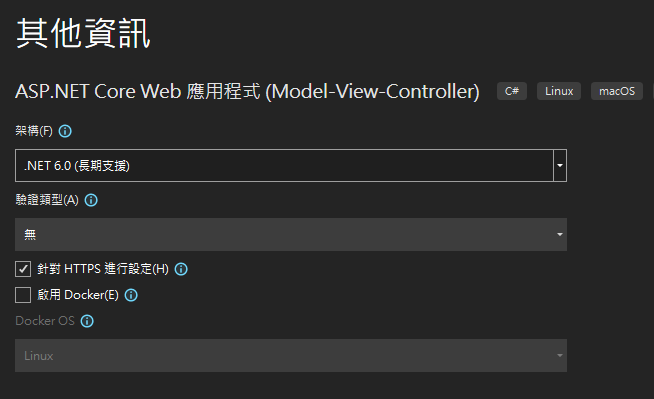
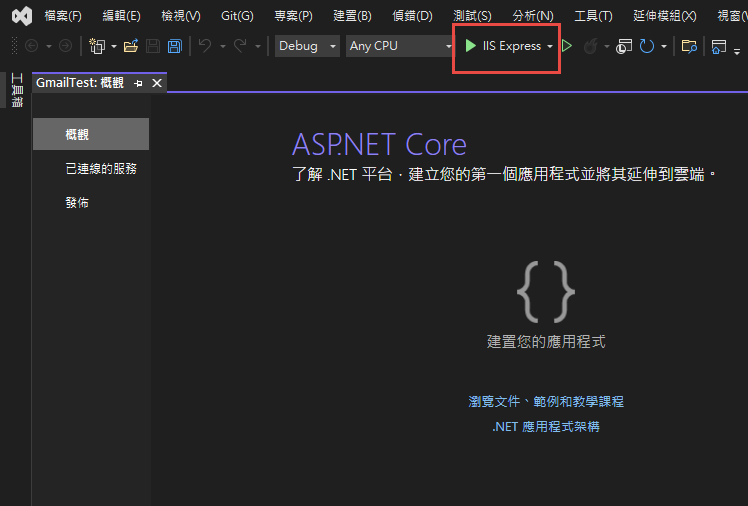
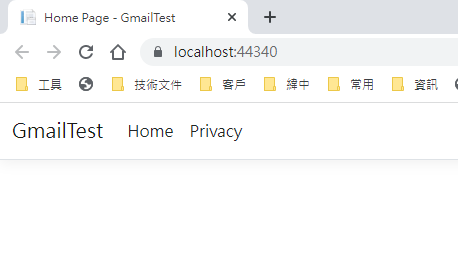
記錄網址, 本測試專案是 https://localhost:44340/ ,請依實際網址為準。
回到 OAuth 2.0 用戶端 ID 的設定頁. 在已授權的重新導向 URI 中填入 https://localhost:44340/Home/AuthReturn (填入的網址依實際專案的狀況,可能會有變化)
在 VS2022 中,使用 Nuget 安裝套件: (有漏的再麻煩和我說)
Google.Apis.Gmail.v1
Google.Apis.Auth
MimeKit (發送 gmail 時使用)
建立認証用的網址:
建立一個 Action, 用來取得認証用的網址:
執行結果:
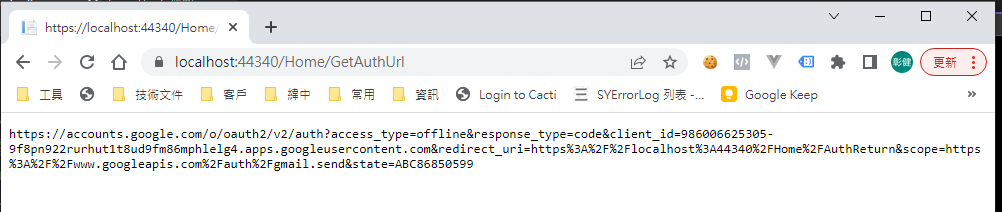
用 chrome 開啟產生的網址:
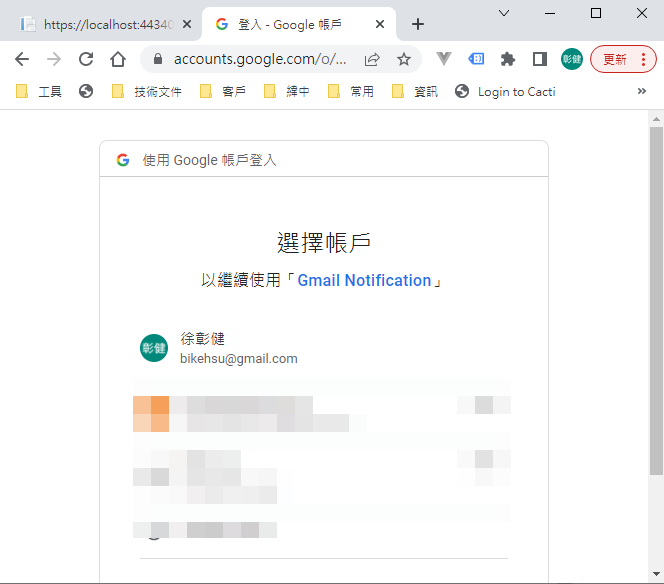
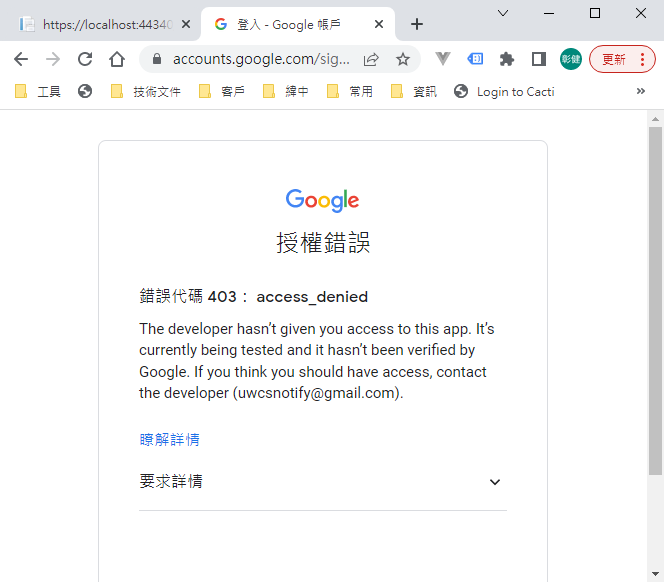
選取任一帳號,如果出現以下錯誤,請回到 "OAuth 同意畫面" 去新增測試使用者
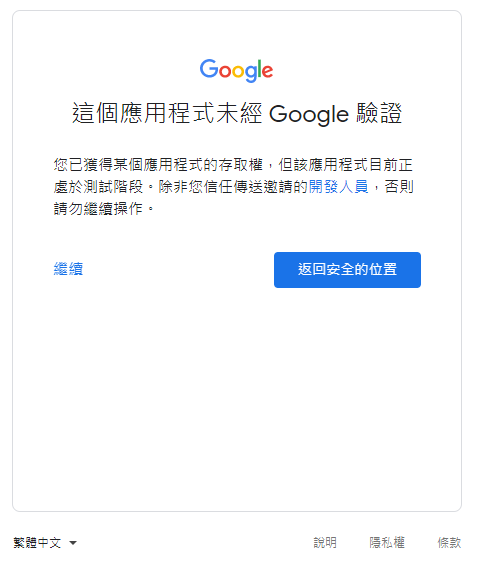
因為應用程式尚未發布,所以會看到警告,勇敢的繼續下去
這裡會要求授權使用你的名義發送信件。(這是在程式中取得授權的項目 Scopes 中所指定的)

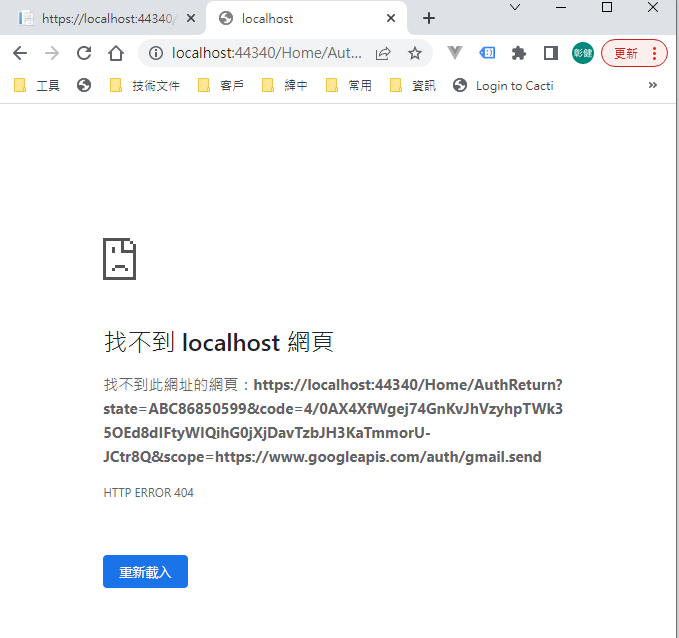
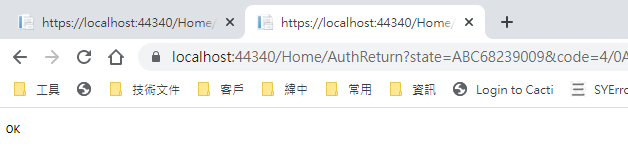
再繼續之後,會被重導至我們在 redirectUri 指定的網址。因為我們尚未完成,所以會看到錯誤,順便也可以看一下,會帶回哪一些參數。有 state, code, scope,共三個。
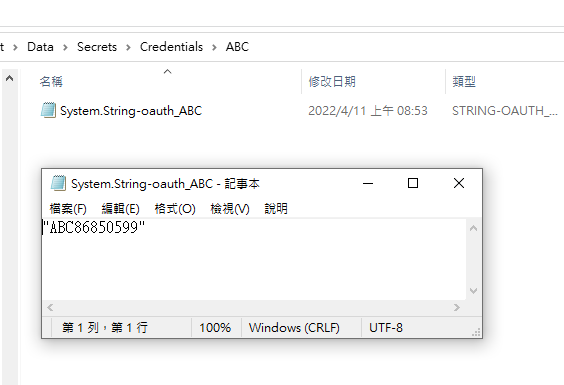
順便看一下,google 的套件會在 Credentials 的目錄下幫使用者建立一個目錄,在完成驗証前,會先放一個 System.String-oauth_XXX 的檔案,裡面的值和回傳的 state 是一樣的,這個應該是用來驗証回傳資料的。
接下來我們要新增 Action "AuthReturn" 如下:
再跑一次上面的流程,最後回到 AuthReturn
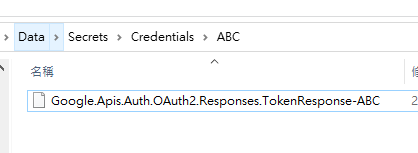
在 D:\project\GmailTest\Data\Secrets\Credentials\ABC 裡面會產生一個檔案: 這個就是我們的 token 了。
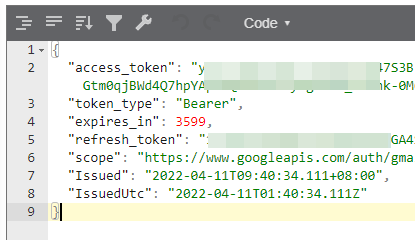
看一下裡面的內容, 有 access_token, refresh_token, scope 等等, 用途應該很好猜了.. 不知道各項目的目途也沒有關係。只要有這個 token 就可以了。
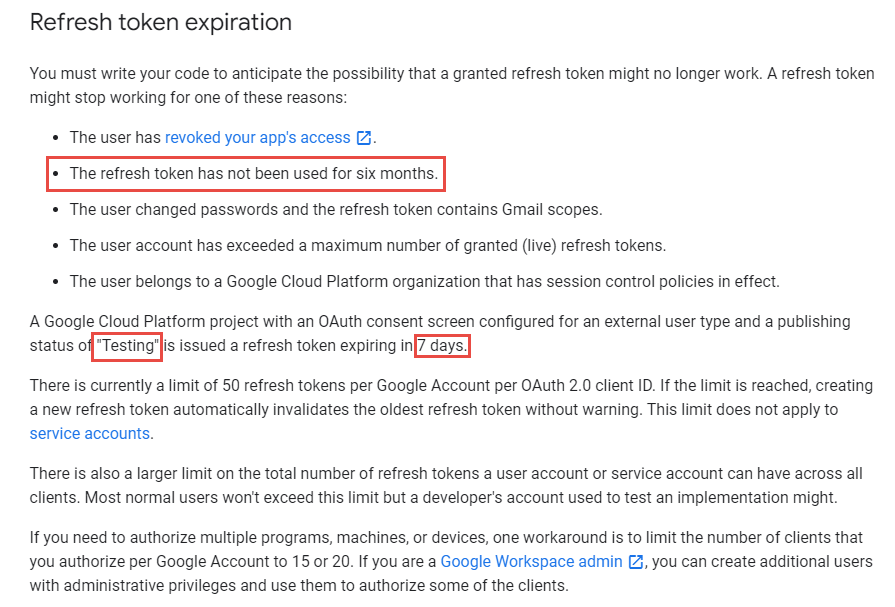
refresh_token 的效期請參考以下文件:
https://developers.google.com/identity/protocols/oauth2 。也可以參考下圖, 若是要用 gmail api 來發送通知信(例如連絡我們),紅色的地方是比較令人困擾的,例如 6 個月以上,沒有人留言,原來留下的 refresh_token 就失效了。使用者必需重新建立一個 refresh_token 。
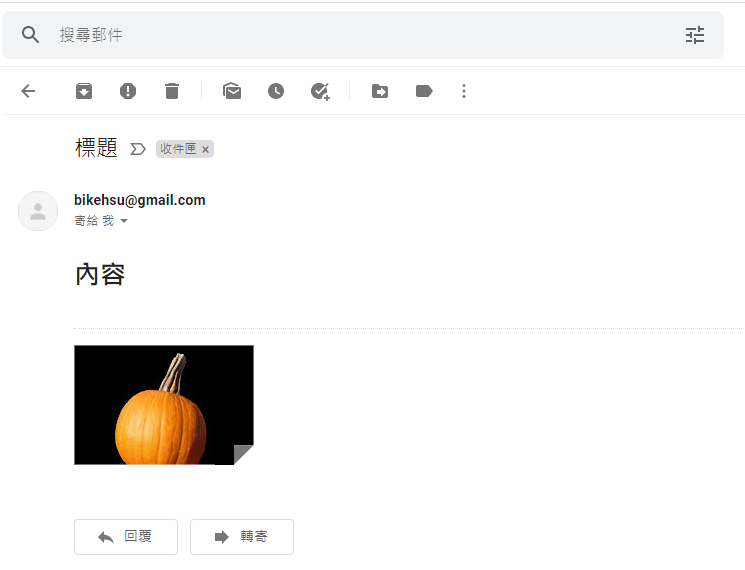
最後來使用 gmail api 發送通知信, 直接看程式碼如下: 在這個過程中遇到最大的問題除了憑証問題之外,另一個問題是編碼。直到最後找到可以用 MimeKit 把 System.Net.Mail.MailMessage 編碼成 Gmail API 的格式才解決。程式碼如下:
收到的信件:
結論:
使用 Gmail API 最大的原因是要增加安全性,和舊的 smtp 不同的地方是,使用 gmail api 之後,客戶不需要提供 gmail 的帳號和密碼就可以讓系統使用 gmail 發送信件,不過由於 refresh_token 的效期問題,可能會造成無法發送通知信而沒有任何人發現的情況,整個實用性會變的很低。
另一個還沒有測試的部份是應用程的啟用。這個審核不知道會不很麻煩,不過可以而知的時,整個流程會花更多的時間。
取代的做法: 可能要改用 Amazon 的 SES 來寄信,而且為了避免每個小網站都要跑 SES 的建立流程,準備來寫一個 API 給各網站使用,可以發送簡單的通知信。
以上的程式碼可以在這裡下載: https://github.com/bikehsu/GmailTest
如果你的目的是要使用 Gmail Api 取代舊的 Gmail SMTP 來發送通知信,建議你先跳到最下方看一下結論。
如果你是想要看一下 Gmail API 和 Google API 憑証的使用方法,可以看一下這篇文章。
1. 在 google cloud platform 建立新的專案.
https://console.cloud.google.com/
啟用 Gmail API
因為我們要透過 OAuth 取得使用者授權,所以要設定使用 OAuth 的同意畫面。
指定授權的範圍
因為剛建立的專案,不會被公開,所以要指定測試使用者
如果要給任意使用者,必需經過發布的流程,但準備工作有點麻煩,所以這次就不發布了。
建立 OAuth 2.0 用戶端 ID 憑証
這裡除了名稱外,還有一個設定重導 Uri 的項目。現在不填寫,但稍後要回來補這個資料。
下載 json 之後,命名為 client_secret.json 保留後續使用。
再來就要建立專案了. 用 VS2022 建立一個新專案
記錄網址, 本測試專案是 https://localhost:44340/ ,請依實際網址為準。
回到 OAuth 2.0 用戶端 ID 的設定頁. 在已授權的重新導向 URI 中填入 https://localhost:44340/Home/AuthReturn (填入的網址依實際專案的狀況,可能會有變化)
在 VS2022 中,使用 Nuget 安裝套件: (有漏的再麻煩和我說)
Google.Apis.Gmail.v1
Google.Apis.Auth
MimeKit (發送 gmail 時使用)
建立認証用的網址:
建立一個 Action, 用來取得認証用的網址:
        /// <summary>

        /// 取得授權的項目

        /// </summary>

        static string[] Scopes = { GmailService.Scope.GmailSend };


        // 和登入 google 的帳號無關

        // 任意值,若未來有使用者認証,可使用使用者編號或登入帳號。

        string Username = "ABC";


        /// <summary>

        /// 存放 client_secret 和 credential 的地方

        /// </summary>

        string SecretPath = @"D:\project\GmailTest\Data\Secrets";


        /// <summary>

        /// 認証完成後回傳的網址, 必需和 OAuth 2.0 Client Id 中填寫的 "已授權的重新導向 URI" 相同。

        /// </summary>

        string RedirectUri = $"https://localhost:44340/Home/AuthReturn";


        /// <summary>

        /// 取得認証用的網址

        /// </summary>

        /// <returns></returns>

        public async Task<string> GetAuthUrl()

        {

            using (var stream = new FileStream(Path.Combine(SecretPath, "client_secret.json"), FileMode.Open, FileAccess.Read))

            {

                FileDataStore dataStore = null;

                var credentialRoot = Path.Combine(SecretPath, "Credentials");

                if (!Directory.Exists(credentialRoot))

                {

                    Directory.CreateDirectory(credentialRoot);

                }


                //存放 credential 的地方,每個 username 會建立一個目錄。

                string filePath = Path.Combine(credentialRoot, Username);

                dataStore = new FileDataStore(filePath);


                IAuthorizationCodeFlow flow = new GoogleAuthorizationCodeFlow(new GoogleAuthorizationCodeFlow.Initializer

                {

                    ClientSecrets = GoogleClientSecrets.Load(stream).Secrets,

                    Scopes = Scopes,

                    DataStore = dataStore

                });


                var authResult = await new AuthorizationCodeWebApp(flow, RedirectUri, Username)

                .AuthorizeAsync(Username, CancellationToken.None);


                return authResult.RedirectUri;

            }

        }
執行結果:
用 chrome 開啟產生的網址:
選取任一帳號,如果出現以下錯誤,請回到 "OAuth 同意畫面" 去新增測試使用者
因為應用程式尚未發布,所以會看到警告,勇敢的繼續下去
這裡會要求授權使用你的名義發送信件。(這是在程式中取得授權的項目 Scopes 中所指定的)
再繼續之後,會被重導至我們在 redirectUri 指定的網址。因為我們尚未完成,所以會看到錯誤,順便也可以看一下,會帶回哪一些參數。有 state, code, scope,共三個。
順便看一下,google 的套件會在 Credentials 的目錄下幫使用者建立一個目錄,在完成驗証前,會先放一個 System.String-oauth_XXX 的檔案,裡面的值和回傳的 state 是一樣的,這個應該是用來驗証回傳資料的。
接下來我們要新增 Action "AuthReturn" 如下:
        public async Task<string> AuthReturn(AuthorizationCodeResponseUrl authorizationCode)

        {

            string[] scopes = new[] { GmailService.Scope.GmailSend };


            using (var stream = new FileStream(Path.Combine(SecretPath, "client_secret.json"), FileMode.Open, FileAccess.Read))

            {

                //確認 credential 的目錄已建立.

                var credentialRoot = Path.Combine(SecretPath, "Credentials");

                if (!Directory.Exists(credentialRoot))

                {

                    Directory.CreateDirectory(credentialRoot);

                }


                //暫存憑証用目錄

                string tempPath = Path.Combine(credentialRoot, authorizationCode.State);


                IAuthorizationCodeFlow flow = new GoogleAuthorizationCodeFlow(

                new GoogleAuthorizationCodeFlow.Initializer

                {

                    ClientSecrets = GoogleClientSecrets.Load(stream).Secrets,

                    Scopes = scopes,

                    DataStore = new FileDataStore(tempPath)

                });


                //這個動作應該是要把 code 換成 token

                await flow.ExchangeCodeForTokenAsync(Username, authorizationCode.Code, RedirectUri, CancellationToken.None).ConfigureAwait(false);


                if (!string.IsNullOrWhiteSpace(authorizationCode.State))

                {

                    string newPath = Path.Combine(credentialRoot, Username);

                    if (tempPath.ToLower() != newPath.ToLower())

                    {

                        if (Directory.Exists(newPath))

                            Directory.Delete(newPath, true);


                        Directory.Move(tempPath, newPath);

                    }

                }


                return "OK";

            }

        }
再跑一次上面的流程,最後回到 AuthReturn
在 D:\project\GmailTest\Data\Secrets\Credentials\ABC 裡面會產生一個檔案: 這個就是我們的 token 了。
看一下裡面的內容, 有 access_token, refresh_token, scope 等等, 用途應該很好猜了.. 不知道各項目的目途也沒有關係。只要有這個 token 就可以了。
refresh_token 的效期請參考以下文件:
https://developers.google.com/identity/protocols/oauth2 。也可以參考下圖, 若是要用 gmail api 來發送通知信(例如連絡我們),紅色的地方是比較令人困擾的,例如 6 個月以上,沒有人留言,原來留下的 refresh_token 就失效了。使用者必需重新建立一個 refresh_token 。
最後來使用 gmail api 發送通知信, 直接看程式碼如下: 在這個過程中遇到最大的問題除了憑証問題之外,另一個問題是編碼。直到最後找到可以用 MimeKit 把 System.Net.Mail.MailMessage 編碼成 Gmail API 的格式才解決。程式碼如下:
        public async Task<bool> SendTestMail()

        {

            var service = await GetGmailService();


            GmailMessage message = new GmailMessage();

            message.Subject = "標題";

            message.Body = $"<h1>內容</h1>";

            message.FromAddress = "bikehsu@gmail.com";

            message.IsHtml = true;

            message.ToRecipients = "bikehsu@gmail.com";

            message.Attachments = new List<Attachment>();


            string filePath = @"C:\Users\bike\Pictures\Vegetable_pumpkin.jpg";    //要附加的檔案

            Attachment attachment1 = new Attachment(filePath);

            message.Attachments.Add(attachment1);


            SendEmail(message, service);

            Console.WriteLine("OK");


            return true;

        }


        async Task<GmailService> GetGmailService()

        {

            UserCredential credential = null;


            var credentialRoot = Path.Combine(SecretPath, "Credentials");

            if (!Directory.Exists(credentialRoot))

            {

                Directory.CreateDirectory(credentialRoot);

            }


            string filePath = Path.Combine(credentialRoot, Username);


            using (var stream = new FileStream(Path.Combine(SecretPath, "client_secret.json"), FileMode.Open, FileAccess.Read))

            {

                credential = await GoogleWebAuthorizationBroker.AuthorizeAsync(

                GoogleClientSecrets.Load(stream).Secrets,

                Scopes,

                Username,

                CancellationToken.None,

                new FileDataStore(filePath));

            }


            var service = new GmailService(new BaseClientService.Initializer()

            {

                HttpClientInitializer = credential,

                ApplicationName = "Send Mail",

            });


            return service;

        }


        public class GmailMessage

        {

            public string FromAddress { get; set; }

            public string ToRecipients { get; set; }


            public string Subject { get; set; }

            public string Body { get; set; }

            public bool IsHtml { get; set; }


            public List<System.Net.Mail.Attachment> Attachments { get; set; }

        }


        public static void SendEmail(GmailMessage email, GmailService service)

        {

            var mailMessage = new System.Net.Mail.MailMessage();

            mailMessage.From = new System.Net.Mail.MailAddress(email.FromAddress);

            mailMessage.To.Add(email.ToRecipients);

            mailMessage.ReplyToList.Add(email.FromAddress);

            mailMessage.Subject = email.Subject;

            mailMessage.Body = email.Body;

            mailMessage.IsBodyHtml = email.IsHtml;


            if (email.Attachments != null)

            {

                foreach (System.Net.Mail.Attachment attachment in email.Attachments)

                {

                    mailMessage.Attachments.Add(attachment);

                }

            }


            var mimeMessage = MimeKit.MimeMessage.CreateFromMailMessage(mailMessage);


            var gmailMessage = new Google.Apis.Gmail.v1.Data.Message

            {

                Raw = Encode(mimeMessage)

            };


            Google.Apis.Gmail.v1.UsersResource.MessagesResource.SendRequest request = service.Users.Messages.Send(gmailMessage, "me");


            request.Execute();

        }


        public static string Encode(MimeMessage mimeMessage)

        {

            using (MemoryStream ms = new MemoryStream())

            {

                mimeMessage.WriteTo(ms);

                return Convert.ToBase64String(ms.GetBuffer())

                    .TrimEnd('=')

                    .Replace('+', '-')

                    .Replace('/', '_');

            }

        }
收到的信件:
結論:
使用 Gmail API 最大的原因是要增加安全性,和舊的 smtp 不同的地方是,使用 gmail api 之後,客戶不需要提供 gmail 的帳號和密碼就可以讓系統使用 gmail 發送信件,不過由於 refresh_token 的效期問題,可能會造成無法發送通知信而沒有任何人發現的情況,整個實用性會變的很低。
另一個還沒有測試的部份是應用程的啟用。這個審核不知道會不很麻煩,不過可以而知的時,整個流程會花更多的時間。
取代的做法: 可能要改用 Amazon 的 SES 來寄信,而且為了避免每個小網站都要跑 SES 的建立流程,準備來寫一個 API 給各網站使用,可以發送簡單的通知信。
以上的程式碼可以在這裡下載: https://github.com/bikehsu/GmailTest
Bike, 2022/4/10 下午 09:31:15
第一步,把 PC 加入 AD
在嘗試把 PC110 加入 Active Directory 時,發生了找不到 SRV 記錄的問題。
最後發現是因為在 AD 的 DNS Server 中沒有 _msdcs 這個網域.
所以手動建立 _msdcs.shop.eva 這個網域 (記得要允許安全的動態更新),並且讓 AD 重新建立相對應的記錄。
建立網域後,執行以下的指令
ipconfig/flushdns
ipconfig/registerdns
net stop netlogon
net start netlogon
可以參考以下文件
https://polinwei.com/dns-recreate-_msdcs/
在嘗試把 PC110 加入 Active Directory 時,發生了找不到 SRV 記錄的問題。
最後發現是因為在 AD 的 DNS Server 中沒有 _msdcs 這個網域.
所以手動建立 _msdcs.shop.eva 這個網域 (記得要允許安全的動態更新),並且讓 AD 重新建立相對應的記錄。
建立網域後,執行以下的指令
ipconfig/flushdns
ipconfig/registerdns
net stop netlogon
net start netlogon
可以參考以下文件
https://polinwei.com/dns-recreate-_msdcs/
Bike, 2022/3/21 下午 03:55:44
環境說明:
AD Server: dc1 (192.168.101.109)
PC: pc110 (192.168.101.110)
PC: pc111 (192.168.101.111)
第一步,把 PC 加入 AD, 這個算是基本操作,網路上說明很多, 就不再截圖了。不過在這裡還是遇到了第一個問題,解決過程請參考另一份文件: https://blog.uwinfo.com.tw/Article.aspx?Id=486
第二步,在 Visual Studio 的測試環境中測試:
一開始是使用 .Net 6.0 來實作,沒想到找到的文件都是 .Net Core 3.1 的,所以先用 .Net Core 3.1 實做了一次,後來改用 .Net 6.0 實作才成功。使用 .Net 6.0 實作的過程如下:
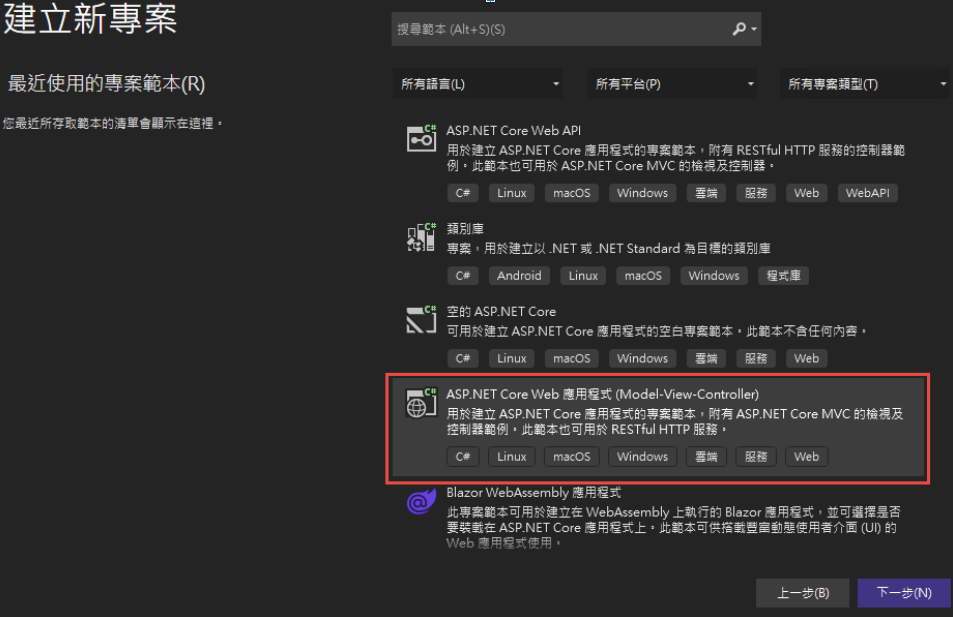
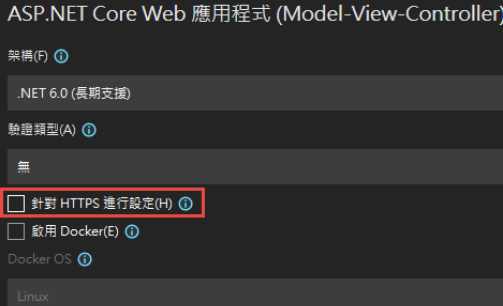
1. 建立一個 MVC 的標準專案:
為了避免憑証問題,所以拿掉了 HTTPS 的設定
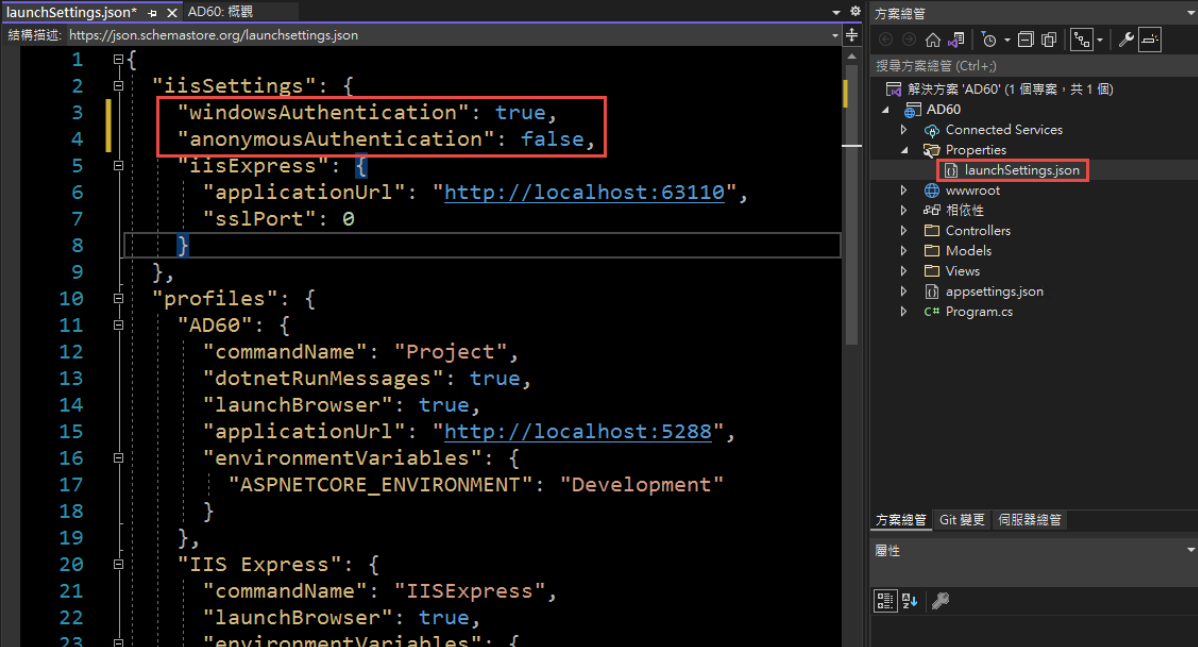
2. 改寫 launchSettings.json:
iisSettings 中的 windowsAuthentication 改為 True, anonymousAuthentication 改為 false。如下圖:
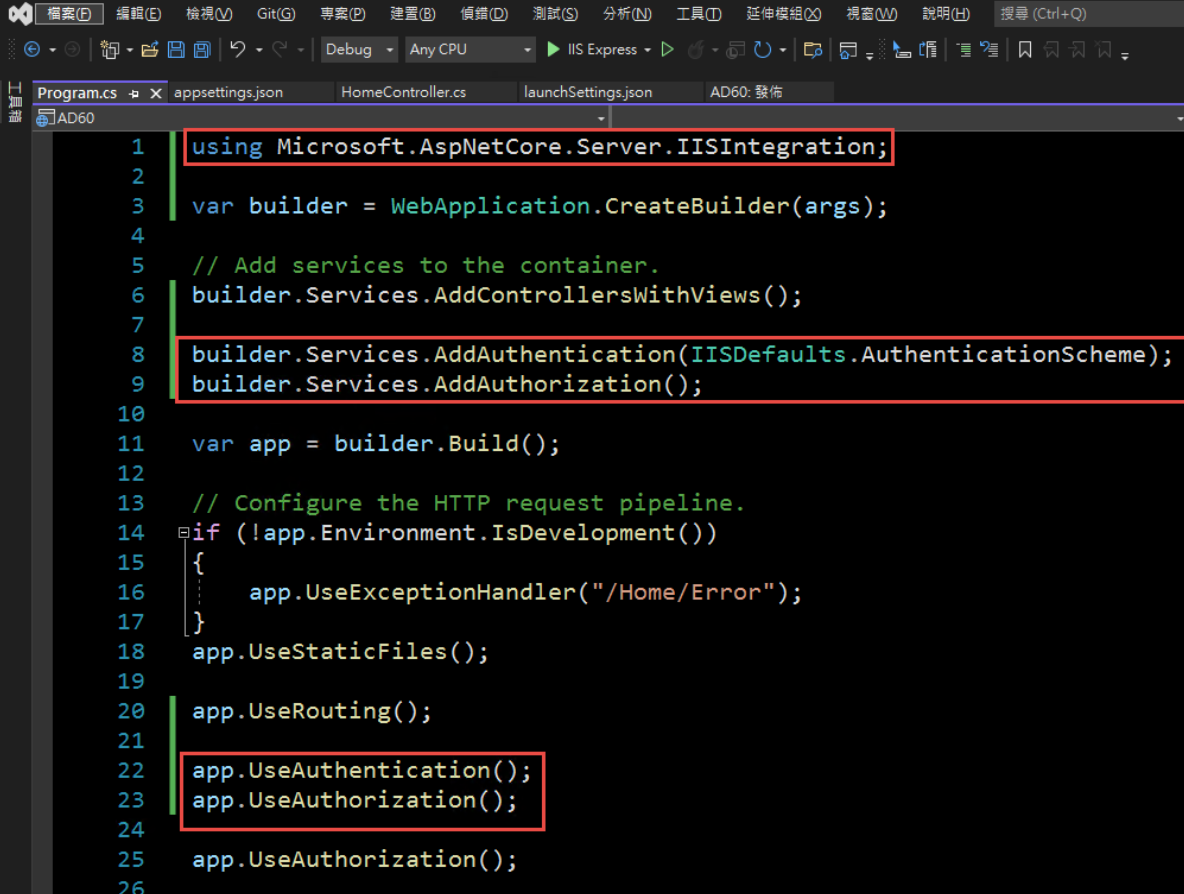
3. 修改 Program.cs, 加入以下四行指令:
builder.Services.AddAuthentication(IISDefaults.AuthenticationScheme);
builder.Services.AddAuthorization();
app.UseAuthentication();
app.UseAuthorization();
(注意: UseAuthentication 要加在 UseAuthentication 之後, VS 2022 應該會提示要新增 using Microsoft.AspNetCore.Server.IISIntegration;)
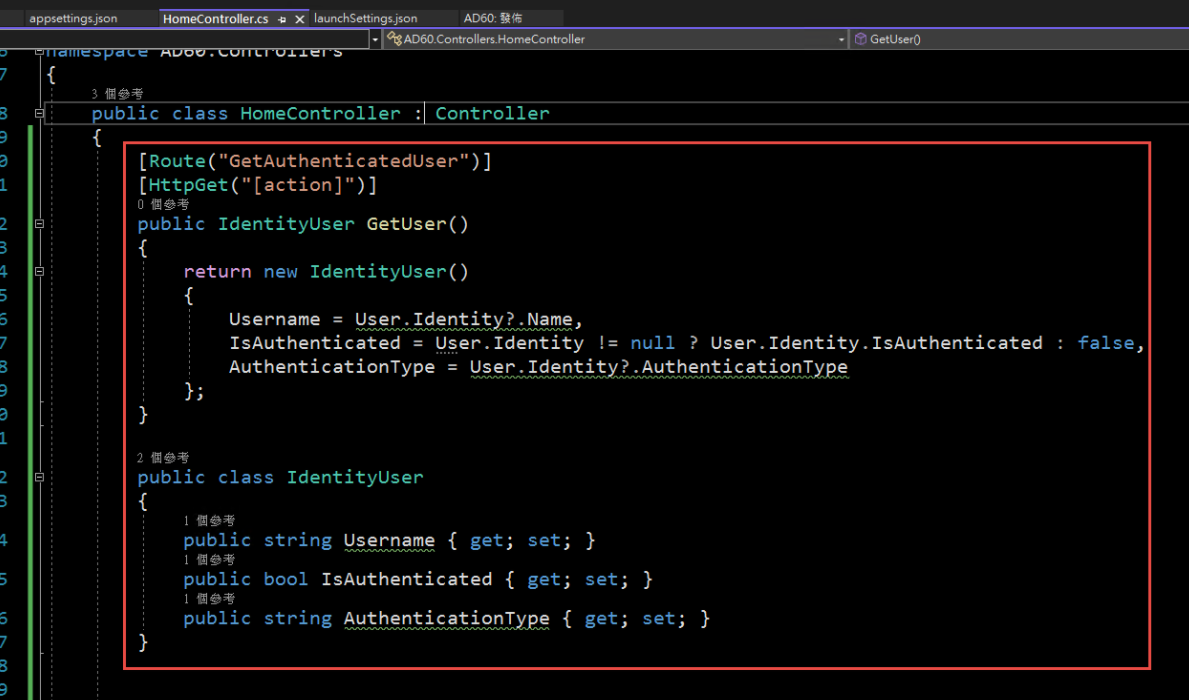
4. 在 HomeController 增加一個 Action, 以讀取驗証資料:
[Route("GetAuthenticatedUser")]
[HttpGet("[action]")]
public IdentityUser GetUser()
{
return new IdentityUser()
{
Username = User.Identity?.Name,
IsAuthenticated = User.Identity != null ? User.Identity.IsAuthenticated : false,
AuthenticationType = User.Identity?.AuthenticationType
};
}
public class IdentityUser
{
public string Username { get; set; }
public bool IsAuthenticated { get; set; }
public string AuthenticationType { get; set; }
}
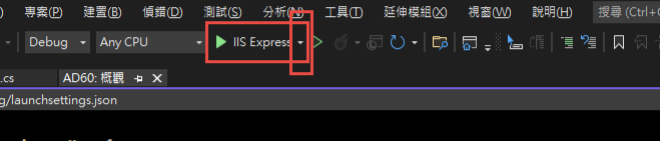
5. 啟動時記得要改用 IIS Express (感覺早上花了兩三個小時在為了這個問題打轉):
6. 執行結果:

第三步,在 IIS 中安裝網站:
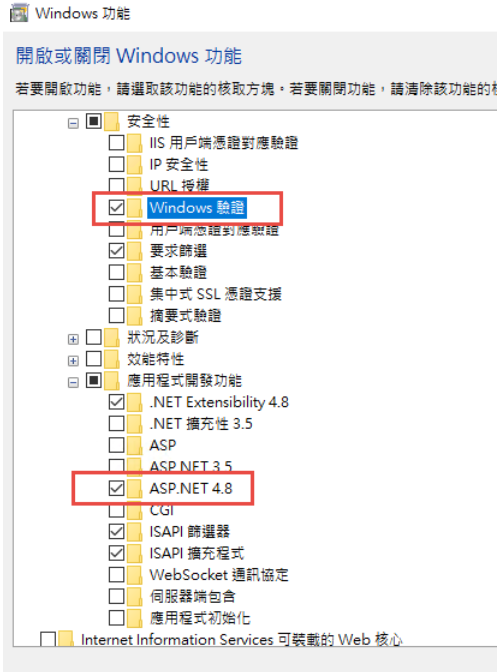
1. 在安裝 IIS 時,記得要勾選 windows 驗證
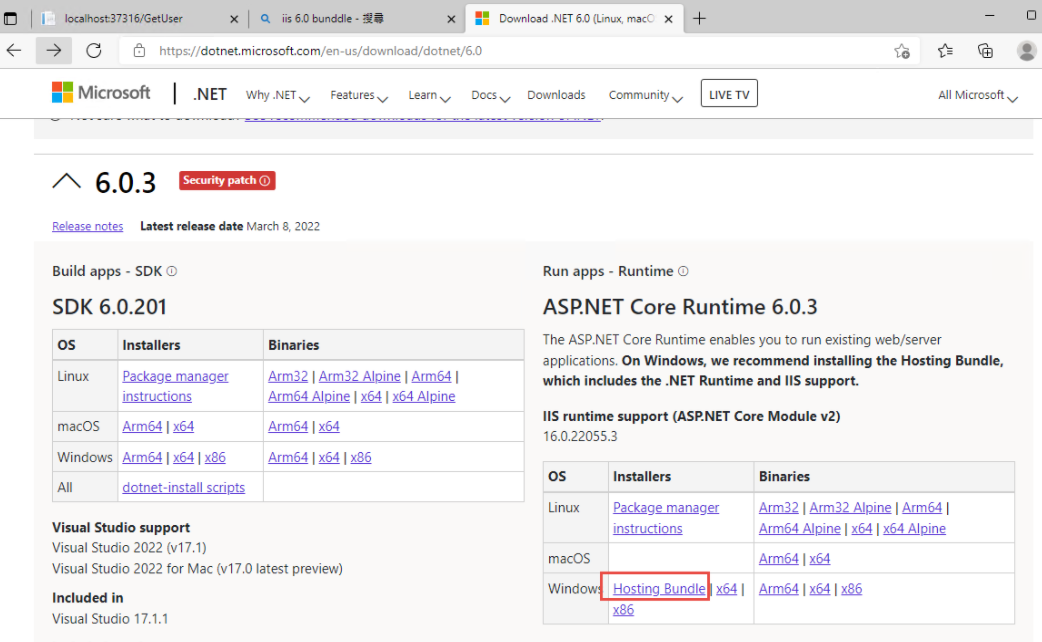
2. 安裝 .Net 6.0 的 Hosting Bundle
https://dotnet.microsoft.com/en-us/download/dotnet/6.0
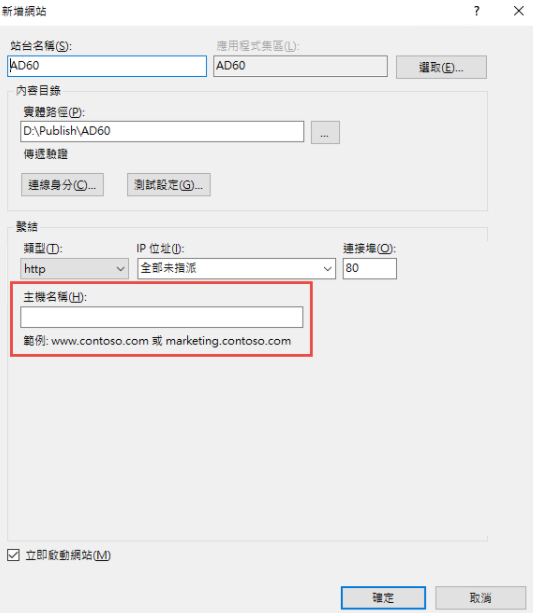
3. 新增網站:
主機名稱留空白 (AD 驗証在網域內好像不會使用指定的主機名稱,這個有待後續再做確認)
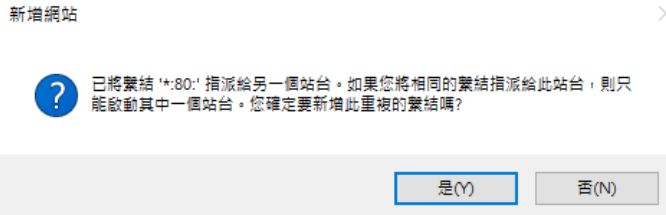
如果沒有刪除預設網站,會遇到警告,直接確認即可.
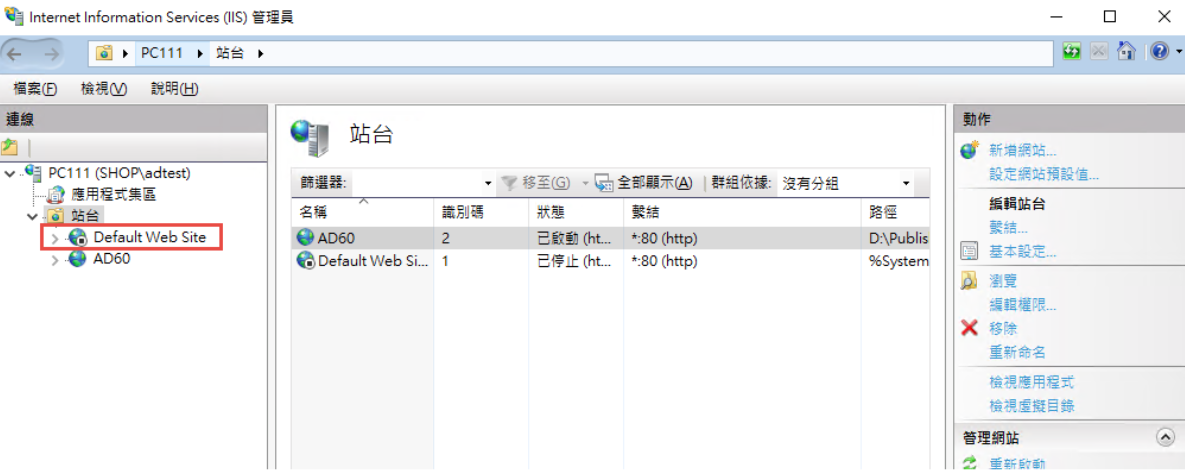
要把 Default Web Site 關閉,再啟動測試站
要啟動 windows 驗証: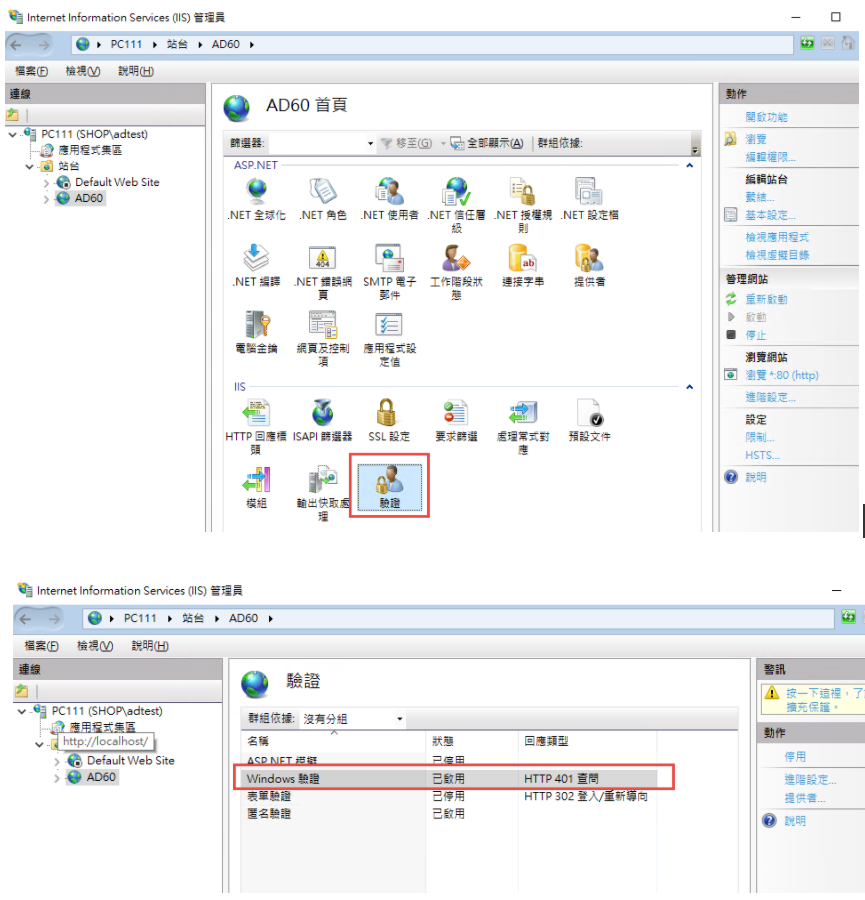
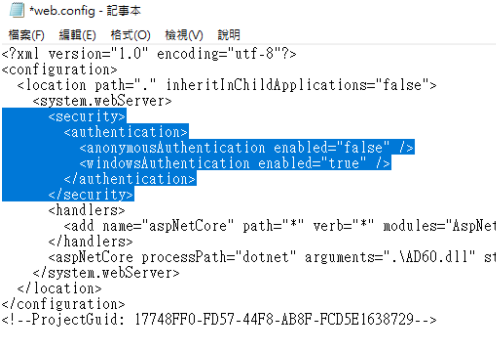
在 web.config 中增加
修改 applicationHost.config:
檔案位置: %windir%\system32\inetsrv\config\applicationHost.config
這兩地方的 Deny 改為 Allow
參考文件: https://docs.microsoft.com/zh-tw/iis/get-started/planning-for-security/how-to-use-locking-in-iis-configuration
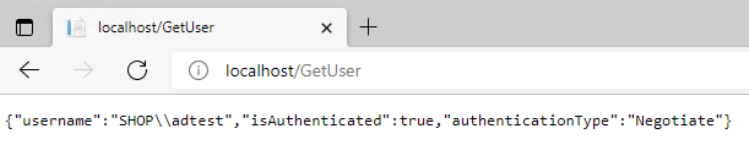
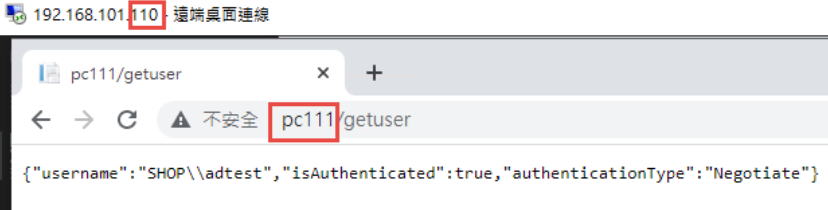
3. 可以取得登入資訊如下:
4. 從 Domain 中另一台主機來存取,不用登入,自動取得目前登入者的資訊。
5. 從非網域主機連線: 會要求認証
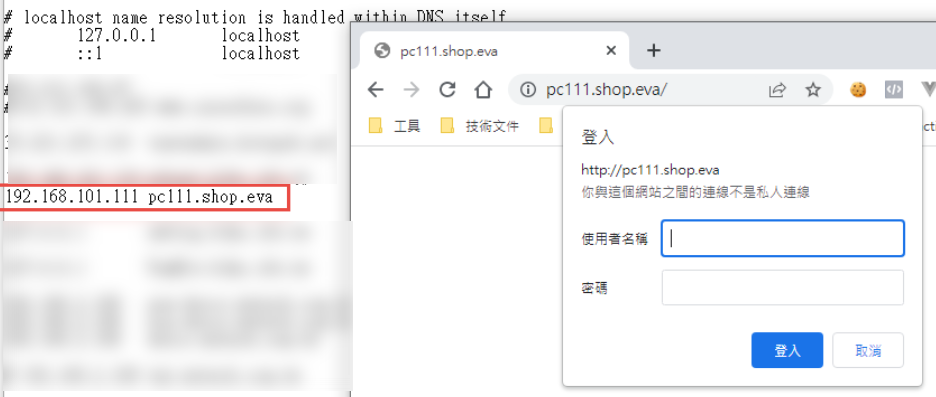
目前遇到問題: 在網域中的電腦只能用主機名稱登入,非網域的電腦,才能夠使用網址登入。
測試專案下載: https://github.com/bikehsu/AD60
AD Server: dc1 (192.168.101.109)
PC: pc110 (192.168.101.110)
PC: pc111 (192.168.101.111)
第一步,把 PC 加入 AD, 這個算是基本操作,網路上說明很多, 就不再截圖了。不過在這裡還是遇到了第一個問題,解決過程請參考另一份文件: https://blog.uwinfo.com.tw/Article.aspx?Id=486
第二步,在 Visual Studio 的測試環境中測試:
一開始是使用 .Net 6.0 來實作,沒想到找到的文件都是 .Net Core 3.1 的,所以先用 .Net Core 3.1 實做了一次,後來改用 .Net 6.0 實作才成功。使用 .Net 6.0 實作的過程如下:
1. 建立一個 MVC 的標準專案:
為了避免憑証問題,所以拿掉了 HTTPS 的設定
2. 改寫 launchSettings.json:
iisSettings 中的 windowsAuthentication 改為 True, anonymousAuthentication 改為 false。如下圖:
3. 修改 Program.cs, 加入以下四行指令:
builder.Services.AddAuthentication(IISDefaults.AuthenticationScheme);
builder.Services.AddAuthorization();
app.UseAuthentication();
app.UseAuthorization();
(注意: UseAuthentication 要加在 UseAuthentication 之後, VS 2022 應該會提示要新增 using Microsoft.AspNetCore.Server.IISIntegration;)
4. 在 HomeController 增加一個 Action, 以讀取驗証資料:
[Route("GetAuthenticatedUser")]
[HttpGet("[action]")]
public IdentityUser GetUser()
{
return new IdentityUser()
{
Username = User.Identity?.Name,
IsAuthenticated = User.Identity != null ? User.Identity.IsAuthenticated : false,
AuthenticationType = User.Identity?.AuthenticationType
};
}
public class IdentityUser
{
public string Username { get; set; }
public bool IsAuthenticated { get; set; }
public string AuthenticationType { get; set; }
}
5. 啟動時記得要改用 IIS Express (感覺早上花了兩三個小時在為了這個問題打轉):
6. 執行結果:
第三步,在 IIS 中安裝網站:
1. 在安裝 IIS 時,記得要勾選 windows 驗證
2. 安裝 .Net 6.0 的 Hosting Bundle
https://dotnet.microsoft.com/en-us/download/dotnet/6.0
3. 新增網站:
主機名稱留空白 (AD 驗証在網域內好像不會使用指定的主機名稱,這個有待後續再做確認)
如果沒有刪除預設網站,會遇到警告,直接確認即可.
要把 Default Web Site 關閉,再啟動測試站
要啟動 windows 驗証:
在 web.config 中增加
      <security>

        <authentication>

          <anonymousAuthentication enabled="false" />

          <windowsAuthentication enabled="true" />

        </authentication>

      </security>
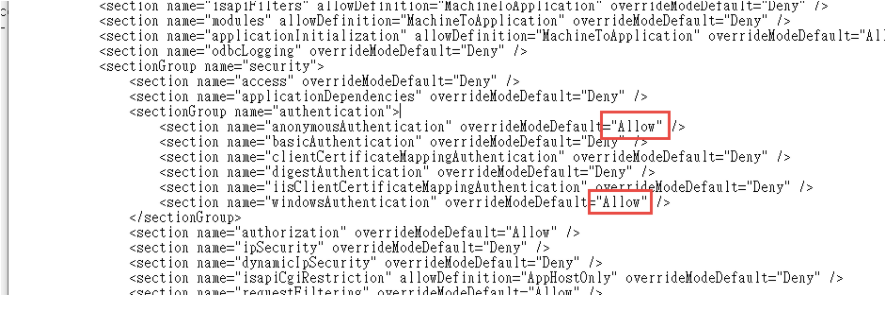
修改 applicationHost.config:
檔案位置: %windir%\system32\inetsrv\config\applicationHost.config
這兩地方的 Deny 改為 Allow
<section name="anonymousAuthentication" overrideModeDefault="Deny" />

<section name="windowsAuthentication" overrideModeDefault="Deny" />
參考文件: https://docs.microsoft.com/zh-tw/iis/get-started/planning-for-security/how-to-use-locking-in-iis-configuration
3. 可以取得登入資訊如下:
4. 從 Domain 中另一台主機來存取,不用登入,自動取得目前登入者的資訊。
5. 從非網域主機連線: 會要求認証
目前遇到問題: 在網域中的電腦只能用主機名稱登入,非網域的電腦,才能夠使用網址登入。
測試專案下載: https://github.com/bikehsu/AD60
Bike, 2022/3/19 下午 09:10:08
Lucene.Net是一套C#開源全文索引庫,其主要包含了:
· Index : 提供索引的管理與詞組的排序
· Search : 提供查詢相關功能
· Store : 支援資料儲存管理,包括I/O操作
· Util : 共用套件
· Documents : 負責描述索引儲存時的文件結構管理
· QueryParsers : 提供查詢語法
· Analysis : 負責分析內容
要達到高效能的全文檢索讓機器可以明白我們的語言,最重要的關鍵就是"分詞器"了。
試想一下這一句話你會如何拆分成一段一段的關鍵字呢?
"一天一蘋果,醫生遠離我"
還有英文版本
"An apple a day, doctor keep me away."
中文版本的拆分:
"一天"、"一"、"蘋果"、"醫生"、"遠離"、"我"
英文版本的拆分:
"apple"、"day"、"doctor"、"keep"、"me"、"away"
有沒有注意到不同語系所分析出來的關鍵字有一點不一樣呢?
而在Lucene中分詞的工作會交給Analysis來完成,
不過我們可以依照不同的語系去選擇想使用的分詞器(Analyzer)!
首先簡單說明一下Lucene的實作流程
1. 確認主要搜尋的語系來決定使用的分詞器(analyzer)
2. 建立Document依照analyzer匯入資料
(前置完成)
3. 建立IndexSearcher導入準備好的Document
4. 建立Parser來分析SearchValue
5. 使用IndexSearcher分析Parser取得結果(Hits)
*本專案使用的是Lucene.Net 3.0.3*
接下來我們來建立一個提供查詢使用的Document。
如此一來我們就建立好Lucene的基本配備囉!
其中analyzer的部分我們使用Lucene.Net預設,
要特別注意的是,其處理中文語系的能力非常之爛!
之後再寫一篇文章深入探討。
再來值得一提的是
前兩個參數就是Key跟Value,可以簡單理解為欄位與其內容。
後面兩個參數是重點!
Store: 代表是否儲存這個Key的Value
例如在google打上台南美食會搜索出許多不同的文章連結,
不過google給你的資料中最重要的不是文章內容(Description),
而是哪一篇文章(Name)與台南美食最有關係。
假如今天我只要回傳一個列表而不用提示文章中有哪些內容,
那麼我就可以選擇給"Description" Field.Store.No來節省空間。
Index:
· NO - 不加入索引,這個內容只需要隨著結果出爐,不需要在查詢的時候被考慮。
· ANALYZED、NOT_ANALYZED - 是否使用分詞
· NO_NORMS - 關閉權重功能
或許許多人會對權重功能(NORMS)感到疑惑,
簡單的舉個例子
{ Id=1, Key="蘋果", Value="一天一蘋果,醫生遠離我。"}
{ Id=2, Key="橘子", Value="醫生給娜美最珍貴的寶藏。"}
{ Id=3, Key="梨子", Value="我是梨子,比蘋果蘋果好吃多囉!"}
當我搜尋"蘋果"的時候結果會是
{ Id=1, MatchKey=1, MatchValue=1, Score=(1*5) + (1*2) = 7}
{ Id=3, MatchKey=0, MatchValue=1, Score=(0*5) + (2*2) = 4}
有發現了嗎?
雖然同樣都對中兩個結果但是Id 1的資料Key值中有包含關鍵字,
因此得到較高的分數排在Id 3前方
準備好Document了,我們可以開始來實際使用看看囉!
最後的結果(Hits),是需要再回到Document去撈出對應的資料喔!
是不是非常簡單呢?
筆者寫了一個簡單的範例在GitHub上,秉持著追求新技術的心使用了.Net 6,還請各位大大多多包涵。
有中英文兩種Repository,只需要在上方的DI注入切換就可以囉!
GitHub連結: https://github.com/g13579112000/Lucene
筆者第一次撰寫這種教學文章,有哪邊錯誤的非常歡迎一起來討論指教。
之後有機會再撰寫Lucene更深入的應用方面,
例如權重的分配與分詞器的選擇與使用。
感謝您的閱讀。
參考文獻:
1.黑暗大大的全文檢索筆記: https://blog.darkthread.net/blog/lucene-net-notes-1/
2.使用.Net實現全文檢索: https://blog.csdn.net/huwei2003/article/details/53408388
3.伊凡的部落格: http://irfen.me/5-lucene4-9-learning-record-lucene-analysis-tokenizer/
4.純淨天空代碼範例: https://vimsky.com/zh-tw/examples/detail/csharp-ex-Lucene.Net.Documents-Document---class.html
· Index : 提供索引的管理與詞組的排序
· Search : 提供查詢相關功能
· Store : 支援資料儲存管理,包括I/O操作
· Util : 共用套件
· Documents : 負責描述索引儲存時的文件結構管理
· QueryParsers : 提供查詢語法
· Analysis : 負責分析內容
要達到高效能的全文檢索讓機器可以明白我們的語言,最重要的關鍵就是"分詞器"了。
試想一下這一句話你會如何拆分成一段一段的關鍵字呢?
"一天一蘋果,醫生遠離我"
還有英文版本
"An apple a day, doctor keep me away."
中文版本的拆分:
"一天"、"一"、"蘋果"、"醫生"、"遠離"、"我"
英文版本的拆分:
"apple"、"day"、"doctor"、"keep"、"me"、"away"
有沒有注意到不同語系所分析出來的關鍵字有一點不一樣呢?
而在Lucene中分詞的工作會交給Analysis來完成,
不過我們可以依照不同的語系去選擇想使用的分詞器(Analyzer)!
首先簡單說明一下Lucene的實作流程
1. 確認主要搜尋的語系來決定使用的分詞器(analyzer)
2. 建立Document依照analyzer匯入資料
(前置完成)
3. 建立IndexSearcher導入準備好的Document
4. 建立Parser來分析SearchValue
5. 使用IndexSearcher分析Parser取得結果(Hits)
*本專案使用的是Lucene.Net 3.0.3*
接下來我們來建立一個提供查詢使用的Document。
 // 取得或建立Lucene文件資料夾

        if (!File.Exists(_dir.FullName))

        {

            System.IO.Directory.CreateDirectory(_dir.FullName);

        }

        // Asp.Net Core需要於Nuget安裝System.Configuration.ConfigurationManager提供用戶端應用程式的組態檔存取

        Lucene.Net.Store.Directory directory = FSDirectory.Open(_dir);

        // 選擇分詞器

        var analyzer = new StandardAnalyzer(Lucene.Net.Util.Version.LUCENE_CURRENT);

        // 資料來源

        var repository = new Repository();

        // 依照指定的文件結構來建立

        var indexWriter = new IndexWriter(directory, analyzer, true, IndexWriter.MaxFieldLength.LIMITED);

        foreach (var index in repository)

        {

            var document = new Document();

            document.Add(new Field("Id", index.Id.ToString(), Field.Store.YES, Field.Index.NO));

            document.Add(new Field("Name", index.Name, Field.Store.YES, Field.Index.ANALYZED));

            document.Add(new Field("Description", index.Description, Field.Store.NO, Field.Index.ANALYZED));

            indexWriter.AddDocument(document);

        }

        indexWriter.Optimize();

        indexWriter.Commit();

        indexWriter.Dispose();
如此一來我們就建立好Lucene的基本配備囉!
其中analyzer的部分我們使用Lucene.Net預設,
要特別注意的是,其處理中文語系的能力非常之爛!
之後再寫一篇文章深入探討。
再來值得一提的是
document.Add(new Field("Id", index.Id.ToString(), Field.Store.YES, Field.Index.NO));前兩個參數就是Key跟Value,可以簡單理解為欄位與其內容。
後面兩個參數是重點!
Store: 代表是否儲存這個Key的Value
例如在google打上台南美食會搜索出許多不同的文章連結,
不過google給你的資料中最重要的不是文章內容(Description),
而是哪一篇文章(Name)與台南美食最有關係。
假如今天我只要回傳一個列表而不用提示文章中有哪些內容,
那麼我就可以選擇給"Description" Field.Store.No來節省空間。
Index:
· NO - 不加入索引,這個內容只需要隨著結果出爐,不需要在查詢的時候被考慮。
· ANALYZED、NOT_ANALYZED - 是否使用分詞
· NO_NORMS - 關閉權重功能
或許許多人會對權重功能(NORMS)感到疑惑,
簡單的舉個例子
{ Id=1, Key="蘋果", Value="一天一蘋果,醫生遠離我。"}
{ Id=2, Key="橘子", Value="醫生給娜美最珍貴的寶藏。"}
{ Id=3, Key="梨子", Value="我是梨子,比蘋果蘋果好吃多囉!"}
當我搜尋"蘋果"的時候結果會是
{ Id=1, MatchKey=1, MatchValue=1, Score=(1*5) + (1*2) = 7}
{ Id=3, MatchKey=0, MatchValue=1, Score=(0*5) + (2*2) = 4}
有發現了嗎?
雖然同樣都對中兩個結果但是Id 1的資料Key值中有包含關鍵字,
因此得到較高的分數排在Id 3前方
準備好Document了,我們可以開始來實際使用看看囉!
// 決定所要搜索的欄位

        var parser = new QueryParser(Lucene.Net.Util.Version.LUCENE_CURRENT, "Description", analyzer).Parse(searchValue);

        // 提供剛剛建立的Document

        var indexSearcher = new IndexSearcher(directory);

        // 搜尋取出結果的數量

        var queryLimit = 20;

        // 開始搜尋!

        var hits = indexSearcher.Search(parser, queryLimit);

        if (!hits.ScoreDocs.Any())

        {

            Console.WriteLine("查無相關結果。");

            return;

        }

        Document doc;

        foreach (var hit in hits.ScoreDocs)

        {

            doc = indexSearcher.Doc(hit.Doc);

            Console.WriteLine("Score :" + hit.Score + ", Id :" + doc.Get("Id") + ", Name :" + doc.Get("Name") + ", Description :" + doc.Get("Description"));

        }
最後的結果(Hits),是需要再回到Document去撈出對應的資料喔!
是不是非常簡單呢?
筆者寫了一個簡單的範例在GitHub上,秉持著追求新技術的心使用了.Net 6,還請各位大大多多包涵。
有中英文兩種Repository,只需要在上方的DI注入切換就可以囉!
GitHub連結: https://github.com/g13579112000/Lucene
筆者第一次撰寫這種教學文章,有哪邊錯誤的非常歡迎一起來討論指教。
之後有機會再撰寫Lucene更深入的應用方面,
例如權重的分配與分詞器的選擇與使用。
感謝您的閱讀。
參考文獻:
1.黑暗大大的全文檢索筆記: https://blog.darkthread.net/blog/lucene-net-notes-1/
2.使用.Net實現全文檢索: https://blog.csdn.net/huwei2003/article/details/53408388
3.伊凡的部落格: http://irfen.me/5-lucene4-9-learning-record-lucene-analysis-tokenizer/
4.純淨天空代碼範例: https://vimsky.com/zh-tw/examples/detail/csharp-ex-Lucene.Net.Documents-Document---class.html
梨子, 2022/2/24 下午 08:23:46
2022.06.22
1) 後來發現更新這兩個檔案就可以了
參考來源:
https://docs.microsoft.com/zh-tw/dotnet/framework/install/guide-for-developers

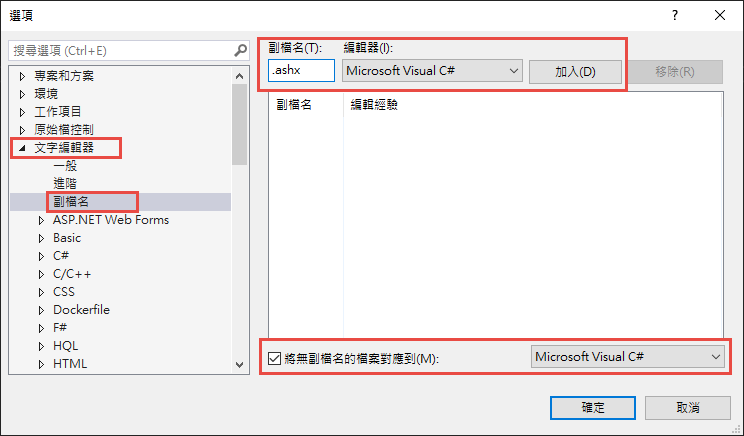
2) 要記得把文字編輯器>副檔名的設定移除
3) 注意web.config 中 targetFramework 的版本 不能太舊
targetFramework ="4.6.1"
----------------------------------------------
最近安裝新版的Visual Studio 2022
發現ashx檔案沒有自動排版與程式碼相關名稱可以自動代入
找了一陣子才找到, 使用後發現不會檢查程式是否有錯誤..
但還是紀錄一下
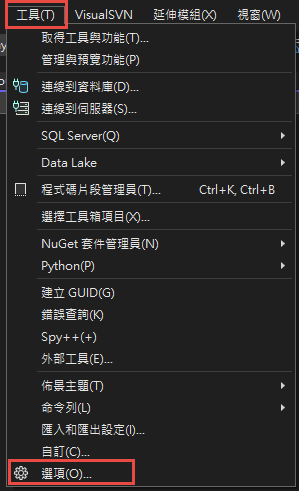
開啟Visual Studio 於選單
工具>選項
文字編輯器>副檔名
1) 後來發現更新這兩個檔案就可以了
參考來源:
https://docs.microsoft.com/zh-tw/dotnet/framework/install/guide-for-developers
2) 要記得把文字編輯器>副檔名的設定移除
3) 注意web.config 中 targetFramework 的版本 不能太舊
targetFramework ="4.6.1"
----------------------------------------------
最近安裝新版的Visual Studio 2022
發現ashx檔案沒有自動排版與程式碼相關名稱可以自動代入
找了一陣子才找到, 使用後發現不會檢查程式是否有錯誤..
但還是紀錄一下
開啟Visual Studio 於選單
工具>選項
文字編輯器>副檔名
choco, 2022/2/11 上午 09:10:08
加構獨立的 API Server 時, 要使用 Cookie 認証必需有以下條件:
1. Web Server 和 API Server 有相同的父網域.
2. Cookie 的網域指定到相同的父網域.
3. 在 API 的 Application 中允許 CORS Request, 需要修改 Startup.cs
3.1 在 ConfigureServices 中要加入 AddCors, 而且要記得 AllowCredentials()
3.2 在 Configure 中, 要加入 app.UseCors("Cors(PolicyName"), 記得要在 UseAuthorization() 之前.
4. 在 Client 端要加上 withCredentials: true
1. Web Server 和 API Server 有相同的父網域.
2. Cookie 的網域指定到相同的父網域.
3. 在 API 的 Application 中允許 CORS Request, 需要修改 Startup.cs
3.1 在 ConfigureServices 中要加入 AddCors, 而且要記得 AllowCredentials()
        public void ConfigureServices(IServiceCollection services)

        {

            services.AddCors(options =>

            {

                options.AddPolicy(name: "Cors(PolicyName",

                                 builder =>

                                 {

                                     builder.WithOrigins("https://web1.yourdomain.com",

                                                         "https://web2.yourdomain.com")

                                     .AllowCredentials();

                                 });

            });


            services.AddControllers()

                .AddNewtonsoftJson(opt =>

                 opt.SerializerSettings.ContractResolver = new CamelCasePropertyNamesContractResolver());
3.2 在 Configure 中, 要加入 app.UseCors("Cors(PolicyName"), 記得要在 UseAuthorization() 之前.
        public void Configure(IApplicationBuilder app, IWebHostEnvironment env)

        {

            app.UseExceptionMiddleware();


            app.UseHttpsRedirection();


            app.UseHttpsRedirection();


            app.UseRouting();


            app.UseCors(MyAllowSpecificOrigins);


            app.UseAuthorization();
4. 在 Client 端要加上 withCredentials: true
                            $.ajax({

                                url: apiRoot + "apiurl",

                                type: 'GET',

                                dataType: 'json', // 預期從server接收的資料型態

                                success: function (res) {

                                    console.log("success: ");

                                    console.log(res);

                                },

                                xhrFields: {

                                    withCredentials: true

                                },

                                error: function (XMLHttpRequest, textStatus, errorThrown) {

                                    alert("發生錯誤");

                                }

});Bike, 2021/10/24 下午 05:17:54
在 .net framework 的 Web API 專案中.
安裝某些套件時, 會在 Startup.cs 中增加一行:
app.UseWebApi(config);
這個會在 WebApiConfig 的 Register 之後執行. 造成 WebApiConfig.Register 失效.
解決的方法是把 WebApiConfig.Register 的指令全部搬到 Startup.cs 之中, 放在 app.UseWebApi(config) 之後即可...
這大概是為什麼 .Net Core 之後的設定都在 StartUp.cs 裡面的原因..
花了一些時間 : (
安裝某些套件時, 會在 Startup.cs 中增加一行:
app.UseWebApi(config);
這個會在 WebApiConfig 的 Register 之後執行. 造成 WebApiConfig.Register 失效.
解決的方法是把 WebApiConfig.Register 的指令全部搬到 Startup.cs 之中, 放在 app.UseWebApi(config) 之後即可...
這大概是為什麼 .Net Core 之後的設定都在 StartUp.cs 裡面的原因..
花了一些時間 : (
Bike, 2021/9/7 上午 10:39:38
config.MapHttpAttributeRoutes(); 不可以放在 Startup 的 Configuration 裡面.
必需放在 WebApiConfig 的 Register 之中, 並在 Application_Start 之中執行 GlobalConfiguration.Configure(WebApiConfig.Register)
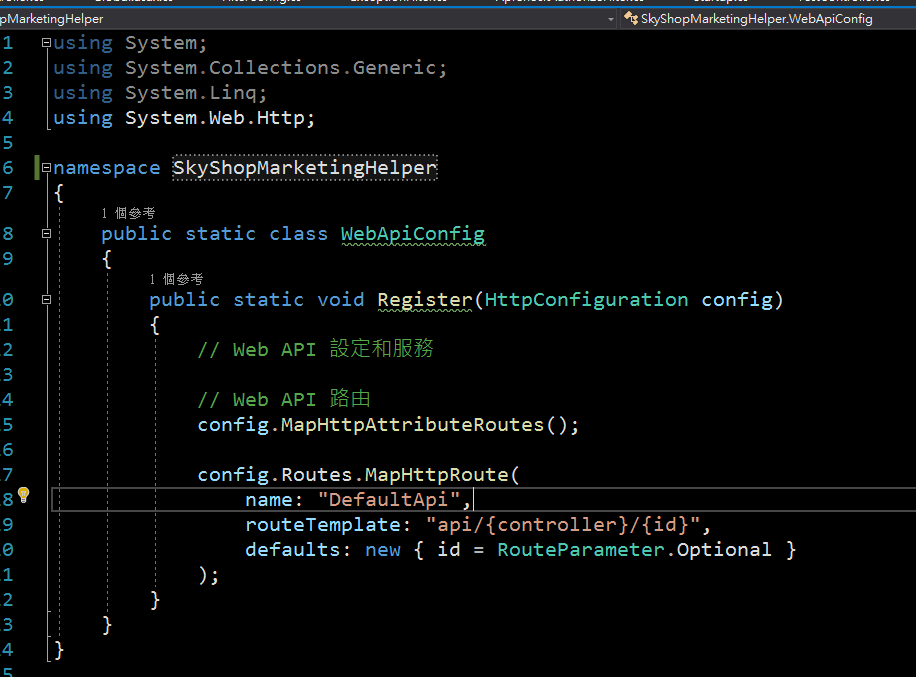
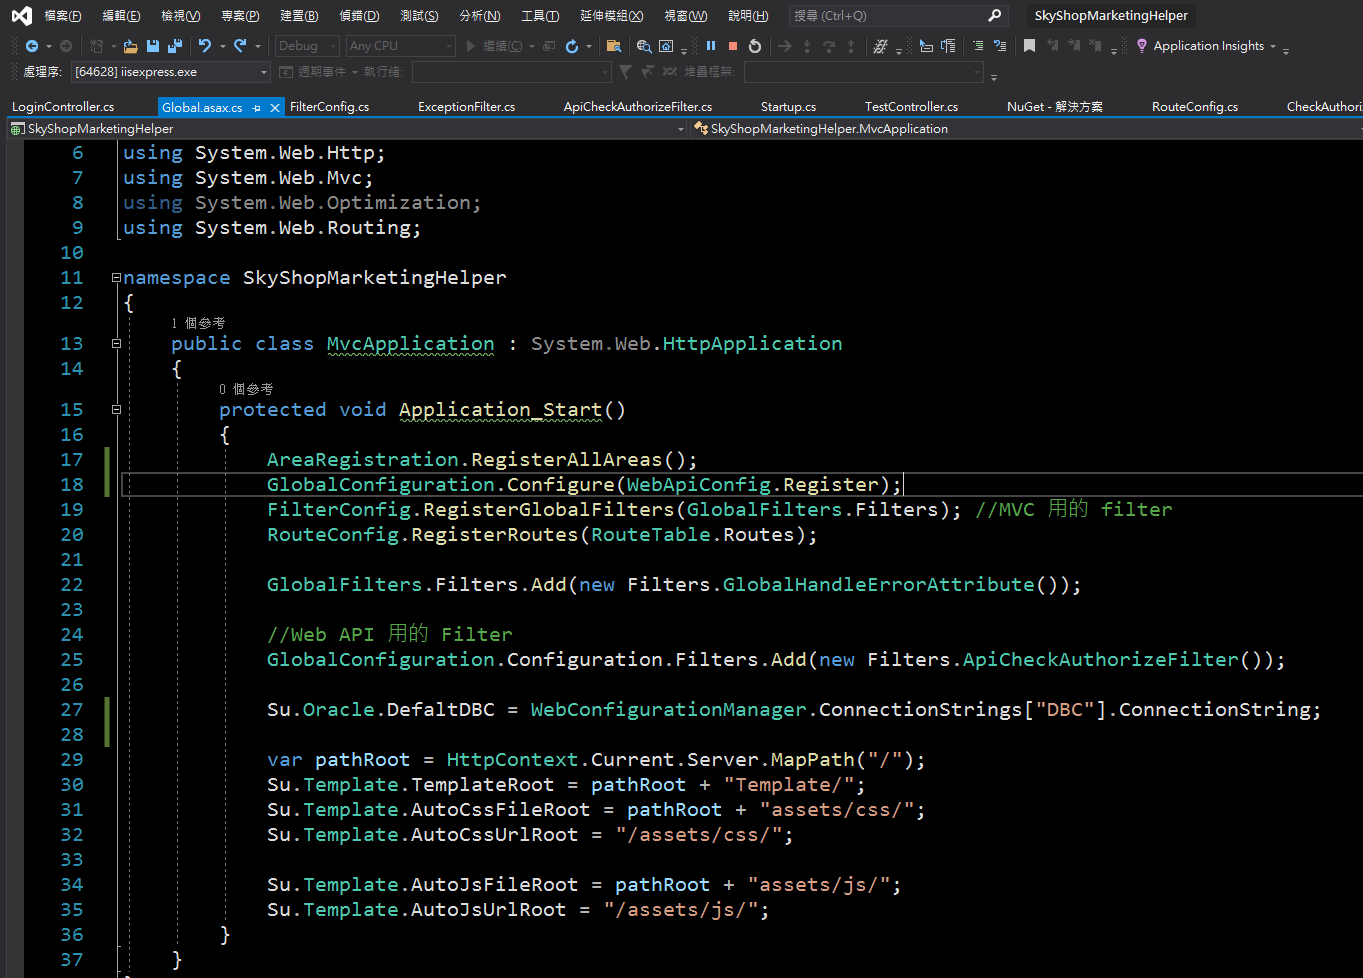
必需放在 WebApiConfig 的 Register 之中, 並在 Application_Start 之中執行 GlobalConfiguration.Configure(WebApiConfig.Register)
Bike, 2021/8/22 下午 10:15:13
1. 參考這裡設定第一個網站:
https://blog.johnwu.cc/article/centos-asp-net-core-neginx.html
注意, 文章中有一個錯誤:
/etc/nginx/conf.d/my-website.conf 的第 27 行, 應該是 include /etc/nginx/conf.d/default_proxy_settings;
2. 因為要避開 5000 port, 所以修改第二個網站的 appsettings.json, 讓第二個網站開在 5002 port, 如下.
3. 新增 /etc/nginx/conf.d/my-website2.conf, 要注意
A. portal2
B. server localhost:5002
C. server_name coretest2.bike.idv.tw
當然 SSL 憑証的檔名也要記得改.
改完後就可以用了.
以下是 https://blog.johnwu.cc/article/centos-asp-net-core-neginx.html 抄過來的一些檔案, 作為備份:
setup-aspnet-core.sh
用以下指令執行:
/etc/systemd/system/my-website.service, (/bin/dotnet 有可能是 /usr/bin/dotnet)
服務相關指令:
/etc/nginx/conf.d/default_proxy_settings
/etc/nginx/conf.d/my-website.conf
Nginx 重新啟動:
https://blog.johnwu.cc/article/centos-asp-net-core-neginx.html
注意, 文章中有一個錯誤:
/etc/nginx/conf.d/my-website.conf 的第 27 行, 應該是 include /etc/nginx/conf.d/default_proxy_settings;
2. 因為要避開 5000 port, 所以修改第二個網站的 appsettings.json, 讓第二個網站開在 5002 port, 如下.
{

"Logging": {

    "LogLevel": {

     "Default": "Information",

     "Microsoft": "Warning",

     "Microsoft.Hosting.Lifetime": "Information"

    }

},

"Kestrel": {

        "EndPoints": {

                "Http": {

                        "Url": "http://localhost:5002"

                }

        }

},

"AllowedHosts": "*"

}
3. 新增 /etc/nginx/conf.d/my-website2.conf, 要注意
A. portal2
B. server localhost:5002
C. server_name coretest2.bike.idv.tw
當然 SSL 憑証的檔名也要記得改.
upstream portal2 {

    # localhost:5000 改成 ASP.NET Core 所監聽的 Port

    server localhost:5002;

}


server {

    # 只要是透過這些 Domain 連 HTTP 80 Port,都會轉送封包到 ASP.NET Core

    listen 80;

    # 可透過空白區分,綁定多個 Domain

    server_name coretest2.bike.idv.tw;

    location / {

        proxy_pass http://portal2/;

        include /etc/nginx/conf.d/default_proxy_settings;

    }

}


# 用 HTTPS 必須要有 SSL 憑證,如果沒有要綁定 SSL 可以把下面整段移除

server {

    # 只要是透過這些 Domain 連 HTTPS 443 Port,都會轉送封包到 ASP.NET Core

    listen 443 ssl;

    server_name coretest2.bike.idv.tw;

    ssl_certificate /etc/nginx/ssl/coretest2.bike.idv.tw.crt;

    ssl_certificate_key /etc/nginx/ssl/coretest2.bike.idv.tw.key;


    location / {

        proxy_pass http://portal2/;

        include /etc/nginx/conf.d/default_proxy_settings;

    }

}
改完後就可以用了.
以下是 https://blog.johnwu.cc/article/centos-asp-net-core-neginx.html 抄過來的一些檔案, 作為備份:
setup-aspnet-core.sh
#!/bin/bash


main() {

    sudo yum -y install epel-release

    sudo yum -y update


    install_nginx

    install_dotnet


    sudo firewall-cmd --add-service=http --permanent

    sudo firewall-cmd --add-service=https --permanent

    sudo firewall-cmd --reload

}


install_nginx() {

    echo "###################################"

    echo "########## Install Nginx ##########"

    echo "###################################"

    sudo yum -y install httpd-tools nginx

    sudo setsebool -P httpd_can_network_connect on

    sudo sed -i 's/^SELINUX=.*/SELINUX=disabled/' /etc/selinux/config

    sudo setenforce 0

    sudo systemctl enable nginx

    sudo systemctl restart nginx

}


install_dotnet() {

    echo "###########################################"

    echo "########## Install .NET Core 2.2 ##########"

    echo "###########################################"

    sudo rpm -Uvh https://packages.microsoft.com/config/rhel/7/packages-microsoft-prod.rpm

    sudo yum -y install aspnetcore-runtime-2.2

}


main "$@"
用以下指令執行:
sudo sh setup-aspnet-core.sh
/etc/systemd/system/my-website.service, (/bin/dotnet 有可能是 /usr/bin/dotnet)
[Unit]

# Description=<此服務的摘要說明>

Description=MyWebsite


[Service]

# WorkingDirectory=<ASP.NET Core 專案目錄>

WorkingDirectory=/usr/share/my-website


# ExecStart=/bin/dotnet <ASP.NET Core 起始 dll>

ExecStart=/bin/dotnet MyWebsite.dll


# 啟動若失敗,就重啟到成功為止

Restart=always

# 重啟的間隔秒數

RestartSec=10


# 設定環境變數,注入給 ASP.NET Core 用

Environment=ASPNETCORE_ENVIRONMENT=Production

Environment=DOTNET_PRINT_TELEMETRY_MESSAGE=false


[Install]

WantedBy=multi-user.target
服務相關指令:
# 開啟,開機自動啟動服務

systemctl enable my-website.service


# 關閉,開機自動啟動服務

systemctl disable my-website.service


# 啟動服務

systemctl start my-website.service


# 重啟服務

systemctl restart my-website.service


# 停止服務

systemctl stop my-website.service


# 查看服務狀態

systemctl status my-website.service
/etc/nginx/conf.d/default_proxy_settings
proxy_http_version 1.1;

proxy_set_header Upgrade $http_upgrade;

proxy_set_header Connection $http_connection;

proxy_set_header Host $host;

proxy_set_header X-Real-IP $remote_addr;

proxy_set_header X-Forwarded-Host $remote_addr;

proxy_set_header X-Forwarded-For $proxy_add_x_forwarded_for;

proxy_set_header X-Forwarded-Proto $scheme;

proxy_cache_bypass $http_upgrade;
/etc/nginx/conf.d/my-website.conf
upstream portal {

    # localhost:5000 改成 ASP.NET Core 所監聽的 Port

    server localhost:5000;

}


server {

    # 只要是透過這些 Domain 連 HTTP 80 Port,都會轉送封包到 ASP.NET Core

    listen 80;

    # 可透過空白區分,綁定多個 Domain

    server_name demo.johnwu.cc example.johnwu.cc;

    location / {

        proxy_pass http://portal/;

        include /etc/nginx/conf.d/default_proxy_settings;

    }

}


# 用 HTTPS 必須要有 SSL 憑證,如果沒有要綁定 SSL 可以把下面整段移除

server {

    # 只要是透過這些 Domain 連 HTTPS 443 Port,都會轉送封包到 ASP.NET Core

    listen 443 ssl;

    server_name demo.johnwu.cc;

    ssl_certificate /etc/nginx/ssl/demo.johnwu.cc_bundle.crt;

    ssl_certificate_key /etc/nginx/ssl/demo.johnwu.cc.key;


    location / {

        proxy_pass http://portal/;

        include /etc/nginx/conf.d/default_proxy_settings;

    }

}
Nginx 重新啟動:
# 檢查 Nginx 的設定是否有誤

nginx -t


# 若沒有錯誤,即可套用

nginx -s reload
Bike, 2020/7/7 上午 08:01:43
for VS2017: 在 sln 檔的目錄下, 找 .vs\config\applicationhost.config
例如:
D:\ASP.NET Project\S3_WEB4_NET\.vs\config\applicationhost.config
For VS2019: $(solutionDir)\.vs\{slnName}\config\applicationhost.config
例如:
D:\ASP.NET Project\S3_WEB4_NET\.vs\S3\config\applicationhost.config
例如:
D:\ASP.NET Project\S3_WEB4_NET\.vs\config\applicationhost.config
For VS2019: $(solutionDir)\.vs\{slnName}\config\applicationhost.config
例如:
D:\ASP.NET Project\S3_WEB4_NET\.vs\S3\config\applicationhost.config
Bike, 2020/1/31 下午 07:56:15